Crazy Colored Easter Eggs

Last year was the first time we colored our Easter eggs in this fashion and oh my gosh, was it easy!!! These CRAZY COLORED EASTER EGGS are much cleaner and quicker to make than the traditional dyed Easter eggs! And aren’t they just beautiful???


Materials needed:

  • white eggs
  • pot with water
  • broken crayons
  • tin foil
  • large dish or pan
  • fork
  • tongs
  • glitter (optional)
  • towel for drying
  • parchment paper

First, put your eggs in the pot of water and on your stovetop to boil. I’ve always heard that 13 minutes is the magic number for perfectly cooked, hard-boiled eggs.

While your eggs cook, line your pan with tin foil. Also, prepare a place on your kitchen counter for your finished eggs…just a piece of parchment paper will do!

Make some crayon shavings, using a sharp knife. The more wild and beautiful your colors, the more wild and beautiful the eggs!

Sprinkle the crayon shavings on top of the tin foil and add glitter if you like too! You don’t need a whole lot of crayon shavings…less is really better to avoid big color mixtures turning the eggs into yucky shades of brown.

Once the eggs are cooked, use tongs to carefully move one egg at a time onto the towel to dry, and then into the pan of crayon shavings. Have your little one roll the egg around the shavings, pushing gently with the underside of a fork. Since the eggs are still very hot, the crayon shavings will melt immediately, painting the eggs!


After each egg is dyed, remove it with the tongs and lay it on the parchment paper to cool completely.  Repeat with the remaining eggs!


I just love our CRAZY COLORED EASTER EGGS!!! Beautiful!!! Enjoy!

I Spy Bottle and Games

How many of you grew up loving the “Where’s Waldo?” books by Martin Handford or the “I Spy” books by Jean Marzollo and Walter Wick? My brothers, sisters and I adored them and now, L enjoys reading them too! The I SPY BOTTLE is very similar in principal and so much fun! It’s a fully contained game…no pieces to lose or to pick up! We take our bottle with us to restaurants on occasion and always on long car trips. The I SPY BOTTLE would be great fun in a classroom too! Be sure to scroll down, after the “how to” I’ve shared a few ideas of games to play.

Materials needed:

  • clear bottle with a wide mouth
  • rice
  • electrical tape
  • lots of small objects

First, remove the label from your bottle and clean and dry it completely. Goo Gone always works great for removing any stickiness and label residue! Fill the bottle a little over halfway with white rice.

Next, drop your objects in. We used beads, a bouncy ball, a plastic ring, spoon, animal figures, a marble, dice, a stamp, buttons, a clothespin, a rubber band, a paperclip, a toy car, keys, a wine cork, and although pictured is a crayon, I switched it out with a paintbrush. I was afraid the crayon would melt if left in the car!


Once the rice and objects are inside the bottle, use electrical tape to seal the lid closed. You could always use super glue, but I was afraid a time would come that we’d want one of the objects locked inside!

Now, time to shake your bottle up and play!!!


Different ways to play:

  • Call out the color of an object…”I spy something green!”…and have the other person find it.
  • Call out the function of an object…”I spy something that makes art!”…”A paintbrush!”
  • Things that rhyme. “I spy something that rhymes with ‘moon.'”…”Spoon!”
  • If your children can read, you could make little cards that go along with the I SPY BOTTLE too. How perfect would that be for a long car ride? Easy entertainment! Enjoy!!!


Homemade Butter in a Jar

Have you ever been to a restaurant that along with fresh, baked bread served homemade butter? It’s the smoothest, fluffiest, creamiest butter you’ve ever tasted and truly, nothing compares to it! Now you can make your own at home in only 10 minutes! This afternoon L and I made HOMEMADE BUTTER IN A JAR and it was so easy, so delicious, I may never buy butter from the store again!

Ingredients/Materials needed:

  • heavy cream
  • jar
  • marble

While I made butter in a jar, L made some in a small plastic container with a screw-on lid…perfect for little hands!

First, fill your jar half-way with heavy cream. Add a clean marble and screw the lid on tight. The marble speeds up the process, churning the butter a little quicker, but you can make butter with just a jar too!


Next, shake, shake, shake! Shake the jar for a full 10 minutes! After about 5 minutes, the contents will be thick like whipping cream.


Continue to shake! If you get bored, turn some music on and dance while you shake! As the cream turns to butter, you’ll hear the marble clanking less and less and eventually you won’t hear it at all.


Some people end up with thick butter at the bottom and a layer of liquid at top…if that happens, just pour the liquid off the top. That’s the butter milk! Ours never separated and we ended up with just butter, through and through. Absolutely delicious, light and creamy butter!


Spread on top of fresh, baked bread it could’ve been a meal in itself! I think next, we’ll try making an herbed butter or homemade honey butter! Mmm… Enjoy!

DIY Tin Can Bird Feeder #2

To celebrate the last week of National Bird Feeding Month, L and I made these adorable TIN CAN BIRD FEEDERS! They are really easy to make, look beautiful and cost nothing…just go digging through your recyclables! Not only will the birds love this winter treat, this bird feeder would make a fantastic gift for your children to make for a friend, parent or grandparent!

IMG_0317

IMG_0150

IMG_0141

Materials needed:

  • tin can w/ lid
  • wooden paint stirrer
  • pliers
  • acrylic paints
  • hot glue gun
  • string
  • glossy sealant (optional)
  • church key can and bottle opener (optional)
  • bird seed


IMG_0107

IMG_0111

First, make sure your can is clean and remove the label.

IMG_0108


Using your hands, carefully bend the lid of the can in half. Using pliers, squeeze it flat.

IMG_0109


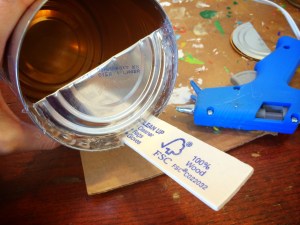
Using the hot glue gun, glue the paint stirrer inside the can. You can break the stirrer if it’s too long. This will be the birds’ perch.

IMG_0113


Next, glue the bent lid back into the can as pictured. Try not to make a huge mess with the hot glue gun, but if the glue shows it is no big deal…you will paint over it next.

IMG_0114


Paint the can any way you like.


IMG_0125

IMG_0128

IMG_0129


After the paint dries, you can use the can opener to make holes in the can from where you’ll hang it on a string. On one of our cans I placed two holes on the top…this bird feeder will hang from an old clothes line end.

IMG_0136


On our second can I made holes in the back of the bird feeder…this one we will tie onto a fence. I was careful to put the holes in the can after we painted it, because I wanted to avoid any sharp edges while L was handling the bird feeder.

IMG_0135


If you’d like your bird feeder to have a shiny, glossy finish, spray the can with a glossy sealant. It only takes 15-30 min to dry and will help protect the paint as well!

IMG_0137


Thread string through the holes of the bird feeder and fill with bird seed!


IMG_0138

IMG_0150


Now, find the perfect spot to hang your TIN CAN BIRD FEEDER! We placed one of ours right outside our kitchen window…the girls will love watching their little wildlife friends snack throughout the day! Enjoy!


IMG_0141

IMG_0144

IMG_0142


IMG_0191


In case you missed it, here’s the first DIY TIN CAN BIRD FEEDER we made! Another fun nature craft!

IMG_3262

DIY Toy Vacuum (that Really Cleans!!!)

I love showing my kids that with a little creativity and a basketful of recycling materials you can make just about anything! One morning L woke up asking me to make her a vacuum…strange request, but I accepted the challenge. My thoughts immediately went to that toy vacuum from yesteryear with the popping balls inside. Kids love those things because of the noise they make, so I knew ours had to be similar. The only thing to improve upon that vacuum would be to make one that cleans as well! So here you have it — a toy vacuum that essentially costs you nothing (assuming you have all the materials) and it actually cleans the floors while your kid plays!

Materials needeed:

  • Swiffer sweeper w/ dry swiffer pad
  • empty milk carton
  • plastic container (like one berries come in)
  • plastic beads
  • duct tape
  • paper towel tube (optional)
  • hot glue gun
  • scissors

First, using scissors or a knife, cut a little window on the front of the milk carton. Cut a piece of clear plastic off of the plastic container to cover the window.

Using a hot glue gun, carefully glue the clear plastic in place over the “window.”

Cover the entire milk carton in duct tape. Make sure you cover up the glued edges of the plastic window as well…this should eliminate any sharp or pointy edges.

Next, have your little one help you drop beads into the carton. A few handfuls will do. Screw the lid back on the carton.

If your Swiffer sweeper’s handle has removable links (which I think they all do), remove the two middle ones to make it a more suitable height for your child.

Now the next step you can do in two ways: you can tape the milk carton directly onto the Swiffer sweeper…it may be more secure, but it may also leave some duct tape residue on the Swiffer. (That would be the more permanent option.) Or, you can glue and tape a paper towel tube onto the back of the milk carton and slide it onto the Swiffer’s handle. We went with the later…I thought it may jiggle more and make a louder, bead-popping sound too!

Now to clean floors…just replace the Swiffer pad as you would normally do and let your child go to work! (I mean play!) I really thought ours would last a couple weeks, but we’re going on 4 months now and every week L asks if she can help “vacuum” the floors. Enjoy!!!


It’s Tea Time!!! Tea Party Ideas

Over at Our Beautifully Messy House, we love a good TEA PARTY! We have breakfast tea parties and mid-afternoon tea parties, tea parties in a teepee outside, and tea parties on the kitchen floor! We have tea parties with friends and tea parties with fairies! There is only one rule in our house when it comes to having a tea party: Everyone must wear a hat! It doesn’t matter if you are still wearing your pajamas, everybody starts the tea party with a hat!


IMG_9142

IMG_9633

IMG_6466


If you’re planning ahead, you can make some “Floppy Newspaper Hats” for tea time! (DIY here.)

IMG_7266


Tea Ideas

Obviously you can steep any flavor of tea, but with little kids you may want to get creative! Sometimes I pour L half a cup of Blueberry Wild Child Tea, fill the rest with milk and she drinks it out of her fancy tea cup with a straw. Anything goes! Kids can drink water, milk, juice mixed with water, or hot chocolate…if it’s in a tea cup, it’s tea!


IMG_8855


Tea Cups

Tea cups don’t have to be fancy, but fancy is fun! The best place to find tea cups is at antique stores, yard sales and flea markets. Such places are filled with tea pots and cups and, at only a couple of dollars a piece, it’s no big deal if one breaks.


IMG_9635

Tea Party Treats

For breakfast tea parties, we make PANCAKE SANDWICHES with cream cheese and strawberry jam layered in-between two pancakes. To make them extra fancy, cut the pancakes with a heart cookie cutter and let the red, strawberry jam shine through!


IMG_8833

These Strawberry Jam Scones are perfect for tea time! Get the recipe here.

IMG_9157


No-Bake Acorn Treats are fun and yummy for your tea party outdoors! Get the quick and easy how-to here.

IMG_7737


If you’re just throwing together a tea party last minute, anything will do…a granola bar cut into bites, muffins, a bowl of popcorn. Your kids will love it!

A Tea Party for Fairies

IMG_9127


If you don’t have fairies and fairy furniture, you can easily make some!

IMG_9148

DIY Fairy Folk


IMAGE_1841

DIY Fairy Furniture

IMAGE_2311

Acorn Cap Treasures (aka Fairy Hats!)

Use cheerios to make FAIRY DONUTS. If you have a microwave, simply place one chocolate chip on top of a cheerio and zap it for a few seconds. Top with mini-sprinkles! We don’t have a microwave and melted the chocolate chips in a double-broiler on the stove-top and it worked just as well! For powdered fairy donuts, dip the cheerios in some maple syrup and then toss around in some powdered sugar. Silly, sweet, and so much fun!!!


IMG_8598

IMG_9123


If you don’t have a mini-tea set, you can use buttons for fairy plates and thimbles for the tea cups. Have the tea party on top of a box or a colorful pillow!

IMG_9131

IMG_9408


Please don’t think that if you have little boys that they can’t partake in your tea party fun! Everybody loves a party and if you must, call it a “picnic!” Enjoy!!!


IMG_8769


PVC Pipe Ball Drop / Water Run

We made this PVC PIPE BALL DROP / WATER RUN last Summer to take with us to the beach…beach houses usually have large windows and sliding doors so I knew it’d be the perfect place to test it out. We originally used corn kernels to drop through the tubes, which turned out to be a huge mess, but we had fun!!! As cabin fever set in this week with cold, snowy weather outside I decided to bring out the PVC PIPE BALL DROP / WATER RUN again! This time we used poof balls (as well as plastic fairies and frogs) to drop through the tubes and it worked great! You could also put this up in the shower and dump water through the tubing to make a water run…I think we’ll try that next! The materials for this project only cost about $10 and it provides hours of fun!


IMG_9538

IMG_9528


Materials needed:

  • PVC connectors and elbows
  • suction cups
  • drill
  • flathead screw driver
  • poof balls, beans, feathers, pennies…

We found these suction cups at the craft store and they were perfect…just remove the little, metal hook.

 IMG_9455


First, drill a hole in the middle of one side of each PVC connector. Compare the suction cup piece with the drill bits to figure out the right size to use…you can always drill a bigger hole if need be, so start with the smaller bit if you’re deciding between two. Using the flat head screw driver, pry and poke the suction cup into the PVC connector.

IMG_9456

IMG_9452

IMG_9453


Now, time to play!!! Press the tubes onto a sturdy glass door or window and let the fun begin! It’s fun letting the kids experiment with placement of the tubes!


IMG_9480

IMG_9464


If your “Ball Drop” has two starting places, it’s fun to race the balls down…see whose comes out first!

 IMG_9471

IMG_9490


To mix things up, give your kid a spoon or tongs to pick the balls up and drop them down!

 IMG_9552

IMG_9559


Get crazy! Have fun! Enjoy!!!

20 Non-Candy Valentine Ideas!

Valentine’s Day is just around the corner…time to spread a little love and happiness! Instead of giving out candy this year, why not make some NON-CANDY VALENTINES for friends and loved ones? Here are a few ideas for your kids’ friends and for yours…you may even want to make a “Thumbprint Necklace” for yourself! Most of these are really quick and easy to make too! Enjoy!!!

2016-01-14 21.04.09

Just click on the link under each picture for the “how-to!”

For kids:

IMG_2106

Homemade Sidewalk Chalk

DSC_0574

Hidden Fairy Bath Bombs

IMG_1988

DIY Pocket Parachutes


IMG_9038

Fairy Folk


IMG_8741
Sock Puppets


IMG_9380
Melted Crayon Stones…Love Rocks!


IMG_3348

Craft Stick Fairy Doors


IMG_8404
Scented Play Dough


IMAGE_2341
Story Stones


DIY Capes…Wizard Capes…Superhero Capes

IMG_9308

Sensory Bottles, Sparkle Bottles, Glow-in-the-Dark Bottles, and an Ocean in a Bottle!

IMG_0981

DIY Flower Fairies

IMG_1375

Doorknob Mushroom-Fairy Houses

For adults:

IMG_84811
Thumbprint Necklace

IMG_9978

DIY Chocolate Orange Sugar Scrub


IMG_8122
Semisoft Honeysuckle Soap


IMG_9188
Heart Wreath


IMG_9161
Strawberry Jam Scones

DSC_0943

Cardboard Heart Stamps

IMAGE_1417

Melted Crayon Art with Variations

Melted Crayon Rocks

I remember doing this craft as a kid and how much I loved it, so today I introduced MELTED CRAYON ROCKS to L. And of course, she loved making them as well!!! It was the perfect way to spend this snowy afternoon!

 IMG_9380

IMG_9393


This is definitely a craft to do with older kids, as the rocks get extremely hot! L was just old enough at 3 yrs of age. I constantly reminded her not to touch the rocks and kept a close eye at all times!

Materials needed:

  • rocks
  • crayons
  • tin foil
  • towels, cardboard, or newspapers
  • oven mitt or tongs
  • oven

 IMG_9364


First, clean and dry the rocks if there’s any dirt on them. Lay them out on a cookie sheet and place in the oven, set at 350 degrees F for 10 minutes. After 10 minutes I turned the oven off, leaving the rocks in there until we were ready to use them. I removed one rock at a time as we went along.

 IMG_9365


As the rocks are heating up, remove the paper from some crayons. If you use a knife to carefully cut down the side of the paper, it comes off in one nice, big piece. Prepare your work area with towels, cardboard or newspapers beneath a sheet of tin foil.

 IMG_9366


When you are ready to create, remove one rock at a time using an oven mitt or tongs. Obviously, be very careful…you don’t want to burn yourself or have the rock fall, roll and burn anyone else.

Gently press crayons onto the rock and watch the wax melt down the side. Sooo relaxing and mesmerizing!!! You can draw pictures, designs or make them completely random! It’s a fun craft to experiment with!

 IMG_9374

IMG_9373

IMG_9375


MELTED CRAYON ROCKS would make sweet little gifts for family and friends…a fun surprise to leave in your neighbor’s garden or on their front steps! I think we’ll be making more this coming month to hand out on Valentine’s Day, because LOVE ROCKS!!! Enjoy!!!

 IMG_9391


DIY Planetarium for Kids

Have your kids ever daydreamed about going to the moon? To Mars or the Milky Way? By making a PLANETARIUM FOR KIDS you can take them to outer space without even leaving your house!


2015-06-01 20.56.05

IMG_9221


Last week L and I turned our dining room into a PLANETARIUM complete with the all the planets of our solar system, constellations, “telescopes,” MOON DOUGH!, Glow-in-the-Dark Glitter Bottles, Sprinkle Star Sugar Cookies and more! Once you get going on this project the possibilities are endless…your kids will be entertained, playing and learning for days on end!

IMG_9243


First, start by making the planets in our solar system. Find a good picture of the solar system, in a book or online, and talk about the planets. Depending on the age of your kids, you can keep the research brief or stretch it out, talking about the facts and properties of each planet. (I included Pluto when teaching L about our solar system…it was always my favorite planet and last I heard, it was back in the solar system!) Next, cut out circles of construction paper to resemble the sun and each planet. Have your lil one color them!


 IMG_9203

Tape your planets to the underside of a table! Depending on what your child is interested in, feel free to add the moon (made out of tin foil), some constellations…anything you all think is important and fun! Having a good time learning about outer space is the most important part here, so if your lil one wants stars all over in random places, go with it! Why not!? Among our randomly placed stars we included the Big Dipper and Cassiopeia.

IMG_9221


Hang some foil stars from the sides of your table for a lil extra pizzaz as well. This was WB’s favorite part!


IMG_9245

Throw a blanket and some pillows under the table, grab a flashlight and get ready to star gaze! “It’s a real campout!” L exclaimed.


IMG_9227

IMG_9237


Having a flashlight is a must! You can put some SENSORY BAGS (click here) over the flashlight to change colors.


IMG_9208

IMG_9209

Make some sparkle bottles as well! The GLOW-IN-THE-DARK BOTTLES (DIY here) were a lot of fun with this activity! How many stars can you count? Can you see any constellations in the bottle?


IMG_9325

IMG_9204

IMG_9308


Make a “TELESCOPE” too!


IMG_9242

Materials needed: 

  • paper towel tube (or paper rolled up)
  • clear plastic (sandwich bag works well)
  • star stickers
  • rubber bands


IMG_9232

Cut the plastic sandwich bag into a small square. Stick some star stickers on top. Place the plastic over the cardboard tube and secure it with two small rubber bands. Looking out the window or at a light with the “telescope,” your child will see stars! Maybe even a constellation!


IMG_9234

IMG_9241


You can also do the reverse…punch some holes out of construction paper (best if they are in the form of a constellation), and shine the flashlight through! The stars will appear upon the wall!


IMG_9360

Getting hungry? Make some SPRINKLE STAR SUGAR COOKIES (recipe here) with your kids! It’s a quick and easy sugar cookie recipe and perhaps you’ll find more constellations as you snack!


IMG_9619


Another fun mess to make as you’re exploring outer space is MOON DOUGH! (recipe here) One of our favorites…the silky powder can be molded into shapes and forms and only includes 2 ingredients!


IMG_9358

Have fun with this one!!! What else will you all come up with as you venture out, past our atmosphere???

IMG_9213