DIY Pocket Parachute

What kid doesn’t love throwing a toy parachute around?!! And what parent doesn’t love a toy that costs nothing, takes less than 5 minutes to make, and entertains your kids for hours on end?!! I made this DIY POCKET PARACHUTE for L on a rainy day last week…as soon as there was a break in the weather, we were out the door throwing the parachute all around town. L dropped the parachute off the steps of the old courthouse, a church, the library, a little pavilion stage, and she climbed up a tree and dropped it down as well. This pocket parachute is so simple, so easy, and so much fun!!!


Materials needed:

  • plastic bag
  • food pouch cap
  • string
  • scissors
  • an awl (or screwdriver)

If you don’t have a food pouch cap, a toy wheel, some safety pins, paper clips or a wine cork could be used as well…get creative with what you have on hand!

First, cut the plastic bag into a square at least 12×12 inches.

Cut your string into 4 equal pieces, all approximately 15 inches long.

Using the awl, carefully poke a hole through the center of the food pouch cap.

Also, poke holes into each corner of the square you cut from the plastic bag. Make each hole 1/2 an inch from the edges.

Tie a piece of string onto each corner, using a double knot.


Next, gather all the strings together and tie them together with one overhand knot, about 3 inches from the end.


Thread two of the strings through the center of the food pouch cap and thread the other two through the side. Tie the ends together with a double knot.


Too easy, right? Now time to play!!! It’s just as much fun trying to catch the parachute as it is to throw it!


If your kids are older, they can experiment by making various parachutes…some out of bigger pieces of plastic, longer strings and cutting a hole in the center parachute as well. Enjoy!!!

Patricia Polacco’s THUNDER CAKE RECIPE

“Grandma looked at the horizon, drew a deep breath and said, ‘This is Thunder Cake baking weather, all right. Looks like a storm coming to me.'”

 IMG_3498

If you haven’t read the book “Thunder Cake” by Patricia Polacco, get yourself to the library or a local book store and get your hands on a copy pronto…you and your kids will love it! The story centers around the author and her grandmother (her Babushka) and the summer storms she feared as a little girl, at her grandmother’s farm in Michigan. I’ve loved reading this book ever since I was a little girl and now L adores it as well.

With the summer heat and thunderstorms we’ve been having lately, I decided it was definitely time to try our hand at baking some real Thunder Cake for ourselves! It’s fun to make memories with your little ones and read this book as your Thunder Cake is baking in the oven…the perfect activity for a lazy, stormy, summer afternoon. It really seems like magic to smell the chocolaty cake baking in your own home as the little girl and her Babushka are putting theirs into the oven as well!

The recipe calls for 1 cup of shortening; we used what we had — 2 sticks of butter  — and the result was still wonderful! With the secret ingredient of pureed tomatoes, the flavor of this chocolate cake is very unique, but very moist and delectable as well. I suggest serving your Thunder Cake with extra strawberries…they pair so well with the hint of tomato and make the desert complete!

As instructed in the book:

Cream together, one at a time…

  • 1 cup shortening (or 2 sticks of softened butter)
  • 1 3/4 cup sugar
  • 1 teaspoon vanilla
  • 3 eggs, separated (Blend yolks in. Beat whites until they are stiff, then fold in after the tomatoes.)
  • 1 cup cold water
  • 1/3 cup fresh, pureed tomatoes

Sift together…

  • 2 1/2 cups cake flour (We used all-purpose, Gluten Free flour.)
  • 1/2 cup dry cocoa
  • 1 1/2 teaspoon baking soda
  • 1 teaspoon salt

Mix dry mixture into creamy mixture.
Bake in two greased and floured 8 1/2-inch round pans at 350 degrees for 35 to 40 minutes.
Frost with chocolate butter frosting. Top with strawberries.

IMG_2246

We used this chocolate buttercream frosting recipe because I had all the ingredients on hand and it was quick and easy. Feel free to use your favorite chocolate buttercream recipe in its place!

Enjoy!!!

Polacco, Patricia. “Thunder Cake.” New York: Scholastic Inc., 1990. Print.


Glow-in-the-Dark Bath

A couple weeks ago L and I walked down the street to check out a kids’ festival going on in town. Our favorite part was some “Glow-in-the-Dark Yoga” going on at a local yoga studio. While the kids danced and froze into yoga poses with their glow bracelets on, the skies opened up into a torrential downpour outside. (I thought we’d need a canoe to get home.) Of course L and I embraced mother nature as we danced and splashed the whole way home. Cold and muddy, our next stop was a hot and soapy bath…with the lights off and our glow bracelets still on!!! It was silly, but so cool…I don’t know why I never thought of it before!


While lil ones love the idea of glow sticks, our kids are rarely up late enough to play with them in the dark. Turning the lights off at bath time and adding some glow sticks and glow bracelets to the water is perfect! Glow sticks only cost $1 to $2 dollars for a pack of 5-10.

Many bathrooms don’t have windows, so a glow-in-the-dark bath can be done at any time of day.


Make sure you keep an eye on your children while taking a glow bath, many glow sticks suggest kids be at least 8 years old to play with them. You definitely want to make sure your little teethers keep them out of their mouths!


You can even add some “glow-in-the-dark bottles” to the mix as well! Enjoy!!!

Doorknob Mushroom-Fairy Houses

Aren’t these DOORKNOB MUSHROOM-FAIRY HOUSES the cutest??? I originally planned to just make mushrooms out of these little wooden knobs, but I just had to paint a little door and window on too. They’re just so sweet! L painted hers knobs into multi-colored mushrooms today and they are already out in the garden! So easy and so much fun!


Materials needed:

  • small wooden knobs w/ screws
  • acrylic paint
  • sealant spray
  • egg carton (optional)

First, twist the screw into the knobs.

Next, paint your knobs. You can paint them to look like mushrooms or add a few extra details for a fairy house. Even a 3 year old can paint the knob to look like a cute, lil mushroom!


After your knobs are painted, set them aside to dry. I suggest using an egg carton to prop the knobs up. Next, take them outside to spray with a coat of sealant. (The egg carton works great for this step too!)

Now for the fun part…tuck them away into your fairy garden, in a flower pot or in a wreath. Keep the screws in, just push them into the ground. Adorable! Might as well make a couple extra for family and friends!


If you like this one, you’ll be sure to like our JAM JAR FAIRY HOUSES and GNOME HOMES too!

Jam Jar Fairy House / Jam Jar Gnome Home

The other night I had a hard time falling asleep because I couldn’t stop brainstorming about how to turn a jar into a fairy house. (Only me…I know.) I knew I wanted to make it so at night the windows and door would light up; the house needed to be sturdy enough to stand up to the elements outdoors; and I wanted to use craft materials we already had around the house. Finally I had a eureka moment…why not use my beloved hot glue gun!?! So many people think hot glue guns are just for gluing things together, but they can add texture and dimension to your work as well. I’m super excited to share with you this simple tutorial for making JAM JAR FAIRY HOUSES & GNOME HOMES! They really are adorable!


Materials needed:

  • jars
  • hot glue gun and glue
  • acrylic paints
  • preserved moss, tree bark, or dried leaves
  • dried flowers
  • a bead or button
  • tea lights (battery operated)


First, decide which direction you’d like your jar to stand. For instance, my smallest JAM JAR FAIRY HOUSE stands on its lid, but the larger one (made from an apple sauce jar) stands upright. Using your hot glue gun, “draw” a door and windows on your house. Then, fill in the walls of the house with vertical lines of your hot glue. Try to draw them on in long, fluid strokes, but the house by no means needs to be perfect. Each lil blip or quirk, will give your fairy house more character!


Next, paint the inside of the jar where your windows and door are located. Keep in mind that you’ll want some light to shine through at night, so don’t pick colors too dark or layer the paint too thick.


After you’ve painted the inside, paint the outside of the jar brown. Carefully go around each window and the doorway.


After the paint dries, the final step is gluing on dried moss and some tiny dried flowers. For our little jam jar fairy house, I glued moss on the top of the house (bottom of the jar) and along the edges of the lid. You can find preserved moss at your local craft store or, if you like, just use natural materials found in your own backyard…twigs, tree bark, fallen leaves, helicopter seeds, acorns.


You can display your fairy houses inside or outside. To light them up at night, just place a little, battery operated, tea light inside. Enjoy!


If you’re giving a JAM JAR FAIRY HOUSE away as a gift, don’t forget to include some fairies and some fairy furniture tucked away inside the jar!

DIY Fairy Folk

DIY Flower Fairies

Fairy Furniture

DIY Fairy Wands


DIY Flower Fairies

I first made FLOWER FAIRIES with my youngest sister when we were kids. They are just so sweet, I couldn’t wait to make them again with my girls! L and I made these fairies this past week and we plan on making more tomorrow…I’m thinking garlands, magnets, and of course, just flower fairy dolls for playing pretend!


Materials needed:

  • florist wire
  • fabric flowers
  • wooden beads
  • other beads (wooden, plastic; colorful, plain)
  • acrylic paint
  • embroidery thread
  • scissors
  • hot glue gun and glue

First, paint simple, little faces on your wooden beads.

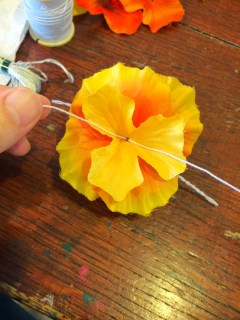
While your beads dry, take the artificial flowers apart. All you’ll need is the fabric petals. If you have any tiny flowers, set them aside to use for head decorations.

Cut a 14-inch piece of wire, and an 8-inch piece of wire. Fold the 14-inch piece in half.

With the smaller piece, bring both ends towards the center and twist the wire, leaving a little loop on each side for the fairy’s “hands.” Set aside.


Select the colors of embroidery thread you’d like to use for the fairy’s hair. Wrap the thread around all four of your fingers.

Place your looped, embroidery thread into the fold of the 14-inch piece of wire. Twist the wire, once to secure it in place.

Next, thread a “head” onto the wires (the large wire folded in half), followed by a couple small or medium-sized flowers.


Take the small wire piece (already folded and twisted into arms) and place it under the flowers, but in-between the two wires. If you like, you can fold each arm over once to secure the arms in place a little more.

Next, thread a bead onto the wire, followed by 2, 3, or more large flower petals.

At this point, separate the long wires into two legs. Fold each one in half and twist the wire, leaving a little loop on each end for the fairy’s “feet.”


Time to style some hair! You can twist the hair and glue it on top the fairy’s head. You can simply cut the thread loops and let it hang wild and free. Get creative with it!


To finish each flower fairy, glue a small flower on top of the hair. Too cute!!!


To host a tea party for your flower fairies, be sure to check out our “It’s Tea Time! Tea Party Ideas” page!


DIY String Bowls

Before we packed up our Easter stuff, I decided to make some fun and funky STRING BOWLS with L…we used the bottoms of our Easter eggs for molds. How cute are these? And even better, all the materials needed we already had lying around the house…you probably do too! If you don’t have Easter egg bottoms to use, any small or medium-sized bowls will work for molds.

Materials needed:

  • small plastic bowls or Easter egg bottoms
  • yarn or string
  • white glue
  • water
  • plastic wrap
  • scissors
  • glitter (optional)
  • hair dryer (optional)

First, cover your molds with plastic wrap.

In a small bowl, mix a little bit of water into some white glue. If you like, mix some glitter into the glue as well.

Next, cut your string into small pieces and stir it into the glue. You can experiment with this step…we did one bowl using 1-inch pieces of yarn, another using 2-3 inch pieces, and one bowl using one long piece of string.


Remove each piece of string from the glue, one at a time, and lay them across your mold. If the glue is thick on the string, you can squeeze some of the excess glue off.


Once all your string is laid out across and around your molds, lay them aside to dry. It may take a couple days for the glue to dry completely, or you can speed up the process by using a hair dryer.

After the glue has dried, turn your bowls over. Remove the molds and the plastic wrap.


Using fine-tipped scissors, you can trim any string or glue that you may need to off the edges.


Beautiful and fun! Perfect for rings, hair clips, buttons and trinkets!

Rainbow-Shaving Cream Sensory Play

This is such a fun activity for kids and even more fun if you surprise them with it! I prepared our RAINBOW-SHAVING CREAM SENSORY PLAY activity beforehand and when I called L to the kitchen to play, draw and discover she was delighted! She kept saying, “Hey, how’d the rainbow get in here!?!” Like many of our crafts and activities, this one is done with things we already had around the house…so no need to go to the store to buy supplies! For what it’s worth, a can of cheap shaving cream equals hours of fun for kids…we always have one on hand!


Materials needed:

  • large, oven-safe pan
  • aluminum foil
  • broken crayons
  • sharp knife & cutting board
  • oven
  • shaving cream

First, line your pan with aluminum foil. Spread it out as smooth and flat as possible.

Cut your crayons into shavings…we did the colors of the rainbow, but you can do any combination of colors.

Sprinkle the crayon shavings out on the foil-lined pan.

Bake in the oven at 200 degrees F for 5 minutes. Remove from the oven, careful not to tip or shake the pan, and let the pan and crayons cool completely.

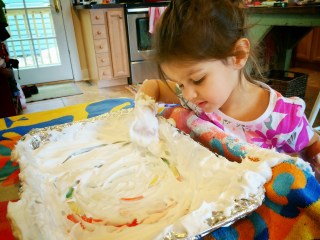
Next, squirt shaving cream onto the pan and spread it out evenly…about 1/2 inch thick.


Here comes the fun part…time for your little ones to play!!!


They can practice drawing shapes, writing letters and numbers in the shaving cream.

We had fun taking turns, playing “pictionary” too! Enjoy!!!


Knuckle-Print Carrots

How cute are these KNUCKLE-PRINT CARROTS we made for Easter? They’re not only fun to make with your little ones, but they make sweet gifts for parents and grandparents too!

Materials needed:

  • paper
  • orange and green paint
  • little knuckles

Just a little note: Whenever doing projects like this, I like to have a sheet of paper to practice on first. Our practice paper is the big white one here, giving us lots of room to experiment with before making little Easter cards for the grandparents.

First, paint your kid’s knuckles orange. Have them stamp the paper with their knuckles. We found that it worked best if L was standing or on her knees doing this part, making sure she was well above the paper.


Next, I marked each carrot lightly with a pencil, so we knew which side would be best to put the “leaves” on.

Using your child’s thumb or index finger, have them make little leaves atop each carrot. I had to help L with this part…as you can see in the picture below, when left to do it alone, she was happy putting green dots all over her carrots! Ha!


So sweet! Happy Spring!

Egg Carton Flower Wreath

Can you believe this beautiful Spring wreath was made primarily out of egg cartons!?! I just love the outcome! I’ve wanted to make an EGG CARTON FLOWER WREATH for years! Last year we tried it, using tempera paints, but the colors weren’t nearly as vibrant. I highly suggest using acrylics for this project. Our EGG CARTON FLOWER WREATH hangs inside Our Beautifully Messy House, as we await the first blooms of spring flowers outside in our garden!


Materials needed:

  • 3 egg cartons
  • med-large cardboard piece
  • sharp scissors (fabric scissors)
  • acrylic paints
  • hot glue gun and glue

First, cut the egg cartons into flower shapes. Get creative! The pointy, divider sections can be used to make narrow flowers or daffodil trumpets and the lids of the egg cartons can be cut into leaves.

After all your flowers are cut, time to paint with your little ones! L and I painted side-by-side…when she was finished with a flower or bored with a color, I’d let her start on another one while I filled in any spots she may missed. After all the flowers were painted a solid color, I went back and painted on some details! Although the flowers look great in solid colors, the details really bring them to life…worth the extra 30 minutes of painting!


To make your wreath base, use some large mixing bowls to trace circles onto your cardboard and cut it out. I used two separate pieces of cardboard and just taped them together. Once your wreath base is cut out, give it a quick coat of green paint.


Next, using a hot glue gun, glue the leaves onto your wreath base randomly.

After the leaves are in place, glue the flowers on. Try to space the colors out, but don’t think too much about order. In nature, nothing is perfect and the imperfections themselves are beautiful!


Hang your wreath on a door, a wall or in your kitchen window! Enjoy!!!