April Fools’ Jokes to Play on Your Kids, Spouse and Coworkers!!!

APRIL FOOLS’ DAY is just around the corner! What a delightful day of the year — one of my favorites!!! Many of these harmless pranks are quick to throw together and result in silly fun and laughter had by all! Enjoy!

For Little Kids:

  1. Fill your little ones’ shoes with buttons, beads or poof balls.
  2. Stick googlie eyes and mustaches on pictures and objects around your house…cups, the front door, bathroom mirror, backpacks, shoes.
  3. Serve your kids food on teeny, tiny, doll dishes.
  4. Switch your kid’s socks with your spouse’s the night before April Fools’ Day.
  5. If the head of your sink faucets are removable, unscrew the head and place an Easter Egg dying tablet inside. Screw the head back on. When the kids turn on the sink, orange, blue or green water will come rushing out!

For Teenagers or Your Spouse:

  1. Take an empty water bottle and using a pin, poke 10 holes in the bottom. Fill the bottle with water and quickly screw the lid back on. Dry off the bottle. Ask somebody to help you open the bottle and watch as water falls out the bottom!
  2. Using safety pins, pin all their underwear together in one long line. Carefully replace the underwear back in their drawer, so when they go to remove the top pair the next comes out too, and the next, and the next, and the next…
  3. Short-sheet their beds — Remove all the sheets from the bed. Using one sheet, lay it out over the bed and tuck it in at the top. Fold the bottom of the sheet up to the top and tuck the sides in. Cover with their quilt or comforter. The bed looks normal from the outside, but when they get into bed their feet will only go in halfway!
  4. If their bed is messy, unmade or lumpy, put a bristly hair brush into their bed. When your kids feet touch the brush, it’ll feel like a prickly animal or giant bug!
  5. If your spouse is heading to the grocery store, add some “extras” to list: 2 lbs of banana peels, a dozen robin’s eggs, 1 loaf of bread crumbs.

For Coworkers:

  1. Write “April Fool!” on a sticky note. Stick it to the bottom of your coworker’s computer mouse. Not only will the mouse not work, when they flip it over, perplexed, your message will be delivered.
  2. If you’re wearing a blazer to work, take a spool of thread and thread a needle onto the end of the string. Poke the needle through near the shoulder of your jacket, from inside out. Remove the needle, leaving a couple inches of string showing on your jacket. Place the spool of thread in the inner-pocket. Just wait for your coworker to notice and remove the string for you…then wait for the horrified look on their face as the string pulls longer and longer and longer!


Rainbow-Shaving Cream Sensory Play

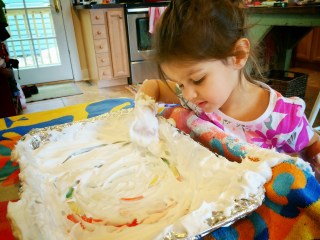
This is such a fun activity for kids and even more fun if you surprise them with it! I prepared our RAINBOW-SHAVING CREAM SENSORY PLAY activity beforehand and when I called L to the kitchen to play, draw and discover she was delighted! She kept saying, “Hey, how’d the rainbow get in here!?!” Like many of our crafts and activities, this one is done with things we already had around the house…so no need to go to the store to buy supplies! For what it’s worth, a can of cheap shaving cream equals hours of fun for kids…we always have one on hand!


Materials needed:

  • large, oven-safe pan
  • aluminum foil
  • broken crayons
  • sharp knife & cutting board
  • oven
  • shaving cream

First, line your pan with aluminum foil. Spread it out as smooth and flat as possible.

Cut your crayons into shavings…we did the colors of the rainbow, but you can do any combination of colors.

Sprinkle the crayon shavings out on the foil-lined pan.

Bake in the oven at 200 degrees F for 5 minutes. Remove from the oven, careful not to tip or shake the pan, and let the pan and crayons cool completely.

Next, squirt shaving cream onto the pan and spread it out evenly…about 1/2 inch thick.


Here comes the fun part…time for your little ones to play!!!


They can practice drawing shapes, writing letters and numbers in the shaving cream.

We had fun taking turns, playing “pictionary” too! Enjoy!!!


Knuckle-Print Carrots

How cute are these KNUCKLE-PRINT CARROTS we made for Easter? They’re not only fun to make with your little ones, but they make sweet gifts for parents and grandparents too!

Materials needed:

  • paper
  • orange and green paint
  • little knuckles

Just a little note: Whenever doing projects like this, I like to have a sheet of paper to practice on first. Our practice paper is the big white one here, giving us lots of room to experiment with before making little Easter cards for the grandparents.

First, paint your kid’s knuckles orange. Have them stamp the paper with their knuckles. We found that it worked best if L was standing or on her knees doing this part, making sure she was well above the paper.


Next, I marked each carrot lightly with a pencil, so we knew which side would be best to put the “leaves” on.

Using your child’s thumb or index finger, have them make little leaves atop each carrot. I had to help L with this part…as you can see in the picture below, when left to do it alone, she was happy putting green dots all over her carrots! Ha!


So sweet! Happy Spring!

Egg Carton Flower Wreath

Can you believe this beautiful Spring wreath was made primarily out of egg cartons!?! I just love the outcome! I’ve wanted to make an EGG CARTON FLOWER WREATH for years! Last year we tried it, using tempera paints, but the colors weren’t nearly as vibrant. I highly suggest using acrylics for this project. Our EGG CARTON FLOWER WREATH hangs inside Our Beautifully Messy House, as we await the first blooms of spring flowers outside in our garden!


Materials needed:

  • 3 egg cartons
  • med-large cardboard piece
  • sharp scissors (fabric scissors)
  • acrylic paints
  • hot glue gun and glue

First, cut the egg cartons into flower shapes. Get creative! The pointy, divider sections can be used to make narrow flowers or daffodil trumpets and the lids of the egg cartons can be cut into leaves.

After all your flowers are cut, time to paint with your little ones! L and I painted side-by-side…when she was finished with a flower or bored with a color, I’d let her start on another one while I filled in any spots she may missed. After all the flowers were painted a solid color, I went back and painted on some details! Although the flowers look great in solid colors, the details really bring them to life…worth the extra 30 minutes of painting!


To make your wreath base, use some large mixing bowls to trace circles onto your cardboard and cut it out. I used two separate pieces of cardboard and just taped them together. Once your wreath base is cut out, give it a quick coat of green paint.


Next, using a hot glue gun, glue the leaves onto your wreath base randomly.

After the leaves are in place, glue the flowers on. Try to space the colors out, but don’t think too much about order. In nature, nothing is perfect and the imperfections themselves are beautiful!


Hang your wreath on a door, a wall or in your kitchen window! Enjoy!!!


20+ Non-Candy Easter Egg Surprises

Last year we put a few chocolates into L’s Easter eggs, but for the most part the Easter bunny left her with NON-CANDY EASTER EGG SURPRISES and she LOVED it! Inside the eggs were buttons, a spool of thread (to string the buttons into a necklace), a lil plastic turtle, and strips of paper with fun activities for the whole family to do.


Some of the “ACTIVITIES” included:

  • Hop like a bunny.
  • Jump like a frog.
  • Who can laugh the silliest?
  • Give daddy a hug.
  • Give a bunny kiss to mommy.
  • Walk backwards.
  • Clap and count to 10.
  • Peep like a chick.
  • Play ring-around-the-rosie.
  • Roll like an egg.


Yes, it was silly and ridiculous, but we had so much fun!!!

Other NON-CANDY EASTER EGG IDEAS:

  • Army men
  • Marbles
  • Puzzle pieces
  • Stickers
  • Crayons
  • A Prism
  • Coins
  • Beads
  • Play-dough (Recipe here.)
  • Fairy folk (DIY here.)
  • Shoelaces
  • Plastic figurines
  • Wooden Stamps
  • Jacks
  • Story Stones (DIY here.)
  • Buttons (and thread to make a necklace)
  • Mardi-Gras Beads
  • Miniature Tea Set
  • Rocks (like Jade, Obsidian, Pyrite, Quartz, etc.)
  • Dice
  • Erasers


You also might like these CRAZY COLORED EASTER EGGS


And this DIY SOCK BUNNY RABBIT! Enjoy!!!

Crazy Colored Easter Eggs

Last year was the first time we colored our Easter eggs in this fashion and oh my gosh, was it easy!!! These CRAZY COLORED EASTER EGGS are much cleaner and quicker to make than the traditional dyed Easter eggs! And aren’t they just beautiful???


Materials needed:

  • white eggs
  • pot with water
  • broken crayons
  • tin foil
  • large dish or pan
  • fork
  • tongs
  • glitter (optional)
  • towel for drying
  • parchment paper

First, put your eggs in the pot of water and on your stovetop to boil. I’ve always heard that 13 minutes is the magic number for perfectly cooked, hard-boiled eggs.

While your eggs cook, line your pan with tin foil. Also, prepare a place on your kitchen counter for your finished eggs…just a piece of parchment paper will do!

Make some crayon shavings, using a sharp knife. The more wild and beautiful your colors, the more wild and beautiful the eggs!

Sprinkle the crayon shavings on top of the tin foil and add glitter if you like too! You don’t need a whole lot of crayon shavings…less is really better to avoid big color mixtures turning the eggs into yucky shades of brown.

Once the eggs are cooked, use tongs to carefully move one egg at a time onto the towel to dry, and then into the pan of crayon shavings. Have your little one roll the egg around the shavings, pushing gently with the underside of a fork. Since the eggs are still very hot, the crayon shavings will melt immediately, painting the eggs!


After each egg is dyed, remove it with the tongs and lay it on the parchment paper to cool completely.  Repeat with the remaining eggs!


I just love our CRAZY COLORED EASTER EGGS!!! Beautiful!!! Enjoy!

I Spy Bottle and Games

How many of you grew up loving the “Where’s Waldo?” books by Martin Handford or the “I Spy” books by Jean Marzollo and Walter Wick? My brothers, sisters and I adored them and now, L enjoys reading them too! The I SPY BOTTLE is very similar in principal and so much fun! It’s a fully contained game…no pieces to lose or to pick up! We take our bottle with us to restaurants on occasion and always on long car trips. The I SPY BOTTLE would be great fun in a classroom too! Be sure to scroll down, after the “how to” I’ve shared a few ideas of games to play.

Materials needed:

  • clear bottle with a wide mouth
  • rice
  • electrical tape
  • lots of small objects

First, remove the label from your bottle and clean and dry it completely. Goo Gone always works great for removing any stickiness and label residue! Fill the bottle a little over halfway with white rice.

Next, drop your objects in. We used beads, a bouncy ball, a plastic ring, spoon, animal figures, a marble, dice, a stamp, buttons, a clothespin, a rubber band, a paperclip, a toy car, keys, a wine cork, and although pictured is a crayon, I switched it out with a paintbrush. I was afraid the crayon would melt if left in the car!


Once the rice and objects are inside the bottle, use electrical tape to seal the lid closed. You could always use super glue, but I was afraid a time would come that we’d want one of the objects locked inside!

Now, time to shake your bottle up and play!!!


Different ways to play:

  • Call out the color of an object…”I spy something green!”…and have the other person find it.
  • Call out the function of an object…”I spy something that makes art!”…”A paintbrush!”
  • Things that rhyme. “I spy something that rhymes with ‘moon.'”…”Spoon!”
  • If your children can read, you could make little cards that go along with the I SPY BOTTLE too. How perfect would that be for a long car ride? Easy entertainment! Enjoy!!!


Homemade Butter in a Jar

Have you ever been to a restaurant that along with fresh, baked bread served homemade butter? It’s the smoothest, fluffiest, creamiest butter you’ve ever tasted and truly, nothing compares to it! Now you can make your own at home in only 10 minutes! This afternoon L and I made HOMEMADE BUTTER IN A JAR and it was so easy, so delicious, I may never buy butter from the store again!

Ingredients/Materials needed:

  • heavy cream
  • jar
  • marble

While I made butter in a jar, L made some in a small plastic container with a screw-on lid…perfect for little hands!

First, fill your jar half-way with heavy cream. Add a clean marble and screw the lid on tight. The marble speeds up the process, churning the butter a little quicker, but you can make butter with just a jar too!


Next, shake, shake, shake! Shake the jar for a full 10 minutes! After about 5 minutes, the contents will be thick like whipping cream.


Continue to shake! If you get bored, turn some music on and dance while you shake! As the cream turns to butter, you’ll hear the marble clanking less and less and eventually you won’t hear it at all.


Some people end up with thick butter at the bottom and a layer of liquid at top…if that happens, just pour the liquid off the top. That’s the butter milk! Ours never separated and we ended up with just butter, through and through. Absolutely delicious, light and creamy butter!


Spread on top of fresh, baked bread it could’ve been a meal in itself! I think next, we’ll try making an herbed butter or homemade honey butter! Mmm… Enjoy!