Snow Paint Fun

This activity is so easy, so simple, it almost seems silly to write a blog post on it…but people have asked, so here it is! Earlier this week, we had  35 inches of snow fall in our area and it’s given us an opportunity to do anything and everything snow-related…we’ve built igloos and tunnels, gone sledding, and eaten snow cream. I thought today would be a fun day to give “snow paint” a try. Every recipe I’ve seen floating around the internet involves dying water and putting it in separate spray bottles or squirt bottles though, something we just didn’t have. I figured why not just use our tempera paints!?

2016-01-27 19.02.54

We rarely use tempera paints, because frankly I don’t really like them. They’re absolutely perfect for this activity though! Tempera paint in general is washable and non-toxic, so it won’t stain clothes or harm the environment when the snow melts.

IMG_5275

To prepare for snow painting, I gathered 8 small plastic containers, 8 paint brushes, all our tempera paints, and a large plastic container. Even though the paint is washable, we went ahead and put aprons on over our snow clothes and wore old gloves too.

IMG_5269

Outside, spread the small containers out with a good squirt of paint in each one, as well as a paint brush. Now simply, paint the snow! After a day of the snow melting and then refreezing, our snow had a nice icy layer on top…it was perfect for painting!

IMG_5280

IMG_5283

An hour or two later, when it’s time to go inside (L could’ve painted all day!), gather all the brushes and throw them into the larger plastic container. Stack up your paint cups and put them in the container too. Now it’s easy to carry everything inside in only one trip! Just rinse your containers out and put them in the dishwasher to clean…and don’t forget to rinse your brushes too! Super easy to clean up…definitely worth the hours of creativity outside! Enjoy!!!

IMG_5273

IMG_5299

Ice Cube Heart Garland

I don’t know why I never thought of this project until now, but an Ice Cube Heart Garland is perfect for this time of year! It takes about 5 minutes to make and costs nearly nothing! If you live up north where temps are below freezing consistently in the winter months, Ice Cube Garlands would be beautiful hanging everywhere! You could make other shapes too! Along with our garland, we also made some individual Ice Cube Hearts (more like ornaments)…the week of Valentine’s Day, the girls and I plan on making dozens of these to hang off of trees all over town. Such a sweet, little heart surprise!

IMG_5107(1)


IMG_5097

Materials needed:

  • silicone heart molds
  • food coloring
  • water
  • string
  • scissors
  • a tray or cardboard that will fit in your freezer


DSC_1008

First, place your silicone heart molds on your tray or cardboard piece. (It’s a tricky mess if you do it after the water is poured, like I did the first time!) Next, put about 10 drops of food coloring into a measuring cup and fill with water.

Pour the water into the heart molds.

DSC_1009

Now, cut a string long enough for your garland and/or some smaller pieces for ornaments. Using your fingers, press the string into the heart molds. Make sure you leave 4-5 inches of string between each heart.

DSC_1011

To make the ornaments, just press both ends of your string into the mold filled with water. The center 2 hearts are ornaments in the pictures above and below. You can see the shorter loops of string.

DSC_1010

Next, place the tray with your heart molds into the freezer for a couple hours until they’re completely frozen.

DSC_1012

Carefully pop your ice cube hearts out of the molds.

IMG_5236

IMG_5235

Now for the fun part…find a place outside to display and enjoy your Icy Hearts! So sweet!

IMG_5106

IMG_5107

Lace Snowflake Bowls & Decorations

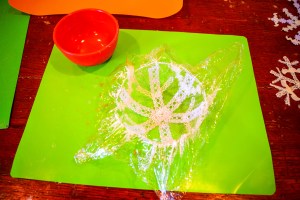
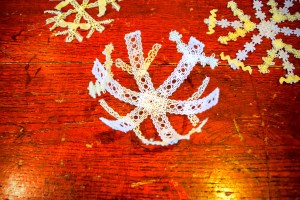
Our LACE SNOWFLAKE BOWLS are one of those crafts that started as one thing, but inspiration hit and they morphed into something even cooler in the process! Originally, L and I were just making lacy snowflakes to hang in a window…which we did! But then it dawned on me that, much like our DIY String Bowls, we could easily turn the snowflakes into bowls as well! These are super-easy to make and it’s fun experimenting with various-sized lace and bowl molds. The finished product makes a whimsical, winter decoration for any windowsill or tabletop. They’d be a lovely centerpiece with candles set inside each snowflake too…so many possibilities!

DSC_1029


DSC_1013


Materials needed:

  • white or cream-colored lace
  • white glue
  • glitter (optional)
  • scissors
  • water
  • craft stick or plastic spoon
  • a cup for mixing
  • silicone mats
  • plastic wrap (not pictured)
  • small bowls (not pictured)

DSC_0969

First, prepare your work station. Have silicone mats out on the table and mix up your glue. Use about 3-4 parts glue to 1 part water. (An old yogurt cup or butter tub is great for holding your mixture.) Add some glitter to the mix as well, if you like!

DSC_0978

DSC_0983

If you’re making a snowflake bowl, cover a small bowl from your kitchen in plastic wrap. (We used measuring bowls.) Pull the wrap tight and smooth it down, though it doesn’t need to be perfect.

Next, get an idea of how you’d like your snowflakes to look. Cut some strips of lace and lay them out, either flat on the table or across your bowl.

DSC_0972

DSC_0974

DSC_0977

When you’re ready to start crafting, dip a strip of lace into the glue mixture. Take it out and run your fingers down the lace to remove any excess glue.

DSC_0984

DSC_0985

DSC_0991

Now, lay the lace strip out…either flat on the silicone mat for a simple snowflake to hang in your window, or across your bowl, if you’re making a lace snowflake bowl.

DSC_0988

DSC_0989

DSC_0992

Continue to dip strips of lace in the glue mixture, then lay them down on top of each other, creating a snowflake pattern.

DSC_0994

DSC_0996

Once your snowflakes are complete, set them aside overnight to dry. If you’re the impatient type, you could also dry them very carefully with a hot blow dryer. : )

DSC_0997

After the glue is good and dry, gently peel the lace snowflake off of the silicone mats. Ready to hang in a window!!!

DSC_0998

DSC_1000

To remove a snowflake from the bowl, turn the bowl upside down. Undo the plastic wrap and remove the bowl. Finally, gently peel the plastic wrap off of the snow flake.

DSC_0999

DSC_1002

DSC_1003

DSC_1004


Beautiful!!!

DSC_1019

Such a fun way to celebrate a snow day!

Cardboard Heart Stamps

How cute are these HEART STAMPS L and I made last week? Nobody would know by looking at the girls’ outfits that the hearts were made with a cardboard tube, but they were! This is such a simple craft, little hands can do the stamping all by themselves. Any imperfections make the final product even sweeter…that’s the sign that they were made with love. : ) After making Valentine’s outfits for the girls, we went on to stamp a pillowcase for L’s bed and some tea towel-dishcloths to give away as gifts. As I often say, the possibilities are endless!

DSC_0950

DSC_0967

DSC_0932

Materials needed:

  • cardboard tubes
  • acrylic paints
  • old lids or plates
  • rubberband
  • placemats or thin cardboard (to protect surfaces)
  • shirts, leggings, tea towels, pillowcase, tablecloth, etc

DSC_0921

DSC_0923

To make your heart stamps, simply squash a cardboard tube in half gently. Then, push one crease inwards to create a heart shape. You can roll a rubber band over the tube to help hold the shape.

DSC_0924

Next, test your stamp out and have your little one practice a bit on paper. Just put the tube end into a little paint, and then, press down on a flat surface.

DSC_0926

DSC_0928

DSC_0929

Make sure whatever you are stamping is nice and flat. Run an iron over any clothes or towels. When stamping shirts or pillowcases, it’s a good idea to put a thin piece of cardboard in-between the clothing’s layers too. That way the paint won’t seep through the cloth and onto the other side.

Finally, stamp away!

DSC_0931

DSC_0932

DSC_0933

We used red paint, glitter paint, and some white paint to make our hearts. Really though, you could use any colors and they’d be just as precious!

DSC_0937

DSC_0945

I love the little sideways, topsy-turvy hearts…simply “falling” in love.

Happy Valentine’s crafting!!!