Glue Ghosts

Did you ever make these “glue ghosts” when you were a kid? They were always one of my favorites! This must be one of the simplest Halloween crafts out there! L and I made extras this year so we’d have plenty to make a ghost garland decoration and to make ghost necklaces.

Materials needed:

  • wax paper
  • Elmer’s glue
  • googlie eyes (or permanent markers)
  • paperclips (optional)
  • needle and thread, string or dental floss

First, spread out a piece of wax paper over your working surface. You may want to do this on a silicone cutting board or a tray so it can be moved. (I had no idea that wax paper was slightly porous…when we did this craft the glue seeped through the wax paper a bit and stuck to our kitchen counter. It was no problem, cause Elmer’s glue washes off easily, but the project was stuck to our counter for a few days while we waited for the ghosts to dry. Ha! Just another beautiful mess!)

Next, have your little one squeeze out blobs of glue into ghost shapes.


Wait a few hours for the glue to dry a bit and then gently press in some googlie eyes. If you don’t have googlie eyes, don’t worry…you can always draw a face on the ghosts after they dry with a permanent marker.


At this point, you can also cut a paperclip and press the wire into the ghosts to make hooks. We experimented with this and I personally like the ghosts better without the paperclip-hooks. Instead, you can just use a needle to poke a hole through the ghosts after they’re dried. It’s up to you though..both methods work great!


Now for the waiting-game…wait 2 or 3 days for the ghosts to dry completely before gently peeling them off the wax paper. If you didn’t use paperclip-hooks, now is the time to use a sewing needle to thread some string or floss through your ghosts.


All done! Super easy, huh? Will you wear your “glue ghosts” on a necklace or hang them up in a doorway this Halloween? Enjoy!!!


DIY Story Stones

This is one of my favorite “games” that I’ve made for our girls, as well as one of my favorite gifts to make for other children. It’s such a versatile, quirky activity for kids (or adults) of any age and the possibilities of play are endless. We take them on long car trips, pull them out when friends are over, and use them during quiet-time when WB is sleeping.


I’ve read before that “story stones” come from the Waldorf school of thought, believing that it is far more important to teach children how to creatively weave a story at a young age than it is to teach them how to read and write. After the directions for making story stones, read on for various ways of how to play with them!


Materials needed:

  • colored pencils and paper
  • sticker book (optional)
  • old workbooks with lots of little pictures (optional)
  • scissors
  • smooth stones (found at the dollar store)
  • Mod Podge and sponge-brush

First, spend some time doodling little pictures on white paper. Think about what pictures would make up a good story…include people and animals, active words, weather, vehicles, houses, etc. Try to keep some of your pictures a little bit vague. For instance, instead of drawing a plate of spaghetti you could draw a fork, knife and spoon and the child playing could imagine any kind of meal. A picture of a foot could lead to putting on socks and shoes or it could be used for walking/running. A swirly doodle could be used for wind, but it could also be used for music, dancing, painting, water, etc.

Next, cut out each of your little doodles. If you don’t want to draw your pictures, or you’d like to use various mediums as I do, you can also cut pictures out of old workbooks or children’s dictionaries, or use a sticker book. I tend to look for such books whenever I’m browsing a flea market, antique store, or the dollar store.

After the pictures are cut out and ready, go ahead and wash and dry your rocks. Working one stone at a time, apply a little bit of Mod Podge to the smoothest surface of the rock then lay a picture in place. Apply more Mod Podge over top of the picture, making sure you smooth down all edges and avoid any wrinkles in the paper. Mod Podge dries pretty quickly. After the stones are all dry, I like to go over them all with another thin layer of Mod Podge to give them an even smoother look.


Once the stones are all dry, you’re ready to play!


(In case you want story stones the really easy way and you live in the Winchester area, Steamy’s Cafe on Piccadilly St currently sells story stones…1 for $1 and 20 for $15! They make great gifts!)

Ideas for Play:

SOLO STORY-BUILDING: Take turns building your own stories.

DICTATING STORIES: This is a good one especially with young children…take turns telling a story, while the other person finds the stones and puts them in order.

PARTNER OR GROUP STORIES: Take turns, picking stones and adding to the story.

RANDOM SELECTION – MYSTERY STORY: Turn all the stones over and take turns randomly selecting a stone to build a story.

ONE STONE STORY: Select only one stone at random and make up a whole story revolving around the stone. Or tell a silly sentence using the stone in the sentence.

CLASSIFYING: Put the stones into groups based on theme, color, likes and dislikes, etc.

EXPLORING: Let your child use the stones while playing with blocks or trucks or coloring or playing house. The stones can become pets, cars, food, etc. If the children are having fun imagining, just let them go with it!

What other ways have you found to play with your story stones? Please share with us in the comments below!

The Buckeye Zoo (and Other Fall Seed Creations)

I just love this time of year! One of my favorite things to do since I was a kid and now with my own kids is collecting the Fall leaves, nuts, and seeds. L says she likes to be a “thing finder” like Pippi Longstocking on our nature walks. This year, as we’ve been foraging, we’ve also begun gluing some of our buckeyes and other nuts and seeds together into animals.

Materials needed:

  • buckeyes
  • acorns
  • helicopter seeds
  • whatever other nuts and seeds you can find
  • feathers
  • twigs
  • glue (I used a hot glue gun, but let L use wood glue.)
  • acrylic paint
  • sealant

Before you start gluing, it’s important to make sure that all your findings are bug-free and that they’re dry. Put a layer of tinfoil on a baking sheet or pan and spread your nuts and seeds out on top. With your oven set to 200 degrees, bake your acorns, walnuts and buckeyes for about 1.5 to 2 hours. Turn the seeds over about every half an hour to prevent burning. With some of the spiky or more delicate seeds, bake them at a lower temperature…around 180 degrees…for an hour or so.

After the seeds are baked and cooled, you can start gluing together your creatures. I prefer using a hot glue gun…it’s quick and holds the buckeyes and other seeds together nicely. I let L glue some of her own with some standard “wood glue” though. It takes longer to dry, but it’s much safer for a 2 year old to use on her own!


The elephant was the first member of our Buckeye Zoo…definitely L’s idea! She looooves elephants!


Here’s a little bunny rabbit…I think tomorrow I’ll make some flop-eared bunnies for a dear friend of mine. So simple, but so cute!


I thought this one was gonna be a porcupine or hedgehog, but L said it looked most like a sheep. I agree!

And I just love this bird. We’ll be making him/her a nest by gluing together twigs later this week.


While most of our creatures were complete after gluing, we chose to paint others…like L’s caterpillar and the turtle and dragonfly we made together.


What Buckeye creatures will you and your kids make this year? We’d love to see your creations shared here in the comment section…there are so many possibilities! Have fun collecting and creating!!!

Playing Monet

Ever since I was a kid and was given the book “Linnea in Monet’s Garden,” Claude Monet has been one of my very favorite painters. When L found my old book last week, I immediately thought of our melted crayon art and thought that we could try to make our own impressionist, water lily artwork. We used a different technique to melt the crayons this time, and we used materials found in the recycling basket for a “canvas.” I was thrilled to be able to teach L a little bit about Monet and his phenomenal paintings…and in such a fun way too!


Materials Needed:

  • empty cereal or cracker box
  • acrylic paints
  • crayons
  • oven

First, I cut the cereal boxes to make nice little “canvases” to paint on. I left the side flaps intact, making the artwork easier to move while working, using the flaps as handles. You can cut them off at the end.

Next, looking at Monet’s painting we talked about what colors to paint the background, representing the water. We chose two colors of green and two of blue to use. I let L paint the cardboard canvas however she pleased, encouraging her to cover the entire thing.


After the paint dried, it was time to create the lily pads and flowers. I made crayon shavings by simply cutting up crayons into little shavings or pieces. You can use a cheese grater if you like, but a sharp knife works just fine! (The crayon shavings pictured here are from another piece of work…hence the orange, yellows and reds. For Monet’s water lilies, I made shaving from three different green crayons, as well as some pinks, yellows and white.)

Now, using one color at a time, L sprinkled the crayon shavings onto her canvas. We started with the greens for the lily pads, putting the shavings into little piles, and followed it with the pink and white for flowers.


Next is the really fun part…melting the crayons, transforming the artwork! With the oven set to 200 degrees F, I lay the cardboard on a cookie sheet and placed it in the oven for 5 minutes. L loved watching the crayons melt!

Once the shavings were all melted, we removed the artwork from the oven to cool. Be very careful not to tilt or shake the artwork at this point…for the first minute or two before the melted crayon cools, it’s very liquid and will drip or move-mix around. After a couple minutes, the crayon is dried and the art ready to show off and display!


I hope you have as much fun with this one as we did! If you have a favorite impressionist painter, other than Monet, I’m sure the melted-crayon technique would work to mimic their work too! Enjoy!

DIY Wind Chimes

I love finding new uses for old things and I’ll take any excuse to peruse an antique store, so making these wind chimes was the perfect project for L and me! Like most of our home decor projects, L couldn’t help with everything, but I let her help where she could…she painted all the keys and picked out all the buttons we used. Your wind chime doesn’t have to include everything ours does, but hopefully it inspires you to make one with things you do have around the house!


 Materials for Wind Chime #1:

  • antique cheese grater
  • old buttons
  • keys
  • an old prism
  • sturdy thread or cord
  • acrylic paint
  • glossy sealant spray

 Materials for Wind Chime #2:

  • antique, silver candy dish
  • old buttons
  • keys
  • an old prism
  • sturdy thread or cord
  • acrylic paint
  • glossy sealant spray

For Wind Chime #1, which we made for my younger brother, I painted an old cheese grater that I had found at an antique store. While I painted the cheese grater, L painted a bunch of old keys. Once the keys dried, we turned them over and painted the other side different colors. After both sides were painted and dried, I sprayed the keys and the cheese grater with a glossy sealant. It gives the items a more finished look and will help them stand up to the weather a little better too.


First, figure out how you’d like your wind chime to hang…for instance Wind Chime #1 was hung on a slight angle, so the painting was visible. Wind Chime #2 was an antique candy dish hung upside-down. Hang the wind chime between two chairs while you work on it. This makes fastening all your keys and buttons soooo much easier!

To assemble the wind chime, we first laid out all the materials we had on hand…buttons, keys, old thread spools, and prisms. From here we decided what we wanted the wind chime to look like and started piecing it all together. It’s a great opportunity to talk about patterns with your little ones!

After everything was strung-up and fastened the way we liked it, I put a spot of crazy-glue on each knot and cut the extra strings. Now for the fun part…ready to wrap it up and give it away as a gift or find the perfect spot for your wind chime to hang! What will your wind chime look like?


Baking Soda and Vinegar Color Fun

This is by far our favorite science experiment these days at Our Beautifully Messy House. It’s incredibly simple and quick to put together and L loves it! Whenever she has a friend over and there’s a lull in the action, I usually pull this one out to keep the hooligans entertained.

IMAGE_1627

IMAGE_1625

Materials needed:

  • food coloring
  • baking soda
  • vinegar
  • medium-sized container
  • cup
  • medicine dropper

IMAGE_1628

First, put some drops of food coloring around the bottom of the container. Remember that the colors will eventually mix, so place the colors accordingly.

Next, pour some baking soda over the little, food-coloring puddles until the colors are completely hidden.


Now, pour some vinegar into a small cup. This is a great place to stop and talk a little bit about the science behind this fun and fizzy experiment. Even though L is only 2 years old, we still talk about how it’s an acid-base reaction that causes the fizzing. She loves tasting the baking soda and talking about how it’s salty versus the vinegar that smells and tastes sour. (Bottom picture is after tasting the salty baking soda.)


Now for the fun part! Using the medicine dropper, squirt vinegar onto the baking soda mounds and watch the concoction fizz while the colors appear and mix together. It should continue fizzing as long as baking soda is visible and your child continues to squirt vinegar into the container.


Not only is this experiment easy to put together, but clean-up is a cinch too! Just dump the mixture down the drain and toss the cup and container into the dishwasher. The vinegar-baking soda concoction will help clean your sink too…an added bonus! I hope your kids love this one as much as mine do! Enjoy!

Clothespin Butterflies

These clothespin butterflies are fun to make and can be clipped just about anywhere! L and I started this craft on a whim a couple weeks ago, we were trying to make butterflies with things we already had. Hopefully you have all the materials hiding around your house too! You could use paint or markers to color the clothespins. Using markers, the butterflies could be finished in one morning. We chose to paint ours…L loves to paint and I like when projects can be stretched out, keeping us busy for a few days.

Materials needed:

  • clothespins
  • paint or markers
  • pipe cleaners
  • beads
  • hot glue gun and glue

First, paint the clothespins. We painted one side, let them dry, then painted the other. I helped with the touch-ups…filling in any little spots that were missed. Let the kids have fun with it! L was happy painting hers all sorts of colors…there’s no right or wrong way.


Next, choose the color pipe cleaners you want to use for wings and the color beads. We used three colors of beads for the wings. This was a great learning activity to teach little ones about patterns! L strung the beads on the pipe cleaners, repeating our 3-bead pattern 4 times for each wing.


Spread the beads out a little bit, so the color of the pipe-cleaner can be seen. Next, loop one end of the pipe cleaner around to the middle of the pipe cleaner and wrap it once or twice, leaving about half an inch of the end sticking out. Repeat with the other side of the pipe cleaner, forming a figure-8 butterfly wing shape. Twist both half-inch ends together. (This step is much easier to see in the pictures than to explain!) Repeat for the second wing.


To make the butterfly’s antennas, cut a pipe cleaner in half. Then, bend that piece in half. Put a bead on each end of the antenna and curl it down a bit.


After you’ve shaped both butterfly wings and the antennas, it’s time to glue them to the clothespin. Using the hot glue gun, put a little bit of glue on the inside ridge of the clip and quickly press the middle of the antennas in place.


Next, put a bit of glue inside the wire coil and push one of the wings in. Repeat the same on the other side, only put the glue above the wire coil and slide the wing in place.


Cute, right? These would be beautiful hanging in a window with the sun lighting-up the beads! We’re making something special for WB’s room with ours…I can’t wait to show you next week! Enjoy!

DIY Melted Crayon Art with Variations

This was the perfect “rainy day craft” for today…fun for me and for L! I’m so excited about these melted crayon creations, I can’t wait to make more! Let’s jump right in…


Materials needed:

  • white canvas
  • crayons
  • hot glue gun and glue
  • cardboard box
  • hair blowdryer

Although there’s definitely some unpredictability in this project, you first need to plan it out a bit. Start with picking out your colors.


After deciding where your crayons will go, use the hot glue gun to attach them to the canvas.


Next, place the canvas in a cardboard box. The box will keep your work area clean, catching the crayon splatter.

Prop the box up against a chair, table, or wall. Make sure the crayons are facing down (if you want a dripping effect) and that the box and canvas are on a little bit of an incline.


Next for the fun part, use the hair dryer to melt the crayons and blow the wax around. I let L do most of the rainbow picture. Turned out pretty awesome, huh!?


Now, display your work in whichever direction you please. I think a ribbon pinned or glued around the outside edges of the canvas would give it a nice, finished look!

Variations:

Wildflowers

To make the wildflower piece, I used mostly greens and browns. After I was done melting the crayons and the wax had time to cool down, I used the hot glue gun to attach flowers. Do this step carefully, so no glue shows! It works best to glue the flowers on spots without any wax.


Wild Splatter

I experimented with this one a bit, trying to plan for some future creations. I kept the box flat to the ground and used broken crayon pieces. To hold the crayons in place while melting them, I used a fork and smudged them around a bit. The outcome was a little funky…next time I’ll use smaller crayon pieces and maybe some crayon shavings instead.


I’m hoping to make a vibrant, Autumn tree next! I’ll be sure to update the blog and add those pictures as well, so check back soon!!! What “melted crayon art” will you make???


Stick Shapes Game

Do your kids do this? Lately L makes shapes and pictures with everything stick-like…markers, crayons, toothpicks, straws, hot glue gun sticks, chopsticks, everything! It’s a great learning activity though and can be a lot of fun! It’s also something you all can play anywhere at any time…think restaurant, waiting forever for dinner to come…


Materials:

  • markers (or anything stick-like)

L always initiates this game, usually by making triangles and squares.

We do some letters.

Make some snakes…be careful, this one bites!


Sometimes I tell L which shape to build. Other times we can take turns building shapes, having the other person guess what it is. I made this one and L proclaimed, “Like a stop sign!”


And still, other times we make pictures and shapes together.

You can also practice colors and counting with this game too. It’s so simple, yet so much fun for a two year old or older! Sometimes simple really is best. What little games like this does your family play?

DIY Baby Play Area + DIY Baby Toys

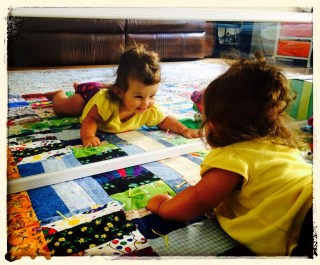
Over the past few weeks I had been thinking of putting together a little play area for WB, now 7 months old. WB is definitely our laid back kid, compared to her wild-child, older sister. She is perfectly content sitting back and observing the world around her. WB can roll over and push herself up on her belly, but she doesn’t do it very often…so I thought a little play area may be fun and may encourage her to move around a little more. And boy was I right…she LOVES it! When I saw some long mirrors for a good deal at Lowe’s last week, inspiration struck and WB’s play area was put in motion!

Materials Needed:

  • comfy, colorful blanket
  • long mirror
  • 2 med-sized boxes
  • 6 to 8 bricks (or other heavy items)
  • colored paper
  • tape or glue


To hold the mirror in place, in a safe and sturdy way, I decided to fill a couple boxes with bricks. (We just happen to have a pile of them sitting outside of our house, leftover from a patio project.) You can also use heavy rocks, bags of sand, or whatever is most convenient for you! Brighten-up a plain cardboard box by taping colored paper to it. I originally planned to cover the diaper-box I was using as well, but then I remembered how much babies like other smiling babies and kids, so I only partially covered it. The box was colorful already too!


Other things you can put in or near your baby’s play area include:

Sensory Bags (DIY link here.)

Sensory Bottles for Baby (link here.)

Sparkle Bottles (link here.)

Plush Animals and Toys (DIY bunny link here.)


Colorful Garland…I put this feather one up above for WB to look at while on her back. I love how the feathers gently “dance” continuously. (DIY feather garland link here!)


What will you include in your baby’s play area??? As always, never leave your children unattended and make sure all toys you put in the play area are baby-safe! Have fun watching your little ones explore!