Celery-Rose Print Shirts

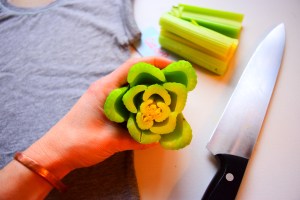
If you’re a frequent reader of the blog, you know how much I love printing with the girls…citrus prints, finger prints, leaf prints, cardboard tube-heart prints, and now celery prints! They’re the perfect replica of a rose flower! Like most of our printing projects, the girls and I put these on shirts today so they can wear their art everywhere we go. You could also make a beautiful table cloth, tea towels, or pillow cases with this celery-rose print craft.


Materials needed:

  • celery
  • knife
  • t-shirts
  • acrylic paints (red, pink, and green)
  • paper plate or plastic lid
  • thin cardboard piece


First, place a thin piece of cardboard inside the shirt you will print. A cereal box flattened out works great…just something to protect the backside of the shirt from any paint that may soak through.


Cut the celery straight across, down towards the bottom of the celery stalks where they all come together. Don’t worry if it doesn’t resemble a perfect rose. First, roses aren’t perfect either…they have beautiful and unique imperfections just like people do. And second, you can add a green leaf detail at the end that will round the flowers out.


Next, put your red and pink paint on a plastic lid or paper plate to use as your palette. Press the celery into the paint and swirl it around a bit to get the paint on all stalks.


Carefully, press the celery onto the shirt and lift up. Voilà! Continue this process until you have all the flowers you want.


The last step is to add a little bit of green. Take one of the celery stalks that was cut off and simply stamp it into some green paint. Press it sparingly around the flowers to round them out and make the appearance of leaves.


Beautiful!!! This craft makes beautiful Valentine’s Day gifts, but would be perfect for any flower-loving friend anytime of the year. Enjoy!!!


Homemade Stovetop Potpourri

As I’m writing this our house smells like….you guessed it…Christmas!!! Stovetop potpourris seem to be the “in” thing these days, replacing seasonal candles and old school potpourri, and I am totally on board! Basically you gather a handful of ingredients, put them in a saucepan with water to simmer, and enjoy the fresh, seasonal smells that perfume your entire house. What I’ve done here is taken our favorite stovetop potpourri and preserved it using our food dehydrator. Then we jarred individual portions to give as gifts and to keep on hand during the holidays. Now whenever we’re in the mood, we put a pot of water on to simmer, add our homemade potpourri and enjoy the smells of Christmas!

Ingredients:

  • 4-5 apple slices
  • 4-5 orange slices
  • 2 lemon slices
  • 1 small handful of dried cranberries
  • 1 cinnamon stick
  • 1 whole nutmeg
  • a pinch of whole cloves (~10 cloves)

To dehydrate the apple, orange, and lemon slices, you’ll want to cut them very thin…especially the citrus. (.5 cm or less) Expect the fruit to take up to 12 hours to dry completely. Check them often.

After the fruit is dehydrated, add it to a jar with the other ingredients.

Add a tag with instructions for your friends, and your gift is set! Such a sweet gift for teachers and neighbors!

Be sure to make lots of extra to use in your own home over the holidays! Enjoy!!!

Fall Leaf Mason Jar Lanterns

I don’t ever seem to get enough of mason jar crafts…whether it’s a fairy house, a pumpkin lantern, or this week’s project…these festive FALL MASON JAR LANTERNS! The great thing about this project is that it’s very hard to mess the jars up and there are a few variations to try. I made these this morning with a group of ladies at L’s new school…each lady’s lantern was unique and beautiful. One lady mixed gold paint with every color, some overlapped the leaf prints, while others put just a couple prints on each jar. There’s plenty of creative freedom with this project! The jars shine brilliantly as lanterns, but you could also use them as a vessel for your No-Bake Acorn Treats or even arrange an Autumn flower bouquet in one, using it as a vase.

dsc_0499

Materials needed:

  • jars
  • acrylic paints and brushes
  • small-med fall leaves
  • tea light
  • dried rice, beans, corn, coffee beans

dsc_04751

First, prep your work space with cardboard, wax paper, or old newspapers.

Next, paint the underside of a leaf with a fall color or combination of 2 or 3. (Red, orange, yellow, green, brown, gold)

dsc_0483

Carefully press the painted leaf onto the surface of the jar and smooth down all the edges.

dsc_0486

Peel the leaf off gently to reveal your painted-leaf print. If your first print doesn’t look exactly as you thought it would, no worries…as you add more prints, any blips or irregularities will be hidden.

dsc_0487

dsc_0488

A variation to this, is doing quite the opposite. Hold a clean leaf on the surface of the jar and paint around the edges. You can then paint the entire jar, leaving a little leaf window for the light to shine out. I originally thought this would look great with a solid color of gold…didn’t turn out as I planned, so I ended up dabbing all the fall colors all over the jar and it turned out beautifully! A beautiful oops! If something doesn’t turn out how you imagined, try something new and you may be surprised what you come up with!

dsc_0476

dsc_0477

dsc_0478

dsc_0481

Arranged on a tabletop with mini-pumpkins, gourds, leaves, acorns, or flower petals, you’ll have a festive centerpiece for your Thanksgiving meal! Instead of just placing a tea light in each jar, first add small layer of dried beans, rice, corn, or coffee beans. This will bring the light up to the little “window” you have created in the jar and make it look more complete. Enjoy!

dsc_0493

dsc_0501

Mini-Canvas Magnets

MINI-CANVAS MAGNETS are not only a fun project for kids (and adults!) of all ages, but they also make sweet, little gifts for friends, grandparents, and teachers! I’ve founded mini-canvases at Michael’s on numerous occasions…usually on the ends of the acrylic paint aisle.

dsc_0327

dsc_0339


Materials needed:

  • mini-canvases
  • acrylic paints & brushes
  • thin magnet strips

img_5625

First, paint your mini-canvases. The canvases are so small, little hands have no problem filling the space with a rainbow of colors. Best to give the kids 2-3 colors to use at a time. You may even want to paint a few!

img_5638

img_5636

img_5668

After the paint dries, flip the canvases over and attach magnet strips. You can find an array of magnets at craft stores with an adhesive tape on one side. Best to choose thin magnets, so the canvases lie close to the fridge.

dsc_0330

dsc_0331

Now, time to gift and/or display your mini-masterpieces! So cute…and easy!!! Enjoy!

dsc_0341

dsc_0339


DIY Bird Nesting Kit

The “DIY Bird Nesting Kit” is the perfect project for little hands and little helpers! L and I made three kits this week: two gifts and one to hang in our own backyard, next to our DIY Tin Can Bird Feeder. It took less than a day for our feathered-friends to find it and start picking away, flying bits of string home to cozy-up their nests! The DIY Bird Nesting Kit costs only $2.50 to make (I’m not kidding!) and it’s a wonderful project to help teach kids about giving, sharing, and caring for the world around us….aaand about birds and the various types of nests they make of course!

DSC_1062

Before making our Bird Nesting Kits, the girls and I read “Mama Built a Little Nest” by Jennifer Ward and Steven Jenkins. It is fascinating book with beautiful, collage-like illustrations, depicting all kinds of birds, their families, and the homes they build. (It’s best to read in a pile of beach towels, swirled around on the floor into your own nest.) I highly recommend it!

IMG_5479

Materials needed:

  • Wired bird suet holder
  • yarn scraps
  • scissors
  • ruler (optional)

DSC_1036

First, have your little one cut the yarn scraps up into pieces about 3-5 inches long. You don’t have to measure them, but your little one might want to with the ruler!

DSC_1042

DSC_1044

After you have a nice pile of yarn pieces, it’s time to stuff them into the suet holder. Then, close the suet holder up and it’s all done. It’s that easy!

DSC_1048

DSC_1049

DSC_1050

Now, time to find the perfect place outside to hang your Bird Nesting Kit…someplace where the birds will find it and you can spy them doing so is best!

DSC_1054

IMG_5468

If you’re giving your Bird Nesting Kit away as a gift, you may want to include a little card inside explaining what it is. Your friends will be sure to love such a colorful, quirky, and fun gift! Enjoy!!!

DSC_1065

Ice Cube Heart Garland

I don’t know why I never thought of this project until now, but an Ice Cube Heart Garland is perfect for this time of year! It takes about 5 minutes to make and costs nearly nothing! If you live up north where temps are below freezing consistently in the winter months, Ice Cube Garlands would be beautiful hanging everywhere! You could make other shapes too! Along with our garland, we also made some individual Ice Cube Hearts (more like ornaments)…the week of Valentine’s Day, the girls and I plan on making dozens of these to hang off of trees all over town. Such a sweet, little heart surprise!

IMG_5107(1)


IMG_5097

Materials needed:

  • silicone heart molds
  • food coloring
  • water
  • string
  • scissors
  • a tray or cardboard that will fit in your freezer


DSC_1008

First, place your silicone heart molds on your tray or cardboard piece. (It’s a tricky mess if you do it after the water is poured, like I did the first time!) Next, put about 10 drops of food coloring into a measuring cup and fill with water.

Pour the water into the heart molds.

DSC_1009

Now, cut a string long enough for your garland and/or some smaller pieces for ornaments. Using your fingers, press the string into the heart molds. Make sure you leave 4-5 inches of string between each heart.

DSC_1011

To make the ornaments, just press both ends of your string into the mold filled with water. The center 2 hearts are ornaments in the pictures above and below. You can see the shorter loops of string.

DSC_1010

Next, place the tray with your heart molds into the freezer for a couple hours until they’re completely frozen.

DSC_1012

Carefully pop your ice cube hearts out of the molds.

IMG_5236

IMG_5235

Now for the fun part…find a place outside to display and enjoy your Icy Hearts! So sweet!

IMG_5106

IMG_5107

Lace Snowflake Bowls & Decorations

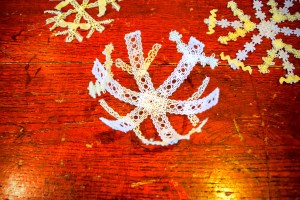
Our LACE SNOWFLAKE BOWLS are one of those crafts that started as one thing, but inspiration hit and they morphed into something even cooler in the process! Originally, L and I were just making lacy snowflakes to hang in a window…which we did! But then it dawned on me that, much like our DIY String Bowls, we could easily turn the snowflakes into bowls as well! These are super-easy to make and it’s fun experimenting with various-sized lace and bowl molds. The finished product makes a whimsical, winter decoration for any windowsill or tabletop. They’d be a lovely centerpiece with candles set inside each snowflake too…so many possibilities!

DSC_1029


DSC_1013


Materials needed:

  • white or cream-colored lace
  • white glue
  • glitter (optional)
  • scissors
  • water
  • craft stick or plastic spoon
  • a cup for mixing
  • silicone mats
  • plastic wrap (not pictured)
  • small bowls (not pictured)

DSC_0969

First, prepare your work station. Have silicone mats out on the table and mix up your glue. Use about 3-4 parts glue to 1 part water. (An old yogurt cup or butter tub is great for holding your mixture.) Add some glitter to the mix as well, if you like!

DSC_0978

DSC_0983

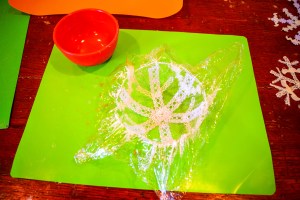
If you’re making a snowflake bowl, cover a small bowl from your kitchen in plastic wrap. (We used measuring bowls.) Pull the wrap tight and smooth it down, though it doesn’t need to be perfect.

Next, get an idea of how you’d like your snowflakes to look. Cut some strips of lace and lay them out, either flat on the table or across your bowl.

DSC_0972

DSC_0974

DSC_0977

When you’re ready to start crafting, dip a strip of lace into the glue mixture. Take it out and run your fingers down the lace to remove any excess glue.

DSC_0984

DSC_0985

DSC_0991

Now, lay the lace strip out…either flat on the silicone mat for a simple snowflake to hang in your window, or across your bowl, if you’re making a lace snowflake bowl.

DSC_0988

DSC_0989

DSC_0992

Continue to dip strips of lace in the glue mixture, then lay them down on top of each other, creating a snowflake pattern.

DSC_0994

DSC_0996

Once your snowflakes are complete, set them aside overnight to dry. If you’re the impatient type, you could also dry them very carefully with a hot blow dryer. : )

DSC_0997

After the glue is good and dry, gently peel the lace snowflake off of the silicone mats. Ready to hang in a window!!!

DSC_0998

DSC_1000

To remove a snowflake from the bowl, turn the bowl upside down. Undo the plastic wrap and remove the bowl. Finally, gently peel the plastic wrap off of the snow flake.

DSC_0999

DSC_1002

DSC_1003

DSC_1004


Beautiful!!!

DSC_1019

Such a fun way to celebrate a snow day!

Cardboard Heart Stamps

How cute are these HEART STAMPS L and I made last week? Nobody would know by looking at the girls’ outfits that the hearts were made with a cardboard tube, but they were! This is such a simple craft, little hands can do the stamping all by themselves. Any imperfections make the final product even sweeter…that’s the sign that they were made with love. : ) After making Valentine’s outfits for the girls, we went on to stamp a pillowcase for L’s bed and some tea towel-dishcloths to give away as gifts. As I often say, the possibilities are endless!

DSC_0950

DSC_0967

DSC_0932

Materials needed:

  • cardboard tubes
  • acrylic paints
  • old lids or plates
  • rubberband
  • placemats or thin cardboard (to protect surfaces)
  • shirts, leggings, tea towels, pillowcase, tablecloth, etc

DSC_0921

DSC_0923

To make your heart stamps, simply squash a cardboard tube in half gently. Then, push one crease inwards to create a heart shape. You can roll a rubber band over the tube to help hold the shape.

DSC_0924

Next, test your stamp out and have your little one practice a bit on paper. Just put the tube end into a little paint, and then, press down on a flat surface.

DSC_0926

DSC_0928

DSC_0929

Make sure whatever you are stamping is nice and flat. Run an iron over any clothes or towels. When stamping shirts or pillowcases, it’s a good idea to put a thin piece of cardboard in-between the clothing’s layers too. That way the paint won’t seep through the cloth and onto the other side.

Finally, stamp away!

DSC_0931

DSC_0932

DSC_0933

We used red paint, glitter paint, and some white paint to make our hearts. Really though, you could use any colors and they’d be just as precious!

DSC_0937

DSC_0945

I love the little sideways, topsy-turvy hearts…simply “falling” in love.

Happy Valentine’s crafting!!!

Hidden Fairy Bath Bombs

Have you ever bought bath bombs for yourself or for your kids? Bath bombs were originally intended for adults to use in the bath…their scents make the water smell wonderful and many times the bath bombs contain epsom salts to soften and refresh your skin. The thing that many people don’t know is that kids LOVE them too!!! The fizzy, bubbly, sizzling chemical reaction is just too cool! In the past, we’ve bought bath bombs and given them to our girls in their stockings at Christmas or for their birthdays…but now, we’ll never buy them again! These bath bombs are so quick and easy to make and there’s a surprise hidden inside each one! I found inspiration for this DIY on a fellow blogger’s site; she makes “Hidden Train Bath Bombs” for her little boys…adorable and genius!

DSC_0574

Materials needed:

  • 2 cups baking soda
  • 1 cup citric acid
  • food coloring
  • essential oil
  • water in a spray bottle (not pictured)
  • plastic fairies (flowers, dinosaurs, cars…)
  • silicone molds or a muffin tin

DSC_0547

First, mix two cups of baking soda and 1 cup of citric acid together in a large bowl.

DSC_0548

Next, add about 10-15 drops of food coloring and some essential oil, and mix. You can add more coloring and oil to suit your preference. I used a “sweet orange” oil and yellow food coloring. Even though the bath bombs themselves were not super-vibrant in color, the bath water certainly was! The kids loved it!

DSC_0553


Now, spray your mixture with water and mix quickly! I would give our mixture about 3 squirts, mix, then repeat. The baking soda and citric acid will start to fizz a bit, but once you mix, it will stop. Repeat this process until the mixture clumps together like breadcrumbs.

DSC_0554

Spoon the mixture into your silicone molds. Fill about halfway and pack it down firmly with your hands.

DSC_0555

DSC_0557

Now, add your fairies. We added a silk flower to one of ours as well.

DSC_0560

Fill the molds the rest of the way with the baking soda-citric acid mixture and pack it down firmly. Once the bath bombs set, they will expand. The next time I make bath bombs, I may not fill them all the way up to the top…or I may do so purposely and make them look like frosted cupcakes!

DSC_0563

DSC_0564

Let your bath bombs set up for a few hours until they are hard. (Can you believe how ours expanded and “grew”!?!) Flip the bath bombs over and gently pop them out of the molds.

DSC_0565

DSC_0566

Now for the fun part, surprise your kids with the bath bombs! The chemical reaction is just so cool!!!

DSC_0576

DSC_0586

They will be doubly-surprised to find fairies hidden inside!

DSC_0582

The walls, tile and bathtub in our bathroom are all white…the bath water was so, so yellow the whole bathroom glowed!!!

DSC_0601

DSC_0584

DSC_0603

This recipe can easily make 7-8 bath bombs…plenty for you and a friend! Enjoy!!!


Candy Corn Candles

I was so excited when I saw some “candy corn candles” online the other day, I couldn’t wait to make them! The candles were so cute, but when I read the tutorial, I discovered that they were just white candles painted to look like candy corn! What a disappointment! I figured, “How hard could it be to actually make CANDY CORN CANDLES?” And so I did just that! I’ve made all types of candles before and each time is an experiment. They are a lot of fun to play around with! Give yourself some time and patience when you’re making candles…they are definitely worth it! These candy corn candles may be my favorite yet! They’re seasonal and adorable! My suggestion is to make a few at a time…one for you to keep and a couple to give away as gifts!

DSC_0442

Materials needed:

  • large pot with 1-2 in. water inside
  • metal pouring-pot or large metal can
  • paraffin wax
  • crayons (yellow, orange and white)
  • mason jars
  • primed wicks
  • pencils
  • paper towels
  • wax paper (to protect your counter top)
  • wooden skewer or stick
  • candle thermometer

DSC_0388

First, place your metal pouring pot (or large can) into the large pot of water. Place 2-3 blocks of paraffin wax into the pouring pot. Turn the stove on high, bringing the water to a boil, then turn it down a bit so the water doesn’t boil over.

DSC_0390

As your wax melts, peel the paper off of two orange crayons. The easiest way to do this is to carefully slice the paper down the side with a sharp knife.

DSC_0410

If you have a candle thermometer, continue to heat the wax until it reaches 180 degrees. Usually once all the wax is melted it is at or near 180 degrees. Now, add the two orange crayons. Using a wooden skewer or a stick, mix the color and wax together.

DSC_0396

DSC_0400

Carefully pour the orange wax into your three mason jars. If you have any excess wax, you can pour it into a disposable bread pan and save the wax for later. (I poured mine into a cheap coffee mug and made an additional candle in a mug!)

DSC_0412

The next step is a little tricky, but take your time…wax doesn’t harden immediately, so relax and stay calm! Place your candle wick into the middle of the candle and wrap the extended portion around a pencil. Lay the pencil across the jar to keep the wick in place. You may have to move the pencil around a bit to get the wick right where you want it. Sometimes the wick likes to move within the first few minutes, so keep an eye on it!

DSC_0414

Let the wax set for at least 30 min to an hour, but not much more. While you’re waiting, reheat the few drops of wax that remain in the pouring pot and, careful not to burn yourself, wipe the pot out with a paper towel.

After the wax has set, it’s time to do the exact same thing, but this time making yellow candle wax! Heat the paraffin wax in the pouring pot or large can. After it melts, throw in two yellow crayons. Mix the wax with the other end of your wooden skewer. Carefully pour the wax into your three jars. Let it set 30 min to an hour and wipe out your pouring pot.

DSC_0416

And last, but not least…time to do the same with the white wax. If your paraffin is semi-translucent before it melts, I’d add a white crayon or two. Some paraffin wax that is designed specifically for candle-making is very white to begin with…you don’t have to add any crayons to this type.

DSC_0418

Now, let your candles set for a few hours! Sometimes when making candles a little well develops around the wick as it sets. If this happens, melt some more white wax and carefully pour it into the well to top it off. For the first time in making candles myself, this didn’t happen with my candy corn candles! Once set, the tops were just as flat as when I poured the wax in. Trim the wicks down to about half an inch. Enjoy!!!

DSC_0443

Some tips I learned the hard way:

  • You definitely need at least 2 crayons to color the wax. When the wax sets, the color will appear much lighter than it looks when poured. If the orange color appears too light for your taste, you can carefully place the jar into hot or boiling water to re-melt the wax and stir in another crayon piece. Best to avoid this step altogether though, and put enough color in at the start!
  • When making these layered, candy corn candles, let the wax set for an hour in-between pouring layers, but not much more! When I made these, I poured the orange and yellow wax at night and then I waited til morning to add the final, white layer. I totally forgot that the wax can shrink a bit when it completely sets, causing it to separate from the jar a little. When I went to pour the white wax onto the top, in two of my candles the white wax seeped down the edges, covering up the yellow a little bit. Oops! So let the wax set, but not for over an hour before adding the next layer!


DSC_0441


Enjoy this adorable craft! They are just too cute!