Homemade Sugar Skulls

Sugar Skulls aren’t a typical Halloween craft and that’s because they’re not one! Calaveras de azúcar,  as they are pronounced in Spanish, are a sweet decoration originating from the Latino celebration los días de los muertos or “The Days of the Dead.” Celebrated from October 31 until November 2, many Latinos remember their loved ones who have passed by setting up altars, having late-night parades through the streets and picnics in the cemetery. It is an extremely colorful and lively time of the year, sharing memories of their antepasados. A Day of the Dead altar is not complete without sugar skulls, and what better way to show your love than making your own!


DSC_0381


I first made SUGAR SKULLS years ago when I taught Spanish at a local elementary and middle school. My students couldn’t wait until they were in 6th grade and got to make them with me! The hardest thing to find for this craft will be the skull molds, but I have seen them at craft stores this time of year…both at Hobby Lobby and at Michael’s. Meringue powder is easy to find at craft stores as well!

Materials needed:

  • plastic skull molds
  • mixing bowl and spoon
  • 2 cups granulated sugar
  • 2 teaspoons meringue powder
  • 2 teaspoons water
  • paper plates, silicone mats, cutting board
  • gel food coloring/icing
  • toothpicks
  • sequins


DSC_0325


First, mix the dry ingredients together in the bowl. Sprinkle in the water and continue to mix until the sugar is completely moistened and becomes the consistency of wet sand.


DSC_0328


Scoop some of the mixture into the mold and pack it evenly and firmly. Scrape off any excess.


DSC_0329

DSC_0342

DSC_0333


Next, place a small silicon mat or paper plate over the mold. Carefully flip the mold over.


DSC_0334


If you want to keep it on a paper plate, just carefully lift the mold. Otherwise, gently remove the silicon mat and lift the mold, leaving the skulls on a cutting board until they set up! Let the skulls dry and harden for 24 hours.


DSC_0335

DSC_0336

DSC_0338


After the skulls have hardened completely, it’s time for the fun part…decorating! I used a plastic lid as a palate for L, and squirted a bit of every color out for her to use. Then she used toothpicks to decorate her skulls. The more colorful, the more beautiful!


DSC_0344

DSC_0348

DSC_0354


Flowers play a big part in the Days of the Dead celebrations, so I was sure to add some to our skulls as well!


DSC_0363

DSC_0365


DSC_0374


Now for the question you are all wondering: Can you eat the sugar skulls? Technically, yes. But even with my 6th graders, they realized that it’s basically a rock of sugar and nobody tried eating them. If you keep your skulls in a safe place, the same ones will last for years! My dad has some that I made at least 7 or 8 years ago…he pulls them out as decorations every Halloween! Check out your local library for some beautifully illustrated books on The Days of Dead!


DSC_0376


Pumpkin Jar Craft

I am so excited that October is finally here and we can start doing some Halloween crafts around our house! This PUMPKIN JAR CRAFT was inspired by the Jam Jar Fairy Houses we made last Spring. It’s a very similar concept! While many people think hot glue guns are just for gluing things together, we like to use them to add texture to our crafts as well. The hot glue gives our pumpkin jars a true, warty pumpkin appearance! I love the way they look with and without jack-o-lantern faces, in the day and at night! Too cute!!!


2015-10-01 20.22.19


Materials needed:

  • jars, various sizes
  • hot glue gun and glue
  • acrylic paint
  • green, glitter spray paint
  • battery-operated tea lights


DSC_0106


First, decide whether or not you’d like jack-o-lantern faces on your jars. I really liked our mixed…two with, one without. If you’re putting a face on your jar, carefully do that first with the hot glue gun. One great thing about hot glue gun glue: if you make a mistake, simply let the glue cool completely, then peel it off and start again!


DSC_0108


Next, fill in the spaces and go around the jar with long, vertical stripes of hot glue. It certainly doesn’t need to be perfect…no two pumpkins are ever alike!


DSC_0111


After the glue has cooled completely, paint the inside of the jar yellow, where the face shines through.


DSC_0157

DSC_0161


Now, paint the exterior of the jar orange. We painted ours with a mix of yellow and orange to give the pumpkins varying hues. Be careful around the face!


DSC_0162

DSC_0164

DSC_0175


The pumpkins without jack-o-lantern faces are perfect for your littles to paint!


DSC_0167

DSC_0171


As the jars dry, spray your lids with glittery, green spray paint. Do this outside or in a well-ventilated area. If you don’t have spray paint, green acrylics would work fine too!


DSC_0179


After the lids have dried, screw them on top your jars and your pumpkin jars are complete! Now for the fun part…find a place to display your pumpkins for everyone to enjoy! At nighttime, place a battery-operated tea light inside each jar to bring your pumpkins to life!


DSC_0224

DSC_0190

DSC_0192


Are they cute or what? Enjoy!!!

DIY Citrus Stamps

How cute are these DIY CITRUS STAMPS we made this week? They really were simple to make and the outcome is adorable…perfect for Summer! L and I stamped t-shirts, tea towels, and a pillow case for her bed. Just think of the possibilities… You could use this stamping technique to brighten-up party invitations, gift bags, skirts, shorts, a tablecloth, shower curtain…the possibilities are endless (and sweet)!


Materials needed:

  • an orange, lemon, & lime
  • tea towels, t-shirts, etc.
  • knife
  • acrylic or fabric paints
  • flat, plastic lids or plates
  • paper towels
  • parchment paper

If you need to, iron your tea towels or t-shirts first! Protect your work area with parchment paper. (Usually I use cardboard or old newspapers for projects, but with this one I didn’t want the texture of the cardboard to effect the stamping and I didn’t want newspaper to discolor my cloth. Parchment paper was perfect!)

Next, cut your orange, lemon and lime in half with a sharp knife. If you like to, cut a little “handle” in each fruit half…makes stamping easier, especially for kids!


Turn the fruit over onto a paper towel, to soak up some of the juice from the fruits.

Next, squirt your paints onto plastic lids or plates.

Dip the sliced fruit into the paint. Blot it onto a paper towel, if there appears to be too much paint.


And press the fruit gently onto your cloth. Too easy, right!?


We experimented and made some of our tea towels patterned, while others we stamped randomly. The random was definitely our favorite…a little more carefree, like all things “summer” should be!

If you have some prints that are more solid looking (a bit too much paint), don’t fret…just overlap another fruit in another color on top! It will look like you planned it that way all along!


Instead of stamping an entire tablecloth, you can just stamp tea towels and overlap them as we did here. Looks great on their own or with a solid tablecloth underneath!

Too cute, huh!?! Enjoy!!!


Fairy Doors and Gnome Doors (#2)

After making a fairy door out of sticks and hiding it in our neighbor’s garden last Summer, L and I thought we’d spread the fairy love a little farther this year…we’ve been making FAIRY DOORS and GNOME DOORS and hiding them all around town! It’s so much fun surprising the young and the old — just imagine the look on anyone’s face when they’re out in the garden and suddenly discover a teeny, tiny door that wasn’t there before. Ha! These fairy doors are so simple to make and all you need is rocks, paint and clear sealant (which is optional). To draw a little more attention to the fairy doors, we like to leave a tiny button or painted rock trail as well.


Materials needed:

  • medium-sized rocks
  • acrylic paints
  • clear sealant spray (optional)

After cleaning any dirt off your rock, start by painting on a door.

Next, add some windows, if you have room.

If adding any glitter paint, apply that next. We like to paint a little glitter over our windows.

Next, outline the door and windows carefully with black paint. Add a doorknob as well.


Now for my favorite part, paint connecting black lines on the rock, resembling a stone wall.

If you’d like to add a flower pot or lil window box, add one now.

Finally, finish with some green vines, leaves, and flower details.


Once all your paint is dry, you can spray the rocks with a coat of clear sealant to make the fairy doors even more weather resistant. Permanent paint usually doesn’t wash away, but I always like to add a coat of sealant just in case.

Now for the real fun…time to hide your fairy doors and gnome doors. (Gnome doors go on trees, generally speaking.)


I like making some of our fairy doors to resemble our neighbor’s front porches and gardens…


Enjoy!!!


See also this DIY for fairy furniture!


Doorknob Mushroom-Fairy Houses

Aren’t these DOORKNOB MUSHROOM-FAIRY HOUSES the cutest??? I originally planned to just make mushrooms out of these little wooden knobs, but I just had to paint a little door and window on too. They’re just so sweet! L painted hers knobs into multi-colored mushrooms today and they are already out in the garden! So easy and so much fun!


Materials needed:

  • small wooden knobs w/ screws
  • acrylic paint
  • sealant spray
  • egg carton (optional)

First, twist the screw into the knobs.

Next, paint your knobs. You can paint them to look like mushrooms or add a few extra details for a fairy house. Even a 3 year old can paint the knob to look like a cute, lil mushroom!


After your knobs are painted, set them aside to dry. I suggest using an egg carton to prop the knobs up. Next, take them outside to spray with a coat of sealant. (The egg carton works great for this step too!)

Now for the fun part…tuck them away into your fairy garden, in a flower pot or in a wreath. Keep the screws in, just push them into the ground. Adorable! Might as well make a couple extra for family and friends!


If you like this one, you’ll be sure to like our JAM JAR FAIRY HOUSES and GNOME HOMES too!

Jam Jar Fairy House / Jam Jar Gnome Home

The other night I had a hard time falling asleep because I couldn’t stop brainstorming about how to turn a jar into a fairy house. (Only me…I know.) I knew I wanted to make it so at night the windows and door would light up; the house needed to be sturdy enough to stand up to the elements outdoors; and I wanted to use craft materials we already had around the house. Finally I had a eureka moment…why not use my beloved hot glue gun!?! So many people think hot glue guns are just for gluing things together, but they can add texture and dimension to your work as well. I’m super excited to share with you this simple tutorial for making JAM JAR FAIRY HOUSES & GNOME HOMES! They really are adorable!


Materials needed:

  • jars
  • hot glue gun and glue
  • acrylic paints
  • preserved moss, tree bark, or dried leaves
  • dried flowers
  • a bead or button
  • tea lights (battery operated)


First, decide which direction you’d like your jar to stand. For instance, my smallest JAM JAR FAIRY HOUSE stands on its lid, but the larger one (made from an apple sauce jar) stands upright. Using your hot glue gun, “draw” a door and windows on your house. Then, fill in the walls of the house with vertical lines of your hot glue. Try to draw them on in long, fluid strokes, but the house by no means needs to be perfect. Each lil blip or quirk, will give your fairy house more character!


Next, paint the inside of the jar where your windows and door are located. Keep in mind that you’ll want some light to shine through at night, so don’t pick colors too dark or layer the paint too thick.


After you’ve painted the inside, paint the outside of the jar brown. Carefully go around each window and the doorway.


After the paint dries, the final step is gluing on dried moss and some tiny dried flowers. For our little jam jar fairy house, I glued moss on the top of the house (bottom of the jar) and along the edges of the lid. You can find preserved moss at your local craft store or, if you like, just use natural materials found in your own backyard…twigs, tree bark, fallen leaves, helicopter seeds, acorns.


You can display your fairy houses inside or outside. To light them up at night, just place a little, battery operated, tea light inside. Enjoy!


If you’re giving a JAM JAR FAIRY HOUSE away as a gift, don’t forget to include some fairies and some fairy furniture tucked away inside the jar!

DIY Fairy Folk

DIY Flower Fairies

Fairy Furniture

DIY Fairy Wands


Knuckle-Print Carrots

How cute are these KNUCKLE-PRINT CARROTS we made for Easter? They’re not only fun to make with your little ones, but they make sweet gifts for parents and grandparents too!

Materials needed:

  • paper
  • orange and green paint
  • little knuckles

Just a little note: Whenever doing projects like this, I like to have a sheet of paper to practice on first. Our practice paper is the big white one here, giving us lots of room to experiment with before making little Easter cards for the grandparents.

First, paint your kid’s knuckles orange. Have them stamp the paper with their knuckles. We found that it worked best if L was standing or on her knees doing this part, making sure she was well above the paper.


Next, I marked each carrot lightly with a pencil, so we knew which side would be best to put the “leaves” on.

Using your child’s thumb or index finger, have them make little leaves atop each carrot. I had to help L with this part…as you can see in the picture below, when left to do it alone, she was happy putting green dots all over her carrots! Ha!


So sweet! Happy Spring!

Egg Carton Flower Wreath

Can you believe this beautiful Spring wreath was made primarily out of egg cartons!?! I just love the outcome! I’ve wanted to make an EGG CARTON FLOWER WREATH for years! Last year we tried it, using tempera paints, but the colors weren’t nearly as vibrant. I highly suggest using acrylics for this project. Our EGG CARTON FLOWER WREATH hangs inside Our Beautifully Messy House, as we await the first blooms of spring flowers outside in our garden!


Materials needed:

  • 3 egg cartons
  • med-large cardboard piece
  • sharp scissors (fabric scissors)
  • acrylic paints
  • hot glue gun and glue

First, cut the egg cartons into flower shapes. Get creative! The pointy, divider sections can be used to make narrow flowers or daffodil trumpets and the lids of the egg cartons can be cut into leaves.

After all your flowers are cut, time to paint with your little ones! L and I painted side-by-side…when she was finished with a flower or bored with a color, I’d let her start on another one while I filled in any spots she may missed. After all the flowers were painted a solid color, I went back and painted on some details! Although the flowers look great in solid colors, the details really bring them to life…worth the extra 30 minutes of painting!


To make your wreath base, use some large mixing bowls to trace circles onto your cardboard and cut it out. I used two separate pieces of cardboard and just taped them together. Once your wreath base is cut out, give it a quick coat of green paint.


Next, using a hot glue gun, glue the leaves onto your wreath base randomly.

After the leaves are in place, glue the flowers on. Try to space the colors out, but don’t think too much about order. In nature, nothing is perfect and the imperfections themselves are beautiful!


Hang your wreath on a door, a wall or in your kitchen window! Enjoy!!!


DIY Tin Can Bird Feeder #2

To celebrate the last week of National Bird Feeding Month, L and I made these adorable TIN CAN BIRD FEEDERS! They are really easy to make, look beautiful and cost nothing…just go digging through your recyclables! Not only will the birds love this winter treat, this bird feeder would make a fantastic gift for your children to make for a friend, parent or grandparent!

IMG_0317

IMG_0150

IMG_0141

Materials needed:

  • tin can w/ lid
  • wooden paint stirrer
  • pliers
  • acrylic paints
  • hot glue gun
  • string
  • glossy sealant (optional)
  • church key can and bottle opener (optional)
  • bird seed


IMG_0107

IMG_0111

First, make sure your can is clean and remove the label.

IMG_0108


Using your hands, carefully bend the lid of the can in half. Using pliers, squeeze it flat.

IMG_0109


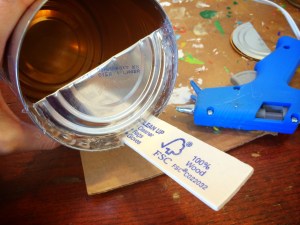
Using the hot glue gun, glue the paint stirrer inside the can. You can break the stirrer if it’s too long. This will be the birds’ perch.

IMG_0113


Next, glue the bent lid back into the can as pictured. Try not to make a huge mess with the hot glue gun, but if the glue shows it is no big deal…you will paint over it next.

IMG_0114


Paint the can any way you like.


IMG_0125

IMG_0128

IMG_0129


After the paint dries, you can use the can opener to make holes in the can from where you’ll hang it on a string. On one of our cans I placed two holes on the top…this bird feeder will hang from an old clothes line end.

IMG_0136


On our second can I made holes in the back of the bird feeder…this one we will tie onto a fence. I was careful to put the holes in the can after we painted it, because I wanted to avoid any sharp edges while L was handling the bird feeder.

IMG_0135


If you’d like your bird feeder to have a shiny, glossy finish, spray the can with a glossy sealant. It only takes 15-30 min to dry and will help protect the paint as well!

IMG_0137


Thread string through the holes of the bird feeder and fill with bird seed!


IMG_0138

IMG_0150


Now, find the perfect spot to hang your TIN CAN BIRD FEEDER! We placed one of ours right outside our kitchen window…the girls will love watching their little wildlife friends snack throughout the day! Enjoy!


IMG_0141

IMG_0144

IMG_0142


IMG_0191


In case you missed it, here’s the first DIY TIN CAN BIRD FEEDER we made! Another fun nature craft!

IMG_3262

Snow Candles

Ever since I was a kid I’ve always wanted to try making candles in the snow and today was the day!!! Such a cool experiment! I just love how they turned out! The sides of the SNOW CANDLES have this beautiful texture created by the crystals of snow. Just like snowflakes, each snow candle is unique!

IMG_0008

 IMG_0027

IMG_0028

IMG_0023

This is definitely a craft that should be done with adult supervision, though it is a fun one for kids of all ages.

Materials needed:

  • snow
  • paraffin wax
  • crayons
  • candle wicks
  • med/large pot for water
  • tin can or candle pouring pot
  • stick

 IMG_9999

First, decide what color you want your candles to be. Pick out 5 or 6 crayons all similar in color. L chose purples for our candles. Using a knife, cut a slit down the side of the crayon papers and peel the paper off.

 IMG_0003

Fill your pot with water about an inch high. Next place your pouring pot or tin can in the water creating a double boiler. (If using a tin can, make sure it is clean and the paper has been removed.) Place 3 blocks of paraffin wax and your crayons into the pouring pot or can. Bring the water to a boil, then turn the heat down to med-low so it’s at a simmer. ***Never melt wax directly on the stove top without the double boiler! The high heat may cause a fire!***

 IMG_0002

IMG_0004

Watch as the crayons and wax melt completely. Turn the stovetop off as you go outside to prepare your candle molds.

Outside you’ll need about a foot of snow. If the snow isn’t deep enough, you can use your hands to pile it up and lightly pack it down. Using a stick or a spoon handle, dig a little hole in the snow. We made ours about 4 inches deep and 1 to 2 inches wide.

 IMG_0005

Back inside, turn the stove back on for a couple minutes to heat up the wax again. Gather your candle wicks. When you’re ready, carefully remove the pouring pot or tin can (using an oven mitt) and quickly go outside to pour the wax into your molds. After a couple minutes, insert the wicks into your candles and hold in place until the wax hardens a bit…about 4-5 minutes.

 IMG_0007

IMG_0008

Leave your candles in the snow for an hour to harden completely. As the wax hardens, the candles take on their funky shape and texture. So cool!

 IMG_0014

Once they have hardened, carefully dig the candles out of the snow with your hands. Inside, use a knife to shave off some of the bottom of the candles if needed, so they will sit flat. Using scissors, trim the wicks to 1/2 inch high.

 IMG_0018

IMG_0020

Arrange on a dish or in a large bowl, add some decorative “fairy stones” if you like and enjoy!!! Beautiful!!!

 IMG_0025

IMG_0029