DIY Rustic Spinning Stars

I love these Rustic Spinning Stars. When I first saw something similar here on the “happy hooligans” blog I just knew we had to make them! They’re fun to make with the kids and are beautiful hanging inside or outside. We have ours spinning on our front porch, while my dad hung his (which we gave him for Father’s Day) in their kitchen. I think the stars would be really fun hanging, spinning from the branches of a big tree too!


Materials needed:

  • sticks
  • glue gun and glue
  • white acrylic paint and brushes
  • colored ribbon scraps, string, raffia
  • florist wire

First, have your little ones collect sticks. You can make big stars with big sticks or use little twigs, like we did, to make little 3 to 5-inch stars.

Use the hot glue gun to glue five sticks together into the shape of a star. The stars don’t all have to be the same size and they certainly don’t have to be perfect…any imperfections give your stars more character! Don’t worry about the glue showing either, in the next step the paint will cover it up.

Next, have your kids help you paint each star with white acrylic paint. This is a great painting project for little ones, since any missed spots give the stars their rustic appearance.


After the paint dries, tie one end of your ribbon to the center of the star and wrap it around. Again, no need to be perfect here…another great task for your kids to help you do! After the star is wrapped, tie the end in a knot around one of the star’s arms.

You can attach the stars to each other with string or wire. We used green florist wire, which is weather resistant and sturdy. If you link two pieces of wire together, between each star, the stars will spin a little more than if you use only one wire. We tried both ways…both did the job and look great, so it’s up to you!

Now for the fun part, find the perfect spot to hang your Rustic Spinning Stars! Enjoy!

DIY Vintage Feather Garland

I love this simple, yet colorful and fun feather garland. The orange, yellow and browns of our garland take me back to the 70s and 80s, and the make-believe games of yesteryear, making it the perfect garland for a kid’s bedroom or play area. You could spruce this garland up a bit for the holidays though, using all white or sparkly feathers. Peacock feathers would be beautiful as well! There are so many possibilities!


Materials needed:

  • feathers
  • gold wire
  • basic wiring tools
  • string


The easiest way I found to attach the wire to the feathers, is as follows… (If you “click” on each picture, the wiring is much clearer when it’s enlarged.)

For each feather, you’ll need a piece of wire about 1 1/2 to 2 inches long.

Wrap one end of the wire twice, making a small loop.

About 1/2 an inch from the other end of the wire, wrap the wire once, folding the excess wire around the back of the mid-section. (Much easier to see in the picture than it is to explain!) Bend the loop you first made, so it’s perpendicular to rest.


To attach the wire to the feather, thread the end of the feather through the bent loop. Bend the loop, back down so it’s laying more or less flat against the feather, holding it in place. On the opposite end of the wire, hold the loop still while you wrap the excess wire around the feather. Repeat with each feather.


I’ve pictured multiple feathers in their completed state. As you can see each wiring job is a little different, adjusting to the various lengths and widths of the feathers’ ends.


The last step is certainly the easiest…thread the feathers onto your string and hang!


Our feather garland is hanging above the little one’s play area. The brightly colored feathers are constantly in motion, gently dancing as the air moves around the room. I love how it catches WB’s eye while she’s playing on her back, taking in her surroundings. Where will you hang your feather garland for the whole family to enjoy?

DIY Tin Can Bird Feeder

I think what I love most about the Tin Can Bird Feeder is that you’re essentially making something from nothing! It’s also such a fun way to teach kids how to reuse and recycle! We just made the bird feeder on a whimsy for our own backyard, but it would make a terrific gift too.


Materials needed:

  • tin can and its lid
  • pliers
  • hot glue gun and glue
  • sticks
  • string
  • a few small rocks


First, make sure your can has been thoroughly cleaned and remove the paper label.


Next, being careful not to cut yourself, fold the lid in half using your pliers. Our lid was one of the pull-top ones, which made it a little tricky, but we were still able to make it work!


Now, using the hot glue gun, put a little bit of glue around half of the rim of the can and set the lid inside. Try your best to hide the glue, so it’s not so visible from the outside.


While you’re folding and gluing the top, go ahead and send the little ones off to find sticks in the backyard.


Find one or two thicker, sturdier sticks and glue them to the bottom of the bird feeder…this is where the birds can perch while they snack.


Now, go around the can gluing sticks side-by-side until the entire can has been covered. We broke the sticks so they were all roughly the same length, but by no means perfect. If one stick is curved and leaves a substantial gap, go ahead and glue a small stick in to fill the hole.


On the bottom of the can, glue a few rocks in place…these probably won’t be seen, but will help balance out the bird feeder so it doesn’t tip too far forward.


Lastly, tie a string around the bird feeder and fill with bird seed. Hang it up where you and the kids can see it from a window…maybe on a nearby branch or off of your porch. Now, sit back and wait for the birds!


We decorated our bird feeder with sticks from the yard, but you can certainly get creative and mix things up a bit. Your kids can paint the tin can, wrap string around the can, or glue buttons on it…anything you all are inspired to do to make it unique!

DIY Sock Bunny Rabbit

This project was inspired by a dear friend Libby, who left this world way too early in life. When I was 10 years old I was diagnosed with type I diabetes. As my doctor came to the hospital that evening to diagnose and take care of me, his wife, Libby, got out her sewing kit. She stayed up late that night making me a precious bunny rabbit that I still have to this day.


So when one of my best friends’ babies, my godchild, was in the hospital for surgery last week and ended up staying much longer than expected, my first thought was of Libby and the bunny. I knew I had to make one.

Materials needed:

  • one pair of socks (regular or knee high)
  • needle and thread
  • stuffing material
  • embroidery floss and embroidery needle
  • buttons (optional for children 3+)


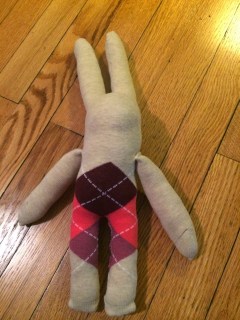
First, take one sock and open it up so the heel is facing you. Lay it flat. The heel of the sock will be the bunny’s face.


Then, make a cut in the middle of the toe of the sock, cutting towards the heel. This will be the bunny’s ears. Don’t cut all the way to the heel though, remember the heel becomes the face. Next, make a cut from the opposite end of the sock for the bunny’s legs. Again, don’t cut all the way up to the heel…this time you need to leave room for a body too.


Turn the sock inside-out. Starting at the tip of an ear, stitch down one ear and up the other. Next, sew the legs in a similar fashion, but this time leave about a 2-inch opening.


Turn the sock right-side-out. Through the 2-inch opening, carefully stuff the bunny’s ears, body and legs. Sew the opening closed.


Now take the other sock and cut off the toe, close to the heel. Lay this part flat, like you did the first sock, and cut it in half. These will be the arms.


Turn one sock piece inside-out and, starting from the tip, stitch the side closed. Turn it right-side-out again and fill it with stuffing.


Next, fold the open edge inwards and pinch it together. Sew the arm closed, attaching it to the body at the same time. Repeat with the other arm.


Your bunny’s adorable already, isn’t it? But, it still needs a face! Using embroidery floss, stitch on little eyes or attach buttons (if the child receiving the bunny is 3 years old or older) and sew a lil nose. All done!


As you can see from the picture below, using knee socks gives you a tall and skinny bunny and using slightly smaller socks results in an adorable, baby bunny rabbit. Now to deliver them to my godchild and her 3 yr old sister…I can’t wait to see those happy faces!

“Making something is one way to say, ‘I love you.'” -Daniel Tiger