DIY Nature Frame

Is your child a nature collector or, as Pippi Longstocking would say, a “thing finder”? If so, the DIY Nature Frame is the perfect project for them! Just about every day of the year, L fills our stroller, our wagon, or our pockets with things she finds on walks. We could be going for a walk around the block in the city and she still comes home with feathers, sticks, rocks, butterfly wings and seed pods! This past weekend we went for a walk and L brought home pinecones and pine needles that she wanted to “do a craft” with, ie. glue to paper. I knew that wouldn’t quite work, so in less than 10 minutes we put together this Nature Frame!

2016-02-22 21.17.25

The best part about having a Nature Frame, is that it’s a project that is constantly changing, evolving throughout the year. While ours has pine cones and pine needles in it now, the end of February, I’m sure within a month or two it will be filled with Spring flowers, robins eggs, and fallen bird’s nests. In the Fall, our Nature Frame will most likely be glowing orange with fallen leaves from the backyard…finally, a place for all our nature findings!!!

IMG_4198

Materials needed:

  • an old frame
  • string
  • scissors

DSC_1070

First, dismantle your frame. I bought this old and ugly print, among a collection of 5 other framed pictures, for $1.75 at an antique auction. I liked two of the pictures and that was worth the $1.75 and getting stuck with 3 I didn’t care for so much! So I stashed the ugly pictures away in a closet and I’m glad I did…the frame on this one was perfect for a Nature Frame! You can find similar frames for pennies at secondhand stores, yard sales, and antique shops.

DSC_1071

DSC_1072

Next, tie your string to the edge of your frame and, with the help of your child, wrap it criss-cross around the frame. We used three different strings that were three different colors…anything works!

DSC_1075

Now, after you’ve been for a nature walk and your little one’s pockets are full, you can fill your frame. And then, hang it in a place for everyone to enjoy! We hung ours in our kitchen by the back door…L’s findings usually end up on the floor by the door, so now they can go up on the wall instead! I just love it!

IMG_4303

IMG_6493

DSC_1081

Enjoy!!!


DIY Bird Nesting Kit

The “DIY Bird Nesting Kit” is the perfect project for little hands and little helpers! L and I made three kits this week: two gifts and one to hang in our own backyard, next to our DIY Tin Can Bird Feeder. It took less than a day for our feathered-friends to find it and start picking away, flying bits of string home to cozy-up their nests! The DIY Bird Nesting Kit costs only $2.50 to make (I’m not kidding!) and it’s a wonderful project to help teach kids about giving, sharing, and caring for the world around us….aaand about birds and the various types of nests they make of course!

DSC_1062

Before making our Bird Nesting Kits, the girls and I read “Mama Built a Little Nest” by Jennifer Ward and Steven Jenkins. It is fascinating book with beautiful, collage-like illustrations, depicting all kinds of birds, their families, and the homes they build. (It’s best to read in a pile of beach towels, swirled around on the floor into your own nest.) I highly recommend it!

IMG_5479

Materials needed:

  • Wired bird suet holder
  • yarn scraps
  • scissors
  • ruler (optional)

DSC_1036

First, have your little one cut the yarn scraps up into pieces about 3-5 inches long. You don’t have to measure them, but your little one might want to with the ruler!

DSC_1042

DSC_1044

After you have a nice pile of yarn pieces, it’s time to stuff them into the suet holder. Then, close the suet holder up and it’s all done. It’s that easy!

DSC_1048

DSC_1049

DSC_1050

Now, time to find the perfect place outside to hang your Bird Nesting Kit…someplace where the birds will find it and you can spy them doing so is best!

DSC_1054

IMG_5468

If you’re giving your Bird Nesting Kit away as a gift, you may want to include a little card inside explaining what it is. Your friends will be sure to love such a colorful, quirky, and fun gift! Enjoy!!!

DSC_1065

Ice Cube Heart Garland

I don’t know why I never thought of this project until now, but an Ice Cube Heart Garland is perfect for this time of year! It takes about 5 minutes to make and costs nearly nothing! If you live up north where temps are below freezing consistently in the winter months, Ice Cube Garlands would be beautiful hanging everywhere! You could make other shapes too! Along with our garland, we also made some individual Ice Cube Hearts (more like ornaments)…the week of Valentine’s Day, the girls and I plan on making dozens of these to hang off of trees all over town. Such a sweet, little heart surprise!

IMG_5107(1)


IMG_5097

Materials needed:

  • silicone heart molds
  • food coloring
  • water
  • string
  • scissors
  • a tray or cardboard that will fit in your freezer


DSC_1008

First, place your silicone heart molds on your tray or cardboard piece. (It’s a tricky mess if you do it after the water is poured, like I did the first time!) Next, put about 10 drops of food coloring into a measuring cup and fill with water.

Pour the water into the heart molds.

DSC_1009

Now, cut a string long enough for your garland and/or some smaller pieces for ornaments. Using your fingers, press the string into the heart molds. Make sure you leave 4-5 inches of string between each heart.

DSC_1011

To make the ornaments, just press both ends of your string into the mold filled with water. The center 2 hearts are ornaments in the pictures above and below. You can see the shorter loops of string.

DSC_1010

Next, place the tray with your heart molds into the freezer for a couple hours until they’re completely frozen.

DSC_1012

Carefully pop your ice cube hearts out of the molds.

IMG_5236

IMG_5235

Now for the fun part…find a place outside to display and enjoy your Icy Hearts! So sweet!

IMG_5106

IMG_5107

Lace Snowflake Bowls & Decorations

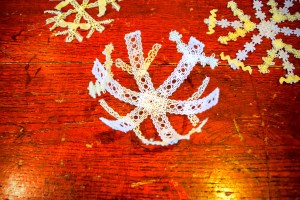
Our LACE SNOWFLAKE BOWLS are one of those crafts that started as one thing, but inspiration hit and they morphed into something even cooler in the process! Originally, L and I were just making lacy snowflakes to hang in a window…which we did! But then it dawned on me that, much like our DIY String Bowls, we could easily turn the snowflakes into bowls as well! These are super-easy to make and it’s fun experimenting with various-sized lace and bowl molds. The finished product makes a whimsical, winter decoration for any windowsill or tabletop. They’d be a lovely centerpiece with candles set inside each snowflake too…so many possibilities!

DSC_1029


DSC_1013


Materials needed:

  • white or cream-colored lace
  • white glue
  • glitter (optional)
  • scissors
  • water
  • craft stick or plastic spoon
  • a cup for mixing
  • silicone mats
  • plastic wrap (not pictured)
  • small bowls (not pictured)

DSC_0969

First, prepare your work station. Have silicone mats out on the table and mix up your glue. Use about 3-4 parts glue to 1 part water. (An old yogurt cup or butter tub is great for holding your mixture.) Add some glitter to the mix as well, if you like!

DSC_0978

DSC_0983

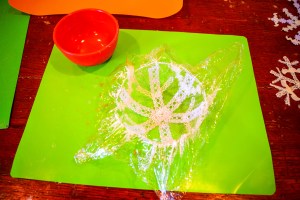
If you’re making a snowflake bowl, cover a small bowl from your kitchen in plastic wrap. (We used measuring bowls.) Pull the wrap tight and smooth it down, though it doesn’t need to be perfect.

Next, get an idea of how you’d like your snowflakes to look. Cut some strips of lace and lay them out, either flat on the table or across your bowl.

DSC_0972

DSC_0974

DSC_0977

When you’re ready to start crafting, dip a strip of lace into the glue mixture. Take it out and run your fingers down the lace to remove any excess glue.

DSC_0984

DSC_0985

DSC_0991

Now, lay the lace strip out…either flat on the silicone mat for a simple snowflake to hang in your window, or across your bowl, if you’re making a lace snowflake bowl.

DSC_0988

DSC_0989

DSC_0992

Continue to dip strips of lace in the glue mixture, then lay them down on top of each other, creating a snowflake pattern.

DSC_0994

DSC_0996

Once your snowflakes are complete, set them aside overnight to dry. If you’re the impatient type, you could also dry them very carefully with a hot blow dryer. : )

DSC_0997

After the glue is good and dry, gently peel the lace snowflake off of the silicone mats. Ready to hang in a window!!!

DSC_0998

DSC_1000

To remove a snowflake from the bowl, turn the bowl upside down. Undo the plastic wrap and remove the bowl. Finally, gently peel the plastic wrap off of the snow flake.

DSC_0999

DSC_1002

DSC_1003

DSC_1004


Beautiful!!!

DSC_1019

Such a fun way to celebrate a snow day!

Thankful Trees and Variations

What a fun way to teach kids about thankfulness! All you need to do to make your own family “Thankful Tree” is to write down things you and your kids are thankful for on “leaves” and put them together in the shape of a tree! Every year now I look forward to making our “Thankful Tree” as Thanksgiving approaches, and every year we do it a little bit differently! In the past, L and I made a simple tree on a single piece of construction paper, the leaves different colors, but all the same size.

IMG_7616

This year we made our “Thankful Tree” when my niece and nephew came over…and we made a big, fun, mixed-media tree!

IMG_4264

We put the tree up on a door in our dining room and everyone had a job to do! L cut strips of brown paper for the tree’s trunk and branches; my 9-year-old niece helped cut leaves of various sizes and shapes; and my 6-year-old nephew did a little of both!

DSC_0675

After everything was cut, we went outside and collected sticks, twigs, and real leaves. My niece helped write all the things we were thankful for on the leaves, while we all took turns shouting out ideas! Meanwhile, I started to tape the tree trunk and branches up on the door.

DSC_0678

DSC_0677

Once all the leaves were full of things we were thankful for, the kids filled the branches with the leaves! I love how it turned out!


DSC_0689

DSC_0685

DSC_0692

IMG_4264

Other ideas:

  • Trace your hands and cut them out, for your tree’s leaves.
  • Add a new leaf every day of November leading up to Thanksgiving.
  • Make a “Thankful Tree” on Thanksgiving with the entire family.
  • Instead of a tree, put your leaves together in the shape of a wreath.

12191331_10153854550573054_2785937210932093271_o

The above photo was shared by one of my dear friends from childhood, Sarah. Her family is adding a hand-shaped leaf every day this November! Too cute! Comment below and share some of your “Thankful Trees” with us! I can’t wait to see all your wonderful creations!!!

Mixed-media Fall Art

We have some glorious October weather in Virginia this week…cool mornings, sunny days, and brilliant leaves falling from our trees! L’s been painting outside these days, in a world of October color! Yesterday she made a beautiful fall tree using acrylics, melted crayons, and a sprinkle of “leaf glitter” (tiny pieces of actually leaves). The outcome is beautiful!!! I made a similar piece last year that I also adore…the process is as much fun as the piece of art itself!

2015-10-21 06.43.21

Materials needed:

  • canvas (you could do this on cardboard too!)
  • acrylic paints (blues, white, brown)
  • crayons (oranges, yellows, and red)
  • knife and cutting board
  • oven

*A tip when buying crayons for this project…when you’re looking for orange crayons, buy a box of 24 crayons. The larger boxes contain more crayons, but not any more orange and yellows!!! We always seem to run out of orange crayons this time of year!

First, have your child paint their canvas blue. We like to use some darker and some lighter blues, mixing them all together.

DSC_0494

DSC_0496

Next, have them paint a few white, fluffy clouds.

DSC_0500

As the sky is drying, sit back and look at the trees with your child. Point out how the trunk is usually straight and thick. As you move up the tree, the branches get smaller and smaller, and they get more squiggly!

DSC_0498

As you continue to discuss trees and their features, lay out a few various-sized paintbrushes. Have your child put them in order from biggest to smallest. Now they know which paintbrush to use for their tree’s trunk and all its branches!

DSC_0504

Time to paint the tree!

DSC_0508

DSC_0516

DSC_0522

The next step is a little “out of the box,” but that’s what makes it so great! Have your child pick out which crayons are the colors of the fall leaves before them. Using a sharp knife and a cutting board, remove the paper off the crayons and chop the crayons up into tiny pieces. I think we used half a lime-green crayon, one yellow, three or four oranges, and one red crayon.

DSC_0523

Lay the painting down on a flat surface and have your little one sprinkle the crayon shavings all over the trees branches. L also crumbled up an actual leaf from the yard and sprinkled some of it among the crayon pieces. It’s a minor detail, but it’s my favorite. I’ll always remember this day and where L made her Fall Tree.

DSC_0529

DSC_0538

DSC_0541

Once the crayon shavings are all dispersed, put your painting into the oven at 200 degrees for about 3-5 minutes. Watch the pieces as they melt. (Our painting was too big to fit in the oven this time, so I carefully held it under the broilers with the oven set on broil. I did one end, then turned it around and did the opposite.) When you remove the artwork from the oven, be careful to hold it flat and steady…until the crayon wax hardens, the wax will drip if it is tilted at all.

DSC_0542

Isn’t the outcome gorgeous? It’s perfectly imperfect…just like a fall leaf.

DSC_0544

If you think this is just a craft for kids, you’re wrong…you can totally do this as well! “Mixed-media Fall Art” is fun for anyone and everyone! Enjoy!!!

IMG_5687

IMG_5689

IMG_5691

DIY Toy Sail Boat

One evening this summer, while we were getting ready for bath time, L pulled a wine cork out of her pocket. She had been saving it all day to float it around and play with in the bath tub. That got me thinking…I knew with a few toothpicks and some leaves we could turn her wine cork into a little sail boat! Leaves work great for this project, because they’re naturally water-proof and easily replaceable!

IMG_3614

IMG_3642

Materials needed:

  • 2 wine corks
  • 4 toothpicks
  • 2 leaves
  • old pencil
  • scissors

IMG_3574

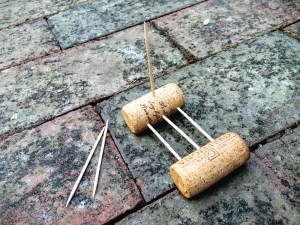
Take one of the wine corks and stick three toothpicks into it, all pointing in the same direction in a line.

IMG_3576

Next, push the second wine cork into the opposite ends of the toothpicks.

IMG_3577

Stick one more toothpick vertically into the middle of one of the corks.

IMG_3578

Find a medium-sized leaf and weave it through the bottom toothpicks. We used a balloon flower leaf. This step isn’t necessary, but it makes a nice lil bed for anything you may want to sail on top…a bug, a rock, a fairy friend.

IMG_3585

IMG_3579

Next, find a slightly larger leaf and thread it onto the vertical toothpick, making a sail. We found the hosta leaves to work best for this, though any thick and sturdy leaf will do!

IMG_3582

To make the sail boat safer for little hands, twist an eraser off the top of an old pencil. Cut it in half with scissors and push it onto the top of the sail.

IMG_3580


IMG_3581


IMG_3584

Now, time to play! L had hours of fun blowing her boats around our rain barrel!

IMG_3589


IMG_3609


IMG_3613

The boats may not seem like much, but ours withstood some submarine plunges under the water and lasted through two nights of bath time play! Tomorrow, we’ll replace the leaves and keep sailing!

IMG_3656


IMG_3662


IMG_3659

Enjoy!!!

Craft Stick Fairy Doors

It’s no secret that we LOVE making fairy/gnome things at Our Beautifully Messy House…fairy houses, fairy furniture, fairy doors, gnome doors, flower fairies, fairy folk…need I go on? We just can’t help it! What I love the most about making fairy doors and gnome doors is surprising people with them! L and I made an abundance of CRAFT STICK FAIRY DOORS this week as we prepare to spread them around the neighborhood. Of course we enjoy surprising our friends and close neighbors, but what I really love is putting them on strangers’ front porches and sneaking them into their gardens! We rarely get to see people discover the fairy and gnome doors, but the surprise, the magic in it all makes L and I giggle for days! We’ve had a great time making these craft stick fairy doors…aren’t they the cutest!?!

Materials needed:

  • crafts sticks (big, small, colored, any or all)
  • wood glue
  • Q-tips
  • buttons

Optional materials:

  • acrylic paint
  • sealant spray
  • wire & nails

First, lay out your craft sticks in a door shape. If you have colored sticks, your kids will enjoy playing with patterns!


Using a Q-tip, put wood glue onto a small craft stick and carefully lay it across your door. If you don’t have small craft sticks, you can always cut a normal-sized one in half! It’s best to put at least 2 sticks across, but you can play with the angles and directions that you put them. Remember, fairy doors don’t have to be perfect!


If you don’t plan to paint your door, you can glue a button-handle on now too!

After the glue has dried a good bit, flip your doors over and smear wood glue all across the back for extra support. Let them dry for a few hours or overnight.


Next, if your craft sticks are plain and you want to, paint the doors. We especially like to add glitter paint to ours…helps the fairies and gnomes find the doors of course.


After the paint has dried, glue on button-handles if you have not done so yet. We like to spray our doors with some acrylic sealant as well…makes the wood a little more durable outdoors and gives them a more finished look.

Now for the fun part, hide them around town…or give them to friends! These would make an adorable party favor for both kids and adults! Enjoy!!!


Other posts you may like:

Jam Jar Fairy House /Jam Jar Gnome Home
Doorknob Mushroom-Fairy Houses
Fairy Furniture
DIY Fairy Door…Gnome Door
Fairy Doors & Gnome Doors #2

DIY Citrus Stamps

How cute are these DIY CITRUS STAMPS we made this week? They really were simple to make and the outcome is adorable…perfect for Summer! L and I stamped t-shirts, tea towels, and a pillow case for her bed. Just think of the possibilities… You could use this stamping technique to brighten-up party invitations, gift bags, skirts, shorts, a tablecloth, shower curtain…the possibilities are endless (and sweet)!


Materials needed:

  • an orange, lemon, & lime
  • tea towels, t-shirts, etc.
  • knife
  • acrylic or fabric paints
  • flat, plastic lids or plates
  • paper towels
  • parchment paper

If you need to, iron your tea towels or t-shirts first! Protect your work area with parchment paper. (Usually I use cardboard or old newspapers for projects, but with this one I didn’t want the texture of the cardboard to effect the stamping and I didn’t want newspaper to discolor my cloth. Parchment paper was perfect!)

Next, cut your orange, lemon and lime in half with a sharp knife. If you like to, cut a little “handle” in each fruit half…makes stamping easier, especially for kids!


Turn the fruit over onto a paper towel, to soak up some of the juice from the fruits.

Next, squirt your paints onto plastic lids or plates.

Dip the sliced fruit into the paint. Blot it onto a paper towel, if there appears to be too much paint.


And press the fruit gently onto your cloth. Too easy, right!?


We experimented and made some of our tea towels patterned, while others we stamped randomly. The random was definitely our favorite…a little more carefree, like all things “summer” should be!

If you have some prints that are more solid looking (a bit too much paint), don’t fret…just overlap another fruit in another color on top! It will look like you planned it that way all along!


Instead of stamping an entire tablecloth, you can just stamp tea towels and overlap them as we did here. Looks great on their own or with a solid tablecloth underneath!

Too cute, huh!?! Enjoy!!!


Fairy Doors and Gnome Doors (#2)

After making a fairy door out of sticks and hiding it in our neighbor’s garden last Summer, L and I thought we’d spread the fairy love a little farther this year…we’ve been making FAIRY DOORS and GNOME DOORS and hiding them all around town! It’s so much fun surprising the young and the old — just imagine the look on anyone’s face when they’re out in the garden and suddenly discover a teeny, tiny door that wasn’t there before. Ha! These fairy doors are so simple to make and all you need is rocks, paint and clear sealant (which is optional). To draw a little more attention to the fairy doors, we like to leave a tiny button or painted rock trail as well.


Materials needed:

  • medium-sized rocks
  • acrylic paints
  • clear sealant spray (optional)

After cleaning any dirt off your rock, start by painting on a door.

Next, add some windows, if you have room.

If adding any glitter paint, apply that next. We like to paint a little glitter over our windows.

Next, outline the door and windows carefully with black paint. Add a doorknob as well.


Now for my favorite part, paint connecting black lines on the rock, resembling a stone wall.

If you’d like to add a flower pot or lil window box, add one now.

Finally, finish with some green vines, leaves, and flower details.


Once all your paint is dry, you can spray the rocks with a coat of clear sealant to make the fairy doors even more weather resistant. Permanent paint usually doesn’t wash away, but I always like to add a coat of sealant just in case.

Now for the real fun…time to hide your fairy doors and gnome doors. (Gnome doors go on trees, generally speaking.)


I like making some of our fairy doors to resemble our neighbor’s front porches and gardens…


Enjoy!!!


See also this DIY for fairy furniture!