Toad Cottages

I saw this idea in a book we checked out from the library recently, “Toad Cottages and Shooting Stars” by Sharon Lovejoy, and thought it was just the cutest! Such a simple and fun summertime craft for kids of any age! Around our house the kids are always finding little critters under rocks and flowerpots and around tree stumps, so why not make little houses inviting the slugs and frogs and skinks and toads and roly-polies to come and stay a while? We expanded on the Toad Cottages idea and also made a Slug Sanctuary, a Frog & Toad & Slug Hotel, and a Frog Planetarium. So much fun!!!


Materials needed:

  • old flowerpots
  • acrylic paints and brushes


First, make sure you protect your painting surfaces from the acrylic paint and have the kids wear smock-shirts.


Next, let the kids paint! We did some pots individually and some as a group effort.


After the paint has dried, it’s time to let the kids pick spots around your house and garden where they think their frog friends would like to visit! Prop one edge of the turned-over flowerpots up on a rock or large stick to give the critters an easy entrance and exit.


Now our kids are checking under their flowerpots first thing in the morning, to see if they’ve had any visitors over night! Watching the worlds of nature and imagination collide in your young one’s eyes is the best! Pure magic – enjoy!!!

Color Changing Carnations

The latest experiment in Our Beautifully Messy House is one of the most colorful ones yet – Color Changing Carnations! It’s pretty simple to throw together and you will start to see results within a day! You can do this experiment with any white flowers…daisies, roses, even Queen Anne’s Lace…but carnations are cheap and abundant in our local grocery store these days. I was able to use this experiment to show L and WB how chemicals get into the food we eat, especially the food we grow. L knows why we always try to find organic fruits and veggies at the grocery, but now she can see why we do too!


Materials needed:

  • jars or vases
  • white flowers
  • scissors
  • water
  • food coloring

First, trim your flowers’ stems. It’s best to cut flowers at an angle and to remove any leafage near the bottom. Leaves trapped underneath the water’s surface become moldy and cause your water to go bad sooner.

Next, put about 10-20 drops of food coloring into each jar. The bigger the jar, the more food coloring you’ll need. Then, add the water.

Finally, put a flower or two into each vase and wait a day or two for the magic to happen!

The results are fun and exciting to see! Even I couldn’t wait to see what our flowers looked like with each passing hour.

To take this experiment to the next level, you can try making bi-colored carnations. Carefully split a flower stem down the middle and put each stem half into a different jar of colored water. We tried to make a half-yellow, half-red flower. Our “red” jar didn’t have quite enough food coloring in it, but the flower was clearly half-yellow! We’re still working on this one!

Enjoy!


Celery-Rose Print Shirts

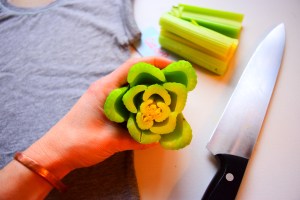
If you’re a frequent reader of the blog, you know how much I love printing with the girls…citrus prints, finger prints, leaf prints, cardboard tube-heart prints, and now celery prints! They’re the perfect replica of a rose flower! Like most of our printing projects, the girls and I put these on shirts today so they can wear their art everywhere we go. You could also make a beautiful table cloth, tea towels, or pillow cases with this celery-rose print craft.


Materials needed:

  • celery
  • knife
  • t-shirts
  • acrylic paints (red, pink, and green)
  • paper plate or plastic lid
  • thin cardboard piece


First, place a thin piece of cardboard inside the shirt you will print. A cereal box flattened out works great…just something to protect the backside of the shirt from any paint that may soak through.


Cut the celery straight across, down towards the bottom of the celery stalks where they all come together. Don’t worry if it doesn’t resemble a perfect rose. First, roses aren’t perfect either…they have beautiful and unique imperfections just like people do. And second, you can add a green leaf detail at the end that will round the flowers out.


Next, put your red and pink paint on a plastic lid or paper plate to use as your palette. Press the celery into the paint and swirl it around a bit to get the paint on all stalks.


Carefully, press the celery onto the shirt and lift up. Voilà! Continue this process until you have all the flowers you want.


The last step is to add a little bit of green. Take one of the celery stalks that was cut off and simply stamp it into some green paint. Press it sparingly around the flowers to round them out and make the appearance of leaves.


Beautiful!!! This craft makes beautiful Valentine’s Day gifts, but would be perfect for any flower-loving friend anytime of the year. Enjoy!!!


Homemade Stovetop Potpourri

As I’m writing this our house smells like….you guessed it…Christmas!!! Stovetop potpourris seem to be the “in” thing these days, replacing seasonal candles and old school potpourri, and I am totally on board! Basically you gather a handful of ingredients, put them in a saucepan with water to simmer, and enjoy the fresh, seasonal smells that perfume your entire house. What I’ve done here is taken our favorite stovetop potpourri and preserved it using our food dehydrator. Then we jarred individual portions to give as gifts and to keep on hand during the holidays. Now whenever we’re in the mood, we put a pot of water on to simmer, add our homemade potpourri and enjoy the smells of Christmas!

Ingredients:

  • 4-5 apple slices
  • 4-5 orange slices
  • 2 lemon slices
  • 1 small handful of dried cranberries
  • 1 cinnamon stick
  • 1 whole nutmeg
  • a pinch of whole cloves (~10 cloves)

To dehydrate the apple, orange, and lemon slices, you’ll want to cut them very thin…especially the citrus. (.5 cm or less) Expect the fruit to take up to 12 hours to dry completely. Check them often.

After the fruit is dehydrated, add it to a jar with the other ingredients.

Add a tag with instructions for your friends, and your gift is set! Such a sweet gift for teachers and neighbors!

Be sure to make lots of extra to use in your own home over the holidays! Enjoy!!!

Fall Leaf Mason Jar Lanterns

I don’t ever seem to get enough of mason jar crafts…whether it’s a fairy house, a pumpkin lantern, or this week’s project…these festive FALL MASON JAR LANTERNS! The great thing about this project is that it’s very hard to mess the jars up and there are a few variations to try. I made these this morning with a group of ladies at L’s new school…each lady’s lantern was unique and beautiful. One lady mixed gold paint with every color, some overlapped the leaf prints, while others put just a couple prints on each jar. There’s plenty of creative freedom with this project! The jars shine brilliantly as lanterns, but you could also use them as a vessel for your No-Bake Acorn Treats or even arrange an Autumn flower bouquet in one, using it as a vase.

dsc_0499

Materials needed:

  • jars
  • acrylic paints and brushes
  • small-med fall leaves
  • tea light
  • dried rice, beans, corn, coffee beans

dsc_04751

First, prep your work space with cardboard, wax paper, or old newspapers.

Next, paint the underside of a leaf with a fall color or combination of 2 or 3. (Red, orange, yellow, green, brown, gold)

dsc_0483

Carefully press the painted leaf onto the surface of the jar and smooth down all the edges.

dsc_0486

Peel the leaf off gently to reveal your painted-leaf print. If your first print doesn’t look exactly as you thought it would, no worries…as you add more prints, any blips or irregularities will be hidden.

dsc_0487

dsc_0488

A variation to this, is doing quite the opposite. Hold a clean leaf on the surface of the jar and paint around the edges. You can then paint the entire jar, leaving a little leaf window for the light to shine out. I originally thought this would look great with a solid color of gold…didn’t turn out as I planned, so I ended up dabbing all the fall colors all over the jar and it turned out beautifully! A beautiful oops! If something doesn’t turn out how you imagined, try something new and you may be surprised what you come up with!

dsc_0476

dsc_0477

dsc_0478

dsc_0481

Arranged on a tabletop with mini-pumpkins, gourds, leaves, acorns, or flower petals, you’ll have a festive centerpiece for your Thanksgiving meal! Instead of just placing a tea light in each jar, first add small layer of dried beans, rice, corn, or coffee beans. This will bring the light up to the little “window” you have created in the jar and make it look more complete. Enjoy!

dsc_0493

dsc_0501

Mushroom Spore Prints

Did you ever make MUSHROOM SPORE PRINTS as a kid? They’re super-easy to make and super-beautiful! Lately the girls and I have found lots of mushrooms around the yard, at L’s school, and when out hiking in the woods! Mushroom spore prints are so mush fun to make…you’ll be out looking for mushrooms everywhere you go! When looking for mushrooms, you’ll want to find some that are fresh (just a day or two old), before they’ve dropped their spores. Mushroom spores are no bigger than a speck of dust and the wind scatters them all around. As you probably assumed, the spores are mushrooms’ “seeds.” In making spore prints on paper, you’ll be amazed at how many just one mushroom has!

2016-10-26-21-13-14


While it’s fun to poke and prod at mushrooms, investigating them and marveling at their unique beauty, be sure to remind your kids that we NEVER eat a mushroom that we find outdoors. Only experts know the difference between ones that are deadly and ones that are okay to eat.


Materials needed:

  • mushrooms
  • sharp knife
  • dark paper or card stock
  • a large bowl or container


First, find a good mushroom or two. Mushrooms come in all shapes and sizes…you’ll want a typical dome-shaped mushroom cap, though it doesn’t matter what color.

dsc_0397

After you’ve carefully removed the mushroom from the soil, cut off the stem close to the top of the mushroom.

dsc_0399

Flip the mushroom onto a dark piece of paper.

dsc_0401

Cover it with a large bowl or container, and let the mushroom sit for a few hours or overnight.

dsc_0403

Carefully remove the container and lift the mushroom off the paper without smudging the spore print.

dsc_0407

dsc_0408

Fascinating and beautiful!!!

Milk Carton Fairy Houses

Who knew milk cartons had so much potential??? They are perfect for making fairy houses and gnome homes! First off, a milk carton is just the right size for fairies…all it needs is a door and a few windows to make it feel like home. Milk cartons are also water-proof, providing adequate housing for both indoor and outdoor use. WB and L like to play with their fairy houses during the day and, at night, we tuck a little tea light inside to turn them into night lights! So sweet!


2016-10-06-14-00-32

Materials needed:

  • milk cartons
  • white primer spray paint
  • exacto knife
  • acrylic paints
  • hot glue gun
  • sticks, bark, moss, acorns, etc.
  • battery-operated tea lights

dsc_0005

First, spray your milk cartons with some primer. The surface of milk cartons is usually waxy and paint will have a hard time sticking. A coat or two of primer should do the trick!

dsc_0006

Next, using an exacto knife, carefully cut a door and windows into the house. And do not worry…the windows don’t need to be perfect! Fairy houses’ never are!

dsc_0344

Now the fun part for the kids, have your little ones paint and decorate the houses. Start with a solid color or two underneath.

dsc_0347

img_0240

Then add details like polka-dot doors and Fall pumpkins. For our pumpkins, the kids used a wine cork as a stamp!

dsc_0349

dsc_0353

While the paint dries, send the kids outside to collect nature materials to use for a roof.

dsc_0356

Before assembling the roof, you can easily flip the screw-top opening inwards. Just push it in with your fingers…it’s easier than you think!

dsc_0357

dsc_0358

Glue twigs or bark over the opening, and then add all sorts of nature findings. Each house will be unique!

dsc_0360

dsc_0359

To light your fairy houses up at night, place battery-operated tea lights inside. You could also use a string of lights in and around the houses for a magical display!

dsc_0373

dsc_0383

“Those who don’t believe in magic will never find it.” -Roald Dahl

dsc_0393

Homemade Elder-Blossom Nectar

Inspiration for our HOMEMADE ELDER-BLOSSOM NECTAR came from one of my favorite children books, “Linnea’s Almanac” by Christina Bjork and Lena Anderson. L rediscovered the Linnea books a couple weeks ago and has been poring over each page. In the July section of the book is a recipe for Elder-Blossom Nectar. Since I had never made it, but always wanted to, we got to work! The very day we came across the recipe, we spotted an Elder Tree on one of our outings! How lucky were we!?! A few days later, we went on an early morning adventure and harvested the Elder blossoms.

DSC_0263

DSC_0301

Ingredients:

  • 25-30 Elder blossom clusters
  • 1-2 lemons
  • 2 lbs sugar
  • 1 quart water

Before you harvest Elder blossoms, you want to make certain that you have the right type of tree. There are other blossoms that are similar, poisonous Elder and poison Hemlock, but are not the same. True Elder blossoms will be on a tree. The white flowers are in big, flat, round clusters that have a strong, sweet smell. (see pictures below) Poisonous Elder grows in pointed clusters that are yellowish-green and they do not have a strong scent. Poison Hemlock has a very different, fern-like leaf shape, and it grows more like a weed…not a tree.


DSC_0249

DSC_0243

IMG_7979

Once you find your Elder tree, you’ll want to cut off 25-30 flower clusters. Have your kids help you count the flowers, inspect them with a magnifying glass for fun, and put them in a large jar.

DSC_0257

DSC_0252

DSC_0268

Next, back at home, slice your lemon and add it to a pot with the water and sugar. Heat the mixture to a boil, then carefully pour it into the jar with your Elder blossoms. Cover the jar and let it sit for three days.

DSC_0271

DSC_0272

DSC_0281


While the nectar is setting, time to find and clean some bottles! You want to make sure your bottles are well washed in preparation for the nectar.

After three days, it’s time to bottle your nectar! Opening the lid, you won’t believe the sweet aroma that’s been bottled up inside! (I have to admit, I cheated. We opened the jar everyday to smell our nectar…it was just so tempting!)

DSC_0275

DSC_0282

First remove whatever blossoms and lemon pieces you can with a fork or spoon.

DSC_0286

Next, tie a cheese cloth around the top of your jar. Strain the nectar thru the cheese cloth, pouring it into a large pitcher.

DSC_0287

DSC_0290

From here, you pour the nectar into the clean bottles or jars you’ve prepared. Make sure you fill the bottles to the top and secure the lids tightly. If done properly, your nectar will last for six months in the refrigerator. After you open a bottle, you’ll have to devour the contents within a month…no problem there! It’s just so good!

DSC_0292

Uses and Recipes:

We use our nectar similar to other syrups or honey.

  • First we made a cold, summer drink by adding 4 tablespoons of the nectar to a quart of water. Yum!
  • You can make a warm, milky, tea-like drink as well. Stir together 1 teaspoon of nectar, 1/4 teaspoon vanilla, and 1 cup of milk for each person. Warm the mixture in a saucepan and pour it into a teapot. (This tea is perfect for summer night tea parties, while watching the stars, lightning bugs, and bats come out!)
  • You can also drizzle your nectar on pancakes or over hot oatmeal or grits for breakfast. Delish!

DSC_0295

IMG_8202


Bjork, Christina and Lena Anderson. “Linnea’s Almanac.” Stockholm: Raben & Sjogren, 1982. Print.

Rain Boot Wreath

I’ve seen old rain boots up-cycled into flower planters before, so I thought, “Why not use them for a Spring wreath!?” This RAIN BOOT WREATH was so quick and easy to put together and the outcome is adorable…perfect for Spring!

DSC_0169

I could’ve gone out and bought some new boots that weren’t dirty, worn, and broken in spots, but that required me to take the kids shopping and more money spent…not my idea of fun! I ended up making these with things we already had: L’s old rain boots and flowers we had leftover from other projects. Every time we walk in through the front door, the rain boots make me think of the many rainy, muddy adventures L went on during the first three years of her life. So much love!

Materials needed:

  • rain boots (kids’, adults’, old or new)
  • artificial flowers
  • rope and/or ribbon
  • scissors

DSC_0149

First, if your boots are dirty, clean and dry them.

DSC_0152

Next, lay out your flowers and decide how you’re going to split them up. When you arrange your flowers, start with the taller and/or leafy flowers first. Put the single, shorter, and more prominent flowers in last. Originally I thought I’d use wire cutters to trim my flowers, but I ended up just bending the wired stems in half, depending on the height I was looking for. This helped them take up room and stay put in each boot!

DSC_0155

DSC_0154

DSC_0156

DSC_0158

Once your boots are filled and arranged the way you like them, tie a rope or ribbon securely to each boot.

DSC_0159

DSC_0160

Now, take the boots to your door and see how they will hang. I ended up tying a knot in the rope down low, tying both halves together so the boots didn’t lean out too far from the door. I also shortened the rope a bit by wrapping and tying it around the wreath hanger.

DSC_0162

DSC_0161

To finish your fun and funky Spring wreath, tie a pretty ribbon in a simple bow around the top and you’re done! So easy, cute and fun!

DSC_0167

Happy Spring!!!

Naturally Dyed Easter Eggs (with Onion Skins & Cabbage)

How beautiful are these Easter eggs!?! Ever since I was a kid and read about dying eggs in onion skins in a nature-craft book, I’ve wanted to try it. I couldn’t believe how easy they were to make and how bright and colorful they turned out! The orange-brownish eggs were dyed in the onion skins, while the bluish ones were dyed using red cabbage. And no, you don’t need to buy a whole bunch of onions to get the skins. Just ask the nearest grocer at the store, and they’ll be happy to let you and the kids dig through the onion bin! You’ll find plenty there! It did not take long at all to dye the eggs in onion skins, while the ones dyed with red cabbage soaked over-night. Just takes a little patience!

DSC_0135

Materials needed:

  • white eggs
  • onion skins
  • red cabbage
  • medium-sized pot
  • water
  • small flowers, leaves, herbs
  • old pantyhose or knee highs
  • twist ties

DSC_0084

First, fill your pot up completely with onion skins. Then, fill with water, leaving a couple inches of space for the eggs.

DSC_0089

Do the same with the red cabbage, chopping the cabbage first.

DSC_0093


Next, put both pots on the stove and turn on high to boil. Let the water simmer for about 5 minutes, then turn the pots off. Let them sit and cool for 5 hours or overnight.

DSC_0095

DSC_0098

To prepare the eggs to dye, to get the beautiful nature prints on them, gather small leaves and flowers from your garden. We even used some weeds with interesting leaf shapes!

Cut your pantyhose or knee-highs in small sections. We used knee highs. I cut them in half and then with the top portion, I cut a slit up the side. With the bottom half, it was easy to just place the egg inside.

DSC_0107

Press a flower or leaf onto the egg and carefully wrap the pantyhose around it. Dipping the leaves in water first makes them stick to the eggs a bit easier.

DSC_0105

DSC_0102

DSC_0104


Twist the pantyhose in the back and secure with a twist tie.

DSC_0103

DSC_0110


Now to dye the eggs! Place your eggs into the pots, making sure they are completely submerged in the water.

DSC_0111

DSC_0115

Put the pots back onto the stove and bring them to a boil again. Turn down to low heat, and let the pots for 20-30 min.

After the water cools a bit, carefully remove the eggs soaking in the onion skins and dry them off a bit on a towel.

DSC_0118

Cut the pantyhose and the eggs will come out carefully. So cool!!!

DSC_0122

DSC_0119

DSC_0124

Place the pot with the red cabbage and eggs in your refrigerator and let them sit up to 24 hrs. Then do the same…removing them from the water and cutting the pantyhose off.

DSC_0129

To make your eggs shine, you can wet a paper towel with vegetable oil and gently rub it onto each egg. Such a naturally beautiful way to celebrate Spring, Easter, or Naw Ruz!!!

DSC_0140