Tin Foil Jelly Fish Craft

I love this super cute, jelly fish craft for so many reasons. Our TIN FOIL JELLY FISH were inspired by a trip to the Baltimore Aquarium and the girls’ fascination with “The Jelly Fish Invasion” exhibit. (Super cool…if you are anywhere near Baltimore, go see it!!!) I love that this craft costs nearly nothing to make and L learned all about textures and rubbings while coloring the foil. And I LOVE the way our jelly fish look hanging in our kitchen window. If you can, place them near an air vent…when the air kicks on the jelly fish will come to life, dancing and swimming in the sun!


“The Jelly Fish Invasion” at the Baltimore Aquarium…

Materials needed:

  • tin foil
  • permanent markers
  • egg cartons
  • other small, plastic containers (think applesauce, olives, etc.)
  • string or fishing line
  • painted stick
  • tape
  • scissors
  • paperclips
  • nail or sharp-tipped tool

First, cut your egg carton into little jelly fish shapes.

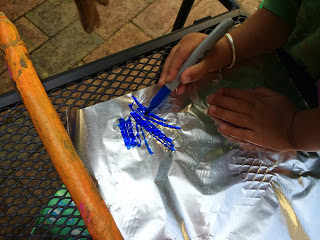
Next, take a few sheets of tin foil and have your children color them. This is a great opportunity to make rubbings. L colored on the patio furniture and bricks, over tree bark, on the textured sidewalk and on her slide. Not entirely necessary, but why not!? Your kids can also try making different patterns if coloring on a flat surface…stripes, dots, swirls, anything goes!


Cut the tin foil into little squares and have your kids wrap the egg carton cut outs with the foil. You may have to help them smooth down the outer edges.


If you have some small, plastic containers to use as well, first poke a hole in the center. Next, cover the containers with the foil too.


Cut strips of tin foil and tape the strips, 2 or 3 at a time, to the inside of your jelly fish.


Using a nail or sharp tool, poke a hole into the top of each jelly fish.

Now, it’s time to hang your jelly fish up. I knew ours would go in our kitchen window, so we hung the jelly fish along a painted stick. You could also make one large jelly fish and hang the smaller ones underneath. That method would be cute if hanging your jelly fish up under a light, in the center of a room.

We hung our jelly fish by stringing them onto fishing line and tying the line to a paperclip underneath each one. Some hung on their own, while others had a second jelly fish hanging underneath. Get creative and have fun with it!


When doing projects like this, it’s definitely easier to have the jelly fish hanging while you are tying them on rather than laying flat on the ground.

Put them up to display and enjoy!!!


DIY Ant Farm

I’m so super excited to share this project with you. ANT FARMS are fun to make and fascinating to observe with your little ones! L and I have been staring at our jar all day, reading kids books on insects, watching some National Geographic clips on ants, and we’ve found some fun facts along the way. Within the first 24 hrs of placing your ants inside your DIY ANT FARM, they will dig tunnels and make chambers right before your eyes!

The ants you collect will most likely be “worker ants” and all worker ants are female…pretty amazing! Most ant colonies contain one queen ant who lays all the eggs, male ants whose only job is to make babies with the queen, and worker ants who gather food, dig tunnels, and protect the colony. When collecting ants you want to be sure to only collect ants from one colony, otherwise the ants will fight to their death inside your jar.

Materials needed:

  • large jar (pickle jar)
  • small jar (jam jar or spice jar)
  • loose, sandy soil (Cactus/Citrus Soil works great!)
  • spoon
  • small jar or cup
  • jam or sugar water

To make your ant farm, place the small jar upside down, inside the larger jar.

Next, carefully spoon the soil into the jar. L would place a spoonful on the top of the little jar and then brush the soil down along the sides. It does not have to be packed tightly, just filled to the top.


To collect ants, put about one tsp. of sugar water or jam into a separate jar or cup and place it outside on its side. This is your ant trap. You may want to set a few ant traps around your garden and be patient. It can take a few days for the ants to discover your bait, but once they do many will follow!

After your ant farm is made and the ants have been caught, quickly and carefully dump your ants inside your ant farm and screw on the cap. You’ll want about 10-20 ants. I think we have about 5 ants in our jar…it takes a couple minutes to find them, but works just fine! They are busy digging all those tunnels and chambers all by themselves!


Once a week, open the lid to your jar and place a few drops of sugar water and/or a couple pieces of bird seed. You don’t want to feed them too much, once a week is plenty! When you open your jar to feed the ants, plenty of fresh oxygen will enter the jar as well…no need for holes! Keep your ant farm indoors, not too hot and not too cold, away from direct sunlight.

For more info on ants, check out some books at your local library and click here to see some fascinating photos and videos from National Geographic! Enjoy!!!


DIY Tin Can Bird Feeder #2

To celebrate the last week of National Bird Feeding Month, L and I made these adorable TIN CAN BIRD FEEDERS! They are really easy to make, look beautiful and cost nothing…just go digging through your recyclables! Not only will the birds love this winter treat, this bird feeder would make a fantastic gift for your children to make for a friend, parent or grandparent!

IMG_0317

IMG_0150

IMG_0141

Materials needed:

  • tin can w/ lid
  • wooden paint stirrer
  • pliers
  • acrylic paints
  • hot glue gun
  • string
  • glossy sealant (optional)
  • church key can and bottle opener (optional)
  • bird seed


IMG_0107

IMG_0111

First, make sure your can is clean and remove the label.

IMG_0108


Using your hands, carefully bend the lid of the can in half. Using pliers, squeeze it flat.

IMG_0109


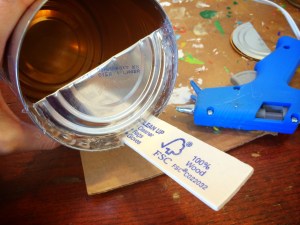
Using the hot glue gun, glue the paint stirrer inside the can. You can break the stirrer if it’s too long. This will be the birds’ perch.

IMG_0113


Next, glue the bent lid back into the can as pictured. Try not to make a huge mess with the hot glue gun, but if the glue shows it is no big deal…you will paint over it next.

IMG_0114


Paint the can any way you like.


IMG_0125

IMG_0128

IMG_0129


After the paint dries, you can use the can opener to make holes in the can from where you’ll hang it on a string. On one of our cans I placed two holes on the top…this bird feeder will hang from an old clothes line end.

IMG_0136


On our second can I made holes in the back of the bird feeder…this one we will tie onto a fence. I was careful to put the holes in the can after we painted it, because I wanted to avoid any sharp edges while L was handling the bird feeder.

IMG_0135


If you’d like your bird feeder to have a shiny, glossy finish, spray the can with a glossy sealant. It only takes 15-30 min to dry and will help protect the paint as well!

IMG_0137


Thread string through the holes of the bird feeder and fill with bird seed!


IMG_0138

IMG_0150


Now, find the perfect spot to hang your TIN CAN BIRD FEEDER! We placed one of ours right outside our kitchen window…the girls will love watching their little wildlife friends snack throughout the day! Enjoy!


IMG_0141

IMG_0144

IMG_0142


IMG_0191


In case you missed it, here’s the first DIY TIN CAN BIRD FEEDER we made! Another fun nature craft!

IMG_3262

Bird Feeder Garland and Bird Feeder Ornaments

The BIRD FEEDER GARLAND is one of my favorite Winter crafts. It’s fun to make and even more fun to watch the wildlife activity that arises in our backyard after we hang it up! This week we’ve watched birds nibbling, followed by squirrels chasing the birds, then snacking themselves, and lastly, we observed four neighborhood cats stalk the squirrels for two days straight. Easy Winter entertainment…the girls and I have been glued to our kitchen window! The BIRD FEEDER GARLAND itself looks beautiful hanging in a tree, around a bush, or along a fence!

IMG_9838

Materials needed:

  • dental floss
  • unsalted peanuts in their shells
  • old apples, oranges, cranberries and/or raisins
  • embroidery needle
  • cardboard


IMG_9795

Thread the dental floss into the needle. I use dental floss for lots of projects, because it’s always on hand and is super-sturdy! Using the needle, string the peanuts onto the dental floss. Having cardboard under the peanuts, makes it easier to push the needle through. Tie a knot after you string the first peanut to hold the rest on!


IMG_9797

IMG_9796

IMG_9799


You can cut an apple into small pieces to string as well. If you have dried fruit, you can string that along with the peanuts too.


IMG_9798


My helper squirreling away some apple bits…

IMG_9800


Once the peanuts are all strung, find the perfect place to hang your BIRD FEEDER GARLAND!


IMG_9832

IMG_9830


The BIRD FEEDER GARLAND looks great on it’s own, but to really give the birds a treat, add some BIRD FEEDER ORNAMENTS as well! Kids love helping with this part!

IMG_9842


Materials needed:

  • dental floss
  • pinecones
  • peanut butter
  • bird seed
  • butter knife
  • 2 plates


IMG_9803

First, tie the dental floss in a knot or two around the top of the pinecone.


IMG_9804

Using a butter knife, slather on some peanut butter.


IMG_9805

IMG_9806


Pour some bird seed out on a plate and let your little one roll the peanut butter-covered pinecone through the bird seed.

IMG_9811


Hang the pinecones from your BIRD FEEDER GARLAND!


IMG_9819

You can also slice some apples and/or oranges to hang from the garland. And if you make these DIY Cereal Bird Feeders, you can add them as well! Enjoy!!!

IMG_9820

IMG_9709


Winter Shelter for Strays

Though we don’t own any furry pets ourselves, our neighborhood seems to have its own little cat community. On any given day we may have up to 5 or 6 cats playing in our yard, hiding under our front porch or napping beneath our Little Free Library. Some of the cats have collars and tags, though quite a few do not. With the temperatures dropping well below freezing, L and I decided to make a warm place for our kitty friends to rest.


IMG_9121

IMG_6569


Materials needed:

  • styrofoam cooler (found at your local grocery store)
  • knife
  • paints (optional)
  • old towels or bedding
  • tape

First, remove the lid and turn the cooler over. Using a knife, cut a small doorway for the cats to go in and out. Next, paint the cooler whatever snazzy way you like!


IMG_9108

IMG_9111


Once the paint is dry, fold up some old towels or bedding (we cut up an old mattress pad) and place it inside the lid.

IMG_9112


Put the cooler on top of the lid and tape it in place.


IMG_9113

IMG_9114


(My friend Helen takes this project a step further…she places the styrofoam cooler inside a plastic rubbermaid-like box with a hole cut out and layers hay in between! Extra warm and cozy!)

Now for the final step, find a safe place near your home to put your WINTER SHELTER FOR STRAYS, preferably up against a building and out of the wind.


IMG_9115

IMG_9121


We put our Winter Shelter in our backyard where we often see cats passing through and, an extra bonus, we can see the shelter from our kitchen window. I know L will be watching for her feline friends first thing every morning! She was so proud today knowing she was helping others!

Scavenger Hunt

SCAVENGER HUNTS are lots of fun for kids (and adults) of all ages! They only take a couple minutes to throw together and can be done just about anywhere…outside on a beautiful day, inside on a rainy day, in your backyard, on a walk around town, at an art museum or the grocery store. At times when kids may become impatient or get the wiggles, a scavenger hunt can be a great way to keep them entertained!

Basically all you need is a list of things to look for and a small bag to collect your finds. It’s that easy!

Our  “around town” scavenger hunt last weekend included the following: an orange leaf, a yellow leaf, a rock, a stick, a feather, a button, a flag, an acorn, a pumpkin, a scarecrow, books, a man wearing a hat, a dog, a flower, and berries. We put the small items that we found in our little bag, while the things that were too big (like a man wearing a hat) were just checked off the list.

You can make a scavenger hunt for long car rides too! Obviously you won’t be filling a bag with things, but your kids can check items they see off a list…or, even better, put it into a “BINGO” type format and you have a car game! See who fills their card first!

Another variation: Leave a trail of clues, leading your kids to a surprise in the end! We like to do this one around the house, sending L upstairs, then downstairs, into cabinets, and under pillows, all to find a hershey kiss tucked into one of her shoes at the end. It takes a little more prep time, but is oh so fun!!!

Where will your SCAVENGER HUNT take you?

Pine Cone Flowers

Have I mentioned before how much I love Fall?! So many things to find and create with…like these mini-pine cones! I’ve been thinking of making “pine cone flowers” for months now, and when L and I found these miniature ones it was a done deal.

Materials needed:

  • miniature pine cones
  • twigs (the more lil knobs and branches the better)
  • acrylic paints
  • hot glue gun and glue

First, choose what colors you’d like your “flowers” to be…we choose multi-colored! Paint each little pine cone as you like. Set aside to dry.


Next, paint your twigs a mixture of dark and light greens. Allow to dry.


Once everything is dry, you can assemble your pine cone flowers. Using a hot glue gun, put a little dab of glue on the tip of a twig. Quickly press and hold a pine cone in place. Repeat until all your pine cones are used up.


So cute, huh!? Arranged in a little, antique bottle they make a sweet gift for a child or an adult.

Leaf Prints…Pillowcases and T-Shirts

Ever since we put up L’s “big girl bed” a couple months ago I’ve been looking for the perfect pillow sham. I finally decided, “Why not just make one!?” And that’s exactly what we did today! I love the outcome…it turned out even better than I imagined it would! The pillow cover will last for years and we can always look back on this perfect Autumn day. We followed it up by making some matching Fall shirts for the girls as well!


Pillow Cover

Materials needed:

  • pillowcase, ironed if needed
  • a few scraps of cardboard
  • paper towels
  • acrylic paints
  • brushes and palettes (we use old, plastic lids)
  • leaves


Before you start painting, prepare your area. You’ll need a piece of cardboard to paint the leaves on top of and a piece of cardboard to slide into the middle of the pillowcase, so no paint seeps through. If the cardboard inside the pillowcase is ridged, you may want to add an old, silicone cutting board or piece of card stock underneath as well. You wouldn’t want the ridges to effect the leaf prints.

Starting with the larger of your leaves, paint the underside of the leaf and then carefully press it onto the pillowcase. Repeat with different colors, different shades and different sizes until you’re happy with your final project. We started with various shades of orange and then added a few reds, yellows and greens. Likewise, we started with large leaves and ended with a few tiny ones.


T-Shirts

Materials needed:

  • t-shirts, ironed if needed
  • a few scraps of cardboard
  • paper towels
  • acrylic paints
  • brushes and palettes (we use old, plastic lids)
  • leaves

You will basically make leaf prints onto your t-shirt in a similar manner as with the pillowcase above. The only difference is that you’ll want smaller cardboard pieces to slide into the shirt and one really narrow piece to slide into the sleeve. As you can see, after printing leaves on the center of the shirt I added one tiny, falling leaf to the sleeve.


Cute, huh!? And easy! What else will you make leaf prints on? I think an Autumn table runner would be beautiful as well! There are so many possibilities! Enjoy!

The Buckeye Zoo (and Other Fall Seed Creations)

I just love this time of year! One of my favorite things to do since I was a kid and now with my own kids is collecting the Fall leaves, nuts, and seeds. L says she likes to be a “thing finder” like Pippi Longstocking on our nature walks. This year, as we’ve been foraging, we’ve also begun gluing some of our buckeyes and other nuts and seeds together into animals.

Materials needed:

  • buckeyes
  • acorns
  • helicopter seeds
  • whatever other nuts and seeds you can find
  • feathers
  • twigs
  • glue (I used a hot glue gun, but let L use wood glue.)
  • acrylic paint
  • sealant

Before you start gluing, it’s important to make sure that all your findings are bug-free and that they’re dry. Put a layer of tinfoil on a baking sheet or pan and spread your nuts and seeds out on top. With your oven set to 200 degrees, bake your acorns, walnuts and buckeyes for about 1.5 to 2 hours. Turn the seeds over about every half an hour to prevent burning. With some of the spiky or more delicate seeds, bake them at a lower temperature…around 180 degrees…for an hour or so.

After the seeds are baked and cooled, you can start gluing together your creatures. I prefer using a hot glue gun…it’s quick and holds the buckeyes and other seeds together nicely. I let L glue some of her own with some standard “wood glue” though. It takes longer to dry, but it’s much safer for a 2 year old to use on her own!


The elephant was the first member of our Buckeye Zoo…definitely L’s idea! She looooves elephants!


Here’s a little bunny rabbit…I think tomorrow I’ll make some flop-eared bunnies for a dear friend of mine. So simple, but so cute!


I thought this one was gonna be a porcupine or hedgehog, but L said it looked most like a sheep. I agree!

And I just love this bird. We’ll be making him/her a nest by gluing together twigs later this week.


While most of our creatures were complete after gluing, we chose to paint others…like L’s caterpillar and the turtle and dragonfly we made together.


What Buckeye creatures will you and your kids make this year? We’d love to see your creations shared here in the comment section…there are so many possibilities! Have fun collecting and creating!!!

Clothespin Butterflies

These clothespin butterflies are fun to make and can be clipped just about anywhere! L and I started this craft on a whim a couple weeks ago, we were trying to make butterflies with things we already had. Hopefully you have all the materials hiding around your house too! You could use paint or markers to color the clothespins. Using markers, the butterflies could be finished in one morning. We chose to paint ours…L loves to paint and I like when projects can be stretched out, keeping us busy for a few days.

Materials needed:

  • clothespins
  • paint or markers
  • pipe cleaners
  • beads
  • hot glue gun and glue

First, paint the clothespins. We painted one side, let them dry, then painted the other. I helped with the touch-ups…filling in any little spots that were missed. Let the kids have fun with it! L was happy painting hers all sorts of colors…there’s no right or wrong way.


Next, choose the color pipe cleaners you want to use for wings and the color beads. We used three colors of beads for the wings. This was a great learning activity to teach little ones about patterns! L strung the beads on the pipe cleaners, repeating our 3-bead pattern 4 times for each wing.


Spread the beads out a little bit, so the color of the pipe-cleaner can be seen. Next, loop one end of the pipe cleaner around to the middle of the pipe cleaner and wrap it once or twice, leaving about half an inch of the end sticking out. Repeat with the other side of the pipe cleaner, forming a figure-8 butterfly wing shape. Twist both half-inch ends together. (This step is much easier to see in the pictures than to explain!) Repeat for the second wing.


To make the butterfly’s antennas, cut a pipe cleaner in half. Then, bend that piece in half. Put a bead on each end of the antenna and curl it down a bit.


After you’ve shaped both butterfly wings and the antennas, it’s time to glue them to the clothespin. Using the hot glue gun, put a little bit of glue on the inside ridge of the clip and quickly press the middle of the antennas in place.


Next, put a bit of glue inside the wire coil and push one of the wings in. Repeat the same on the other side, only put the glue above the wire coil and slide the wing in place.


Cute, right? These would be beautiful hanging in a window with the sun lighting-up the beads! We’re making something special for WB’s room with ours…I can’t wait to show you next week! Enjoy!