Leaf “Glitter” Art

As the girls and I were crunching our way through leaves this week, this leaf “glitter” project came to mind. The leaves in our neighborhood are changing yet again…this time from their vibrant reds and oranges to dried-up, crunchy browns. No fear though, we can get one more craft out them!

Materials Needed:

  • crunchy leaves
  • paper (look in the recycling basket first!)
  • white glue
  • a small container or bowl

First, crumble the leaves into the tiniest pieces possible and collect them in a small dish.

Next, draw a Fall picture on the paper with the white glue. Feel free to draw some for your little ones, but let them scribble a glue picture too!


Now, as you would do with glitter, sprinkle the leaf dust all over the glue. This was definitely L’s favorite part.


Once the glue is all covered, gently shake the excess leaf “glitter” off and reveal your masterpiece!


Pumpkin Seed Necklaces

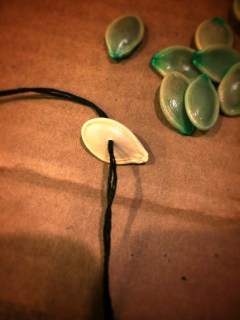
There’s a lot of pumpkin carving going on this week, so I thought I’d hurry and get this one out there! Have you ever turned your pumpkin seeds into jewelry? The key to stringing pumpkin seeds with ease is to make sure that they’re fresh…no baked or thoroughly dried pumpkin seeds here! This year we tried dying some seeds before stringing them too. This craft is super easy and so much fun!

Materials needed:

  • fresh pumpkin seeds
  • dental floss, embroidery floss, or thread
  • sewing needle

For colored seeds you’ll also need:

  • food coloring
  • vinegar
  • boiling water

As you carve your jack-o-lanterns, separate the pumpkin seeds from the pulp. Rinse the seeds in some water to get any excess pumpkin guts off.


If you’d like some colored seeds, boil a cup of water. Add 1-2 tsp of vinegar and lots of food coloring. (I basically followed the directions for dying eggs on the food coloring box, adjusting it a little bit.) Let the water mixture boil for 5 minutes.

Turn the stove off and add your pumpkin seeds. Let them sit for 15-20 minutes, stirring the seeds a couple times, until you achieve the color you like.

Pour your seeds into a colander to drain them and run some cold water over the seeds briefly. Spread the seeds out on some cardboard to dry a bit. You can pat them dry with a paper towel too if needed.

Now, time to make some necklaces! Using the needle and thread (or dental floss), string the seeds on one at a time. If the seeds are a little tough, you can lay them flat on cardboard and push the needle through.


This is a great time to talk to your kids about patterns! Have your little ones pick out seeds and lay them in order to help you string. When you’re finished threading seeds, tie the ends in a knot or two to complete! Enjoy!


Some early morning necklace-making in our pajamas in Our Beautifully Messy House…


DIY Story Stones

This is one of my favorite “games” that I’ve made for our girls, as well as one of my favorite gifts to make for other children. It’s such a versatile, quirky activity for kids (or adults) of any age and the possibilities of play are endless. We take them on long car trips, pull them out when friends are over, and use them during quiet-time when WB is sleeping.


I’ve read before that “story stones” come from the Waldorf school of thought, believing that it is far more important to teach children how to creatively weave a story at a young age than it is to teach them how to read and write. After the directions for making story stones, read on for various ways of how to play with them!


Materials needed:

  • colored pencils and paper
  • sticker book (optional)
  • old workbooks with lots of little pictures (optional)
  • scissors
  • smooth stones (found at the dollar store)
  • Mod Podge and sponge-brush

First, spend some time doodling little pictures on white paper. Think about what pictures would make up a good story…include people and animals, active words, weather, vehicles, houses, etc. Try to keep some of your pictures a little bit vague. For instance, instead of drawing a plate of spaghetti you could draw a fork, knife and spoon and the child playing could imagine any kind of meal. A picture of a foot could lead to putting on socks and shoes or it could be used for walking/running. A swirly doodle could be used for wind, but it could also be used for music, dancing, painting, water, etc.

Next, cut out each of your little doodles. If you don’t want to draw your pictures, or you’d like to use various mediums as I do, you can also cut pictures out of old workbooks or children’s dictionaries, or use a sticker book. I tend to look for such books whenever I’m browsing a flea market, antique store, or the dollar store.

After the pictures are cut out and ready, go ahead and wash and dry your rocks. Working one stone at a time, apply a little bit of Mod Podge to the smoothest surface of the rock then lay a picture in place. Apply more Mod Podge over top of the picture, making sure you smooth down all edges and avoid any wrinkles in the paper. Mod Podge dries pretty quickly. After the stones are all dry, I like to go over them all with another thin layer of Mod Podge to give them an even smoother look.


Once the stones are all dry, you’re ready to play!


(In case you want story stones the really easy way and you live in the Winchester area, Steamy’s Cafe on Piccadilly St currently sells story stones…1 for $1 and 20 for $15! They make great gifts!)

Ideas for Play:

SOLO STORY-BUILDING: Take turns building your own stories.

DICTATING STORIES: This is a good one especially with young children…take turns telling a story, while the other person finds the stones and puts them in order.

PARTNER OR GROUP STORIES: Take turns, picking stones and adding to the story.

RANDOM SELECTION – MYSTERY STORY: Turn all the stones over and take turns randomly selecting a stone to build a story.

ONE STONE STORY: Select only one stone at random and make up a whole story revolving around the stone. Or tell a silly sentence using the stone in the sentence.

CLASSIFYING: Put the stones into groups based on theme, color, likes and dislikes, etc.

EXPLORING: Let your child use the stones while playing with blocks or trucks or coloring or playing house. The stones can become pets, cars, food, etc. If the children are having fun imagining, just let them go with it!

What other ways have you found to play with your story stones? Please share with us in the comments below!

DIY Baby Play Area + DIY Baby Toys

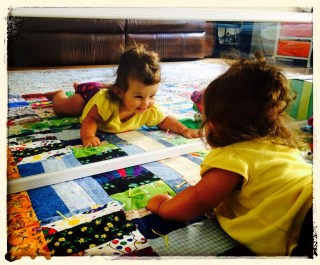
Over the past few weeks I had been thinking of putting together a little play area for WB, now 7 months old. WB is definitely our laid back kid, compared to her wild-child, older sister. She is perfectly content sitting back and observing the world around her. WB can roll over and push herself up on her belly, but she doesn’t do it very often…so I thought a little play area may be fun and may encourage her to move around a little more. And boy was I right…she LOVES it! When I saw some long mirrors for a good deal at Lowe’s last week, inspiration struck and WB’s play area was put in motion!

Materials Needed:

  • comfy, colorful blanket
  • long mirror
  • 2 med-sized boxes
  • 6 to 8 bricks (or other heavy items)
  • colored paper
  • tape or glue


To hold the mirror in place, in a safe and sturdy way, I decided to fill a couple boxes with bricks. (We just happen to have a pile of them sitting outside of our house, leftover from a patio project.) You can also use heavy rocks, bags of sand, or whatever is most convenient for you! Brighten-up a plain cardboard box by taping colored paper to it. I originally planned to cover the diaper-box I was using as well, but then I remembered how much babies like other smiling babies and kids, so I only partially covered it. The box was colorful already too!


Other things you can put in or near your baby’s play area include:

Sensory Bags (DIY link here.)

Sensory Bottles for Baby (link here.)

Sparkle Bottles (link here.)

Plush Animals and Toys (DIY bunny link here.)


Colorful Garland…I put this feather one up above for WB to look at while on her back. I love how the feathers gently “dance” continuously. (DIY feather garland link here!)


What will you include in your baby’s play area??? As always, never leave your children unattended and make sure all toys you put in the play area are baby-safe! Have fun watching your little ones explore!


Play Dough Funny Faces w/ DIY Outlet Covers

When I saw a variation of this craft years ago, I stored it away in the back of my mind, just waiting for L to be old enough to make and play with these! The outlet covers I saw were made using Sharpie Markers, but I love the color we brought to ours with paint! The outlet-cover funny faces are as much fun to make as they are to play with! L and I spent one day painting the outlet covers, let them dry overnight, then the next day, we were able to glue on the googlie eyes and stick them in our play dough! So silly and so much fun!


Materials Needed:

  • outlet covers
  • paint (acrylic and/or puffy paint)
  • googlie eyes
  • jewels (optional)
  • hot glue gun and glue
  • your favorite play dough
  • egg cartons (optional)


The first thing I did, preparing our work station, was to cut off the center tips of an egg carton. I then put an outlet cover in each opening so L could paint them with ease.


Then, paint away! I tried to paint mouths and noses on the outlet covers, while I let L paint hers however she pleased. I figured the ones she painted could be used to glue on the eyes and jewels later on.


After the glue dries, you can go over some with puffy paint too! I thought it was a fun effect for big, puffy lips!

Using a hot glue gun, attach some googlie eyes and jewels to a few of the other outlet covers.


Now it’s time to play! Just push the outlet covers into your favorite play dough…the funny face possibilities are endless!


I love how the play dough doesn’t stick to the outlet covers, rather it just falls off, making clean-up a breeze! Please share pictures of your funny faces…we’d love to see them! Enjoy!

2-Ingredient Gooey Dough

L and I are always looking for new play dough recipes, so when I came across this one I just knew we had to make it! We call it “Gooey Dough” because it’s so stringy, smooth, and gooey! It feels good to squish through your fingers and fun to strrrrreeeeeetch as long as you can!

Materials needed: 

  • 1 to 1 1/2 cups, hair conditioner
  • 2 cups, cornstarch

Using a large mixing bowl, put both ingredients together and mix, mix, squish, mix!


I have to admit that after about a minute, I thought this was the messiest, worst play dough ever made…BUT as I washed my hands, L kept squishing it together and a couple minutes later we had this wonderful concoction!!! I’m so glad she kept at it, because Gooey Dough has become one of our favorites! L has played with it for hours, day after day.


You can add some food coloring if you like or toss in some glitter, but we were happy with the Gooey Dough the way it is…it’s so white, smooth and the conditioner gives the whole kitchen a fresh scent! It’s truly the most luscious dough we’ve ever made!


By day two, I came up with a couple tips…

-Store the dough in a sealed plastic bag or storage container (I’ve read that it keeps for months).
-It’s best for your kids to take their clothes off to play or wear a smock shirt! It can get messy fast!
-This dough just asks to be squished all around, so tape down a plastic/silicone chopping mat on the table or work surface.


Get messy and have fun!!!

Homemade Paper and Seed Paper

Last night, while cleaning up from dinner, I told L not to throw away her pudding cup because it can be recycled. She replied, “What’s recycle? What’s it mean?” So as I was doing my best to explain to a 2-year-old how plastics are melted down and made into new containers, I remembered how I used to make paper as a kid…it’s the perfect activity to teach kids of any age how things are recycled! I lost my paper-making kit years ago, but it didn’t take long to locate and piece together the materials needed for homemade paper. I love this activity because your kids can help with each of the steps, keeping them busy and entertained the whole way through!


Materials needed:

  • old paper
  • water
  • blender
  • 2 small window screens
  • felt (or thin cloth like a cloth diaper)
  • sponges
  • plastic tub or wide container
  • seeds (optional)


First, dig through the recycling basket for colorful paper. (I always save colored-on pieces of construction paper for projects like this!) Have your kids help you tear it up into 2-inch pieces and throw it all into a large bowl.


Add some water to the bowl, covering all the paper pieces, and let it soak thoroughly for a few minutes. Your kids can now reach in the bowl to see how the wet paper feels compared to the dry.


Next, scoop and dump the paper and water into your blender. There’s no exact amount of water needed since it’ll all be squeezed out in the end. Blend the mixture for about a minute. The pulp should resemble the consistency of oatmeal.


Now for the fun, messy part!!! Lay one of the screens over the plastic tub or container. (You could use your sink, but it’s easier for kids if the project is done on the floor!)


Next, dump the paper pulp mixture out on top of the screen. Let your kids help you spread it around gently.


Then lay a large piece of felt on top of the mixture and next, the second window screen.


Using sponges press down on the felt, squeezing most of the water out. We started in the middle of the felt and worked our way out, pressing the paper underneath nice and flat.


Next, take off the top screen and, placing one hand on top of the felt, quickly flip the other over. Remove the screen and leave the paper on the felt to dry. I did this last step outside on our picnic table so the paper could dry in the sun and summer heat. It takes about a day to dry on its own. When I was a kid, doing a similar paper-making project, the paper and felt pieces were much smaller and I’d pop it in the microwave to dry. The paper would curl a little bit sometimes, but it was quick and easy.


Here’s our finished paper! It doesn’t look like your typical paper, but it is beautiful with all the bright yellows, reds and oranges mixed in! It’ll be perfect to paint on later in the day!


Making Seed Paper: 
To make seed paper, add a handful of flower seeds to the pulp before squeezing all the water out. After the paper dries, you can cut it up into squares and gift it to friends. They can plant the paper strips in soil in the Spring, water and wait for their flowers to grow! We used our leftover, perennial Balloon Flower seeds…they’re easy to grow and look beautiful anywhere!


Other Ideas:

  • Before squeezing the water out of the paper-pulp mixture, add some flower petals to the pulp for a fresh and colorful look!
  • After squeezing the water out and removing the screens, use cookie cutters to carefully cut the paper into shapes. After they dry, you can punch a hole to hang the paper shapes and make ornaments! We may do this around the holidays, using holiday-colored paper.
  • You can also add glitter to the paper pulp, before squeezing the water out, to give your paper a little sparkle!


Have fun and get messy! Your kids will love you for it!!!

Sensory Bags

These bags are great for babies to play with and are a nice calming activity for bigger kids…heck, I even have a hard time walking by one without squishing it! They always feel so cool to the touch! We made ours pretty simple, but you can always embellish yours a bit by throwing some glitter in or some flat foam shapes.

Sensory gel bags - 1


Materials needed:

  • Ziplock quart-size bags
  • alcohol wipe
  • hair gel
  • food coloring
  • clear packaging tape


First, use the alcohol wipe to easily remove the Ziplock logo from the bag.


Next, squirt about a cup of hair gel into the bag.

Then add a few drops of food coloring. If you’re using glitter, throw that in too.

Seal the bag shut, making sure you leave little to no air in the bag. Squish the gel and food coloring together, adding more food coloring if you’d like a deeper color.

Reinforce all the edges of the bag with the packaging tape, especially the top, ensuring that the bag won’t split at its seams letting the gel-food coloring mixture out. All done!

WB likes to squish the bags on the kitchen floor, while L likes me to tape hers to the window, letting the sun shine through. As with most toys, you should never leave your baby alone with the sensory bags…you can never be too safe! Enjoy!

New Ways to Paint

I have never met a person, young or old, who didn’t love to paint! So here are over 10 new ways to paint…time to get messy and have some fun!!!


Some tips before we start:

  • Use an old shirt or apron for a smock shirt…or on a hot day, have your kids take off their shirts!
  • When using finger paints, tempera paints or liquid watercolors squirt the paints onto food container lids (Gladware, Tupperware, etc.). Then you can just rinse and toss into the dishwasher to clean them…better for the environment than paper plates!
  • After your child’s done painting outside, find a big rock or brick for them to paint too…this will hold the paper down and keep it from blowing away while the paint dries. We just keep the rocks outside and the rain washes them clean so they’ll be ready for next time.


New Ways to Paint:

“Clean” paintingPaint with water!

This is a great activity for the beginner painter! Inside, have your kids paint with water on construction paper. As the water dries, the paper can be used over and over again. Outside, kids can paint with water on a cement driveway or sidewalk with the same effect. It’s simple, clean, and kids love it!


Paint in a Bag

So quick, so easy and no mess! Put any kind of paint in a gallon-sized bag and tape it to a window! It’s fun to mix and swirl the colors together, making different textures in the paint with your hands. *hint: To get the white label off your plastic bags, just use an alcohol wipe! Easy peasy!


Paint with Flowers

This is definitely a Spring or Summer-time craft! Have your kids walk around outside, picking different sized flowers and grasses to paint with. The outcome is pretty cool!


Paint with Bubbles

I remember doing this one as a kid in school. In a small cup or bowl mix together a lot of paint, a tablespoon or two of dish soap, and a very little bit of water. Then, using a straw, have your kids blow bubbles in the cup until the bubbles rise up and over the edge. At this point you can quickly lay paper over the cup to leave a bubble print. You can also place the cup on a piece of paper before you start and let the bubbles pour over the cup and onto the paper. This one is fun to experiment with!


Paint with Cotton Balls

Clip clothespins onto the cotton balls and use in the place of brushes. L enjoyed making dots with this one. I’ve seen “cloud” pictures before where you make a cloud stencil with a piece of cardboard, lay the stencil over blue paper and use cotton balls and white paint to paint the clouds.


Paint with PomPoms

This is similar to painting with cotton balls. Here are some of my friend Katie’s kids using pompoms instead of brushes. So many colors and so much fun!


Finger Paint

This one is not new, but it is fun! You can always take it to the next level and paint with your feet instead! At Easter this year, we used finger paints and our knuckles to make knuckle carrots.


Paint with Household Brushes

We made fireworks with kitchen brushes this 4th of July. Old toothbrushes would work great too!


Paint with Sponges

Similar to household brushes, use sponges to paint. You can cut up sponges into shapes to stamp with or you can also find a variety of sponge-brushes at your craft store.


Paint Each Other

You don’t have to use face paint to paint your face. Watercolors work great too and wash off in seconds with warm water. I mean, why not let your kid paint green dots on your face?


Paint like the Masters

There’s no reason not to teach even the youngest kids about the extraordinary masters of the paint world. You can let your kids paint like Michelangelo and set-up a mini-Sistine Chapel; using Q-tips have them paint dots like Georges Seurat; or lay paper under the swing-set out back, having your kids swing on their stomach, paint brush in hand, creating a Pollock-like masterpiece.


For some Monet inspired art, check out this post:

Playing Monet.

I’m sure there are other fantastically fun ways to paint that L and I haven’t tried yet. Which ones have you done??? Please share in the “comments” section below!