DIY Witch Legs

So I looked around for a tutorial online for how to make “Witch Legs” and they were all much more complicated than they needed to be! People using irrigation tubing, tube socks with sand and tape, mannequin legs, etc… I don’t know about you, but I’m all for cheap and easy! So I tried it my way, fingers-crossed that it’d work out, and it did! I just love our witch legs…costing under $10, they took about 15-20 minutes to make!

Materials needed:

  • heeled, sparkly shoes (find them at a thrift store!)
  • kids, knit halloween tights
  • poly fil stuffing
  • hot glue gun and glue
  • scissors

(I originally thought I’d decorate the shoes with some pipe cleaner curlicues, but they ended up looking best without! That’s why the pipe cleaners are pictured here, if you’re wondering.)

First, stuff the tights with the poly fil. Leave about 4-5 inches at the top not stuffed.

Next, cut the legs off the tights, as far to the top as possible. Then tie a knot in each.


Position one foot into a shoe to have a good idea how it will set. Then, starting with the toes, glue each foot into the shoe. It’s okay if the “foot” is smaller than the shoe…it probably will be because they’re adult shoes and kid’s tights. You can continue pushing the leg down into the shoe just past the heel and nobody will be able to tell the difference.


And now for the fun part…find the perfect spot to display your witch legs and surprise the neighbors! If you have an overhanging porch on your house or a large bush in the yard, you can hide the ends underneath. There’s about a half-inch gap between the siding of our house and the front porch that I was able to wedge the ends down into. A big flower pot set on top would work too! Get creative and have fun! Ding-dong the wicked witch it dead!!!


DIY Cardboard Tube Bracelets and Watches

This is one of those things that I threw together while fixing breakfast one morning. L has a little craft corner, just a chair pulled up to the kitchen counter, next to where we cook and prep food. She was just looking for something to get into on this particular morning, so I pulled some tubes out of our recycling basket, cut them in half and gave her some markers. L doesn’t use markers very often, so when she does get to use them for a craft she is THRILLED and works for at least 30 min to an hour!

Materials needed:

  • old paper towel or toilet paper tubes
  • markers (or paint)
  • scissors

Other optional embellishments:

  • jewels, sequins
  • poof-balls
  • buttons
  • macaroni noodles
  • string
  • duct tape
  • hot glue gun and glue


 The first step, is to make one cut up the side of the tube. Then cut the tube in half or into pieces, depending on how wide you want the bracelet.

Next, have your kids color the tubes. As you can see here, it was easiest for L to color hers while it was curled around a bottle of paint. A banana or thin rolling pin would work great too!

After the tubes are colored you can glue on any embellishments that you have on hand. L is only 2, so her coloring is basically scribbling…the poof-balls and jewels give her scribbling bracelets a little more bling.


Depending on the brand and type of cardboard tube you are using, you can always make the bracelets more secure with some snazzy duct tape too! Our toilet paper rolls were plenty sturdy, but paper towel rolls were thinner and weaker and needed a little support!


And don’t think this craft is just for girls! Guys can certainly wear bracelets! What Dad wouldn’t want a cardboard tube watch? It’d make a fun lil addition to a Father’s Day gift or birthday gift.


Have fun making something out of nothing!

New Ways to Paint

I have never met a person, young or old, who didn’t love to paint! So here are over 10 new ways to paint…time to get messy and have some fun!!!


Some tips before we start:

  • Use an old shirt or apron for a smock shirt…or on a hot day, have your kids take off their shirts!
  • When using finger paints, tempera paints or liquid watercolors squirt the paints onto food container lids (Gladware, Tupperware, etc.). Then you can just rinse and toss into the dishwasher to clean them…better for the environment than paper plates!
  • After your child’s done painting outside, find a big rock or brick for them to paint too…this will hold the paper down and keep it from blowing away while the paint dries. We just keep the rocks outside and the rain washes them clean so they’ll be ready for next time.


New Ways to Paint:

“Clean” paintingPaint with water!

This is a great activity for the beginner painter! Inside, have your kids paint with water on construction paper. As the water dries, the paper can be used over and over again. Outside, kids can paint with water on a cement driveway or sidewalk with the same effect. It’s simple, clean, and kids love it!


Paint in a Bag

So quick, so easy and no mess! Put any kind of paint in a gallon-sized bag and tape it to a window! It’s fun to mix and swirl the colors together, making different textures in the paint with your hands. *hint: To get the white label off your plastic bags, just use an alcohol wipe! Easy peasy!


Paint with Flowers

This is definitely a Spring or Summer-time craft! Have your kids walk around outside, picking different sized flowers and grasses to paint with. The outcome is pretty cool!


Paint with Bubbles

I remember doing this one as a kid in school. In a small cup or bowl mix together a lot of paint, a tablespoon or two of dish soap, and a very little bit of water. Then, using a straw, have your kids blow bubbles in the cup until the bubbles rise up and over the edge. At this point you can quickly lay paper over the cup to leave a bubble print. You can also place the cup on a piece of paper before you start and let the bubbles pour over the cup and onto the paper. This one is fun to experiment with!


Paint with Cotton Balls

Clip clothespins onto the cotton balls and use in the place of brushes. L enjoyed making dots with this one. I’ve seen “cloud” pictures before where you make a cloud stencil with a piece of cardboard, lay the stencil over blue paper and use cotton balls and white paint to paint the clouds.


Paint with PomPoms

This is similar to painting with cotton balls. Here are some of my friend Katie’s kids using pompoms instead of brushes. So many colors and so much fun!


Finger Paint

This one is not new, but it is fun! You can always take it to the next level and paint with your feet instead! At Easter this year, we used finger paints and our knuckles to make knuckle carrots.


Paint with Household Brushes

We made fireworks with kitchen brushes this 4th of July. Old toothbrushes would work great too!


Paint with Sponges

Similar to household brushes, use sponges to paint. You can cut up sponges into shapes to stamp with or you can also find a variety of sponge-brushes at your craft store.


Paint Each Other

You don’t have to use face paint to paint your face. Watercolors work great too and wash off in seconds with warm water. I mean, why not let your kid paint green dots on your face?


Paint like the Masters

There’s no reason not to teach even the youngest kids about the extraordinary masters of the paint world. You can let your kids paint like Michelangelo and set-up a mini-Sistine Chapel; using Q-tips have them paint dots like Georges Seurat; or lay paper under the swing-set out back, having your kids swing on their stomach, paint brush in hand, creating a Pollock-like masterpiece.


For some Monet inspired art, check out this post:

Playing Monet.

I’m sure there are other fantastically fun ways to paint that L and I haven’t tried yet. Which ones have you done??? Please share in the “comments” section below!

Sunshine Experiment

We call this one the “sunshine experiment”…it’s an oldie, but a goodie. It’s a great experiment to help kids learn about the harmful effects of the sun and why it’s important to always wear sunscreen. L is only 2 years old and was surprised at the outcome, but didn’t understand it 100%. I imagine a 4-year-old would get it and even a 10-year-old would have fun with the experiment!

Materials needed:

  • construction paper
  • old cardstock or thin cardboard (just look in the recycling bin!)
  • scissors
  • a handful of rocks
  • a sunny day

First, have your child dig through the recycling bin to find some pieces of thin cardboard or card stock. (We love any reuse-recycle activity!)

Next, cut out some big and basic shapes. We went with a night sky theme and an under-the-sea theme.


Take the cardboard cutouts and a couple pieces of construction paper outside. In a sunny spot, arrange the cutouts on the paper.


To ensure that they don’t blow away, put a few small rocks on top. Coins would work too! And now you have to wait and wait and wait…go for a walk, a swim, eat some lunch…wait a few hours.


Next is the best part…take the cardboard pieces off the paper and discover the picture left behind, all thanks to the sunshine!


I’m sure older kids could get really creative with this and make up their own themes and scenes. Fun times ahead!

DIY Sock Bunny Rabbit

This project was inspired by a dear friend Libby, who left this world way too early in life. When I was 10 years old I was diagnosed with type I diabetes. As my doctor came to the hospital that evening to diagnose and take care of me, his wife, Libby, got out her sewing kit. She stayed up late that night making me a precious bunny rabbit that I still have to this day.


So when one of my best friends’ babies, my godchild, was in the hospital for surgery last week and ended up staying much longer than expected, my first thought was of Libby and the bunny. I knew I had to make one.

Materials needed:

  • one pair of socks (regular or knee high)
  • needle and thread
  • stuffing material
  • embroidery floss and embroidery needle
  • buttons (optional for children 3+)


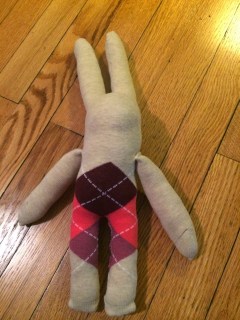
First, take one sock and open it up so the heel is facing you. Lay it flat. The heel of the sock will be the bunny’s face.


Then, make a cut in the middle of the toe of the sock, cutting towards the heel. This will be the bunny’s ears. Don’t cut all the way to the heel though, remember the heel becomes the face. Next, make a cut from the opposite end of the sock for the bunny’s legs. Again, don’t cut all the way up to the heel…this time you need to leave room for a body too.


Turn the sock inside-out. Starting at the tip of an ear, stitch down one ear and up the other. Next, sew the legs in a similar fashion, but this time leave about a 2-inch opening.


Turn the sock right-side-out. Through the 2-inch opening, carefully stuff the bunny’s ears, body and legs. Sew the opening closed.


Now take the other sock and cut off the toe, close to the heel. Lay this part flat, like you did the first sock, and cut it in half. These will be the arms.


Turn one sock piece inside-out and, starting from the tip, stitch the side closed. Turn it right-side-out again and fill it with stuffing.


Next, fold the open edge inwards and pinch it together. Sew the arm closed, attaching it to the body at the same time. Repeat with the other arm.


Your bunny’s adorable already, isn’t it? But, it still needs a face! Using embroidery floss, stitch on little eyes or attach buttons (if the child receiving the bunny is 3 years old or older) and sew a lil nose. All done!


As you can see from the picture below, using knee socks gives you a tall and skinny bunny and using slightly smaller socks results in an adorable, baby bunny rabbit. Now to deliver them to my godchild and her 3 yr old sister…I can’t wait to see those happy faces!

“Making something is one way to say, ‘I love you.'” -Daniel Tiger

Daniel Tiger’s Neighborhood (aka Mr. Roger’s Neighborhood)

Our crafts come from many different directions, with many different goals in mind…the day we made Daniel Tiger’s Neighborhood my goal was to turn the T.V. off and keep it off for as long as possible! So I decided to bring L’s favorite T.V. show neighborhood to life! You really could do this with any neighborhood, real or make-believe.

Daniel Tigers Neighborhood-2


Daniel Tigers Neighborhood-13

 Using items found in our recycling basket, kitchen cabinets, and craft closet we pieced together the houses, castle, clock factory, etc. After all the buildings were up, I used painter’s tape to make a road for “trolley” to drive around on. Painter’s tape should be in everyone’s craft pile…it sticks when you need it to, but comes right-up no problem once you’re done playing. We use it allll the time!


Daniel Tigers Neighborhood-6

Daniel Tiger’s house: old cookie dough container and construction paper

Daniel Tigers Neighborhood-10-EFFECTS

O the Owl’s House: toilet paper roll, tissue paper, construction paper


Daniel Tigers Neighborhood-8Daniel Tigers Neighborhood-5


 Jungle Beach: cookie tin lid, beans, construction paper

Daniel Tigers Neighborhood-7

Prince Wednesday’s Castle: shoebox, random round packaging from recycling basket, construction paper


Daniel Tigers Neighborhood-9


Museum-Go-Round: round hat box, cookie dough container, construction paper

Daniel Tigers Neighborhood-12

Trolley: vintage Little People bus, construction paper….Ding! Ding!

And there you have it. Random stuff pieced together in the form of a neighborhood. Whose neighborhood will you make today?