Road Trip Survival Kit: 10+ Activities for On-the-Go

Every Summer my family likes to take a 7-hour trip to the beach…well, the 7 hours isn’t exactly the part we like, but we do it and we make the best of it! I’m not a fan of giving my kids a screen to look at for the entire trip, because I feel there’s so much that they will be missing out on. Remember when we were kids, going through the entire stash of cassette tapes? Staring out the window watching the terrain change and landmarks pass as we got closer and closer to our destinations, the excitement building? All those silly word games or family air guitar shenanigans? See…I don’t want my kids to miss out on that! I want us to talk. I want them to play, to be entertained, but to experience the trip with us, rather than plugged in and tuned out.

IMG_1696

We started with this ROAD TRIP SURVIVAL KIT when L was just 2. As the kids grow, some things will change, but many will continue to entertain at any age!

Pipe Cleaners, Shoelaces, and Beads

If you have any of those snack cups with the slits on top, they’re the perfect thing to hold beads and prevent spilling! Just tie a shoelace to the handle and you’re good to go!

IMG_3076

Slinky

Who doesn’t love a slinky? You can buy 2 for a dollar at most dollar stores…definitely worth that dollar! We don’t usually play with ours at home, rather we save them for long trips!

IMG_3083

“I Spy” Books

These books are fun for kids age 2 to 100 to look at, no reading required!

IMG_3082

Musical Instruments

When the kids get whiny, bored, tired, put on some jams, some sunglasses and start a family band! Sometimes we even bring out the cow bell – yikes! The kids love it though!

IMG_3081


Paper and Coloring

Go ahead and buy some fun, new crayons for your big trip, as well as a blank composition book, new coloring books, or even post-it notes!

IMG_3080


Figurines and Cars

Even if these things are “old” and have been played with a million times at home, when pulled out one-by-one as a surprise on the 4th hour of your trip, your kids will be delighted…I promise!

IMG_3084

Fairy Folk

L loves her “fairy folk” and will play pretend with them for nearly an hour at home. I scooped up a few of them and their accessories for our last trip. Get the DIY here: DIY Fairy Folk.

IMG_3085

Lacing Boards

If you don’t have lacing boards at home, they’re simple to make. Just cut out a shape from an old cereal box and punch some holes around the edge. Tie a shoelace and and you’re good to go!

IMG_3075

Magna Doodles

These come in all shapes and sizes…and all of them are perfect for the road!

IMG_3073

Kaleidoscopes and View Masters

I always throw one of these in the bag!

IMG_3086

Re-usable Sticker Books

“Melissa & Doug” brand sticker books and Water Wow! books are great for the road. Virtually no mess and they can be used over and over and over and over!

IMG_3077

“I Spy” Bottles

We made this game years ago, and the kids love it! It’s something that can be played with one person or many! Get the DIY here: I Spy Bottle and Games.

IMG_0280


The Tray

We found this traveling tray at Hobby Lobby a few Summers ago. I’m sure you can find one online too! They’re perfect for coloring and containing all those little toys and food.

IMG_3072


It’s hard to believe, but all of this stuff plus more will fit in one medium-sized bag! We usually put the bag off to the side, when we get home, ready to grab-and-go for the next road trip!

IMG_3087


Happy traveling!!! What are some of your favorite activities for on the road?

IMG_1706


DIY Toy Sail Boat

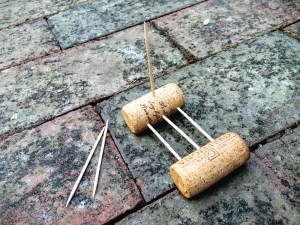
One evening this summer, while we were getting ready for bath time, L pulled a wine cork out of her pocket. She had been saving it all day to float it around and play with in the bath tub. That got me thinking…I knew with a few toothpicks and some leaves we could turn her wine cork into a little sail boat! Leaves work great for this project, because they’re naturally water-proof and easily replaceable!

IMG_3614

IMG_3642

Materials needed:

  • 2 wine corks
  • 4 toothpicks
  • 2 leaves
  • old pencil
  • scissors

IMG_3574

Take one of the wine corks and stick three toothpicks into it, all pointing in the same direction in a line.

IMG_3576

Next, push the second wine cork into the opposite ends of the toothpicks.

IMG_3577

Stick one more toothpick vertically into the middle of one of the corks.

IMG_3578

Find a medium-sized leaf and weave it through the bottom toothpicks. We used a balloon flower leaf. This step isn’t necessary, but it makes a nice lil bed for anything you may want to sail on top…a bug, a rock, a fairy friend.

IMG_3585

IMG_3579

Next, find a slightly larger leaf and thread it onto the vertical toothpick, making a sail. We found the hosta leaves to work best for this, though any thick and sturdy leaf will do!

IMG_3582

To make the sail boat safer for little hands, twist an eraser off the top of an old pencil. Cut it in half with scissors and push it onto the top of the sail.

IMG_3580


IMG_3581


IMG_3584

Now, time to play! L had hours of fun blowing her boats around our rain barrel!

IMG_3589


IMG_3609


IMG_3613

The boats may not seem like much, but ours withstood some submarine plunges under the water and lasted through two nights of bath time play! Tomorrow, we’ll replace the leaves and keep sailing!

IMG_3656


IMG_3662


IMG_3659

Enjoy!!!

Spice Jar Stencils

So maybe I’m a bit obsessed with using everything I find for crafting purposes…but L loves her SPICE JAR STENCILS so much, I just had to share! I usually turn our old spice jars into terrariums, but toss the little plastic lids with holes. Lately I’ve been saving them though, giving the lids to L to use as stencils!

We’ve found that markers work best for this craft. If you color the dots, then rotate the stencils carefully and color more dots, you can make all kinds of flower or sunshine patterns!


You’ll be amazed how quickly your children will perfect the stenciling technique. At first, L had trouble holding the stencil in place while coloring in all the dots, but within 5 minutes of playing with it she had no problem!


I was happy just making flowers, but her 3 year old creativity expanded our flowers into sunshines and even fireworks! I love watching little minds at work!

Really this is a super simple activity, but your little ones will love it nonetheless! Enjoy!

Lemonade Play Dough

We love scented play dough at Our Beautifully Messy House and summertime is the perfect time to make LEMONADE PLAY DOUGH!

I came up with this recipe a couple weeks ago, while mixing up some play dough to take with us on vacation to the beach. And the kids LOVED it!!! It’s always nice having play dough handy for any down-time whether you’re at the beach with family or you’re having friends over for a play date.

I’ve tried making citrus-scented play dough in the past with lemon extracts and oils, but that summery lemonade scent never comes through. Adding a packet or two of lemonade mix did the trick…it was super-quick and easy and smells delicious! I suggest using a sugar-free lemonade mix (Crystal Light brand works great!) so your play dough doesn’t get super sticky with the added sugar.

When I made our lemonade play dough I wanted to make both yellow and pink dough, so I split the dough and added the food coloring before kneading it. The colors came out just fine! This play dough takes only a few minutes to make, but stored in a gallon-sized bag or an air-tight container, it’ll keep for nearly a year! This recipe makes plenty for 2 or 3 kids to play with!

My tip to keep your kids entertained playing with play dough for longer: Start off with plain play dough. Let them play 15 or 20 minutes, then throw some glitter into the mix. Once their attention starts to drift, add some colorful beads or buttons. Add some measuring cups and kitchen utensils, some lil plastic dinosaurs or army men. Just don’t give them everything at once, instead add to the play dough in intervals…works every time!

Ingredients:

  • 2 cups + 1/2 cup flour
  • 1/2 cup salt
  • 2 Tbsp cream of tartar
  • 2 Tbsp vegetable oil
  • 1.5 cups boiling water
  • food coloring
  • 1-2 packets lemonade mix

First, put the water on to boil. Add a few drops of food coloring to the water (yellow or pink). As the water is heating up, mix 2 cups of flour, salt, cream of tartar and one packet of lemonade mix in a large mixing bowl. Then add and mix the vegetable oil into the flour mixture. Once the water is boiling, add it to the bowl and mix with a spatula. The dough will be a sticky mess while warm. Mix it as best you can, then let it cool off. After a few minutes cooling off, sprinkle your working surface with some of the remaining flour. Dump the play dough onto the flour, adding more flour to the top, and knead the dough. Continue working with the dough, adding a bit of flour as needed, til the dough is not sticky anymore and you’ve reached the desired consistency. If you like, sprinkle in another packet of lemonade mix to dough! Yum yum, Summer!!! Enjoy!

DIY Pocket Parachute

What kid doesn’t love throwing a toy parachute around?!! And what parent doesn’t love a toy that costs nothing, takes less than 5 minutes to make, and entertains your kids for hours on end?!! I made this DIY POCKET PARACHUTE for L on a rainy day last week…as soon as there was a break in the weather, we were out the door throwing the parachute all around town. L dropped the parachute off the steps of the old courthouse, a church, the library, a little pavilion stage, and she climbed up a tree and dropped it down as well. This pocket parachute is so simple, so easy, and so much fun!!!


Materials needed:

  • plastic bag
  • food pouch cap
  • string
  • scissors
  • an awl (or screwdriver)

If you don’t have a food pouch cap, a toy wheel, some safety pins, paper clips or a wine cork could be used as well…get creative with what you have on hand!

First, cut the plastic bag into a square at least 12×12 inches.

Cut your string into 4 equal pieces, all approximately 15 inches long.

Using the awl, carefully poke a hole through the center of the food pouch cap.

Also, poke holes into each corner of the square you cut from the plastic bag. Make each hole 1/2 an inch from the edges.

Tie a piece of string onto each corner, using a double knot.


Next, gather all the strings together and tie them together with one overhand knot, about 3 inches from the end.


Thread two of the strings through the center of the food pouch cap and thread the other two through the side. Tie the ends together with a double knot.


Too easy, right? Now time to play!!! It’s just as much fun trying to catch the parachute as it is to throw it!


If your kids are older, they can experiment by making various parachutes…some out of bigger pieces of plastic, longer strings and cutting a hole in the center parachute as well. Enjoy!!!

Glow-in-the-Dark Bath

A couple weeks ago L and I walked down the street to check out a kids’ festival going on in town. Our favorite part was some “Glow-in-the-Dark Yoga” going on at a local yoga studio. While the kids danced and froze into yoga poses with their glow bracelets on, the skies opened up into a torrential downpour outside. (I thought we’d need a canoe to get home.) Of course L and I embraced mother nature as we danced and splashed the whole way home. Cold and muddy, our next stop was a hot and soapy bath…with the lights off and our glow bracelets still on!!! It was silly, but so cool…I don’t know why I never thought of it before!


While lil ones love the idea of glow sticks, our kids are rarely up late enough to play with them in the dark. Turning the lights off at bath time and adding some glow sticks and glow bracelets to the water is perfect! Glow sticks only cost $1 to $2 dollars for a pack of 5-10.

Many bathrooms don’t have windows, so a glow-in-the-dark bath can be done at any time of day.


Make sure you keep an eye on your children while taking a glow bath, many glow sticks suggest kids be at least 8 years old to play with them. You definitely want to make sure your little teethers keep them out of their mouths!


You can even add some “glow-in-the-dark bottles” to the mix as well! Enjoy!!!

Rainbow-Shaving Cream Sensory Play

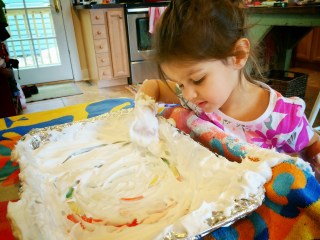
This is such a fun activity for kids and even more fun if you surprise them with it! I prepared our RAINBOW-SHAVING CREAM SENSORY PLAY activity beforehand and when I called L to the kitchen to play, draw and discover she was delighted! She kept saying, “Hey, how’d the rainbow get in here!?!” Like many of our crafts and activities, this one is done with things we already had around the house…so no need to go to the store to buy supplies! For what it’s worth, a can of cheap shaving cream equals hours of fun for kids…we always have one on hand!


Materials needed:

  • large, oven-safe pan
  • aluminum foil
  • broken crayons
  • sharp knife & cutting board
  • oven
  • shaving cream

First, line your pan with aluminum foil. Spread it out as smooth and flat as possible.

Cut your crayons into shavings…we did the colors of the rainbow, but you can do any combination of colors.

Sprinkle the crayon shavings out on the foil-lined pan.

Bake in the oven at 200 degrees F for 5 minutes. Remove from the oven, careful not to tip or shake the pan, and let the pan and crayons cool completely.

Next, squirt shaving cream onto the pan and spread it out evenly…about 1/2 inch thick.


Here comes the fun part…time for your little ones to play!!!


They can practice drawing shapes, writing letters and numbers in the shaving cream.

We had fun taking turns, playing “pictionary” too! Enjoy!!!


I Spy Bottle and Games

How many of you grew up loving the “Where’s Waldo?” books by Martin Handford or the “I Spy” books by Jean Marzollo and Walter Wick? My brothers, sisters and I adored them and now, L enjoys reading them too! The I SPY BOTTLE is very similar in principal and so much fun! It’s a fully contained game…no pieces to lose or to pick up! We take our bottle with us to restaurants on occasion and always on long car trips. The I SPY BOTTLE would be great fun in a classroom too! Be sure to scroll down, after the “how to” I’ve shared a few ideas of games to play.

Materials needed:

  • clear bottle with a wide mouth
  • rice
  • electrical tape
  • lots of small objects

First, remove the label from your bottle and clean and dry it completely. Goo Gone always works great for removing any stickiness and label residue! Fill the bottle a little over halfway with white rice.

Next, drop your objects in. We used beads, a bouncy ball, a plastic ring, spoon, animal figures, a marble, dice, a stamp, buttons, a clothespin, a rubber band, a paperclip, a toy car, keys, a wine cork, and although pictured is a crayon, I switched it out with a paintbrush. I was afraid the crayon would melt if left in the car!


Once the rice and objects are inside the bottle, use electrical tape to seal the lid closed. You could always use super glue, but I was afraid a time would come that we’d want one of the objects locked inside!

Now, time to shake your bottle up and play!!!


Different ways to play:

  • Call out the color of an object…”I spy something green!”…and have the other person find it.
  • Call out the function of an object…”I spy something that makes art!”…”A paintbrush!”
  • Things that rhyme. “I spy something that rhymes with ‘moon.'”…”Spoon!”
  • If your children can read, you could make little cards that go along with the I SPY BOTTLE too. How perfect would that be for a long car ride? Easy entertainment! Enjoy!!!


DIY Chocolate Orange Sugar Scrub

As we move towards Spring, I keep thinking of citrus, lemon-blueberry muffins, lemonade and sunshine! Unfortunately though, we’re not quite there yet…wind chills today in the negative digits! I think it was 4 degrees out when we woke up this morning! Brrr… And let me tell you, this cold weather is not helping the chocolate addiction I acquired over the holidays. So with all that stirring around inside of me, I dreamed up this CHOCOLATE ORANGE SUGAR SCRUB and it is divine!!! Just what I needed today! This would be great to use in the bath or shower!

 IMG_9978


Ingredients:

  • 1 cup white sugar
  • 1/2 cup brown sugar
  • 2 Tbsp cocoa powder
  • 3 Tbsp olive oil (almond oil or coconut oil)
  • ~15 drops (1/2 tsp) Sweet Orange oil
  • 1-2 tsp orange zest (optional)

 IMG_9969


First, mix together the sugars with a fork. If your brown sugar is clumpy, try to mix until most of the clumps are gone.

 IMG_9970


Mix in the 2 Tbsp of cocoa powder.

 IMG_9971


Next, stir in the olive oil one Tbsp at a time. Some olive oils are pretty potent…if you have almond or coconut oil on hand you can certainly substitute that for the olive oil. I’m all about using what I already have though…and it turned out great!

 IMG_9972


Once the olive oil is added, stir in some Sweet Orange Oil. (I found mine in the organics section of our grocery store.) To really bring the aroma up a notch, add about 2 tsp of orange zest to the scrub! Now it is certainly good enough to eat, but even better to exfoliate your skin with in the bathtub! The sugars will scrub away any dry, dead skin and the oil will leave you with just the right amount of moisture.

 IMG_9973


Spoon your concoction into 2 jars…one for you and one for a friend! Enjoy!!!

 IMG_9977


Bird Feeder Garland and Bird Feeder Ornaments

The BIRD FEEDER GARLAND is one of my favorite Winter crafts. It’s fun to make and even more fun to watch the wildlife activity that arises in our backyard after we hang it up! This week we’ve watched birds nibbling, followed by squirrels chasing the birds, then snacking themselves, and lastly, we observed four neighborhood cats stalk the squirrels for two days straight. Easy Winter entertainment…the girls and I have been glued to our kitchen window! The BIRD FEEDER GARLAND itself looks beautiful hanging in a tree, around a bush, or along a fence!

IMG_9838

Materials needed:

  • dental floss
  • unsalted peanuts in their shells
  • old apples, oranges, cranberries and/or raisins
  • embroidery needle
  • cardboard


IMG_9795

Thread the dental floss into the needle. I use dental floss for lots of projects, because it’s always on hand and is super-sturdy! Using the needle, string the peanuts onto the dental floss. Having cardboard under the peanuts, makes it easier to push the needle through. Tie a knot after you string the first peanut to hold the rest on!


IMG_9797

IMG_9796

IMG_9799


You can cut an apple into small pieces to string as well. If you have dried fruit, you can string that along with the peanuts too.


IMG_9798


My helper squirreling away some apple bits…

IMG_9800


Once the peanuts are all strung, find the perfect place to hang your BIRD FEEDER GARLAND!


IMG_9832

IMG_9830


The BIRD FEEDER GARLAND looks great on it’s own, but to really give the birds a treat, add some BIRD FEEDER ORNAMENTS as well! Kids love helping with this part!

IMG_9842


Materials needed:

  • dental floss
  • pinecones
  • peanut butter
  • bird seed
  • butter knife
  • 2 plates


IMG_9803

First, tie the dental floss in a knot or two around the top of the pinecone.


IMG_9804

Using a butter knife, slather on some peanut butter.


IMG_9805

IMG_9806


Pour some bird seed out on a plate and let your little one roll the peanut butter-covered pinecone through the bird seed.

IMG_9811


Hang the pinecones from your BIRD FEEDER GARLAND!


IMG_9819

You can also slice some apples and/or oranges to hang from the garland. And if you make these DIY Cereal Bird Feeders, you can add them as well! Enjoy!!!

IMG_9820

IMG_9709