Candy Cane Sugar Scrub

As I was brainstorming the other day, thinking about switching out the honeysuckle oil in my Semisoft Honeysuckle Soap with peppermint oil, it occurred to me that I could try making something new altogether…a sugar scrub! Even better, a peppermint CANDY CANE SUGAR SCRUB! I had never made a sugar scrub before, but I figured it couldn’t be too hard and I was right…this one is easy peasy! What a beautiful, fun, tasty-smelling gift to give to friends this holiday season!

Ingredients:

  • 2 cups sugar
  • 1/2 cup olive oil (you could also use coconut or almond oil)
  • 1 tsp peppermint oil
  • red food coloring
  • candy cane (optional)

Materials needed:

  • 2 jars
  • spoons
  • fork
  • rolling pin
  • freezer bag
  • mixing bowls
  • thin cardboard (old cereal box…optional)
  • scissors

First, put the 2 cups of sugar in a large bowl and slowing add the olive oil while mixing with a fork. The texture of the sugar scrub should be similar to wet sand.

Next, add the peppermint oil and mix thoroughly.

Once the sugar scrub smells like a delicious candy cane, divide the sugar scrub and put half of the mixture into a separate bowl. Add about 10 drops of red food coloring to one of the bowls and mix thoroughly.

Place your candy cane into a freezer bag (either the gallon or quart-size). Crush it finely with a rolling pin. Add the candy cane dust to the red sugar scrub mixture.


Now you have to decide how you’d like your sugar scrub to look in the jar…either a layered, candy cane effect or a peppermint candy swirl.

To make the layered jar, it’s pretty self-explanatory…just spoon some white sugar scrub in the jar, pat it down and spoon some of the red sugar scrub on top. Pat that layer down and repeat until the jar is full!

To maker a peppermint swirl, it takes a little more time, but is still rather easy. First, cut the cereal box-cardboard into three equally sized strips. Make sure they all fit across, inside the jar.


Next, cut about half an inch off the top of one strip. Cut a full inch off another strip. The shortest strip should be the height of the jar, not any shorter.

Now, with the middle sized strip and the tallest strip, make a vertical cut up the middle of the cardboard, leaving the top half-inch uncut. Place the shortest strip of cardboard inside the jar. Next, slide the mid-sized strip down on top of the shortest one. Follow with the tallest strip. Arrange the cardboard, so the jar is equally divided.

Next, carefully fill each section using a small spoon. Baby spoons work great, but if you don’t have one you could always roll some paper into a funnel-shape and use that.

Once the jar is filled and you’ve gently pressed down on the sugar scrub, very carefully removed the cardboard pieces one at a time. Voila! A peppermint swirl!

L and I took a shower together this morning to try out our new CANDY CANE SUGAR SCRUB creation…amazing! And fun! The sugar gently exfoliates the skin, leaving it nice and smooth. This sugar scrub smells good enough to eat!

Enjoy some pampering amidst all the craziness this holiday season!

DIY Soap Crayons

Here’s another fun craft for your kids to help make and to play with…L had a ball with her DIY SOAP CRAYONS! They’re a little different than the bath crayons you’ll find at the store…these ones wash off the bath and shower walls easily with water. L likes to color with these ones in the shower before I turn the water on, then she makes a nice soapy, colorful mess once the water is on. They’re fun for coloring on your skin too…just add warm water and it washes right off!

Materials needed:

  • bar of white soap
  • cheese grater
  • food coloring
  • 2 to 4 tablespoons hot water
  • fork and spoon
  • ice cube tray, muffin tin, paper cups or candy mold

First, grate the bar of soap into a large bowl. Grate the entire bar, making about 2 cups of soap shavings.


Add 2-4 tablespoons of hot tap water to the soap and mix-mash with a fork or spoon. Continue mixing until the soap has formed a semi-liquid consistency without any big lumps.


Spoon the soap into your molds. Add about 5 drops of food coloring to each one and mix carefully with a spoon. We found that a baby spoon worked great for this step!


Once your soap crayons are all mixed and colorful, carefully push the soap down evenly into the molds. Set them aside to dry for a full week.

After a week has passed and the crayons have hardened, carefully turn the molds over and pop the crayons out. If their underside is still a little soft, let them finish drying for a few more hours.


(We saved all the little colorful crumbs too…added to a bubble bath or some shaving cream, they will make a beautiful rainbow mess!)


Now for the fun part…time to color and play with your own homemade soap crayons!!! Enjoy!!!


Thumbprint Christmas Lights Gifts

I’m super-excited about how easy these THUMBPRINT CHRISTMAS LIGHTS were to do and how cute the finished products turned out! L and I made pictures for her grandparents and this adorable little onsie for her baby sister. I think we’ll be making more of these shirts this coming week…one for L and some for her friends too. The THUMBPRINT CHRISTMAS LIGHTS are just too cute!


Materials needed (shirts):

  • tshirt
  • acrylic paints
  • cardboard (old cereal box works)
  • Sharpie marker, black

Materials needed (card or picture):

  • paper
  • acrylic paints
  • Sharpie marker, black

First, when making prints onto clothing, put a piece of cardboard up through the middle of the shirt. A collapsed cereal box works great for little ones. This will keep any of the paint or marker from seeping through to the other side.

Next, draw a curly line across the shirt with the black Sharpie.

With the paint, help your little one make thumbprints along the line. The thumbprints shouldn’t all touch the line, though it’s okay if a few do.


Once the paint has dried completely, go back with the Sharpie and draw 2, 3, or 4 lines under each thumbprint to make them look like a string of Christmas lights.

So stinkin’ cute! Huh? WB approves!


To make a Christmas card or picture, simply do the same on a piece of card stock paper.


What else could you put THUMBPRINT CHRISTMAS LIGHTS on? A tablecloth, napkins, a small board of wood, little boy’s pants, boxer shorts for dad, ball ornaments…so many possibilities!!! Enjoy!

DIY Semisoft Honeysuckle Soap

I have to start by telling you that I’m not a fan of smelly soaps, smelly candles. I don’t even own perfume. This honeysuckle soap is perfect though…its mild smell reminds me of childhood summers, playing outside in the woods, drinking the lil drops of honeysuckle nectar pretending it was a real treat. Just about everyone I give this soap to has asked for the recipe. It’s just that good!

Ingredients:

  • 1 bar of unscented, white soap (my favorite to use is Dove for sensitive skin)
  • 1 1/2 cups boiling water
  • 1/2 to 1 tsp honeysuckle oil (I buy mine at the Handworks Gallery in Winchester, Va.)
  • 4 drops red food coloring
  • 10 drops yellow food coloring

Tools needed:

  • blender
  • cutting board and knife
  • cooking spray
  • paper towel
  • 12 little jars and lids
  • hot glue gun and glue (optional, to secure lids)

First, put the water on to boil. While waiting for the water to boil, cut your bar of soap up into small pieces.

Place the soap into your blender. (Have the lil kids help with that step!) Pour in the boiling (or nearly boiling) water. Add the honeysuckle oil and food coloring.


Blend for 15-30 seconds. Your blender will fill to the top with foamy, lotion-like soap.


Prepare your jars with a quick spray of cooking oil. Follow by wiping the spray around the inside of the jar briefly with a paper towel.

Carefully pour the soap concoction into each little jar. Set the jars aside for a few hours before putting the lids on. The soap will firm up a bit, but will continue to have a creamy, semi-soft texture. (Most canning jars come with the lids in two pieces. Just use a hot glue gun to secure the lids together if you like. Don’t use super-glue or crazy glue!!! I made that mistake once and all the soap ended up smelling like toxic glue! Ick!)

Stick a little label on the lid; tie a ribbon or string around the jar and you have the perfect “anytime gift.” Enjoy!


No-Bake Acorn Treats

I’ve been making these ACORN TREATS for Thanksgiving for a few years now. I wish I remembered the source where I originally saw them to give the right person credit…somewhere on this big internet universe! I usually pack my ACORN TREATS into little jars and give them away to family and friends on Thanksgiving day. They are so simple to make and everyone always gobbles them up immediately…I think I’d be in trouble if I came to Thanksgiving dinner without them anymore!


Ingredients:

  • Hershey Kisses (dark and original)
  • Nutter Butter Bites
  • mini-chocolate chips
  • chocolate frosting (in a pouch or in a can)


First, to make things go quicker, prepare your work station by taking the Kisses out of their wrappers, putting the mini-chocolate chips in a lil bowl and spreading out some Nutter Butter Bites nearby.

Put a little dab of chocolate frosting on one side of the Nutter Butter Bites and push a Hershey Kiss into place. (This is the perfect time for little hands to help!)


Put a teeny, tiny dab of chocolate frosting on the opposite side and push a mini-chocolate chip in place.


Presto! Too easy, right?

Place them in a little mason jar, tie a string or ribbon around the top and you have a sweet little gift to share! Enjoy!

DIY No-Sew Rag Garland

Out of all the garlands I’ve made over the years, the RAG GARLAND has always been my favorite! It’s bright, colorful, super-easy to make and it looks fantastic inside or outside, day and night!


The RAG GARLAND is fun for the holidays, but can be made and used for any time of the year. I put ours up for Christmas, but I didn’t make the color scheme ultra-Christmassy…I love color and can’t seem to limit myself to just red and green! The best place to find cheap and funky fabric is at antique stores, thrift stores or flea markets…any leftovers can be used to make lil rag tag skirts or tutus for your little ones.

Materials needed:

  • fabric
  • scissors
  • string of lights

First, cut your fabric into strips about 2 inches wide and about 12 inches long.


Next, tie each fabric strip around the string of lights with a single, basic knot. If the fabric is blank on the underside, just fold the fabric over before knotting it. Repeat until the string of lights is covered.


This is a garland we made for Steamys, a local coffee shop/book store/gift shop in town. We used vintage fabrics to make it extra funky!


Happy garland making!!!


Sensory Bottles for Baby

I’ve made sensory bottles for L before, filled with colored water, glue and glitter or colored water and oil, but I don’t know why we never made SENSORY BOTTLES FOR BABIES until now. Babies and toddlers both love them!


The water-filled bottles are fun to look at, but too heavy for WB to really handle safely. Making these SENSORY BOTTLES FOR BABIES was a terrific tactile activity for L, and WB seems to love shaking and playing with the bottles. Not only are they fun to play with around the house and in the car, but sensory bottles make great bath toys too!


Materials needed:

  • small, plastic bottles with lids
  • any of the following: pom-poms, feathers, sequins, straws, ribbon, cereal, dyed rice, etc.
  • glue

Making the bottles is pretty self-explanatory… Remove the label from the bottle. Fill with small, colorful items. Glue the lid shut.

As always, never leave infants unattended with toys, especially if it includes small items. You can never be too safe! Enjoy!!!


Have you seen our DIY Baby Play Area yet??? These bottles would be a great addition!

Homemade Granola (Gluten Free)

Is there anything better this time of year than HOMEMADE GRANOLA, fresh out of the oven? It’s warm, a little chewy, and crunchy too. This granola is sweet and a bit salty, with a just a hint of cinnamon. Oh, how I love homemade granola!

I came up with this granola recipe years ago (a combination of Alton Brown’s, my mom’s, plus a few of my own additions) and I’ll warn you, it’s highly-addictive. The great thing about granola is that you can add or substitute some ingredients to make it your own. You could switch out some of the nuts with walnuts or peanuts, add a pinch of nutmeg or pumpkin pie spice. I like to use Pure Maple Syrup with this recipe, but if I have Apple Syrup from the farmer’s market on hand, it’s a delicious substitution! Granola is a wonderful gift for family and friends and this recipe makes plenty enough for two families. After it’s cooled completely just put half of the granola in a large mason jar with a ribbon tied around the lid and it’s ready to share! Enjoy!


Ingredients:

  • 6 cups of oats (I use Bob’s Red Mill, Gluten-Free, Rolled Oats)
  • 1 cup almonds, sliced
  • 1 cup pecan pieces
  • 1 cup cashews, raw
  • 1/2 cup sunflower seeds
  • 1 1/2 cups coconut
  • 3/4 cup brown sugar
  • 3/4 cup maple syrup
  • 1/2 cup vegetable oil
  • 1 1/2 tsp salt
  • cinnamon
  • honey
  • 1 cup raisins
  • 1 cup dried cranberries


Preheat the oven to 250 degrees F.


In a large bowl, mix together the oats, almonds, pecans, cashews, sunflower seeds, coconut, and brown sugar.


In a smaller bowl (or in a measuring cup!) mix together the maple syrup, vegetable oil and salt. If you have kids in the kitchen, they’ll enjoy seeing how the syrup and oil separate in the glass measuring cup before you mix it all up!


Pour the syrup-oil-salt mixture overtop the oats and nuts. Mix until everything is evenly and thorough coated. Spread the granola out into a large baking pan, or what I prefer…a large, non-stick roasting pan used usually for cooking turkeys or hams. Place in the oven. The total cooking time will be about 2.5 hours for such a large amount of granola, mixing every 15-30 minutes with a large spoon or spatula. Here is the schedule I tend to follow:


Cook 30 min. Mix.

Cook 30 min. Mix again.

Cook 30 min. Mix. Add HONEY in a zigzag, all over pattern.

Cook 15 min. Mix. Add more HONEY and sprinkle CINNAMON on top too.

Cook 15 min. Mix.

Cook 15 min. Mix.

Cook 15 min. Mix. Enjoy some hot and fresh!

Allow to cool for 15 min. Mix in RAISINS and DRIED CRANBERRIES.


Enjoy!!! And share!!!


DIY Floppy Newspaper Hats

Oh, we had so much fun making these FLOPPY NEWSPAPER HATS today! I thought I’d write up this tutorial this weekend, but I just couldn’t wait…they’re just so much fun! If you have little boys in your messy house, please don’t think you can’t make these with them…a hat’s a hat! A floppy hat’s a floppy hat! I’m sure they’ll love them just as much as any girls will! Do it! There will be lots of giggling for sure.

Materials needed:

  • newspaper
  • acrylic paint
  • painters tape
  • tissue paper, poof balls, feathers, etc.
  • white glue

First, prepare your painting area. I taped some trash bags to the floor to protect it from paint…not usually necessary for painting, but the newspaper sheets are just so large.

Next, paint, paint, paint! Paint an entire sheet of newspaper, just one side though. Don’t worry if some  of the newspaper can be seen through the paint, nobody will notice when the hat is finished! Allow the paint to dry completely.


After the paint is dry, lay the paper overtop of another sheet of newspaper…two sheets will make the hat a little more durable. Fold the papers twice, once in each direction, and cut the paper so when you open them back up, you have a circle. The circle really doesn’t have to be perfect, it’ll look great when you’re done!


Next is the tricky part because kids tend to wiggle…lay the paper over your child’s head and scrunch fold it into shape. As you go around, use painters tape to hold the the folds in place. The great thing about painter’s tape is that you can fix any little mistakes and it won’t tear up the paint or paper.


In making WB’s orange hat, I just shaped it around my knee and it worked just fine. I also experimented and used a stapler instead of the painters tape. Stapling worked great and looks fantastic, but it is a little trickier to do. The paper tears a little easier with staples in it too.

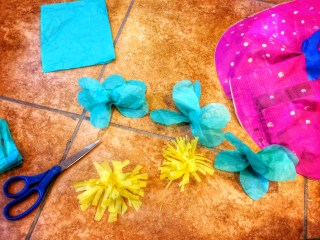
Now to decorate your hat! You can cut flowers out of tissue paper or just cut squares and scrunch them up. If you layer the tissue paper a bit, the flowers are a little fluffier and prettier. You can also glue on poof balls, jewels, feathers, anything you can think of and find around your house!


Super cute, huh!? Forget Easter bonnets, we’ll be wearing these to Thanksgiving dinner!!! That is if they survive a month’s worth of tea parties…


Wouldn’t these be adorable for a birthday party? You could make the hats beforehand and let the kids decorate them at the party…so many fun possibilities! Enjoy!


Pine Cone Flowers

Have I mentioned before how much I love Fall?! So many things to find and create with…like these mini-pine cones! I’ve been thinking of making “pine cone flowers” for months now, and when L and I found these miniature ones it was a done deal.

Materials needed:

  • miniature pine cones
  • twigs (the more lil knobs and branches the better)
  • acrylic paints
  • hot glue gun and glue

First, choose what colors you’d like your “flowers” to be…we choose multi-colored! Paint each little pine cone as you like. Set aside to dry.


Next, paint your twigs a mixture of dark and light greens. Allow to dry.


Once everything is dry, you can assemble your pine cone flowers. Using a hot glue gun, put a little dab of glue on the tip of a twig. Quickly press and hold a pine cone in place. Repeat until all your pine cones are used up.


So cute, huh!? Arranged in a little, antique bottle they make a sweet gift for a child or an adult.