DIY Melted Crayon Art with Variations

This was the perfect “rainy day craft” for today…fun for me and for L! I’m so excited about these melted crayon creations, I can’t wait to make more! Let’s jump right in…


Materials needed:

  • white canvas
  • crayons
  • hot glue gun and glue
  • cardboard box
  • hair blowdryer

Although there’s definitely some unpredictability in this project, you first need to plan it out a bit. Start with picking out your colors.


After deciding where your crayons will go, use the hot glue gun to attach them to the canvas.


Next, place the canvas in a cardboard box. The box will keep your work area clean, catching the crayon splatter.

Prop the box up against a chair, table, or wall. Make sure the crayons are facing down (if you want a dripping effect) and that the box and canvas are on a little bit of an incline.


Next for the fun part, use the hair dryer to melt the crayons and blow the wax around. I let L do most of the rainbow picture. Turned out pretty awesome, huh!?


Now, display your work in whichever direction you please. I think a ribbon pinned or glued around the outside edges of the canvas would give it a nice, finished look!

Variations:

Wildflowers

To make the wildflower piece, I used mostly greens and browns. After I was done melting the crayons and the wax had time to cool down, I used the hot glue gun to attach flowers. Do this step carefully, so no glue shows! It works best to glue the flowers on spots without any wax.


Wild Splatter

I experimented with this one a bit, trying to plan for some future creations. I kept the box flat to the ground and used broken crayon pieces. To hold the crayons in place while melting them, I used a fork and smudged them around a bit. The outcome was a little funky…next time I’ll use smaller crayon pieces and maybe some crayon shavings instead.


I’m hoping to make a vibrant, Autumn tree next! I’ll be sure to update the blog and add those pictures as well, so check back soon!!! What “melted crayon art” will you make???


DIY Rustic Spinning Stars

I love these Rustic Spinning Stars. When I first saw something similar here on the “happy hooligans” blog I just knew we had to make them! They’re fun to make with the kids and are beautiful hanging inside or outside. We have ours spinning on our front porch, while my dad hung his (which we gave him for Father’s Day) in their kitchen. I think the stars would be really fun hanging, spinning from the branches of a big tree too!


Materials needed:

  • sticks
  • glue gun and glue
  • white acrylic paint and brushes
  • colored ribbon scraps, string, raffia
  • florist wire

First, have your little ones collect sticks. You can make big stars with big sticks or use little twigs, like we did, to make little 3 to 5-inch stars.

Use the hot glue gun to glue five sticks together into the shape of a star. The stars don’t all have to be the same size and they certainly don’t have to be perfect…any imperfections give your stars more character! Don’t worry about the glue showing either, in the next step the paint will cover it up.

Next, have your kids help you paint each star with white acrylic paint. This is a great painting project for little ones, since any missed spots give the stars their rustic appearance.


After the paint dries, tie one end of your ribbon to the center of the star and wrap it around. Again, no need to be perfect here…another great task for your kids to help you do! After the star is wrapped, tie the end in a knot around one of the star’s arms.

You can attach the stars to each other with string or wire. We used green florist wire, which is weather resistant and sturdy. If you link two pieces of wire together, between each star, the stars will spin a little more than if you use only one wire. We tried both ways…both did the job and look great, so it’s up to you!

Now for the fun part, find the perfect spot to hang your Rustic Spinning Stars! Enjoy!

DIY Cardboard Tube Bracelets and Watches

This is one of those things that I threw together while fixing breakfast one morning. L has a little craft corner, just a chair pulled up to the kitchen counter, next to where we cook and prep food. She was just looking for something to get into on this particular morning, so I pulled some tubes out of our recycling basket, cut them in half and gave her some markers. L doesn’t use markers very often, so when she does get to use them for a craft she is THRILLED and works for at least 30 min to an hour!

Materials needed:

  • old paper towel or toilet paper tubes
  • markers (or paint)
  • scissors

Other optional embellishments:

  • jewels, sequins
  • poof-balls
  • buttons
  • macaroni noodles
  • string
  • duct tape
  • hot glue gun and glue


 The first step, is to make one cut up the side of the tube. Then cut the tube in half or into pieces, depending on how wide you want the bracelet.

Next, have your kids color the tubes. As you can see here, it was easiest for L to color hers while it was curled around a bottle of paint. A banana or thin rolling pin would work great too!

After the tubes are colored you can glue on any embellishments that you have on hand. L is only 2, so her coloring is basically scribbling…the poof-balls and jewels give her scribbling bracelets a little more bling.


Depending on the brand and type of cardboard tube you are using, you can always make the bracelets more secure with some snazzy duct tape too! Our toilet paper rolls were plenty sturdy, but paper towel rolls were thinner and weaker and needed a little support!


And don’t think this craft is just for girls! Guys can certainly wear bracelets! What Dad wouldn’t want a cardboard tube watch? It’d make a fun lil addition to a Father’s Day gift or birthday gift.


Have fun making something out of nothing!

Play Dough Funny Faces w/ DIY Outlet Covers

When I saw a variation of this craft years ago, I stored it away in the back of my mind, just waiting for L to be old enough to make and play with these! The outlet covers I saw were made using Sharpie Markers, but I love the color we brought to ours with paint! The outlet-cover funny faces are as much fun to make as they are to play with! L and I spent one day painting the outlet covers, let them dry overnight, then the next day, we were able to glue on the googlie eyes and stick them in our play dough! So silly and so much fun!


Materials Needed:

  • outlet covers
  • paint (acrylic and/or puffy paint)
  • googlie eyes
  • jewels (optional)
  • hot glue gun and glue
  • your favorite play dough
  • egg cartons (optional)


The first thing I did, preparing our work station, was to cut off the center tips of an egg carton. I then put an outlet cover in each opening so L could paint them with ease.


Then, paint away! I tried to paint mouths and noses on the outlet covers, while I let L paint hers however she pleased. I figured the ones she painted could be used to glue on the eyes and jewels later on.


After the glue dries, you can go over some with puffy paint too! I thought it was a fun effect for big, puffy lips!

Using a hot glue gun, attach some googlie eyes and jewels to a few of the other outlet covers.


Now it’s time to play! Just push the outlet covers into your favorite play dough…the funny face possibilities are endless!


I love how the play dough doesn’t stick to the outlet covers, rather it just falls off, making clean-up a breeze! Please share pictures of your funny faces…we’d love to see them! Enjoy!

Imagination Box!

I don’t know about you, but our kids always seem to have too much stuff….too many stuffed animals, too many dolls, too many plastic play sets, too many puzzles, etc. When L is going to a birthday party, I hate to buy a toy that her friend will play with for 5 minutes and then toss to the side. Homemade gifts are truly the best, most heart-felt to give and I love making them, but I just don’t have the time some days. The IMAGINATION BOX is my gift-giving solution!!! It is quick and easy to put together and kids of all ages LOVE it! The Imagination Box makes for a fun birthday gift, as well as a perfect “Get Well Soon” gift, plus it guarantees hours of entertainment!

“So, what do I put in the box?” you ask. Anything and everything!

Paper plates and cups, brown paper bags, construction paper, crepe paper, straws…


Cotton balls, clothes pins, colored craft sticks, paper clips, sponges, markers, googlie eyes…


Buttons, rubber bands, glue, beads, shoe laces, pipe cleaners…


Egg cartons, kid scissors, mini-staplers, felt squares, a few sandwich bags (for lil pieces with opened packaging)…


Just about anything that will fit in the Imagination Box, that kids can use to create art, works! I usually go to the Dollar Store, walking up and down every aisle, and look for items with crafting potential. It certainly looks like a lot pictured here, but the box can be filled with less than 25 dollars!


Last, but not least, you need a cardboard box to put everything in. Try to leave the box mostly undecorated, so the child receiving the gift can use it too! The box itself will make a perfect rocketship, firetruck, castle, table, bed, gnome house, etc.


When putting together an Imagination Box, you need to consider the child’s age. It’s best to put things in the box that the child receiving it can create with independently and safely. After all, the box is designed to keep kids busy creating (so mom and dad can cook dinner in peace)! For instance, if you’re making an Imagination Box for a 2 yr old, you may not want to include scissors or a stapler, but an 8 year old would have no problem with them. Always make sure you give parents a heads-up of anything that’s questionable.

Some ideas to get kids started…

  • make a little town or fairy village using paper bags
  • paper plate masks
  • pipe cleaner bracelets, necklaces, glasses
  • puppets
  • robots
  • make pretend food
  • cotton balls for clouds
  • clothespins to make people
  • egg carton flowers
  • egg carton caterpillar

Get messy and have fun!!! Let the kids’ imaginations soar!

Fairy Furniture

It wouldn’t be fair for me to tell you how to make a “fairy door” without showing you how to make some fairy furniture to add to your garden as well! These tables and chairs are super easy and quick to make and, like most of my favorite crafts, they can be made with things you already have!


 Materials needed:

  • bottle caps
  • little sticks and twigs
  • scissors
  • hot glue gun and glue

First, have your kids help you collect sticks out of your yard and select some colorful bottle caps. (Bottle caps are another item we hoard in our house…they can be used for so many crafts!)


Using your scissors, cut a stick into four equal pieces…each about an inch long. These will be the legs of your chair.


Turn a bottle cap upside down and glue the four legs into place. You can either put the glue onto the leg and push it into the bottle cap, or put the glue directly onto the cap and push the stick in. Whichever method you decide on, make sure you do it quickly so the chair legs are super-secure!


Cut two more sticks, about an inch and a half to two inches long. These ones do not have to be exactly equal in length or straight! Cut two or three more sticks about an inch in length.

These sticks will resemble a ladder-back chair. One by one, glue the inch-long sticks to the longer ones, attaching the two. (Easier to see in the pictures below than to explain!) I prefer the small, horizontal sticks to be a little crooked…gives the chair more character!


Once all the sticks are attached and the glue has dried, flip the chair over and decide which side will be the front and which will be the back. Glue the back of the chair to the seat with two more dots of glue. All done!!!


If you’ve made the chair, the table is super easy…essentially it’s a back-less chair!


I just love the color and character the bottle caps give the fairy furniture! Have fun playing with this one! They are so quick and easy to make, you might as well make a few for your neighbor’s garden as well.


Homemade Paper and Seed Paper

Last night, while cleaning up from dinner, I told L not to throw away her pudding cup because it can be recycled. She replied, “What’s recycle? What’s it mean?” So as I was doing my best to explain to a 2-year-old how plastics are melted down and made into new containers, I remembered how I used to make paper as a kid…it’s the perfect activity to teach kids of any age how things are recycled! I lost my paper-making kit years ago, but it didn’t take long to locate and piece together the materials needed for homemade paper. I love this activity because your kids can help with each of the steps, keeping them busy and entertained the whole way through!


Materials needed:

  • old paper
  • water
  • blender
  • 2 small window screens
  • felt (or thin cloth like a cloth diaper)
  • sponges
  • plastic tub or wide container
  • seeds (optional)


First, dig through the recycling basket for colorful paper. (I always save colored-on pieces of construction paper for projects like this!) Have your kids help you tear it up into 2-inch pieces and throw it all into a large bowl.


Add some water to the bowl, covering all the paper pieces, and let it soak thoroughly for a few minutes. Your kids can now reach in the bowl to see how the wet paper feels compared to the dry.


Next, scoop and dump the paper and water into your blender. There’s no exact amount of water needed since it’ll all be squeezed out in the end. Blend the mixture for about a minute. The pulp should resemble the consistency of oatmeal.


Now for the fun, messy part!!! Lay one of the screens over the plastic tub or container. (You could use your sink, but it’s easier for kids if the project is done on the floor!)


Next, dump the paper pulp mixture out on top of the screen. Let your kids help you spread it around gently.


Then lay a large piece of felt on top of the mixture and next, the second window screen.


Using sponges press down on the felt, squeezing most of the water out. We started in the middle of the felt and worked our way out, pressing the paper underneath nice and flat.


Next, take off the top screen and, placing one hand on top of the felt, quickly flip the other over. Remove the screen and leave the paper on the felt to dry. I did this last step outside on our picnic table so the paper could dry in the sun and summer heat. It takes about a day to dry on its own. When I was a kid, doing a similar paper-making project, the paper and felt pieces were much smaller and I’d pop it in the microwave to dry. The paper would curl a little bit sometimes, but it was quick and easy.


Here’s our finished paper! It doesn’t look like your typical paper, but it is beautiful with all the bright yellows, reds and oranges mixed in! It’ll be perfect to paint on later in the day!


Making Seed Paper: 
To make seed paper, add a handful of flower seeds to the pulp before squeezing all the water out. After the paper dries, you can cut it up into squares and gift it to friends. They can plant the paper strips in soil in the Spring, water and wait for their flowers to grow! We used our leftover, perennial Balloon Flower seeds…they’re easy to grow and look beautiful anywhere!


Other Ideas:

  • Before squeezing the water out of the paper-pulp mixture, add some flower petals to the pulp for a fresh and colorful look!
  • After squeezing the water out and removing the screens, use cookie cutters to carefully cut the paper into shapes. After they dry, you can punch a hole to hang the paper shapes and make ornaments! We may do this around the holidays, using holiday-colored paper.
  • You can also add glitter to the paper pulp, before squeezing the water out, to give your paper a little sparkle!


Have fun and get messy! Your kids will love you for it!!!

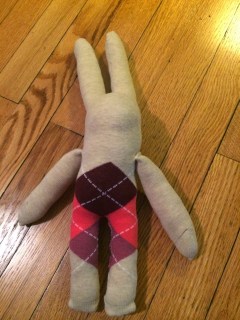
DIY Sock Bunny Rabbit

This project was inspired by a dear friend Libby, who left this world way too early in life. When I was 10 years old I was diagnosed with type I diabetes. As my doctor came to the hospital that evening to diagnose and take care of me, his wife, Libby, got out her sewing kit. She stayed up late that night making me a precious bunny rabbit that I still have to this day.


So when one of my best friends’ babies, my godchild, was in the hospital for surgery last week and ended up staying much longer than expected, my first thought was of Libby and the bunny. I knew I had to make one.

Materials needed:

  • one pair of socks (regular or knee high)
  • needle and thread
  • stuffing material
  • embroidery floss and embroidery needle
  • buttons (optional for children 3+)


First, take one sock and open it up so the heel is facing you. Lay it flat. The heel of the sock will be the bunny’s face.


Then, make a cut in the middle of the toe of the sock, cutting towards the heel. This will be the bunny’s ears. Don’t cut all the way to the heel though, remember the heel becomes the face. Next, make a cut from the opposite end of the sock for the bunny’s legs. Again, don’t cut all the way up to the heel…this time you need to leave room for a body too.


Turn the sock inside-out. Starting at the tip of an ear, stitch down one ear and up the other. Next, sew the legs in a similar fashion, but this time leave about a 2-inch opening.


Turn the sock right-side-out. Through the 2-inch opening, carefully stuff the bunny’s ears, body and legs. Sew the opening closed.


Now take the other sock and cut off the toe, close to the heel. Lay this part flat, like you did the first sock, and cut it in half. These will be the arms.


Turn one sock piece inside-out and, starting from the tip, stitch the side closed. Turn it right-side-out again and fill it with stuffing.


Next, fold the open edge inwards and pinch it together. Sew the arm closed, attaching it to the body at the same time. Repeat with the other arm.


Your bunny’s adorable already, isn’t it? But, it still needs a face! Using embroidery floss, stitch on little eyes or attach buttons (if the child receiving the bunny is 3 years old or older) and sew a lil nose. All done!


As you can see from the picture below, using knee socks gives you a tall and skinny bunny and using slightly smaller socks results in an adorable, baby bunny rabbit. Now to deliver them to my godchild and her 3 yr old sister…I can’t wait to see those happy faces!

“Making something is one way to say, ‘I love you.'” -Daniel Tiger

DIY Capes…Wizard Capes…Superhero Capes

Before I move on to any other posts, I thought I ought to share how to make a cape to go with your magical wand! Now this can be a wizard cape, a superhero cape, a cape for a child or an adult.


Materials needed:

  • jersey knit fabric
  • ribbon (about 5 ft, depending on the size of the wizard)
  • thread and needle
  • sewing pins


First, you must determine whether you want a short or a long cape…both have equal flying abilities. Lay the fabric out on a flat surface and cut out the cape, a little wider at the bottom than the top. If you like, you can measure and draw the cape first…I just eyeballed it. Using knit fabric makes this a super easy craft because the edges will not fray and there is no need to hem the sides.


Next, lay the ribbon out along the top edge of the cape and pin it in place. If you know how to use a sewing machine, this next step should be quick and easy…if you want to do it by hand it is also fairly quick and easy. All you need is a simple, straight stitch across the top of the ribbon and one along the bottom.

More cape pics - 1


Your cape is done! Too easy, right? If you want to add some embellishments…some beads or buttons…you can sew them on as well. To make my nephew’s cape extra wizardly for his birthday I sewed an owl in the middle. (See above, top photo.)


I like to avoid tying anything around a child’s neck, so to attach the cape put the ribbon over the shoulders, then back under the arms and tie it in the back. Off to flying school!


Wizard Wands…Fairy Wands…Magical Wands

This is such a simple craft to do and, paired with a wizard cape or hat, it makes for a fun gift too! I first made these for my nephew’s birthday party…and they were a big hit! Depending on your kid’s age, he or she can help with some and maybe even all of the steps.


Materials:

  • sticks from the yard
  • acrylic paint
  • glitter paint
  • a small marble
  • glitter hot-glue-gun glue and glue gun


Collect sticks! If you don’t have good ones in your yard, go on a nature walk around town collecting some. The more twisty-turny they are the better! Make sure they are strong ones and won’t break easily. Brush sticks off, gently removing any loose bark.


Paint! Most of my acrylics are not labeled “non-toxic” and they are permanent, so I did this step on my own. Sometimes I let L paint with acrylics, but I cover the kitchen counters and nearby appliances with garbage bags, cover the chair she stands on with a towel and make sure she’s wearing her smock. You be the judge on this one! After the paint dries, apply another coat if needed and then paint with the glitter paint. You could stop here if you want and have a pretty awesome wand…I like to add the marble on top though to make it a little safer!


Attach marble! Find a marble that’s the right size and color you like. Old marbles are another great thing to find at antique stores…whenever we see a jar for a good price, we snatch em up. Using the hot glue gun, apply a little dab of glue at the tip of the stick and quickly push a marble in place. To secure the marble, apply more glue around the base and then make a little dripping effect down the wand. Plan on using about one whole glue stick per wand. And that’s it!


Too easy, right? It’s fun watching your kid’s imagination soar while playing with their wand. L likes to think she can make the leaves of a tree dance or birds fly with hers. I always remind her of two rules though… #1: No hitting anything or anyone, and #2: No running with the wand. If you make a wand, please share your pics with us! I’d love to see what else you add…ribbons, jewels, etc.