Tin Foil Jelly Fish Craft

I love this super cute, jelly fish craft for so many reasons. Our TIN FOIL JELLY FISH were inspired by a trip to the Baltimore Aquarium and the girls’ fascination with “The Jelly Fish Invasion” exhibit. (Super cool…if you are anywhere near Baltimore, go see it!!!) I love that this craft costs nearly nothing to make and L learned all about textures and rubbings while coloring the foil. And I LOVE the way our jelly fish look hanging in our kitchen window. If you can, place them near an air vent…when the air kicks on the jelly fish will come to life, dancing and swimming in the sun!


“The Jelly Fish Invasion” at the Baltimore Aquarium…

Materials needed:

  • tin foil
  • permanent markers
  • egg cartons
  • other small, plastic containers (think applesauce, olives, etc.)
  • string or fishing line
  • painted stick
  • tape
  • scissors
  • paperclips
  • nail or sharp-tipped tool

First, cut your egg carton into little jelly fish shapes.

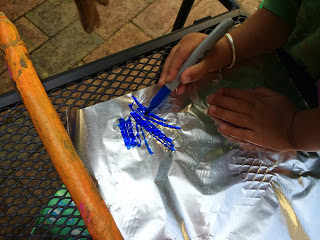
Next, take a few sheets of tin foil and have your children color them. This is a great opportunity to make rubbings. L colored on the patio furniture and bricks, over tree bark, on the textured sidewalk and on her slide. Not entirely necessary, but why not!? Your kids can also try making different patterns if coloring on a flat surface…stripes, dots, swirls, anything goes!


Cut the tin foil into little squares and have your kids wrap the egg carton cut outs with the foil. You may have to help them smooth down the outer edges.


If you have some small, plastic containers to use as well, first poke a hole in the center. Next, cover the containers with the foil too.


Cut strips of tin foil and tape the strips, 2 or 3 at a time, to the inside of your jelly fish.


Using a nail or sharp tool, poke a hole into the top of each jelly fish.

Now, it’s time to hang your jelly fish up. I knew ours would go in our kitchen window, so we hung the jelly fish along a painted stick. You could also make one large jelly fish and hang the smaller ones underneath. That method would be cute if hanging your jelly fish up under a light, in the center of a room.

We hung our jelly fish by stringing them onto fishing line and tying the line to a paperclip underneath each one. Some hung on their own, while others had a second jelly fish hanging underneath. Get creative and have fun with it!


When doing projects like this, it’s definitely easier to have the jelly fish hanging while you are tying them on rather than laying flat on the ground.

Put them up to display and enjoy!!!


Bird Feeder Garland and Bird Feeder Ornaments

The BIRD FEEDER GARLAND is one of my favorite Winter crafts. It’s fun to make and even more fun to watch the wildlife activity that arises in our backyard after we hang it up! This week we’ve watched birds nibbling, followed by squirrels chasing the birds, then snacking themselves, and lastly, we observed four neighborhood cats stalk the squirrels for two days straight. Easy Winter entertainment…the girls and I have been glued to our kitchen window! The BIRD FEEDER GARLAND itself looks beautiful hanging in a tree, around a bush, or along a fence!

IMG_9838

Materials needed:

  • dental floss
  • unsalted peanuts in their shells
  • old apples, oranges, cranberries and/or raisins
  • embroidery needle
  • cardboard


IMG_9795

Thread the dental floss into the needle. I use dental floss for lots of projects, because it’s always on hand and is super-sturdy! Using the needle, string the peanuts onto the dental floss. Having cardboard under the peanuts, makes it easier to push the needle through. Tie a knot after you string the first peanut to hold the rest on!


IMG_9797

IMG_9796

IMG_9799


You can cut an apple into small pieces to string as well. If you have dried fruit, you can string that along with the peanuts too.


IMG_9798


My helper squirreling away some apple bits…

IMG_9800


Once the peanuts are all strung, find the perfect place to hang your BIRD FEEDER GARLAND!


IMG_9832

IMG_9830


The BIRD FEEDER GARLAND looks great on it’s own, but to really give the birds a treat, add some BIRD FEEDER ORNAMENTS as well! Kids love helping with this part!

IMG_9842


Materials needed:

  • dental floss
  • pinecones
  • peanut butter
  • bird seed
  • butter knife
  • 2 plates


IMG_9803

First, tie the dental floss in a knot or two around the top of the pinecone.


IMG_9804

Using a butter knife, slather on some peanut butter.


IMG_9805

IMG_9806


Pour some bird seed out on a plate and let your little one roll the peanut butter-covered pinecone through the bird seed.

IMG_9811


Hang the pinecones from your BIRD FEEDER GARLAND!


IMG_9819

You can also slice some apples and/or oranges to hang from the garland. And if you make these DIY Cereal Bird Feeders, you can add them as well! Enjoy!!!

IMG_9820

IMG_9709


DIY Flower Garden Entrance

I made this FLOWER GARDEN ENTRANCE for WB’s first birthday this week and I just love how it turned out! We put it up in our kitchen, but eventually we’ll move it to brighten up the entrance to her bedroom! A FLOWER GARDEN ENTRANCE is the perfect decoration for birthday parties, tea parties, or anytime you want to bring a little sunshine inside! You could hang it in a doorway or above a window!


IMG_8968

IMG_8966

Materials needed:

  • adjustable shower curtain rod
  • 2 rolls of green tulle
  • silk flowers
  • florist tape
  • hot glue gun and glue
  • piece of string

(Silk flowers are on sale during the winter months at most craft stores…I got these all 50% off!)

IMG_8957


First, I measured the height and width of the doorway where our FLOWER GARDEN ENTRANCE would be. Our house is old with doors of various heights and widths…I wanted to make sure that if I made it in the kitchen doorway it would fit in the doorway to my daughter’s room.

Next, put up the curtain rod and tie a piece of string around the middle. You will thread the tulle through this, so make it not too tight, but not too loose.

IMG_8950


Now thread the tulle through the string, cutting strips in similar lengths. The tulle will travel along the top of the rod and straight down (see the next steps), so measure and cut accordingly.


IMG_8953

IMG_8952


Next, wrap a small scrap of tulle around the middle a few times, tie and cut. You can now remove the string that was holding everything up.


IMG_8954

Do the same at both ends of the curtain rod…wrapping a scrap of tulle around the long tulle strands, tie and cut.


IMG_8955

IMG_8956


Now, figure out where you want your flowers to go. For long stems, I used floral tape to secure them to the curtain rod in various spots. With individual flowers, I just used a hot glue gun to glue them in place. Other smaller stems can be tucked in and behind the rest and may not even need tape or glue.


IMG_8960

IMG_8958

IMG_8959


And finally, pick a few small, delicate flowers to glue in place along the long strands of tulle. My favorite and final touch!

IMG_8964

IMG_8968

IMG_8966

My girls were so excited to find this hanging in the kitchen this morning! Easy, beautiful and fun!!!

DIY Vintage Postcard Christmas Garland

Anybody that’s been to our house knows that I love garlands and the Christmas season is just another excuse for me to make and display more! Our POSTCARD CHRISTMAS GARLANDS are some of the quickest and easiest to make, plus they add a lot of character to the room. We have two postcard garlands in our house…one hangs across a wide doorway and the other under a mantel…both are made a little differently.


The first VINTAGE POSTCARD GARLAND is one that I made new this year. I found a huge collection of postcards at a local antique store a couple weeks ago and knew that I had to do something with them. I carefully went through the postcards, all from the early 1900s, and picked out some of my favorites…some I chose because of the bright and colorful picture on the front and others because of the endearing (or humorous) message written on the back.


Since these postcards were old I didn’t want to damage them in any way, so I decided to clip them to a vintage-looking string with mini-clothespins. It was that easy. You can add an old ornament or a prism, as we did, in the middle as well. I just love ours!

The second POSTCARD GARLAND is one that I made a few years ago out of new, but old looking postcards. Have you ever read any of the “Flower Fairy” books by Cicely Mary Barker? The illustrations are just beautiful!

I once found these postcards with the “Flower Fairies” depicted on them and knew it’d be perfect for a garland. No, these fairies aren’t necessarily Christmassy, but I like things a little different, a little unpredictable. This garland celebrates all things magical about the Christmas season. To make this garland, I punched holes in the tops of the postcards and strung them up. On the ends I tied a few strips of fabric, just some scraps out of my scrap pile. And that’s it! Simple, but definitely cute and fun!


Enjoy!

3 Secrets for Decorating Your Christmas Tree

I always feel like our Christmas tree is a miniature version of the one I grew up with…I’m sure as our ornament collection grows over the years, so will our tree. Many of our ornaments are ones that hung on my family’s tree when I was a kid and hold such special memories to me. Isn’t that one of the best, yet bittersweet parts of Christmas…all those memories? The exciting thing is that now we have the chance to make memories with our own children…some new and some borrowed from our own childhoods. I feel like our Christmas tree is just that!


Popcorn Garland

My parents’ Christmas tree still dons the garland my brothers, sisters and I made when we were kids some 20-30 years ago. If you make it right and store it well, it will obviously last a very long time.


One of the most important tips is using plain popcorn, popped in a hot air popcorn machine. Also, if you plan ahead and have the time, letting your popcorn sit overnight and become slightly stale helps in stringing it…it won’t break as easily. To string the popcorn just use a piece of thread (or dental floss) and a sewing needle. You don’t have to make one super long string at once, make 4 or 5 foot long ones and tie them together.


When storing the popcorn, first start by adding a bright ribbon to both ends of your garland. That will make finding the end easier next year. Find a medium-large container and coil it around inside the container, much like you do a garden hose. We use a plastic tupperware-like container, but a large popcorn tin works very well too.


Tree Skirt

If you’re like me and like a homey, vintage looking tree skirt you don’t have to look far. I bought this cheap Christmas blanket one year at a thrift store and we wrap and fold it around the bottom of our tree. I do wish it was actually a quilt and not a look-alike-quilt, but nobody would ever know the difference and it achieves the look I’m going for. You could do the same with a table cloth or any large piece of fabric.


Tree Topper

Don’t be afraid to use a non-traditional tree topper. I love decorating for Christmas, but even more I love adding magical little twists to our decorations…keeping things unpredictable and slightly quirky. I found this glittery butterfly clip at a local floral shop years ago and attached some florist wire to the back to help secure it to the tree. So much fun!


Happy decorating everyone!

DIY No-Sew Rag Garland

Out of all the garlands I’ve made over the years, the RAG GARLAND has always been my favorite! It’s bright, colorful, super-easy to make and it looks fantastic inside or outside, day and night!


The RAG GARLAND is fun for the holidays, but can be made and used for any time of the year. I put ours up for Christmas, but I didn’t make the color scheme ultra-Christmassy…I love color and can’t seem to limit myself to just red and green! The best place to find cheap and funky fabric is at antique stores, thrift stores or flea markets…any leftovers can be used to make lil rag tag skirts or tutus for your little ones.

Materials needed:

  • fabric
  • scissors
  • string of lights

First, cut your fabric into strips about 2 inches wide and about 12 inches long.


Next, tie each fabric strip around the string of lights with a single, basic knot. If the fabric is blank on the underside, just fold the fabric over before knotting it. Repeat until the string of lights is covered.


This is a garland we made for Steamys, a local coffee shop/book store/gift shop in town. We used vintage fabrics to make it extra funky!


Happy garland making!!!