DIY Fairy Door…Gnome Door…

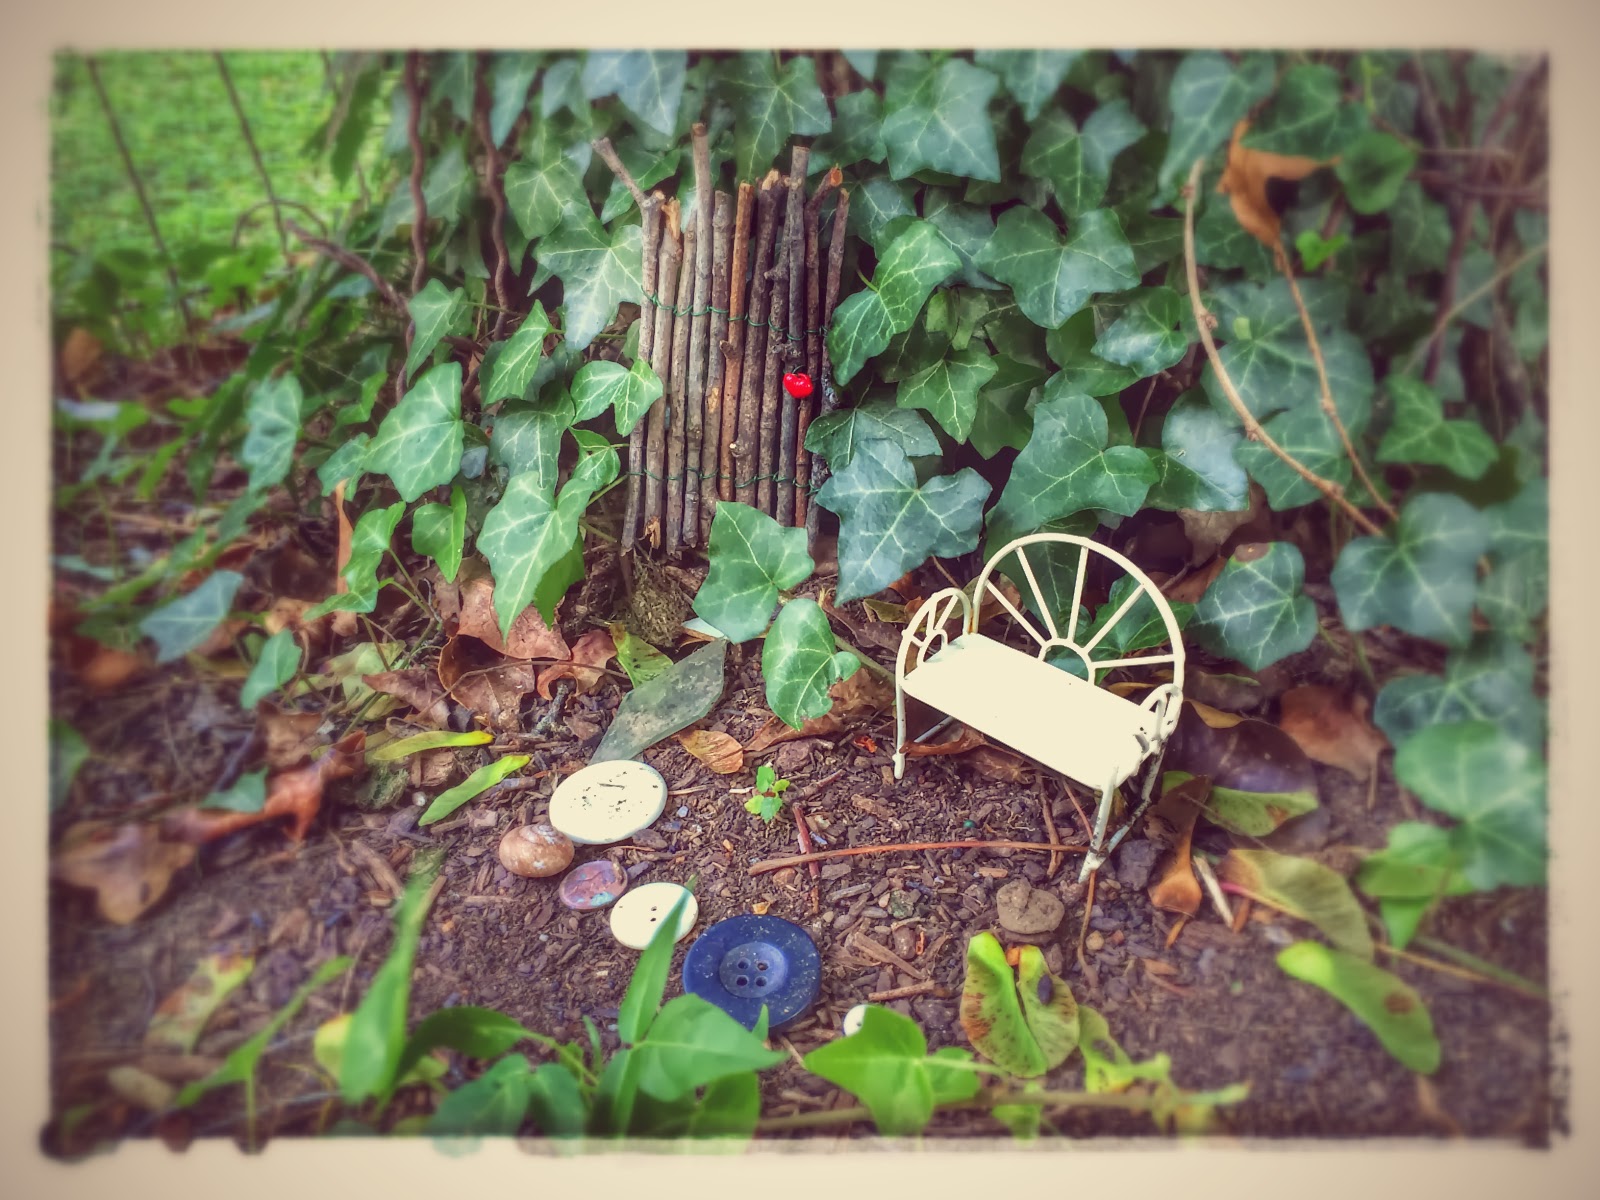
In our garden the fairies and gnomes live amongst each other. Their village spreads around the yard with lil houses, patios and ponds hidden beneath the flowers. Throughout the year, L and I like to collect and make things to add to our garden…this morning we made a lil fairy door.

Materials needed:

  • sticks
  • florist wire
  • a button


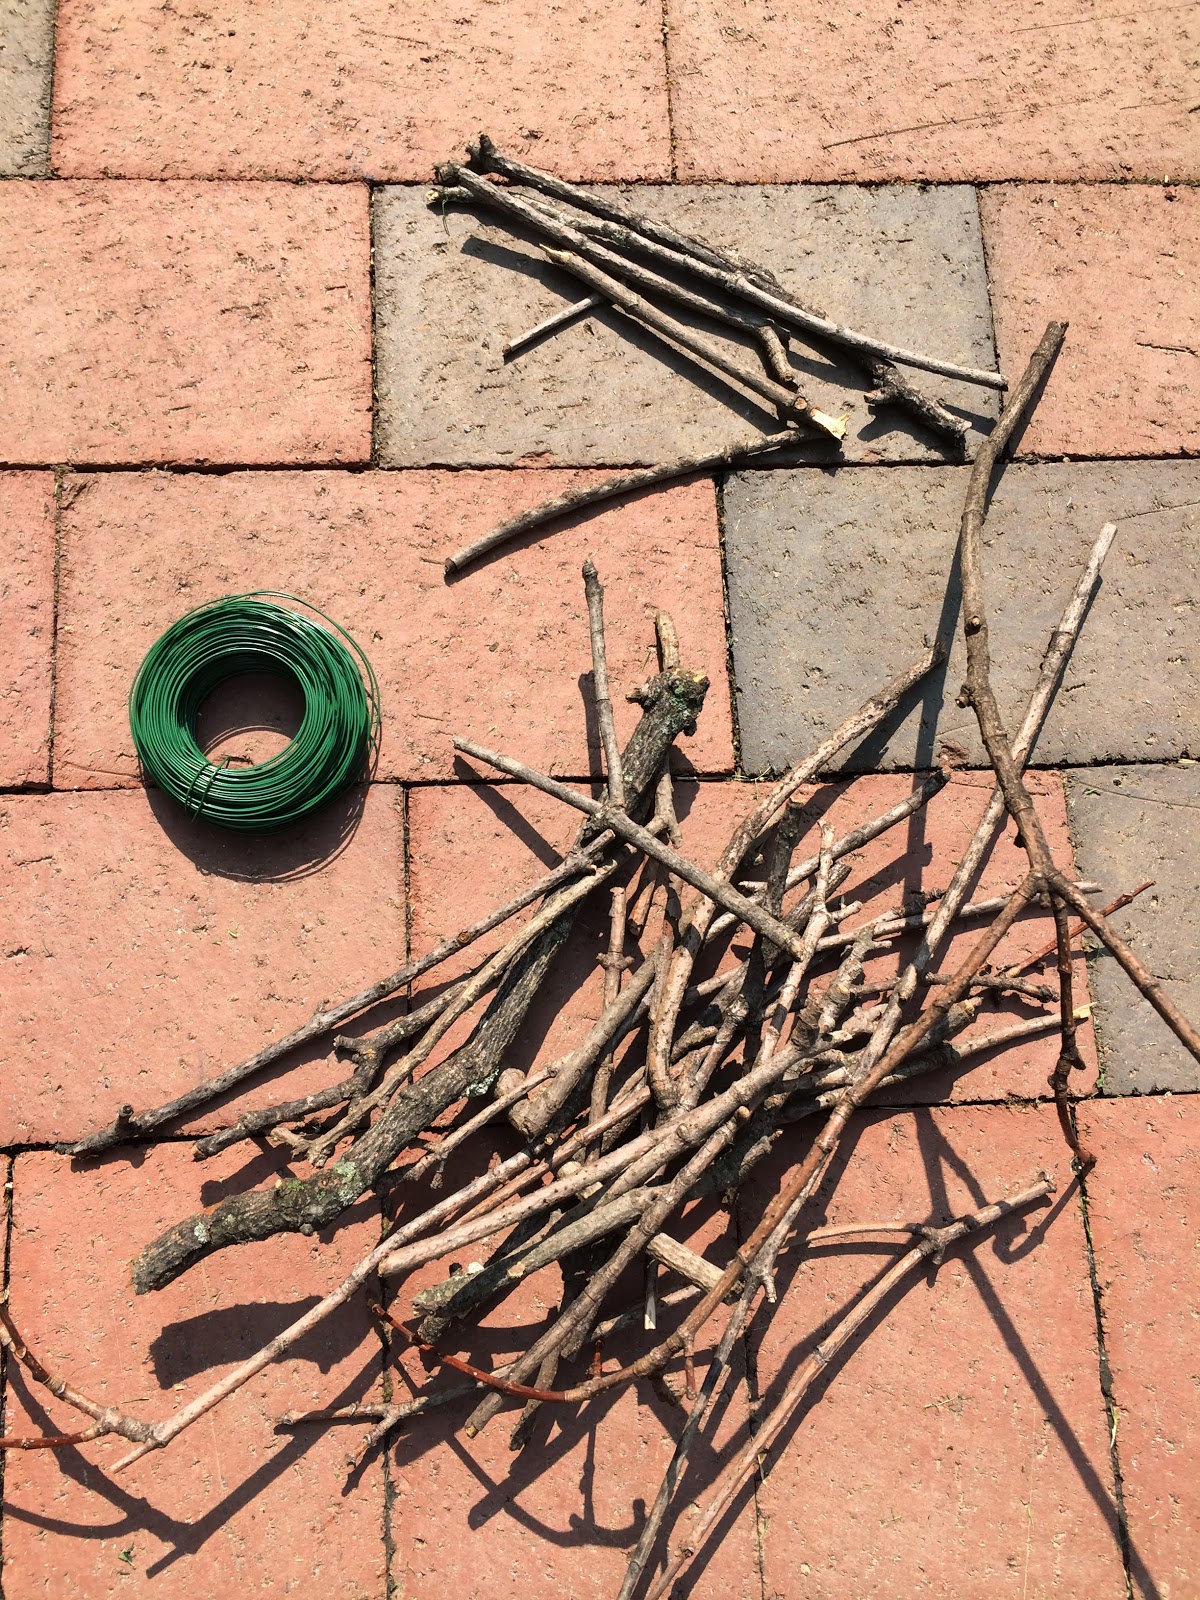
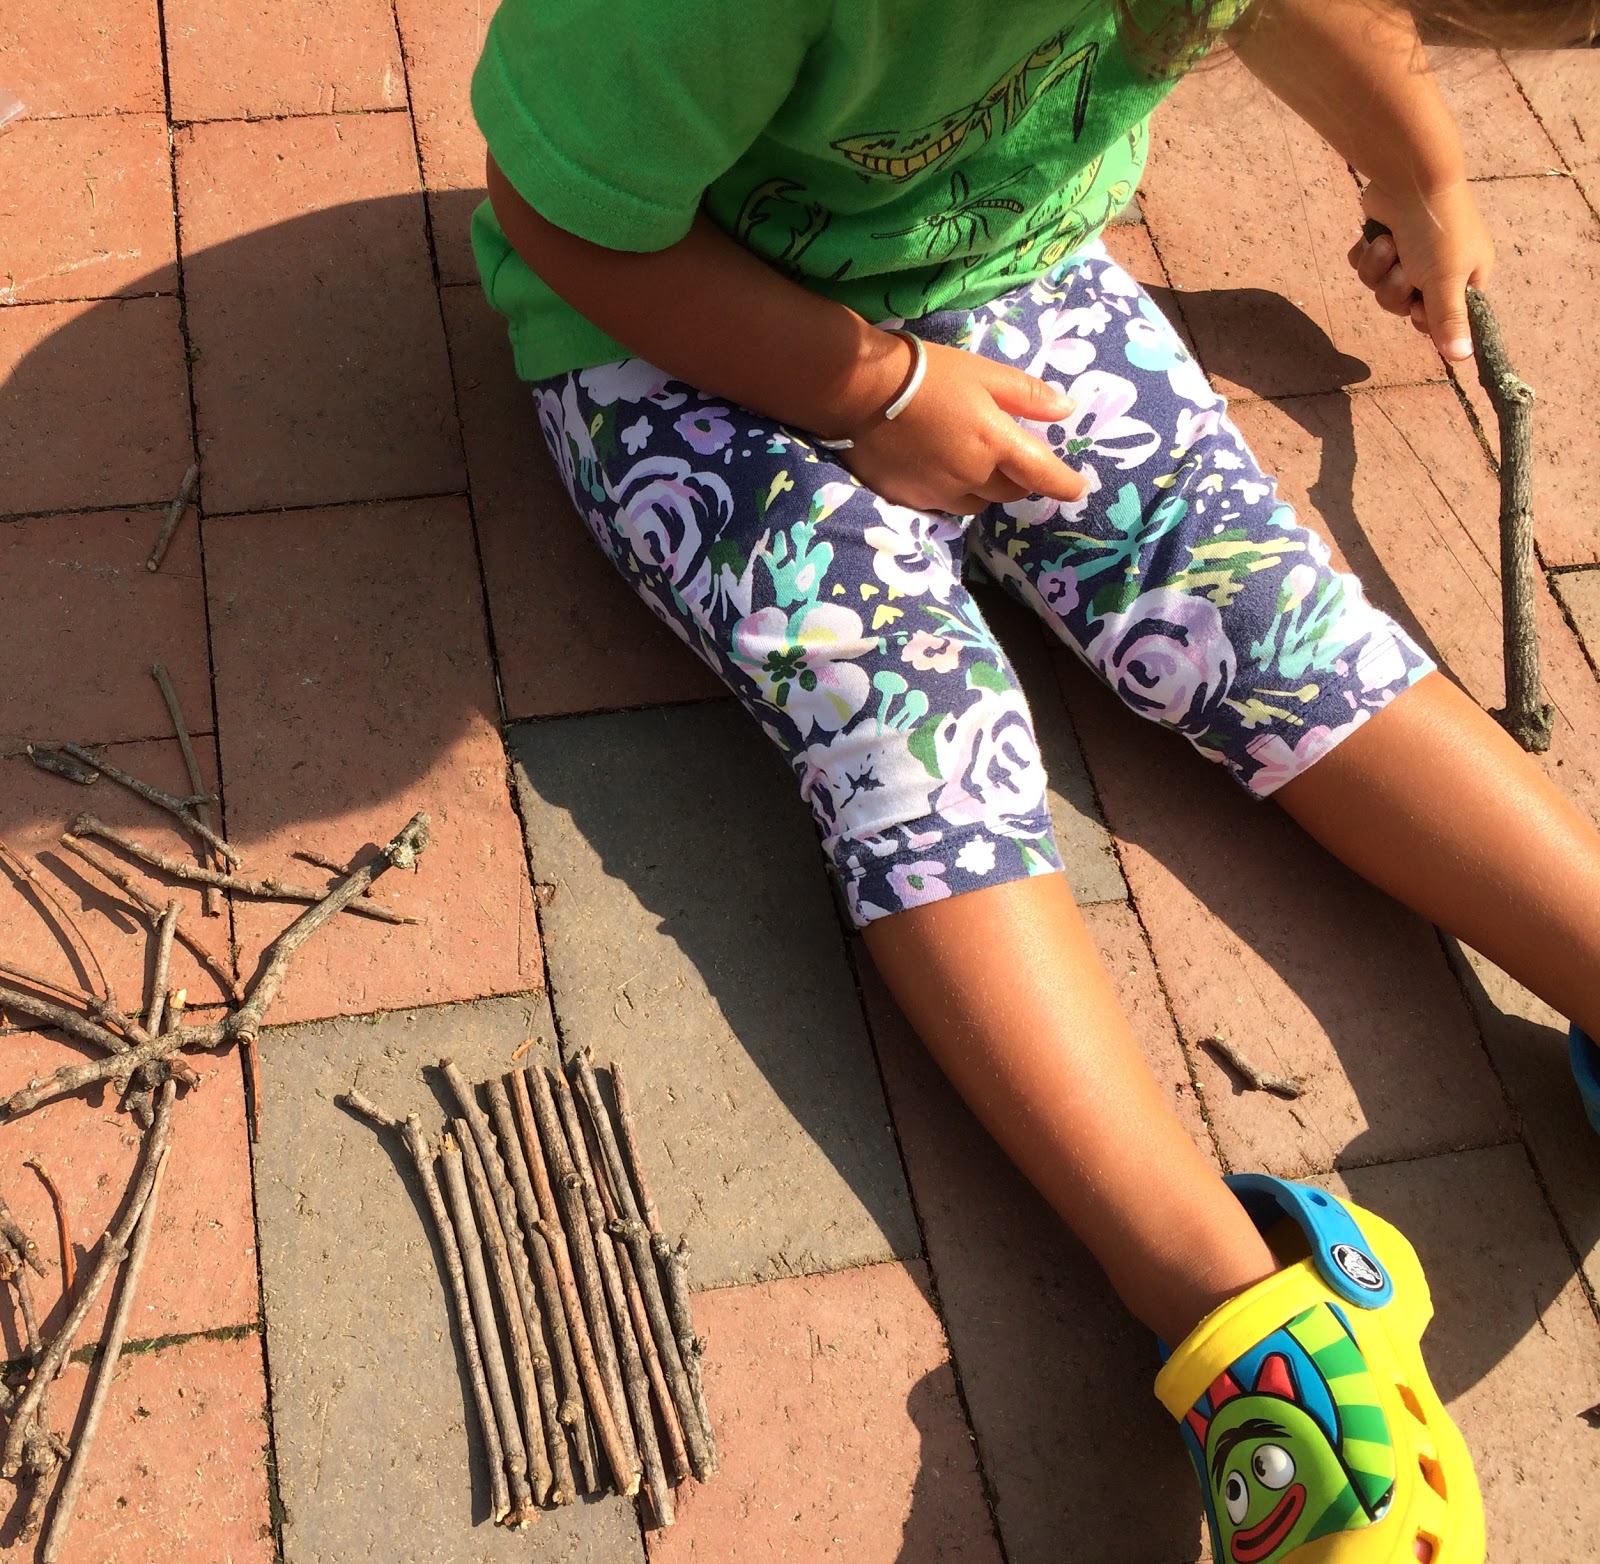
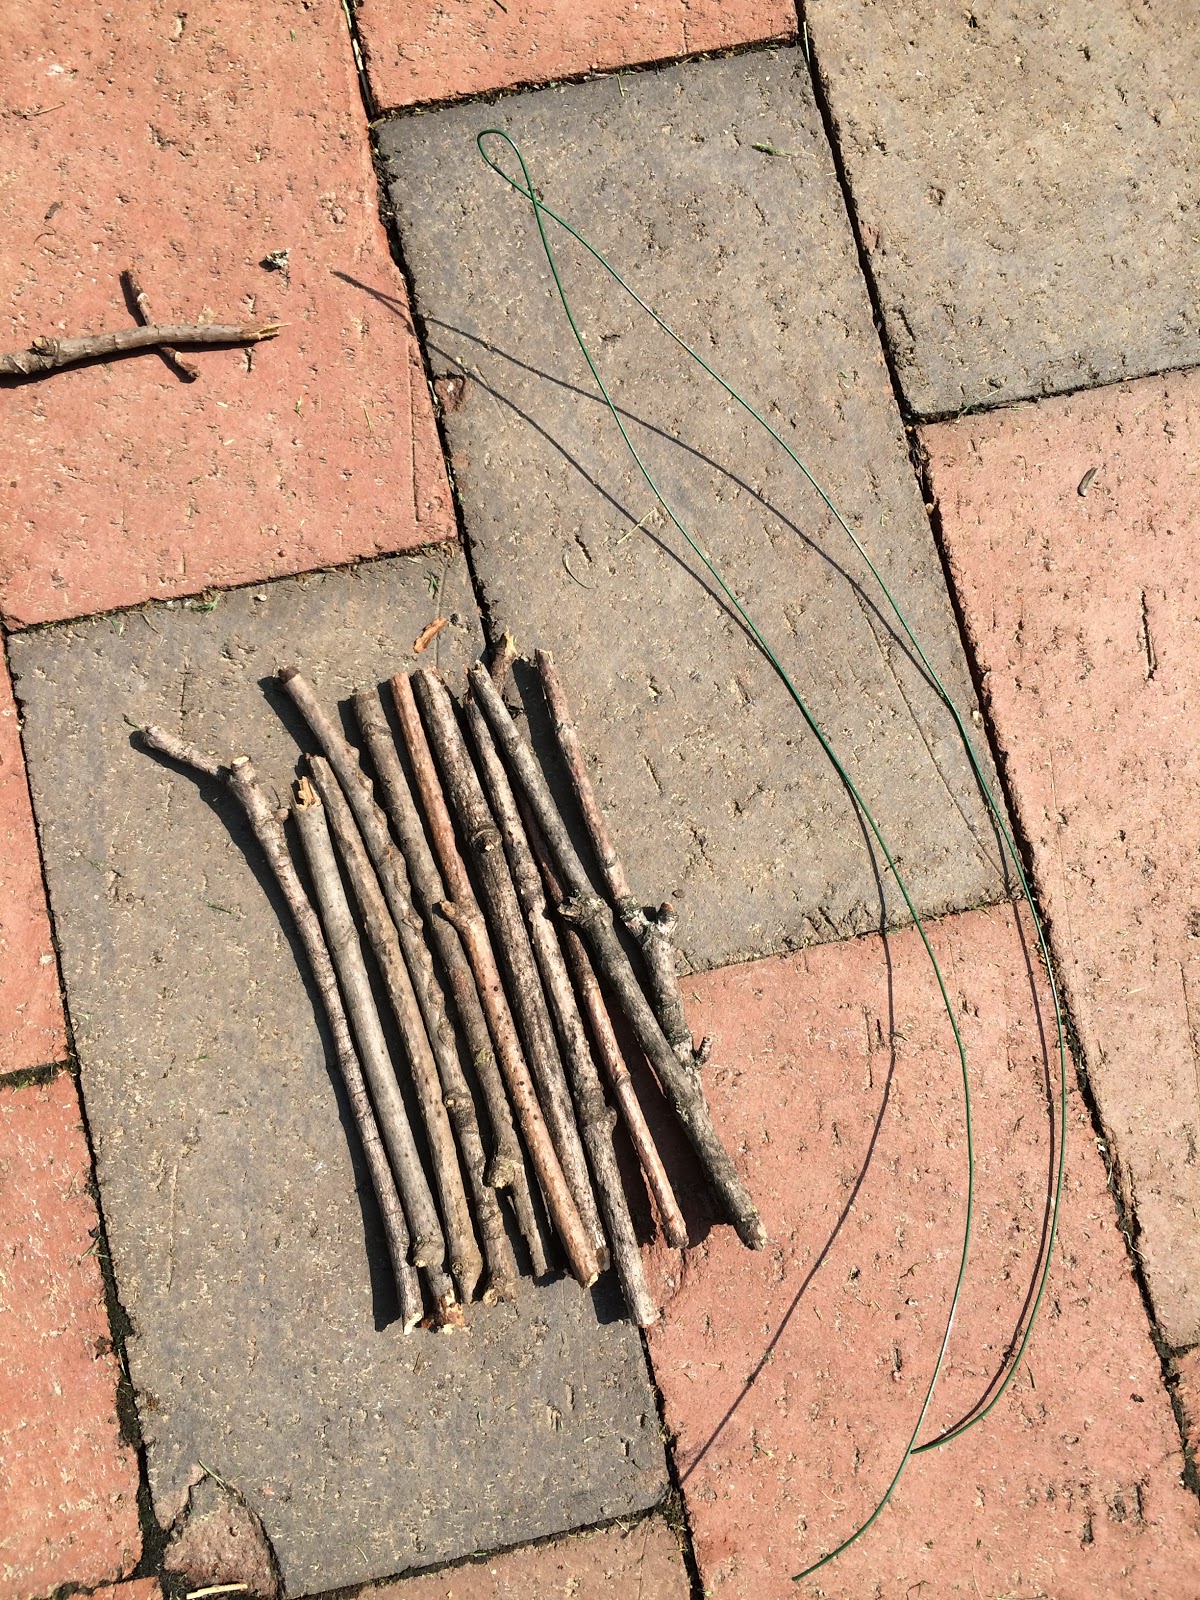
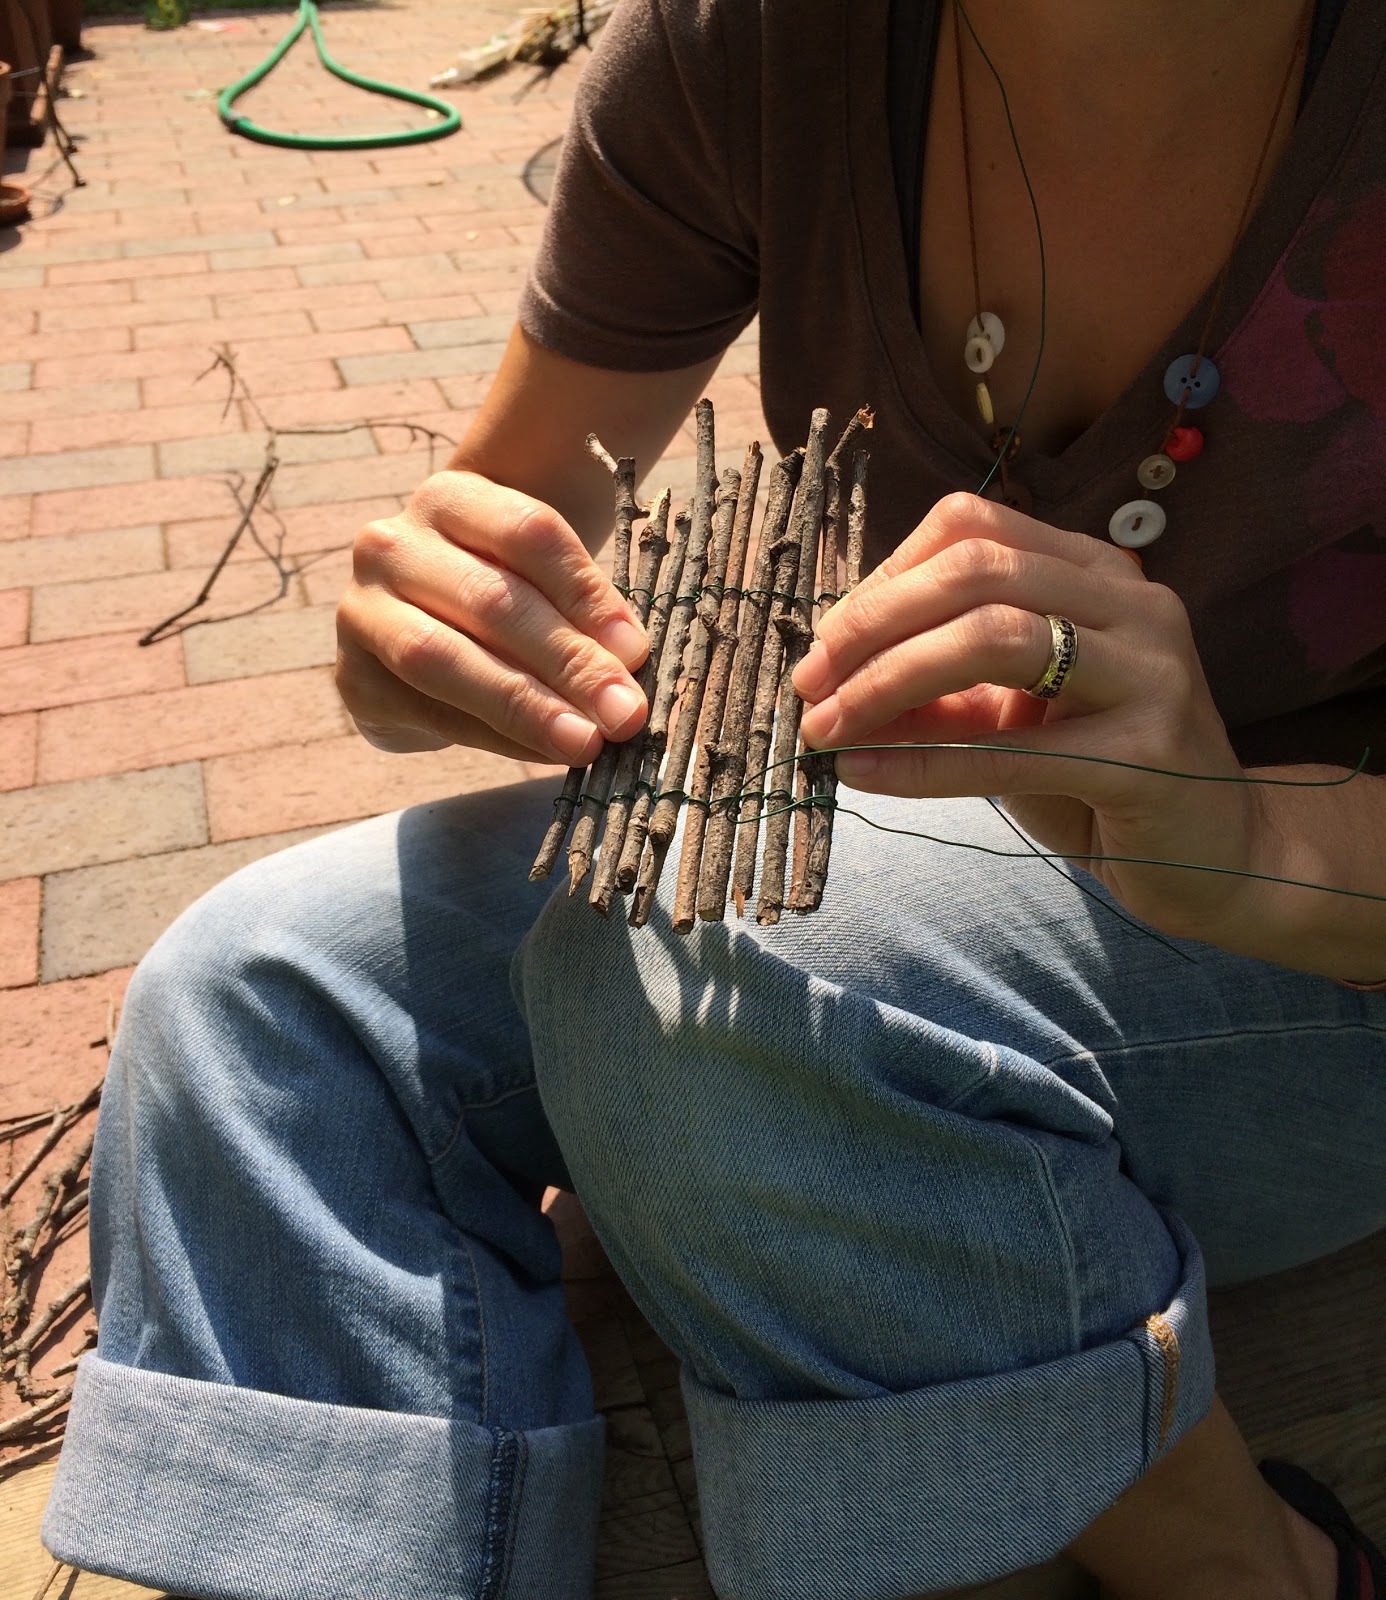
First, have your kids collect some sticks and twigs around the yard. Sort through the sticks, finding ones that are particularly straight. Lay these sticks side-by-side, getting an idea of what your door will look like.


Next, cut two pieces of florist wire about 2-ft long each. Fold them in half.


Take the first stick you have laid out for the door and place it in the middle of one of the wires. Wrap the wire around the stick, about an inch from the bottom, and twist the wire once to secure it.


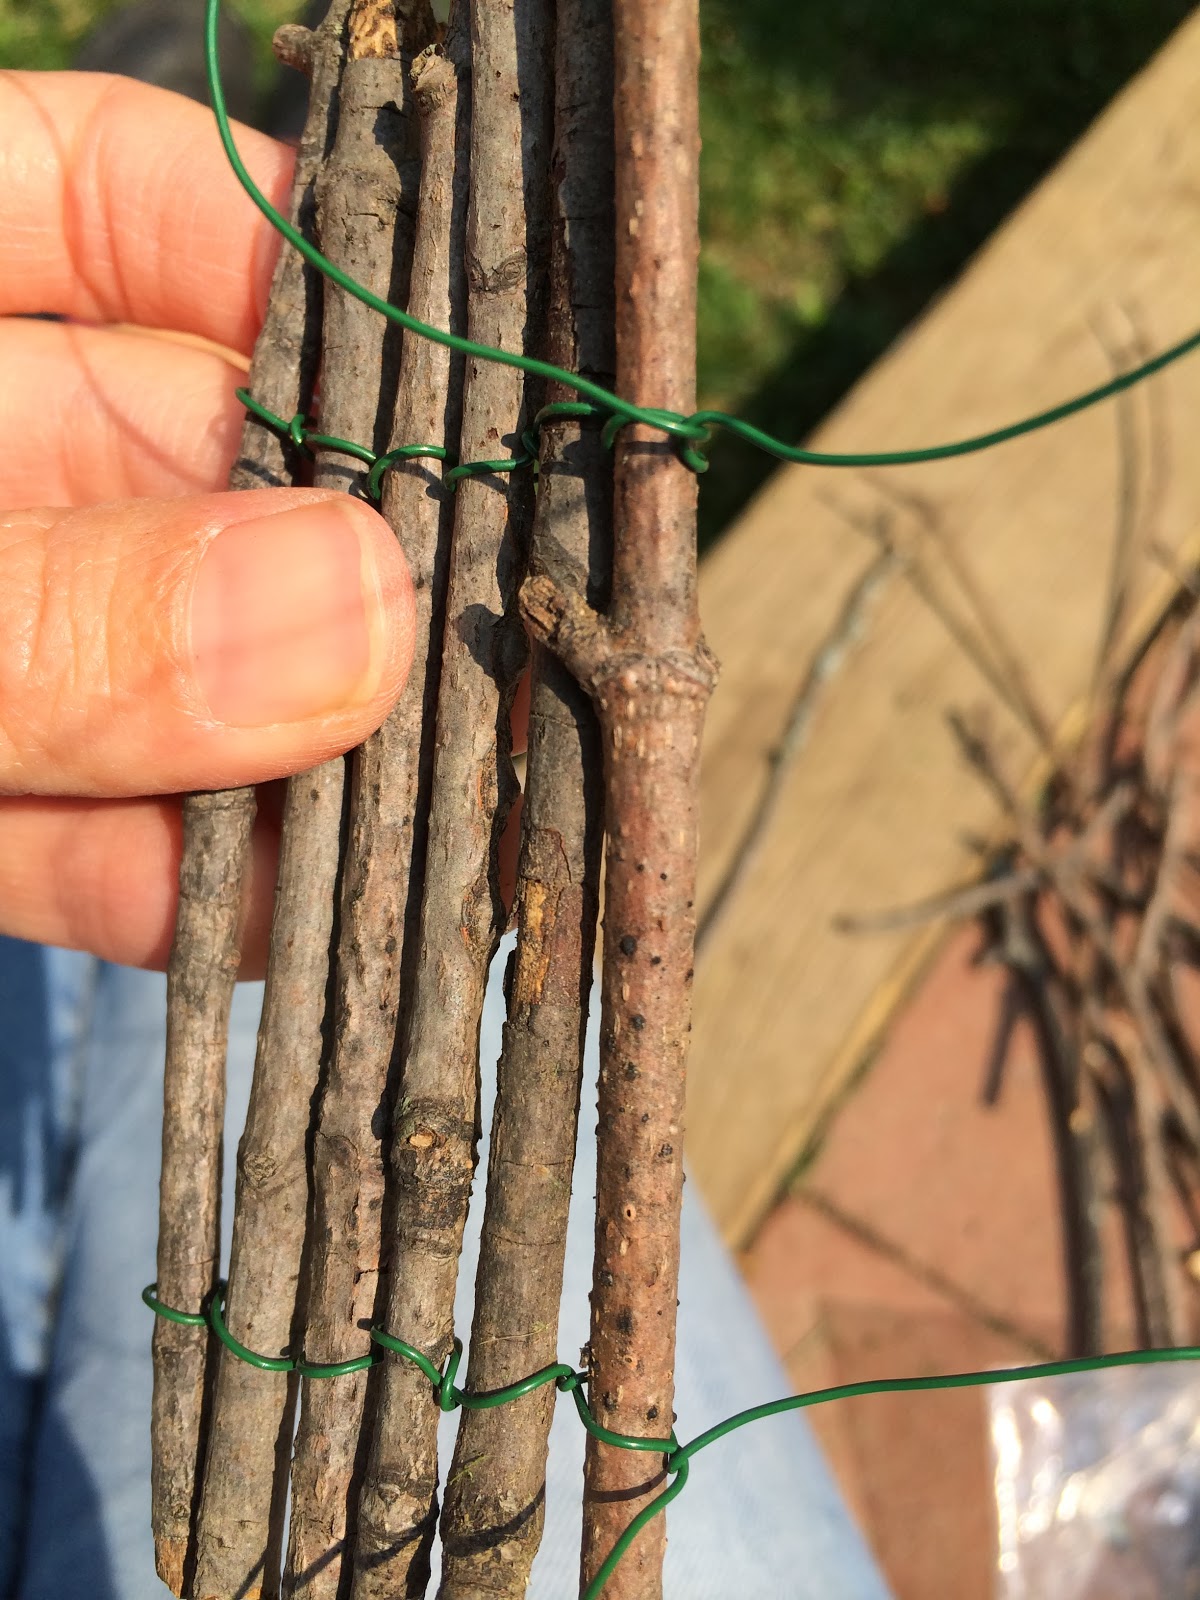
Do the same with the second wire about the an inch from the top of the stick. Continue adding sticks, one-by-one, wrapping and twisting the wires as you go.

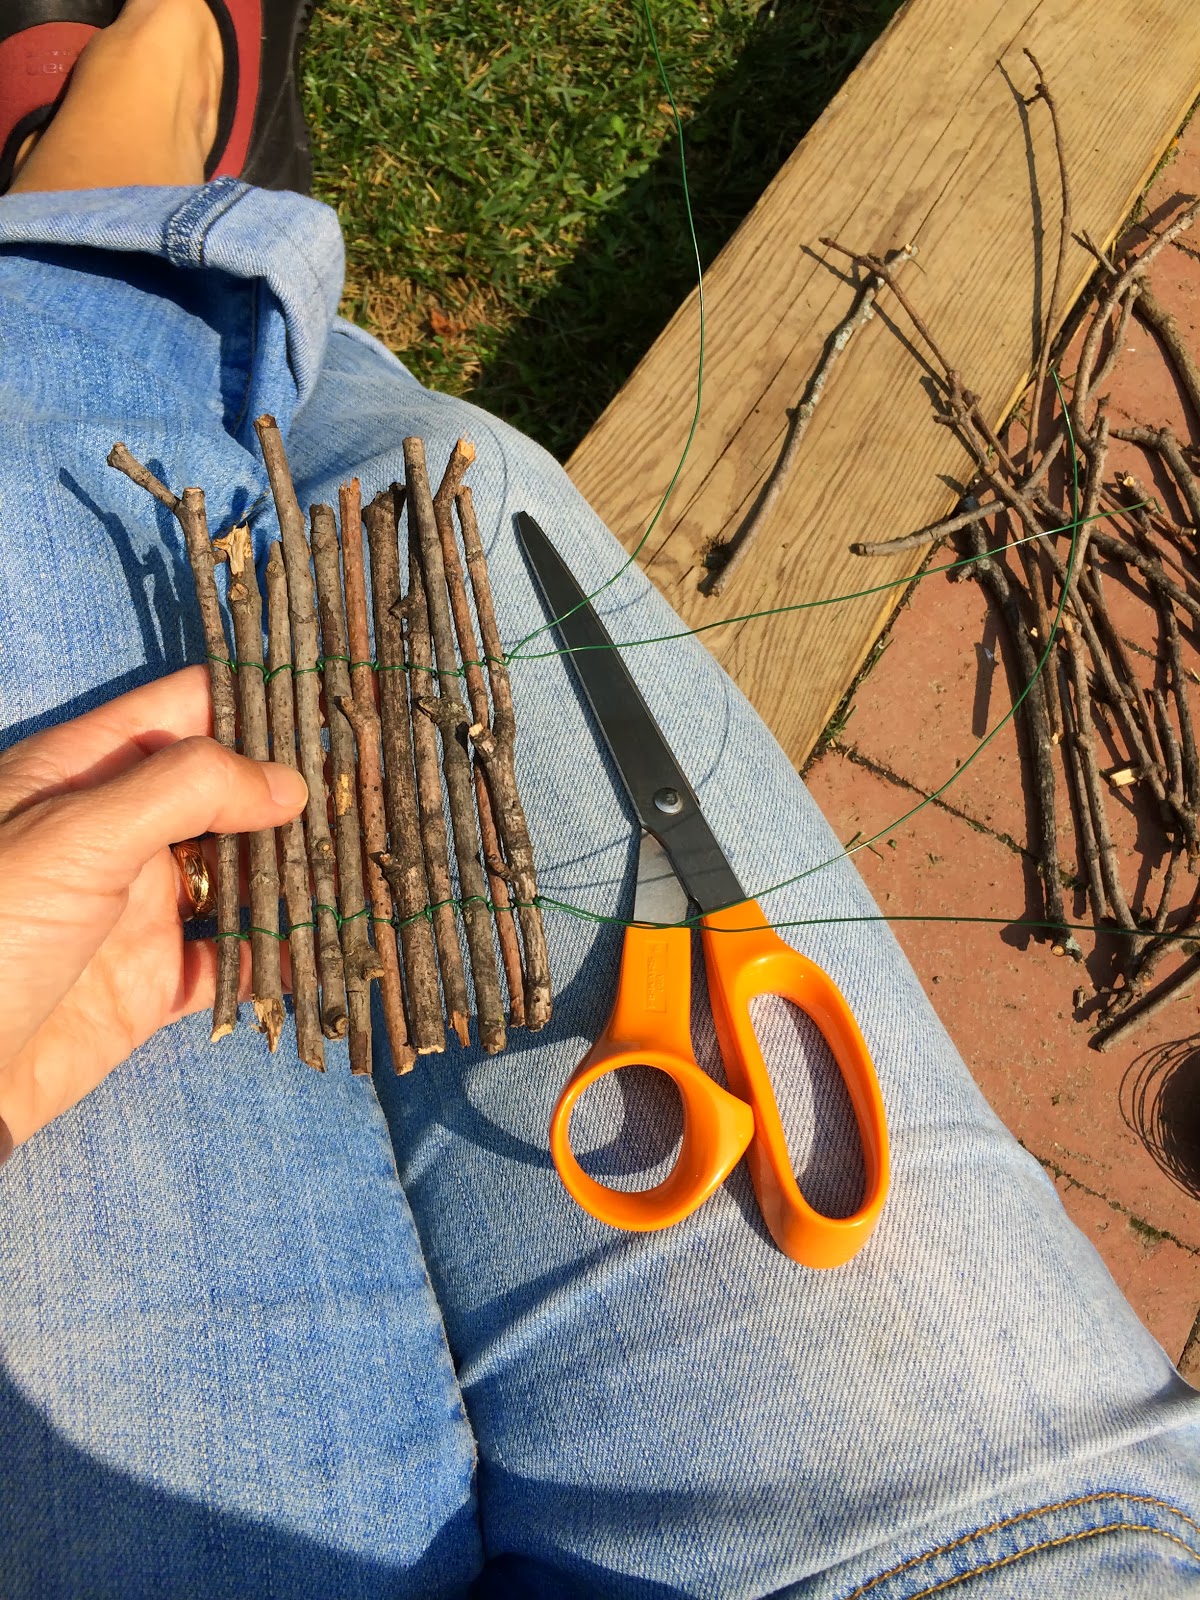
When all the sticks are connected, hold the door in two hands and very gently squeeze the sticks together.


Cut the end of the wire, leaving about half an inch, and fold back the extra.


Next, have your child select a button for a door knob. L chose this cute lil heart button…probably not the one I would have chosen, but it was perfect for a fairy door! (Kids just know when it comes to these things.)


Thread the button onto a 4-inch piece of wire, twisting the wire a bit to secure it. Then, deciding where you’d like the door knob to be, wrap and twist the wire around one or two of the sticks.


To ensure that the button won’t slide down the door, you can thread the excess wire up and over the wire that holds the sticks in place as well.


Now the fun part…find a little piece of wall, fence, or a tree trunk to prop the door up against! Add some buttons, pennies, or broken tile pieces for lil fairy stepping stones… Adorable!


This project was so quick and easy, I think we’ll make another to sneak into our neighbor’s garden. He’s got the perfect tree for a fairy or gnome door…


Sunshine Experiment

We call this one the “sunshine experiment”…it’s an oldie, but a goodie. It’s a great experiment to help kids learn about the harmful effects of the sun and why it’s important to always wear sunscreen. L is only 2 years old and was surprised at the outcome, but didn’t understand it 100%. I imagine a 4-year-old would get it and even a 10-year-old would have fun with the experiment!

Materials needed:

  • construction paper
  • old cardstock or thin cardboard (just look in the recycling bin!)
  • scissors
  • a handful of rocks
  • a sunny day

First, have your child dig through the recycling bin to find some pieces of thin cardboard or card stock. (We love any reuse-recycle activity!)

Next, cut out some big and basic shapes. We went with a night sky theme and an under-the-sea theme.


Take the cardboard cutouts and a couple pieces of construction paper outside. In a sunny spot, arrange the cutouts on the paper.


To ensure that they don’t blow away, put a few small rocks on top. Coins would work too! And now you have to wait and wait and wait…go for a walk, a swim, eat some lunch…wait a few hours.


Next is the best part…take the cardboard pieces off the paper and discover the picture left behind, all thanks to the sunshine!


I’m sure older kids could get really creative with this and make up their own themes and scenes. Fun times ahead!

Water Play

Have a lot of yard work to do this week? Want to keep your kids busy and cool while playing outside? Set up a water station! Whether it be dishes, a waterproof baby doll, a garden owl or a soccer ball, my kid LOVES washing things!


Washing supplies:

  • 1 or 2 wash basins
  • empty soap dispenser filled with water (This is a must! It’s L’s favorite part!)
  • wash cloth
  • drying cloth
  • sponge
  • old toothbrush
  • shaving cream


Things to wash:

  • dishes, utensils
  • toy cars
  • waterproof baby doll
  • stuff out of the garden (rocks, soccer ball, garden owl, figurines they can’t hurt)

First off, expect your kids to get wet…don’t even try to tell them not to! I usually take L’s shirt off and replace it with a smock shirt (one of my old shirts), or on a really hot day she just strips down to her diaper. Afterwards we just hose any excess soap off and, if the smock shirt happens to be covered in shaving cream, we roll that off too.


The key to keeping your kids going with this activity is to NOT give them everything all at once. Start with a wash cloth, soap dispenser and a few dishes. About 20 minutes later, add in a fork and spoon. 5 minutes later say, “Hey, want a toothbrush to clean with? I’ll get you one!” Look around the yard to see what else they can clean…that old, dirty gnome figurine could use a bath. Then, if all else fails, pull out the cheap can of shaving cream!


This is a great activity to do after painting or playing in dirt…your kids will have never been so clean!

DIY No-Sew Teepee

What kid (or adult) doesn’t like to play in a fort, tent or secret hideaway?! This teepee was so incredibly easy to make, I was able to construct it in about 5 minutes, just after the sun came up and before my girls awoke. Breakfast in a teepee anyone?

11289450_10205124128355912_5014849208968153360_o-2

14 - 2

What you need:

  •  6 x 72 in. bamboo stakes ($3-$4 for a pack of 6 at Home Depot)
  • twine
  • 10-12 clothes pins
  • a large bed sheet (I used a king-sized one, queen would probably work too)

First, arrange the stakes in a circle, pushing them about an inch or two into the ground. Leave one opening a little wider than the others, making room for the door.

 49C093ED-8715-43F2-BFA5-5E2D9481ED2B

Second, tie your twine in a knot around one bamboo stake. Gather the stakes at the top, one-by-one wrapping the twine in-and-out and around. (It’s much harder to explain than it is to actually do!) After the last stake has been gathered and wrapped, tie a bow so it is easy to undo when your teepee is ready to come down.


Next, wrap the sheet around the teepee frame and clip a clothespin in the middle to secure it at the top.

E4ABB256-8FD7-4BCD-8221-31AE11863681

Then, starting at the front and the top, clip the sheet to the stakes using the clothespins. Make sure you keep enough fabric up front for a “door.” As you clip the tops of the stakes and the bottoms, smooth out the sheet and pull it taut. Tuck any excess fabric under at the bottom.

021F5786-2BB4-4800-8B7E-9C23A180B586


And there you have it…a teepee in under $10 and under 10 minutes! Not only did L eat breakfast in her teepee, she read books, colored, and played with her dolls for HOURS! The teepee’s been going up and down for a couple weeks now…it’s about time to put it away and out of sight for a couple months so it doesn’t lose its luster. Perhaps we’ll bring it out again this Autumn for a special lunch among the colorful falling leaves!


DIY teepee - 4