Scavenger Hunt

SCAVENGER HUNTS are lots of fun for kids (and adults) of all ages! They only take a couple minutes to throw together and can be done just about anywhere…outside on a beautiful day, inside on a rainy day, in your backyard, on a walk around town, at an art museum or the grocery store. At times when kids may become impatient or get the wiggles, a scavenger hunt can be a great way to keep them entertained!

Basically all you need is a list of things to look for and a small bag to collect your finds. It’s that easy!

Our  “around town” scavenger hunt last weekend included the following: an orange leaf, a yellow leaf, a rock, a stick, a feather, a button, a flag, an acorn, a pumpkin, a scarecrow, books, a man wearing a hat, a dog, a flower, and berries. We put the small items that we found in our little bag, while the things that were too big (like a man wearing a hat) were just checked off the list.

You can make a scavenger hunt for long car rides too! Obviously you won’t be filling a bag with things, but your kids can check items they see off a list…or, even better, put it into a “BINGO” type format and you have a car game! See who fills their card first!

Another variation: Leave a trail of clues, leading your kids to a surprise in the end! We like to do this one around the house, sending L upstairs, then downstairs, into cabinets, and under pillows, all to find a hershey kiss tucked into one of her shoes at the end. It takes a little more prep time, but is oh so fun!!!

Where will your SCAVENGER HUNT take you?

DIY Floppy Newspaper Hats

Oh, we had so much fun making these FLOPPY NEWSPAPER HATS today! I thought I’d write up this tutorial this weekend, but I just couldn’t wait…they’re just so much fun! If you have little boys in your messy house, please don’t think you can’t make these with them…a hat’s a hat! A floppy hat’s a floppy hat! I’m sure they’ll love them just as much as any girls will! Do it! There will be lots of giggling for sure.

Materials needed:

  • newspaper
  • acrylic paint
  • painters tape
  • tissue paper, poof balls, feathers, etc.
  • white glue

First, prepare your painting area. I taped some trash bags to the floor to protect it from paint…not usually necessary for painting, but the newspaper sheets are just so large.

Next, paint, paint, paint! Paint an entire sheet of newspaper, just one side though. Don’t worry if some  of the newspaper can be seen through the paint, nobody will notice when the hat is finished! Allow the paint to dry completely.


After the paint is dry, lay the paper overtop of another sheet of newspaper…two sheets will make the hat a little more durable. Fold the papers twice, once in each direction, and cut the paper so when you open them back up, you have a circle. The circle really doesn’t have to be perfect, it’ll look great when you’re done!


Next is the tricky part because kids tend to wiggle…lay the paper over your child’s head and scrunch fold it into shape. As you go around, use painters tape to hold the the folds in place. The great thing about painter’s tape is that you can fix any little mistakes and it won’t tear up the paint or paper.


In making WB’s orange hat, I just shaped it around my knee and it worked just fine. I also experimented and used a stapler instead of the painters tape. Stapling worked great and looks fantastic, but it is a little trickier to do. The paper tears a little easier with staples in it too.

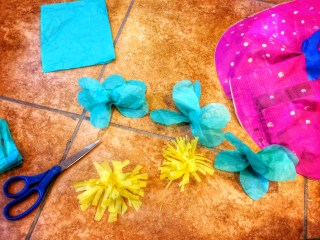
Now to decorate your hat! You can cut flowers out of tissue paper or just cut squares and scrunch them up. If you layer the tissue paper a bit, the flowers are a little fluffier and prettier. You can also glue on poof balls, jewels, feathers, anything you can think of and find around your house!


Super cute, huh!? Forget Easter bonnets, we’ll be wearing these to Thanksgiving dinner!!! That is if they survive a month’s worth of tea parties…


Wouldn’t these be adorable for a birthday party? You could make the hats beforehand and let the kids decorate them at the party…so many fun possibilities! Enjoy!


Pine Cone Flowers

Have I mentioned before how much I love Fall?! So many things to find and create with…like these mini-pine cones! I’ve been thinking of making “pine cone flowers” for months now, and when L and I found these miniature ones it was a done deal.

Materials needed:

  • miniature pine cones
  • twigs (the more lil knobs and branches the better)
  • acrylic paints
  • hot glue gun and glue

First, choose what colors you’d like your “flowers” to be…we choose multi-colored! Paint each little pine cone as you like. Set aside to dry.


Next, paint your twigs a mixture of dark and light greens. Allow to dry.


Once everything is dry, you can assemble your pine cone flowers. Using a hot glue gun, put a little dab of glue on the tip of a twig. Quickly press and hold a pine cone in place. Repeat until all your pine cones are used up.


So cute, huh!? Arranged in a little, antique bottle they make a sweet gift for a child or an adult.

Clothespin Butterflies

These clothespin butterflies are fun to make and can be clipped just about anywhere! L and I started this craft on a whim a couple weeks ago, we were trying to make butterflies with things we already had. Hopefully you have all the materials hiding around your house too! You could use paint or markers to color the clothespins. Using markers, the butterflies could be finished in one morning. We chose to paint ours…L loves to paint and I like when projects can be stretched out, keeping us busy for a few days.

Materials needed:

  • clothespins
  • paint or markers
  • pipe cleaners
  • beads
  • hot glue gun and glue

First, paint the clothespins. We painted one side, let them dry, then painted the other. I helped with the touch-ups…filling in any little spots that were missed. Let the kids have fun with it! L was happy painting hers all sorts of colors…there’s no right or wrong way.


Next, choose the color pipe cleaners you want to use for wings and the color beads. We used three colors of beads for the wings. This was a great learning activity to teach little ones about patterns! L strung the beads on the pipe cleaners, repeating our 3-bead pattern 4 times for each wing.


Spread the beads out a little bit, so the color of the pipe-cleaner can be seen. Next, loop one end of the pipe cleaner around to the middle of the pipe cleaner and wrap it once or twice, leaving about half an inch of the end sticking out. Repeat with the other side of the pipe cleaner, forming a figure-8 butterfly wing shape. Twist both half-inch ends together. (This step is much easier to see in the pictures than to explain!) Repeat for the second wing.


To make the butterfly’s antennas, cut a pipe cleaner in half. Then, bend that piece in half. Put a bead on each end of the antenna and curl it down a bit.


After you’ve shaped both butterfly wings and the antennas, it’s time to glue them to the clothespin. Using the hot glue gun, put a little bit of glue on the inside ridge of the clip and quickly press the middle of the antennas in place.


Next, put a bit of glue inside the wire coil and push one of the wings in. Repeat the same on the other side, only put the glue above the wire coil and slide the wing in place.


Cute, right? These would be beautiful hanging in a window with the sun lighting-up the beads! We’re making something special for WB’s room with ours…I can’t wait to show you next week! Enjoy!

DIY Rustic Spinning Stars

I love these Rustic Spinning Stars. When I first saw something similar here on the “happy hooligans” blog I just knew we had to make them! They’re fun to make with the kids and are beautiful hanging inside or outside. We have ours spinning on our front porch, while my dad hung his (which we gave him for Father’s Day) in their kitchen. I think the stars would be really fun hanging, spinning from the branches of a big tree too!


Materials needed:

  • sticks
  • glue gun and glue
  • white acrylic paint and brushes
  • colored ribbon scraps, string, raffia
  • florist wire

First, have your little ones collect sticks. You can make big stars with big sticks or use little twigs, like we did, to make little 3 to 5-inch stars.

Use the hot glue gun to glue five sticks together into the shape of a star. The stars don’t all have to be the same size and they certainly don’t have to be perfect…any imperfections give your stars more character! Don’t worry about the glue showing either, in the next step the paint will cover it up.

Next, have your kids help you paint each star with white acrylic paint. This is a great painting project for little ones, since any missed spots give the stars their rustic appearance.


After the paint dries, tie one end of your ribbon to the center of the star and wrap it around. Again, no need to be perfect here…another great task for your kids to help you do! After the star is wrapped, tie the end in a knot around one of the star’s arms.

You can attach the stars to each other with string or wire. We used green florist wire, which is weather resistant and sturdy. If you link two pieces of wire together, between each star, the stars will spin a little more than if you use only one wire. We tried both ways…both did the job and look great, so it’s up to you!

Now for the fun part, find the perfect spot to hang your Rustic Spinning Stars! Enjoy!

DIY Vintage Feather Garland

I love this simple, yet colorful and fun feather garland. The orange, yellow and browns of our garland take me back to the 70s and 80s, and the make-believe games of yesteryear, making it the perfect garland for a kid’s bedroom or play area. You could spruce this garland up a bit for the holidays though, using all white or sparkly feathers. Peacock feathers would be beautiful as well! There are so many possibilities!


Materials needed:

  • feathers
  • gold wire
  • basic wiring tools
  • string


The easiest way I found to attach the wire to the feathers, is as follows… (If you “click” on each picture, the wiring is much clearer when it’s enlarged.)

For each feather, you’ll need a piece of wire about 1 1/2 to 2 inches long.

Wrap one end of the wire twice, making a small loop.

About 1/2 an inch from the other end of the wire, wrap the wire once, folding the excess wire around the back of the mid-section. (Much easier to see in the picture than it is to explain!) Bend the loop you first made, so it’s perpendicular to rest.


To attach the wire to the feather, thread the end of the feather through the bent loop. Bend the loop, back down so it’s laying more or less flat against the feather, holding it in place. On the opposite end of the wire, hold the loop still while you wrap the excess wire around the feather. Repeat with each feather.


I’ve pictured multiple feathers in their completed state. As you can see each wiring job is a little different, adjusting to the various lengths and widths of the feathers’ ends.


The last step is certainly the easiest…thread the feathers onto your string and hang!


Our feather garland is hanging above the little one’s play area. The brightly colored feathers are constantly in motion, gently dancing as the air moves around the room. I love how it catches WB’s eye while she’s playing on her back, taking in her surroundings. Where will you hang your feather garland for the whole family to enjoy?

Bubble Blobs and Bubble Worms

Here is a super-fun activity made with materials you already have! L and I started making bubble blobs after breakfast this morning and we were still making them in the shower tonight! (I may or may not have bribed her into the shower with her bubble blob blower.) It’s definitely a good summer activity, but there’s no reason why it can’t be done in the bathtub on a rainy, cold day.


Materials needed:

  • plastic drink bottle
  • old sock (Thick socks work best!)
  • rubber band
  • dish soap
  • food coloring (optional)
  • a small bowl
  • scissors


First, cut the bottom of the plastic bottle off and unscrew the lid.


Turn the sock inside out (so the fluffier side is outside), and pull it over the bottom of the bottle. Secure it in place with a rubber band.


Next, put some dish soap in a small bowl with a little bit of water. If you want your bubble blobs and worms to be colored, add a few drops of food coloring too!


Now for the fun part…put the newly-made, bubble blob blower in the dish soap, then blow through the bottle top!


Instruct your kids to blow as if they’re blowing up a balloon and not to suck in!!! L made that mistake once and got a mouthful of bubbles. Ick!


It’s fun to see who can make the longest bubble worm! 🙂 What other bubble inventions have you made? Please share in the comments section below!


Fairy Furniture

It wouldn’t be fair for me to tell you how to make a “fairy door” without showing you how to make some fairy furniture to add to your garden as well! These tables and chairs are super easy and quick to make and, like most of my favorite crafts, they can be made with things you already have!


 Materials needed:

  • bottle caps
  • little sticks and twigs
  • scissors
  • hot glue gun and glue

First, have your kids help you collect sticks out of your yard and select some colorful bottle caps. (Bottle caps are another item we hoard in our house…they can be used for so many crafts!)


Using your scissors, cut a stick into four equal pieces…each about an inch long. These will be the legs of your chair.


Turn a bottle cap upside down and glue the four legs into place. You can either put the glue onto the leg and push it into the bottle cap, or put the glue directly onto the cap and push the stick in. Whichever method you decide on, make sure you do it quickly so the chair legs are super-secure!


Cut two more sticks, about an inch and a half to two inches long. These ones do not have to be exactly equal in length or straight! Cut two or three more sticks about an inch in length.

These sticks will resemble a ladder-back chair. One by one, glue the inch-long sticks to the longer ones, attaching the two. (Easier to see in the pictures below than to explain!) I prefer the small, horizontal sticks to be a little crooked…gives the chair more character!


Once all the sticks are attached and the glue has dried, flip the chair over and decide which side will be the front and which will be the back. Glue the back of the chair to the seat with two more dots of glue. All done!!!


If you’ve made the chair, the table is super easy…essentially it’s a back-less chair!


I just love the color and character the bottle caps give the fairy furniture! Have fun playing with this one! They are so quick and easy to make, you might as well make a few for your neighbor’s garden as well.


Homemade Paper and Seed Paper

Last night, while cleaning up from dinner, I told L not to throw away her pudding cup because it can be recycled. She replied, “What’s recycle? What’s it mean?” So as I was doing my best to explain to a 2-year-old how plastics are melted down and made into new containers, I remembered how I used to make paper as a kid…it’s the perfect activity to teach kids of any age how things are recycled! I lost my paper-making kit years ago, but it didn’t take long to locate and piece together the materials needed for homemade paper. I love this activity because your kids can help with each of the steps, keeping them busy and entertained the whole way through!


Materials needed:

  • old paper
  • water
  • blender
  • 2 small window screens
  • felt (or thin cloth like a cloth diaper)
  • sponges
  • plastic tub or wide container
  • seeds (optional)


First, dig through the recycling basket for colorful paper. (I always save colored-on pieces of construction paper for projects like this!) Have your kids help you tear it up into 2-inch pieces and throw it all into a large bowl.


Add some water to the bowl, covering all the paper pieces, and let it soak thoroughly for a few minutes. Your kids can now reach in the bowl to see how the wet paper feels compared to the dry.


Next, scoop and dump the paper and water into your blender. There’s no exact amount of water needed since it’ll all be squeezed out in the end. Blend the mixture for about a minute. The pulp should resemble the consistency of oatmeal.


Now for the fun, messy part!!! Lay one of the screens over the plastic tub or container. (You could use your sink, but it’s easier for kids if the project is done on the floor!)


Next, dump the paper pulp mixture out on top of the screen. Let your kids help you spread it around gently.


Then lay a large piece of felt on top of the mixture and next, the second window screen.


Using sponges press down on the felt, squeezing most of the water out. We started in the middle of the felt and worked our way out, pressing the paper underneath nice and flat.


Next, take off the top screen and, placing one hand on top of the felt, quickly flip the other over. Remove the screen and leave the paper on the felt to dry. I did this last step outside on our picnic table so the paper could dry in the sun and summer heat. It takes about a day to dry on its own. When I was a kid, doing a similar paper-making project, the paper and felt pieces were much smaller and I’d pop it in the microwave to dry. The paper would curl a little bit sometimes, but it was quick and easy.


Here’s our finished paper! It doesn’t look like your typical paper, but it is beautiful with all the bright yellows, reds and oranges mixed in! It’ll be perfect to paint on later in the day!


Making Seed Paper: 
To make seed paper, add a handful of flower seeds to the pulp before squeezing all the water out. After the paper dries, you can cut it up into squares and gift it to friends. They can plant the paper strips in soil in the Spring, water and wait for their flowers to grow! We used our leftover, perennial Balloon Flower seeds…they’re easy to grow and look beautiful anywhere!


Other Ideas:

  • Before squeezing the water out of the paper-pulp mixture, add some flower petals to the pulp for a fresh and colorful look!
  • After squeezing the water out and removing the screens, use cookie cutters to carefully cut the paper into shapes. After they dry, you can punch a hole to hang the paper shapes and make ornaments! We may do this around the holidays, using holiday-colored paper.
  • You can also add glitter to the paper pulp, before squeezing the water out, to give your paper a little sparkle!


Have fun and get messy! Your kids will love you for it!!!

Homemade Ice Cream Sandwiches

In the Summer, when I was a kid, my mom used to make a frozen, creamy yogurt pie for us. She mixed together yogurt, whipped cream and fruit, poured it into a graham cracker crust and stuck it into the freezer to harden up. We ate it for dessert, afternoon snacks and even breakfast! This is a new twist on such a yummy and healthy Summer-time treat!

Ingredients:

  • banana
  • graham crackers
  • 2 cups, low fat yogurt, any flavor
  • 1 cup, low fat whipped cream (store bought or homemade)


First, take a 8 x 8 in or 9 x 9 in pan or dish…line it with tin foil. Break the graham crackers into squares and lay them out on the bottom of the pan.


Cut the banana into slices, about 1/4 inch thick, and lay one slice on top of each graham cracker.


Mix the yogurt and the whipped cream together in a bowl. Pour and spread the yogurt mixture evenly over the bananas and graham crackers.


Finish with another layer of graham crackers. Quickly put the pan in the freezer for a few hours to firm up.


Take the pan out of the freezer and carefully lift the foil and ice cream sandwiches out. Place on a cutting board and cut into squares. Let them sit about 5 minutes so they’re more creamy and less icy. Yum-yum….enjoy!


A great thing about this treat is that it’s very versatile…you can make it with just about anything you have on hand.

Variations include:

  • mash up 2-3 ripe bananas, mix with peanut butter…layer in-between graham crackers
  • add 1-2 tablespoons of jelly, jam, nutella or chocolate syrup
  • use strawberries instead of bananas
  • use cookies instead of graham crackers

The possibilities are endless…let us know what you come up with!