DIY Soap Crayons

Here’s another fun craft for your kids to help make and to play with…L had a ball with her DIY SOAP CRAYONS! They’re a little different than the bath crayons you’ll find at the store…these ones wash off the bath and shower walls easily with water. L likes to color with these ones in the shower before I turn the water on, then she makes a nice soapy, colorful mess once the water is on. They’re fun for coloring on your skin too…just add warm water and it washes right off!

Materials needed:

  • bar of white soap
  • cheese grater
  • food coloring
  • 2 to 4 tablespoons hot water
  • fork and spoon
  • ice cube tray, muffin tin, paper cups or candy mold

First, grate the bar of soap into a large bowl. Grate the entire bar, making about 2 cups of soap shavings.


Add 2-4 tablespoons of hot tap water to the soap and mix-mash with a fork or spoon. Continue mixing until the soap has formed a semi-liquid consistency without any big lumps.


Spoon the soap into your molds. Add about 5 drops of food coloring to each one and mix carefully with a spoon. We found that a baby spoon worked great for this step!


Once your soap crayons are all mixed and colorful, carefully push the soap down evenly into the molds. Set them aside to dry for a full week.

After a week has passed and the crayons have hardened, carefully turn the molds over and pop the crayons out. If their underside is still a little soft, let them finish drying for a few more hours.


(We saved all the little colorful crumbs too…added to a bubble bath or some shaving cream, they will make a beautiful rainbow mess!)


Now for the fun part…time to color and play with your own homemade soap crayons!!! Enjoy!!!


Thumbprint Christmas Lights Gifts

I’m super-excited about how easy these THUMBPRINT CHRISTMAS LIGHTS were to do and how cute the finished products turned out! L and I made pictures for her grandparents and this adorable little onsie for her baby sister. I think we’ll be making more of these shirts this coming week…one for L and some for her friends too. The THUMBPRINT CHRISTMAS LIGHTS are just too cute!


Materials needed (shirts):

  • tshirt
  • acrylic paints
  • cardboard (old cereal box works)
  • Sharpie marker, black

Materials needed (card or picture):

  • paper
  • acrylic paints
  • Sharpie marker, black

First, when making prints onto clothing, put a piece of cardboard up through the middle of the shirt. A collapsed cereal box works great for little ones. This will keep any of the paint or marker from seeping through to the other side.

Next, draw a curly line across the shirt with the black Sharpie.

With the paint, help your little one make thumbprints along the line. The thumbprints shouldn’t all touch the line, though it’s okay if a few do.


Once the paint has dried completely, go back with the Sharpie and draw 2, 3, or 4 lines under each thumbprint to make them look like a string of Christmas lights.

So stinkin’ cute! Huh? WB approves!


To make a Christmas card or picture, simply do the same on a piece of card stock paper.


What else could you put THUMBPRINT CHRISTMAS LIGHTS on? A tablecloth, napkins, a small board of wood, little boy’s pants, boxer shorts for dad, ball ornaments…so many possibilities!!! Enjoy!

DIY No-Sew Rag Garland

Out of all the garlands I’ve made over the years, the RAG GARLAND has always been my favorite! It’s bright, colorful, super-easy to make and it looks fantastic inside or outside, day and night!


The RAG GARLAND is fun for the holidays, but can be made and used for any time of the year. I put ours up for Christmas, but I didn’t make the color scheme ultra-Christmassy…I love color and can’t seem to limit myself to just red and green! The best place to find cheap and funky fabric is at antique stores, thrift stores or flea markets…any leftovers can be used to make lil rag tag skirts or tutus for your little ones.

Materials needed:

  • fabric
  • scissors
  • string of lights

First, cut your fabric into strips about 2 inches wide and about 12 inches long.


Next, tie each fabric strip around the string of lights with a single, basic knot. If the fabric is blank on the underside, just fold the fabric over before knotting it. Repeat until the string of lights is covered.


This is a garland we made for Steamys, a local coffee shop/book store/gift shop in town. We used vintage fabrics to make it extra funky!


Happy garland making!!!


Sensory Bottles for Baby

I’ve made sensory bottles for L before, filled with colored water, glue and glitter or colored water and oil, but I don’t know why we never made SENSORY BOTTLES FOR BABIES until now. Babies and toddlers both love them!


The water-filled bottles are fun to look at, but too heavy for WB to really handle safely. Making these SENSORY BOTTLES FOR BABIES was a terrific tactile activity for L, and WB seems to love shaking and playing with the bottles. Not only are they fun to play with around the house and in the car, but sensory bottles make great bath toys too!


Materials needed:

  • small, plastic bottles with lids
  • any of the following: pom-poms, feathers, sequins, straws, ribbon, cereal, dyed rice, etc.
  • glue

Making the bottles is pretty self-explanatory… Remove the label from the bottle. Fill with small, colorful items. Glue the lid shut.

As always, never leave infants unattended with toys, especially if it includes small items. You can never be too safe! Enjoy!!!


Have you seen our DIY Baby Play Area yet??? These bottles would be a great addition!

Gnome Village Advent Calendar

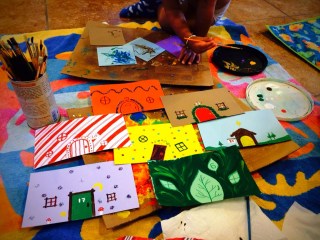
I’m so super-excited about our GNOME VILLAGE ADVENT CALENDAR this year! Starting on the 1st of December the kids will lift up a gnome home each day…the house numbers will correspond with the day. Underneath each house will be a little surprise: a hershey kiss, a candy cane, a miniature ornament for the tree, or a special message. The “special messages” may include,

  • “Make cookies for a neighbor.”
  • “Make Christmas cards for friends and family.”
  • “Leave little notes written in chalk around the neighborhood.”
  • “Make a Gingerbread House today!”


Making the GNOME VILLAGE was a little time consuming, but very easy to make. You could always make your gnome houses very simply with a standard door, windows and house number and they’d look just as cute! Just mix up the colors for some variations!

Materials needed:

  • mulit-colored card stock (or you could use toilet paper rolls)
  • doilies
  • markers and/or paint
  • glitter
  • Elmer’s glue
  • hot glue gun
  • sequins, stickers, etc (optional)

First, cut the card stock in half horizontally, then take about 3 inches off the end. I like using card stock instead of regular construction paper because it doesn’t fade as easily and it’s sturdier. I’m hoping to use our GNOME VILLAGE year after year!

After your paper is cut, it’s time to decorate! We decorated some of our gnome houses with markers, some with paint and embellished them with sequins, jewels and glitter. Have fun and be creative! They certainly don’t all have to be Christmas-y, just colorful!


Once the houses have been colored and painted, shape the paper into little tubes and use a hot glue gun to secure them in place.


To make the gnome house roofs, make a cut to the center of a doily. (I actually used two doilies stacked for a sturdier roof.) Overlap the ends and glue into place…should make a little rooftop-cone.


To add snow to the roofs, very gently roll each roof in Elmer’s glue and then sprinkle with glitter. This was definitely L’s favorite part!


Using the hot glue gun again, attach each rooftop to a house. All done! Pretty easy, huh?


We plan to display our GNOME VILLAGE ADVENT CALENDAR on one of our mantels this year…with a little snow, mini-pine trees, and a few gnomes it will surely become one of our favorite Christmas decorations for years to come! So. Much. Fun! Enjoy!


Leaf Prints…Pillowcases and T-Shirts

Ever since we put up L’s “big girl bed” a couple months ago I’ve been looking for the perfect pillow sham. I finally decided, “Why not just make one!?” And that’s exactly what we did today! I love the outcome…it turned out even better than I imagined it would! The pillow cover will last for years and we can always look back on this perfect Autumn day. We followed it up by making some matching Fall shirts for the girls as well!


Pillow Cover

Materials needed:

  • pillowcase, ironed if needed
  • a few scraps of cardboard
  • paper towels
  • acrylic paints
  • brushes and palettes (we use old, plastic lids)
  • leaves


Before you start painting, prepare your area. You’ll need a piece of cardboard to paint the leaves on top of and a piece of cardboard to slide into the middle of the pillowcase, so no paint seeps through. If the cardboard inside the pillowcase is ridged, you may want to add an old, silicone cutting board or piece of card stock underneath as well. You wouldn’t want the ridges to effect the leaf prints.

Starting with the larger of your leaves, paint the underside of the leaf and then carefully press it onto the pillowcase. Repeat with different colors, different shades and different sizes until you’re happy with your final project. We started with various shades of orange and then added a few reds, yellows and greens. Likewise, we started with large leaves and ended with a few tiny ones.


T-Shirts

Materials needed:

  • t-shirts, ironed if needed
  • a few scraps of cardboard
  • paper towels
  • acrylic paints
  • brushes and palettes (we use old, plastic lids)
  • leaves

You will basically make leaf prints onto your t-shirt in a similar manner as with the pillowcase above. The only difference is that you’ll want smaller cardboard pieces to slide into the shirt and one really narrow piece to slide into the sleeve. As you can see, after printing leaves on the center of the shirt I added one tiny, falling leaf to the sleeve.


Cute, huh!? And easy! What else will you make leaf prints on? I think an Autumn table runner would be beautiful as well! There are so many possibilities! Enjoy!

DIY Story Stones

This is one of my favorite “games” that I’ve made for our girls, as well as one of my favorite gifts to make for other children. It’s such a versatile, quirky activity for kids (or adults) of any age and the possibilities of play are endless. We take them on long car trips, pull them out when friends are over, and use them during quiet-time when WB is sleeping.


I’ve read before that “story stones” come from the Waldorf school of thought, believing that it is far more important to teach children how to creatively weave a story at a young age than it is to teach them how to read and write. After the directions for making story stones, read on for various ways of how to play with them!


Materials needed:

  • colored pencils and paper
  • sticker book (optional)
  • old workbooks with lots of little pictures (optional)
  • scissors
  • smooth stones (found at the dollar store)
  • Mod Podge and sponge-brush

First, spend some time doodling little pictures on white paper. Think about what pictures would make up a good story…include people and animals, active words, weather, vehicles, houses, etc. Try to keep some of your pictures a little bit vague. For instance, instead of drawing a plate of spaghetti you could draw a fork, knife and spoon and the child playing could imagine any kind of meal. A picture of a foot could lead to putting on socks and shoes or it could be used for walking/running. A swirly doodle could be used for wind, but it could also be used for music, dancing, painting, water, etc.

Next, cut out each of your little doodles. If you don’t want to draw your pictures, or you’d like to use various mediums as I do, you can also cut pictures out of old workbooks or children’s dictionaries, or use a sticker book. I tend to look for such books whenever I’m browsing a flea market, antique store, or the dollar store.

After the pictures are cut out and ready, go ahead and wash and dry your rocks. Working one stone at a time, apply a little bit of Mod Podge to the smoothest surface of the rock then lay a picture in place. Apply more Mod Podge over top of the picture, making sure you smooth down all edges and avoid any wrinkles in the paper. Mod Podge dries pretty quickly. After the stones are all dry, I like to go over them all with another thin layer of Mod Podge to give them an even smoother look.


Once the stones are all dry, you’re ready to play!


(In case you want story stones the really easy way and you live in the Winchester area, Steamy’s Cafe on Piccadilly St currently sells story stones…1 for $1 and 20 for $15! They make great gifts!)

Ideas for Play:

SOLO STORY-BUILDING: Take turns building your own stories.

DICTATING STORIES: This is a good one especially with young children…take turns telling a story, while the other person finds the stones and puts them in order.

PARTNER OR GROUP STORIES: Take turns, picking stones and adding to the story.

RANDOM SELECTION – MYSTERY STORY: Turn all the stones over and take turns randomly selecting a stone to build a story.

ONE STONE STORY: Select only one stone at random and make up a whole story revolving around the stone. Or tell a silly sentence using the stone in the sentence.

CLASSIFYING: Put the stones into groups based on theme, color, likes and dislikes, etc.

EXPLORING: Let your child use the stones while playing with blocks or trucks or coloring or playing house. The stones can become pets, cars, food, etc. If the children are having fun imagining, just let them go with it!

What other ways have you found to play with your story stones? Please share with us in the comments below!

DIY Melted Crayon Art with Variations

This was the perfect “rainy day craft” for today…fun for me and for L! I’m so excited about these melted crayon creations, I can’t wait to make more! Let’s jump right in…


Materials needed:

  • white canvas
  • crayons
  • hot glue gun and glue
  • cardboard box
  • hair blowdryer

Although there’s definitely some unpredictability in this project, you first need to plan it out a bit. Start with picking out your colors.


After deciding where your crayons will go, use the hot glue gun to attach them to the canvas.


Next, place the canvas in a cardboard box. The box will keep your work area clean, catching the crayon splatter.

Prop the box up against a chair, table, or wall. Make sure the crayons are facing down (if you want a dripping effect) and that the box and canvas are on a little bit of an incline.


Next for the fun part, use the hair dryer to melt the crayons and blow the wax around. I let L do most of the rainbow picture. Turned out pretty awesome, huh!?


Now, display your work in whichever direction you please. I think a ribbon pinned or glued around the outside edges of the canvas would give it a nice, finished look!

Variations:

Wildflowers

To make the wildflower piece, I used mostly greens and browns. After I was done melting the crayons and the wax had time to cool down, I used the hot glue gun to attach flowers. Do this step carefully, so no glue shows! It works best to glue the flowers on spots without any wax.


Wild Splatter

I experimented with this one a bit, trying to plan for some future creations. I kept the box flat to the ground and used broken crayon pieces. To hold the crayons in place while melting them, I used a fork and smudged them around a bit. The outcome was a little funky…next time I’ll use smaller crayon pieces and maybe some crayon shavings instead.


I’m hoping to make a vibrant, Autumn tree next! I’ll be sure to update the blog and add those pictures as well, so check back soon!!! What “melted crayon art” will you make???


DIY Vintage Feather Garland

I love this simple, yet colorful and fun feather garland. The orange, yellow and browns of our garland take me back to the 70s and 80s, and the make-believe games of yesteryear, making it the perfect garland for a kid’s bedroom or play area. You could spruce this garland up a bit for the holidays though, using all white or sparkly feathers. Peacock feathers would be beautiful as well! There are so many possibilities!


Materials needed:

  • feathers
  • gold wire
  • basic wiring tools
  • string


The easiest way I found to attach the wire to the feathers, is as follows… (If you “click” on each picture, the wiring is much clearer when it’s enlarged.)

For each feather, you’ll need a piece of wire about 1 1/2 to 2 inches long.

Wrap one end of the wire twice, making a small loop.

About 1/2 an inch from the other end of the wire, wrap the wire once, folding the excess wire around the back of the mid-section. (Much easier to see in the picture than it is to explain!) Bend the loop you first made, so it’s perpendicular to rest.


To attach the wire to the feather, thread the end of the feather through the bent loop. Bend the loop, back down so it’s laying more or less flat against the feather, holding it in place. On the opposite end of the wire, hold the loop still while you wrap the excess wire around the feather. Repeat with each feather.


I’ve pictured multiple feathers in their completed state. As you can see each wiring job is a little different, adjusting to the various lengths and widths of the feathers’ ends.


The last step is certainly the easiest…thread the feathers onto your string and hang!


Our feather garland is hanging above the little one’s play area. The brightly colored feathers are constantly in motion, gently dancing as the air moves around the room. I love how it catches WB’s eye while she’s playing on her back, taking in her surroundings. Where will you hang your feather garland for the whole family to enjoy?

DIY Baby Play Area + DIY Baby Toys

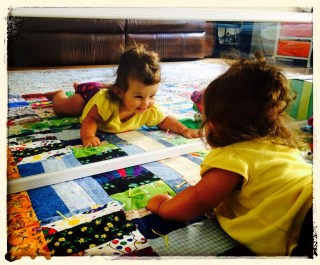
Over the past few weeks I had been thinking of putting together a little play area for WB, now 7 months old. WB is definitely our laid back kid, compared to her wild-child, older sister. She is perfectly content sitting back and observing the world around her. WB can roll over and push herself up on her belly, but she doesn’t do it very often…so I thought a little play area may be fun and may encourage her to move around a little more. And boy was I right…she LOVES it! When I saw some long mirrors for a good deal at Lowe’s last week, inspiration struck and WB’s play area was put in motion!

Materials Needed:

  • comfy, colorful blanket
  • long mirror
  • 2 med-sized boxes
  • 6 to 8 bricks (or other heavy items)
  • colored paper
  • tape or glue


To hold the mirror in place, in a safe and sturdy way, I decided to fill a couple boxes with bricks. (We just happen to have a pile of them sitting outside of our house, leftover from a patio project.) You can also use heavy rocks, bags of sand, or whatever is most convenient for you! Brighten-up a plain cardboard box by taping colored paper to it. I originally planned to cover the diaper-box I was using as well, but then I remembered how much babies like other smiling babies and kids, so I only partially covered it. The box was colorful already too!


Other things you can put in or near your baby’s play area include:

Sensory Bags (DIY link here.)

Sensory Bottles for Baby (link here.)

Sparkle Bottles (link here.)

Plush Animals and Toys (DIY bunny link here.)


Colorful Garland…I put this feather one up above for WB to look at while on her back. I love how the feathers gently “dance” continuously. (DIY feather garland link here!)


What will you include in your baby’s play area??? As always, never leave your children unattended and make sure all toys you put in the play area are baby-safe! Have fun watching your little ones explore!