Snow Candles

Ever since I was a kid I’ve always wanted to try making candles in the snow and today was the day!!! Such a cool experiment! I just love how they turned out! The sides of the SNOW CANDLES have this beautiful texture created by the crystals of snow. Just like snowflakes, each snow candle is unique!

IMG_0008

 IMG_0027

IMG_0028

IMG_0023

This is definitely a craft that should be done with adult supervision, though it is a fun one for kids of all ages.

Materials needed:

  • snow
  • paraffin wax
  • crayons
  • candle wicks
  • med/large pot for water
  • tin can or candle pouring pot
  • stick

 IMG_9999

First, decide what color you want your candles to be. Pick out 5 or 6 crayons all similar in color. L chose purples for our candles. Using a knife, cut a slit down the side of the crayon papers and peel the paper off.

 IMG_0003

Fill your pot with water about an inch high. Next place your pouring pot or tin can in the water creating a double boiler. (If using a tin can, make sure it is clean and the paper has been removed.) Place 3 blocks of paraffin wax and your crayons into the pouring pot or can. Bring the water to a boil, then turn the heat down to med-low so it’s at a simmer. ***Never melt wax directly on the stove top without the double boiler! The high heat may cause a fire!***

 IMG_0002

IMG_0004

Watch as the crayons and wax melt completely. Turn the stovetop off as you go outside to prepare your candle molds.

Outside you’ll need about a foot of snow. If the snow isn’t deep enough, you can use your hands to pile it up and lightly pack it down. Using a stick or a spoon handle, dig a little hole in the snow. We made ours about 4 inches deep and 1 to 2 inches wide.

 IMG_0005

Back inside, turn the stove back on for a couple minutes to heat up the wax again. Gather your candle wicks. When you’re ready, carefully remove the pouring pot or tin can (using an oven mitt) and quickly go outside to pour the wax into your molds. After a couple minutes, insert the wicks into your candles and hold in place until the wax hardens a bit…about 4-5 minutes.

 IMG_0007

IMG_0008

Leave your candles in the snow for an hour to harden completely. As the wax hardens, the candles take on their funky shape and texture. So cool!

 IMG_0014

Once they have hardened, carefully dig the candles out of the snow with your hands. Inside, use a knife to shave off some of the bottom of the candles if needed, so they will sit flat. Using scissors, trim the wicks to 1/2 inch high.

 IMG_0018

IMG_0020

Arrange on a dish or in a large bowl, add some decorative “fairy stones” if you like and enjoy!!! Beautiful!!!

 IMG_0025

IMG_0029

Bird Feeder Garland and Bird Feeder Ornaments

The BIRD FEEDER GARLAND is one of my favorite Winter crafts. It’s fun to make and even more fun to watch the wildlife activity that arises in our backyard after we hang it up! This week we’ve watched birds nibbling, followed by squirrels chasing the birds, then snacking themselves, and lastly, we observed four neighborhood cats stalk the squirrels for two days straight. Easy Winter entertainment…the girls and I have been glued to our kitchen window! The BIRD FEEDER GARLAND itself looks beautiful hanging in a tree, around a bush, or along a fence!

IMG_9838

Materials needed:

  • dental floss
  • unsalted peanuts in their shells
  • old apples, oranges, cranberries and/or raisins
  • embroidery needle
  • cardboard


IMG_9795

Thread the dental floss into the needle. I use dental floss for lots of projects, because it’s always on hand and is super-sturdy! Using the needle, string the peanuts onto the dental floss. Having cardboard under the peanuts, makes it easier to push the needle through. Tie a knot after you string the first peanut to hold the rest on!


IMG_9797

IMG_9796

IMG_9799


You can cut an apple into small pieces to string as well. If you have dried fruit, you can string that along with the peanuts too.


IMG_9798


My helper squirreling away some apple bits…

IMG_9800


Once the peanuts are all strung, find the perfect place to hang your BIRD FEEDER GARLAND!


IMG_9832

IMG_9830


The BIRD FEEDER GARLAND looks great on it’s own, but to really give the birds a treat, add some BIRD FEEDER ORNAMENTS as well! Kids love helping with this part!

IMG_9842


Materials needed:

  • dental floss
  • pinecones
  • peanut butter
  • bird seed
  • butter knife
  • 2 plates


IMG_9803

First, tie the dental floss in a knot or two around the top of the pinecone.


IMG_9804

Using a butter knife, slather on some peanut butter.


IMG_9805

IMG_9806


Pour some bird seed out on a plate and let your little one roll the peanut butter-covered pinecone through the bird seed.

IMG_9811


Hang the pinecones from your BIRD FEEDER GARLAND!


IMG_9819

You can also slice some apples and/or oranges to hang from the garland. And if you make these DIY Cereal Bird Feeders, you can add them as well! Enjoy!!!

IMG_9820

IMG_9709


PVC Pipe Ball Drop / Water Run

We made this PVC PIPE BALL DROP / WATER RUN last Summer to take with us to the beach…beach houses usually have large windows and sliding doors so I knew it’d be the perfect place to test it out. We originally used corn kernels to drop through the tubes, which turned out to be a huge mess, but we had fun!!! As cabin fever set in this week with cold, snowy weather outside I decided to bring out the PVC PIPE BALL DROP / WATER RUN again! This time we used poof balls (as well as plastic fairies and frogs) to drop through the tubes and it worked great! You could also put this up in the shower and dump water through the tubing to make a water run…I think we’ll try that next! The materials for this project only cost about $10 and it provides hours of fun!


IMG_9538

IMG_9528


Materials needed:

  • PVC connectors and elbows
  • suction cups
  • drill
  • flathead screw driver
  • poof balls, beans, feathers, pennies…

We found these suction cups at the craft store and they were perfect…just remove the little, metal hook.

 IMG_9455


First, drill a hole in the middle of one side of each PVC connector. Compare the suction cup piece with the drill bits to figure out the right size to use…you can always drill a bigger hole if need be, so start with the smaller bit if you’re deciding between two. Using the flat head screw driver, pry and poke the suction cup into the PVC connector.

IMG_9456

IMG_9452

IMG_9453


Now, time to play!!! Press the tubes onto a sturdy glass door or window and let the fun begin! It’s fun letting the kids experiment with placement of the tubes!


IMG_9480

IMG_9464


If your “Ball Drop” has two starting places, it’s fun to race the balls down…see whose comes out first!

 IMG_9471

IMG_9490


To mix things up, give your kid a spoon or tongs to pick the balls up and drop them down!

 IMG_9552

IMG_9559


Get crazy! Have fun! Enjoy!!!

DIY Heart Wreath

I’m so glad I dreamt this HEART WREATH up last night…it’s that time of year when your Christmas wreath needs to come down off the front door, but it’s not quite time for your Spring wreath to go up. This HEART WREATH is cute, simple, sweet and perfect to get us through the months of January and February!


IMG_9192


Materials needed:

  • wire coat hanger
  • fabric scraps
  • scissors
  • pliers
  • ribbon


IMG_9170

First, untwist the coat hanger apart. It’s easiest to do this part with your hands, holding the top of the hanger in one hand and untwisting it from below with the other.

IMG_9171


Once the hanger comes apart, try to smooth out some of the bends. Gently fold the hanger in half as well.


IMG_9172

Next, bend the hanger into a heart shape, looping the ends together with the pliers. It’s okay if your heart isn’t perfect…the fabric scraps will hide any blemishes.


IMG_9175

IMG_9174


Once you are satisfied with your wire heart, it’s time to cut some fabric strips. Each strip should be about 1-1.5 inches wide and 5-7 inches long. They do not all have to be the exact same length!


IMG_9176

Now to assemble your wreath…simply knot the fabric strips around the wire. Pull each knot taut and, every once in a while, push the knots down so you can squeeze on as many fabric strips as possible.


IMG_9177

IMG_9178

IMG_9180


If the fabric you’re using is blank on the underside, simply fold it in half before knotting.


IMG_9183

Once your heart wreath is made, use a ribbon to hang it on your front door! So sweet!!!

IMG_9188


This wreath would also be beautiful hanging inside in a kitchen window or on a wall! Enjoy!!! Happy Valentine’s Day!

Giant Ice Marbles

How cool are these GIANT ICE MARBLES!? I’d seen pictures of something similar before, but never a “how-to” on making them. Figuring it couldn’t be too hard to do, we gave it a try! There is definitely a list of things not to do we quickly found out. Haha! Hopefully I can help you avoid such mistakes! These GIANT ICE MARBLES are just beautiful in the snow!


IMG_8998

IMG_9085

Materials needed:

  • regular sized balloons
  • food coloring
  • warm water
  • below freezing temps

First, put 5-10 drops of food coloring in a balloon. Next, fill with warm water and tie off with a knot. Do not try putting food coloring in last…your hands may become dyed blue for a day or two if you do. Make sure to use warm water instead of cold…it helps the coloring spread evenly around the entire balloon. If you fill the balloon to only mid-capacity it will help make the marble round as a ball. Before tying the knot, very carefully let any air residing just above the water line out of the balloon…simply do this by loosening your grip on the mouth of the balloon until a bit of water starts to leak out.


IMG_8989

Now, it’s time to put the balloon outside. Placing the balloon partially on its side (like the balloon pictured on the far right) and in snow is best…helps it keep a nice round shape rather than flattening out.

IMG_8974


Leave the water-filled balloon outside in below freezing temps for 36 to 48 hours. Even if the temperature is in the single digits, one night is not enough for the entire balloon to freeze. As you can see with this one, the water in the center will flow right out.

IMG_8975


Finally, after the water is completely frozen, cut and remove the balloon from your GIANT ICE MARBLE. Beautiful!!!


IMG_9082

IMG_9066

IMG_9060

IMG_9085


Shimmery Snowflakes

Another fun winter craft for you and your lil ones…SHIMMERY SNOWFLAKES! I love “winter” crafts because they can stay up to decorate our house a couple months longer than the “Christmas” ones. Plus, it’s nice to share ideas that everyone can do this time of year, not just families that celebrate Christmas.


I first saw similar snowflakes in the Parents magazine a year or two ago…I knew one day, when L was a bit older, we’d have to make them! So glad that day finally came…these snowflakes sparkle and twirl in our kitchen window when the sun shines in on them. So sweet!

Materials needed:

  • wagon wheel pasta
  • hot glue gun and glue
  • white paint
  • Elmer’s glue
  • glitter
  • ribbon

First, brainstorm a little bit by playing with the wagon wheel pasta. Arrange it into snowflake shapes until you find something you like.

Next, using the hot glue gun, assemble your snowflakes. You could use Elmer’s glue for this step, but I just love how quick and easy the hot glue gun is!

After the snowflakes have been glued together, time to paint! Paint both sides of the snowflakes. If the holes get filled in just blow the paint out or use a tooth pick to poke the paint through.


Acrylic paint dries pretty quickly. Once you and the kids are done painting the last snowflake, the first one will probably be dry enough to add the glitter. First, paint a thin, messy layer of Elmer’s glue on the snowflake. Then, sprinkle with glitter! Allow to dry for an hour or so.

Thread some pretty ribbon through the one of the snowflake holes and hang the SHIMMERY PASTA SNOWFLAKES up in a place where all can enjoy! Happy crafting!

DIY Soap Crayons

Here’s another fun craft for your kids to help make and to play with…L had a ball with her DIY SOAP CRAYONS! They’re a little different than the bath crayons you’ll find at the store…these ones wash off the bath and shower walls easily with water. L likes to color with these ones in the shower before I turn the water on, then she makes a nice soapy, colorful mess once the water is on. They’re fun for coloring on your skin too…just add warm water and it washes right off!

Materials needed:

  • bar of white soap
  • cheese grater
  • food coloring
  • 2 to 4 tablespoons hot water
  • fork and spoon
  • ice cube tray, muffin tin, paper cups or candy mold

First, grate the bar of soap into a large bowl. Grate the entire bar, making about 2 cups of soap shavings.


Add 2-4 tablespoons of hot tap water to the soap and mix-mash with a fork or spoon. Continue mixing until the soap has formed a semi-liquid consistency without any big lumps.


Spoon the soap into your molds. Add about 5 drops of food coloring to each one and mix carefully with a spoon. We found that a baby spoon worked great for this step!


Once your soap crayons are all mixed and colorful, carefully push the soap down evenly into the molds. Set them aside to dry for a full week.

After a week has passed and the crayons have hardened, carefully turn the molds over and pop the crayons out. If their underside is still a little soft, let them finish drying for a few more hours.


(We saved all the little colorful crumbs too…added to a bubble bath or some shaving cream, they will make a beautiful rainbow mess!)


Now for the fun part…time to color and play with your own homemade soap crayons!!! Enjoy!!!


DIY No-Sew Rag Garland

Out of all the garlands I’ve made over the years, the RAG GARLAND has always been my favorite! It’s bright, colorful, super-easy to make and it looks fantastic inside or outside, day and night!


The RAG GARLAND is fun for the holidays, but can be made and used for any time of the year. I put ours up for Christmas, but I didn’t make the color scheme ultra-Christmassy…I love color and can’t seem to limit myself to just red and green! The best place to find cheap and funky fabric is at antique stores, thrift stores or flea markets…any leftovers can be used to make lil rag tag skirts or tutus for your little ones.

Materials needed:

  • fabric
  • scissors
  • string of lights

First, cut your fabric into strips about 2 inches wide and about 12 inches long.


Next, tie each fabric strip around the string of lights with a single, basic knot. If the fabric is blank on the underside, just fold the fabric over before knotting it. Repeat until the string of lights is covered.


This is a garland we made for Steamys, a local coffee shop/book store/gift shop in town. We used vintage fabrics to make it extra funky!


Happy garland making!!!


DIY Floppy Newspaper Hats

Oh, we had so much fun making these FLOPPY NEWSPAPER HATS today! I thought I’d write up this tutorial this weekend, but I just couldn’t wait…they’re just so much fun! If you have little boys in your messy house, please don’t think you can’t make these with them…a hat’s a hat! A floppy hat’s a floppy hat! I’m sure they’ll love them just as much as any girls will! Do it! There will be lots of giggling for sure.

Materials needed:

  • newspaper
  • acrylic paint
  • painters tape
  • tissue paper, poof balls, feathers, etc.
  • white glue

First, prepare your painting area. I taped some trash bags to the floor to protect it from paint…not usually necessary for painting, but the newspaper sheets are just so large.

Next, paint, paint, paint! Paint an entire sheet of newspaper, just one side though. Don’t worry if some  of the newspaper can be seen through the paint, nobody will notice when the hat is finished! Allow the paint to dry completely.


After the paint is dry, lay the paper overtop of another sheet of newspaper…two sheets will make the hat a little more durable. Fold the papers twice, once in each direction, and cut the paper so when you open them back up, you have a circle. The circle really doesn’t have to be perfect, it’ll look great when you’re done!


Next is the tricky part because kids tend to wiggle…lay the paper over your child’s head and scrunch fold it into shape. As you go around, use painters tape to hold the the folds in place. The great thing about painter’s tape is that you can fix any little mistakes and it won’t tear up the paint or paper.


In making WB’s orange hat, I just shaped it around my knee and it worked just fine. I also experimented and used a stapler instead of the painters tape. Stapling worked great and looks fantastic, but it is a little trickier to do. The paper tears a little easier with staples in it too.

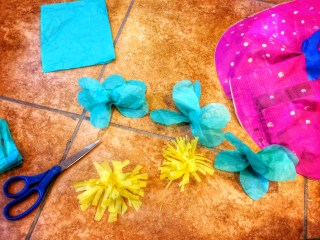
Now to decorate your hat! You can cut flowers out of tissue paper or just cut squares and scrunch them up. If you layer the tissue paper a bit, the flowers are a little fluffier and prettier. You can also glue on poof balls, jewels, feathers, anything you can think of and find around your house!


Super cute, huh!? Forget Easter bonnets, we’ll be wearing these to Thanksgiving dinner!!! That is if they survive a month’s worth of tea parties…


Wouldn’t these be adorable for a birthday party? You could make the hats beforehand and let the kids decorate them at the party…so many fun possibilities! Enjoy!