Lemonade Play Dough

We love scented play dough at Our Beautifully Messy House and summertime is the perfect time to make LEMONADE PLAY DOUGH!

I came up with this recipe a couple weeks ago, while mixing up some play dough to take with us on vacation to the beach. And the kids LOVED it!!! It’s always nice having play dough handy for any down-time whether you’re at the beach with family or you’re having friends over for a play date.

I’ve tried making citrus-scented play dough in the past with lemon extracts and oils, but that summery lemonade scent never comes through. Adding a packet or two of lemonade mix did the trick…it was super-quick and easy and smells delicious! I suggest using a sugar-free lemonade mix (Crystal Light brand works great!) so your play dough doesn’t get super sticky with the added sugar.

When I made our lemonade play dough I wanted to make both yellow and pink dough, so I split the dough and added the food coloring before kneading it. The colors came out just fine! This play dough takes only a few minutes to make, but stored in a gallon-sized bag or an air-tight container, it’ll keep for nearly a year! This recipe makes plenty for 2 or 3 kids to play with!

My tip to keep your kids entertained playing with play dough for longer: Start off with plain play dough. Let them play 15 or 20 minutes, then throw some glitter into the mix. Once their attention starts to drift, add some colorful beads or buttons. Add some measuring cups and kitchen utensils, some lil plastic dinosaurs or army men. Just don’t give them everything at once, instead add to the play dough in intervals…works every time!

Ingredients:

  • 2 cups + 1/2 cup flour
  • 1/2 cup salt
  • 2 Tbsp cream of tartar
  • 2 Tbsp vegetable oil
  • 1.5 cups boiling water
  • food coloring
  • 1-2 packets lemonade mix

First, put the water on to boil. Add a few drops of food coloring to the water (yellow or pink). As the water is heating up, mix 2 cups of flour, salt, cream of tartar and one packet of lemonade mix in a large mixing bowl. Then add and mix the vegetable oil into the flour mixture. Once the water is boiling, add it to the bowl and mix with a spatula. The dough will be a sticky mess while warm. Mix it as best you can, then let it cool off. After a few minutes cooling off, sprinkle your working surface with some of the remaining flour. Dump the play dough onto the flour, adding more flour to the top, and knead the dough. Continue working with the dough, adding a bit of flour as needed, til the dough is not sticky anymore and you’ve reached the desired consistency. If you like, sprinkle in another packet of lemonade mix to dough! Yum yum, Summer!!! Enjoy!

Fairy Mud

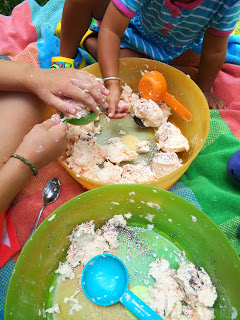
I first saw a recipe for FAIRY MUD a year or two ago on a blog called Happy Hooligans. When L’s cousins came over to play on a hot day last summer it was the perfect activity! Fairy Mud is just as much fun for the kids to make as it is to squish between your fingers and play with! With the temperatures rising and our fairy garden in full bloom, we’ll be making it again this week!


Materials needed:

  • 1 1/2 bars of soap
  • 2 rolls of toilet paper
  • food coloring
  • 1.5 to 2 cups of WARM water
  • glitter, sequins, buttons, jewels, flower petals
  • cheese grater
  • 2 large bowls or tubs

First, grate the bars of soap into a large bowl. If you have older kids, they can certainly help with this process!


While you’re busy grating soap, have the little ones unravel 2 rolls of toilet paper. So silly, they’ll just love it! Gather the toilet paper into the second large bowl.


Once the soap is grated and the toilet paper unravelled, pour the WARM water into the bowl with the soap and add a few drops of food coloring as well. Squish and squeeze the soap shavings until you have some consistently melted and mushy soap blobs.


Pour the water and soap over the toilet paper in the second bowl and continue to mush and mold the fairy mud concoction.


While the kids are playing, add some glitter into the mix. Followed by jewels, flower petals, anything you and the kids can come up with!

Don’t forget to pull out some measuring cups, spoons, and muffin tins so you can make some fairy mud pies as well! Amazingly fun!!! Enjoy!


DIY Peppermint Play Dough

While you escape to the bathtub to enjoy your Candy Cane Sugar Scrub you need something to occupy the kids, right? So, here’s my recipe for PEPPERMINT PLAY DOUGH!

This play dough takes only a few minutes to make, but stored in a gallon-sized bag or an air-tight container, it’ll keep for nearly a year! Whenever L has friends or cousins over I love whipping up a batch of play dough…it keeps them happy and busy for at least an hour and I can split the dough in half and send the other kid home with some. This recipe makes plenty for 2 or 3 kids to play with!

A tip to keep your kids entertained playing with play dough for longer: Start off with plain play dough. Let them play 15 or 20 minutes, then throw some glitter into the mix. Once their attention starts to drift, add some colorful beads or buttons. Add some measuring cups and kitchen utensils, some lil plastic dinosaurs or army men. Just don’t give them everything at once, instead add to the play dough in intervals…works every time!


Ingredients:

  • 2 cups + 1/2 cup flour
  • 1/2 cup salt
  • 2 Tbsp cream of tartar
  • 2 Tbsp vegetable oil
  • 1.5 cups boiling water
  • food coloring
  • 1/2 – 1 tsp peppermint oil

First, put the water on to boil. Add about 10 drops of red food coloring to the water. As the water is heating up, mix 2 cups of flour, salt and cream of tartar in a large mixing bowl. Then add and mix the vegetable oil into the flour mixture. Once the water is boiling, add it to the bowl and mix with a spatula. The dough will be a sticky mess while warm. Mix it as best you can, then let it cool off. After a few minutes cooling off, sprinkle your working surface with some of the remaining flour. Dump the play dough onto the flour, adding more flour to the top, and knead the dough. Continue working with the dough, adding a bit of flour as needed, til the dough is not sticky anymore and you’ve reached the desired consistency. Once the play dough is made, fold in the peppermint oil to make a fun smelling PEPPERMINT PLAY DOUGH! Enjoy!


Play Dough Funny Faces w/ DIY Outlet Covers

When I saw a variation of this craft years ago, I stored it away in the back of my mind, just waiting for L to be old enough to make and play with these! The outlet covers I saw were made using Sharpie Markers, but I love the color we brought to ours with paint! The outlet-cover funny faces are as much fun to make as they are to play with! L and I spent one day painting the outlet covers, let them dry overnight, then the next day, we were able to glue on the googlie eyes and stick them in our play dough! So silly and so much fun!


Materials Needed:

  • outlet covers
  • paint (acrylic and/or puffy paint)
  • googlie eyes
  • jewels (optional)
  • hot glue gun and glue
  • your favorite play dough
  • egg cartons (optional)


The first thing I did, preparing our work station, was to cut off the center tips of an egg carton. I then put an outlet cover in each opening so L could paint them with ease.


Then, paint away! I tried to paint mouths and noses on the outlet covers, while I let L paint hers however she pleased. I figured the ones she painted could be used to glue on the eyes and jewels later on.


After the glue dries, you can go over some with puffy paint too! I thought it was a fun effect for big, puffy lips!

Using a hot glue gun, attach some googlie eyes and jewels to a few of the other outlet covers.


Now it’s time to play! Just push the outlet covers into your favorite play dough…the funny face possibilities are endless!


I love how the play dough doesn’t stick to the outlet covers, rather it just falls off, making clean-up a breeze! Please share pictures of your funny faces…we’d love to see them! Enjoy!

2-Ingredient Gooey Dough

L and I are always looking for new play dough recipes, so when I came across this one I just knew we had to make it! We call it “Gooey Dough” because it’s so stringy, smooth, and gooey! It feels good to squish through your fingers and fun to strrrrreeeeeetch as long as you can!

Materials needed: 

  • 1 to 1 1/2 cups, hair conditioner
  • 2 cups, cornstarch

Using a large mixing bowl, put both ingredients together and mix, mix, squish, mix!


I have to admit that after about a minute, I thought this was the messiest, worst play dough ever made…BUT as I washed my hands, L kept squishing it together and a couple minutes later we had this wonderful concoction!!! I’m so glad she kept at it, because Gooey Dough has become one of our favorites! L has played with it for hours, day after day.


You can add some food coloring if you like or toss in some glitter, but we were happy with the Gooey Dough the way it is…it’s so white, smooth and the conditioner gives the whole kitchen a fresh scent! It’s truly the most luscious dough we’ve ever made!


By day two, I came up with a couple tips…

-Store the dough in a sealed plastic bag or storage container (I’ve read that it keeps for months).
-It’s best for your kids to take their clothes off to play or wear a smock shirt! It can get messy fast!
-This dough just asks to be squished all around, so tape down a plastic/silicone chopping mat on the table or work surface.


Get messy and have fun!!!