Tin Can Telephone

Now I know this craft, toy, activity is as old as they come, but how many of you have actually made a TIN CAN TELEPHONE for your kids yet!?! L has been begging for weeks for us to make one and today was the day! It was so quick and easy to put together and the kids played with it all afternoon. L already has plans for tomorrow and how we’ll make a longer TIN CAN TELEPHONE that will stretch to the neighbor’s porch. And yes…if you’re wondering…yes, it does work!!! As you probably remember, the key is making sure the string is pulled taut when you’re talking to each other, and try not to rest the can against your face as well. Enjoy!

2016-05-18 19.59.34


Materials needed:

  • 2 tin cans, clean and lids removed
  • Sharpie markers (optional)
  • awl or nail
  • scissors
  • string
  • tape (fabric, duct, or gaffer)

DSC_0211

First, color the cans with Sharpie markers. Of course you could always paint the cans, glue paper to the cans, or leave them plain as well.

DSC_0216

DSC_0218

Next, put tape on the cans to protect your kids from any sharp edges. To do this, measure the tape, to get the length right.

DSC_0219


Carefully roll the can over the tape, wrapping the tape around the can, and leaving about half an inch of the tape hanging off the edge.

DSC_0222

DSC_0223

Next, use scissors to cut the tape as pictured. Then, fold all the flaps down over the can’s edge. No fear of little hands getting cut now!

DSC_0224

DSC_0227

DSC_0228

Using an awl or a nail, poke a hole in the bottom of each can.

DSC_0229

Cut a piece of string and thread it through the hole in the bottom of a can. Double or triple knot the string. Repeat on the other side of the string with the second can.

DSC_0230

If the holes seems to be a bit sharp on the inside, and you have especially little hands that you’re afraid may explore the inside of the cans, you can put a piece of tape over the knots and holes of the cans.

DSC_0232

DSC_0231

Now, time to play! Your little ones can experiment talking across a room, through fort walls, up and down stairs, from one bedroom to another…the possibilities are endless.

DSC_0234

DSC_0237

DSC_0239

IMG_7354

Such simple, wonderful, old school fun!!!

IMG_7361

Shoebox-Marble Game

Not only is the SHOEBOX-MARBLE GAME super-easy and simple to make, it’s also a challenging game for anyone to play! For younger children, they can try to catch the marbles on any holes; for adults and older kids, they may try to catch the marbles on specific colors or to make patterns with the marbles. Sounds pretty easy, but it’s not! L and I had lots of fun this afternoon taking turns, playing the Shoebox-Marble Game. Our shoebox was big enough, we were even able to play together with all hands on the box, tipping and tilting it until all the marbles were caught!

DSC_0014


Materials needed:

  • shoebox
  • awl (or sharp tool)
  • markers
  • marbles

DSC_0007


First, color a fun picture or design inside your shoebox.

DSC_0009


Using your awl, poke holes through the bottom. I like to do this by placing the box on a doormat, then poking the holes from the inside of the box – out. If the game is too hard, you may want to go back and make some larger.

DSC_0012


Now it’s time to play! Put some marbles in your box and see who can catch the most on the holes! The more you practice, the better you’ll get. For younger children, it helps to have them balance the box on a flat surface.

DSC_0013

DSC_0023

DSC_0017

Enjoy!!!

DIY Jacob’s Ladder Toy

I really wanted to make L a Jacob’s Ladder Toy, but didn’t want to make a trip to the local hardware or craft store for supplies. So, we made this Jacob’s Ladder out of an old board book! (If you don’t have a board book they are easy to find at the dollar store.) I just love the outcome! This one is super-colorful compared to the wooden one I had as a kid and is just as much fun!

DSC_0095

I loved playing with my Jacob’s Ladder when I was young…it’s such a unique toy! Flip-flopping it back and forth is very calming, but it also makes you think creatively and problem solve. I enjoyed watching L play with the one we made today…not only was she ecstatic when she finally figured out how to work a Jacob’s Ladder, but she was also folding it into shapes, pretending it was a snake, a bracelet and a funky hat.

DSC_0102

DSC_0100

Materials needed:

  • board book
  • 3 pieces of ribbon (35 inches long each)
  • glue
  • box cutter
  • paper cutter (optional)
  • scissors

DSC_0016

First, using a box cutter, disassemble your board book.

DSC_0018

Next, measure the dimensions of one page and decide how best to cut it. The book I used was 7 in x 7 in. I chose to cut the pages down the middle in one direction and into thirds going the other direction. Each piece ended up being 3.5 in x 2.25 in. If you have a paper cutter on hand, it makes this step super quick and easy! I cut up 4 pages, leaving me with 24 pieces.

DSC_0022

DSC_0023

DSC_0026

Once you have 24 pieces cut, sort them into “nice” and “ugly” piles, 12 cards in each pile. The “ugly” cards won’t be seen.

DSC_0027

Next, glue each “nice” card to an “ugly” card with a thin layer of wood glue. Put some canned food on top of the cards to keep them flat and clamped down for the first few minutes, while the glue is setting. Once they are all glued, let them dry for an hour or two. You should now have 12, double-stacked cards.

DSC_0028

DSC_0032

Now, time to make that Jacob’s Ladder! Lay one card-stack in front of you, “nice” side down. Spread a thin layer of glue on top of the card-stack. Place the ends of all three strips of ribbon onto the card-stack. As you can see in the photos, two of the ribbons spread out into one direction and the other ribbon to the opposite direction.

DSC_0034

DSC_0035

Spread a dab of glue on each ribbon end and press another card-stack carefully on top, “nice” side up.

DSC_0037

Fold all the ribbons over the top of the cards and to the opposite direction. Pulling them taut, place another card-stack on top of the ribbons, “nice” side down.

DSC_0038

DSC_0039

DSC_0040

Spread a thin layer of glue on the card-stack and fold the ribbons over, keeping them pulled taut much as possible. You can press the ribbons down into the glue to hold them in place.

DSC_0041

DSC_0042

Spread a dab of glue on top of the ribbons, and press another card-stack on top, “nice” side up.

DSC_0044

DSC_0045

DSC_0046

Folding the ribbons over again, repeat the last three steps, until you reach the last card-stack and the end of your ribbon.

DSC_0048

Trim the ribbon, pull it taut, and glue it in between the last two card-stacks.

DSC_0049

DSC_0050

DSC_0051

DSC_0052

Place a can of food on top of the entire Jacob’s Ladder Toy and allow the glue to dry completely for an hour or two.

DSC_0053

Now, time to play!!! If you’ve never used a Jacob’s Ladder before, you flip the top card to one side and let gravity do the rest of the work. The card’s flip-flop down, one after another, like magic in your own hands!

DSC_0076

DSC_0088

DSC_0104

Enjoy!!!

DIY Toy Sail Boat

One evening this summer, while we were getting ready for bath time, L pulled a wine cork out of her pocket. She had been saving it all day to float it around and play with in the bath tub. That got me thinking…I knew with a few toothpicks and some leaves we could turn her wine cork into a little sail boat! Leaves work great for this project, because they’re naturally water-proof and easily replaceable!

IMG_3614

IMG_3642

Materials needed:

  • 2 wine corks
  • 4 toothpicks
  • 2 leaves
  • old pencil
  • scissors

IMG_3574

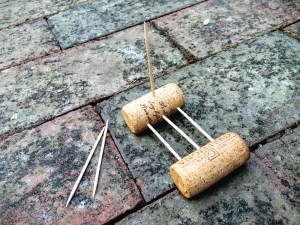
Take one of the wine corks and stick three toothpicks into it, all pointing in the same direction in a line.

IMG_3576

Next, push the second wine cork into the opposite ends of the toothpicks.

IMG_3577

Stick one more toothpick vertically into the middle of one of the corks.

IMG_3578

Find a medium-sized leaf and weave it through the bottom toothpicks. We used a balloon flower leaf. This step isn’t necessary, but it makes a nice lil bed for anything you may want to sail on top…a bug, a rock, a fairy friend.

IMG_3585

IMG_3579

Next, find a slightly larger leaf and thread it onto the vertical toothpick, making a sail. We found the hosta leaves to work best for this, though any thick and sturdy leaf will do!

IMG_3582

To make the sail boat safer for little hands, twist an eraser off the top of an old pencil. Cut it in half with scissors and push it onto the top of the sail.

IMG_3580


IMG_3581


IMG_3584

Now, time to play! L had hours of fun blowing her boats around our rain barrel!

IMG_3589


IMG_3609


IMG_3613

The boats may not seem like much, but ours withstood some submarine plunges under the water and lasted through two nights of bath time play! Tomorrow, we’ll replace the leaves and keep sailing!

IMG_3656


IMG_3662


IMG_3659

Enjoy!!!

Coffee Can Stilts

A few weeks ago a family friend called me up to ask if I had a use for a bunch of old coffee cans. While I was a little afraid to tell my husband that I had said “yes” to accepting such a large bag of junk, taking up more room in our house, I was over-the-moon excited to be acquiring these cans! I knew just what we’d use them for…COFFEE CAN STILTS!!! These are so quick and easy to make and are so much fun for the kids! Walking on stilts is all L wants to do these days!!! “I can almost touch the sky from up here, Mom!”

IMG_3564

IMG_3542

Materials needed:

  • 2 coffee cans
  • church key can opener
  • rope
  • scissors
  • paint (optional)
  • acrylic sealant (optional)

IMG_3522

First, if you want your stilts to be colorful, have your little ones paint the cans with acrylic paints. After the paint has dried, spray on a coat of acrylic sealant to give the cans a glossy finish.

IMG_3524

IMG_3526

Next, using a church key can opener, make two holes on the bottoms of the cans. The holes should be opposite each other. Try to bend the metal all the way back inside the can, so no sharp points protrude out. (Your kids shouldn’t have their hands inside the cans at anytime, but you never know when the curious ones may take off the lid while playing and reach inside…so, better safe than sorry!)

IMG_3533

IMG_3532

Cut two pieces of rope. To find the correct length, have your kid stand on the rope, holding both ends in his or her hands pulled up to chest-level. This is a good place to cut it. After the stilts are assembled, the rope handles should reach your child’s waist.

IMG_3530

IMG_3531

Thread the rope into the holes of the can from the outside. Once both ends are pulled through, tie a knot in each end. Repeat on the second can.

IMG_3535

IMG_3536

IMG_3538

IMG_3540

Place the lids back onto the cans and flip them over. Having the lids isn’t a necessity, but it may save your floors from being scratched up while your children walk around inside. Now, time to play!!!

IMG_3539

As your little ones practice, they’ll get better and better at walking on their stilts and they’ll be oh-so-proud!!! Future circus performers, anyone?

IMG_3561

IMG_3553

Talk about good hand-eye-FOOT coordination! Enjoy!!!

IMG_3567

IMG_3557

DIY Toy Catapult

What kid (or adult) doesn’t love launching things through the air? This DIY TOY CATAPULT takes only minutes to put together and your kids will play with it for hours…days even! I love how kids naturally experiment while playing with this toy. Even as young as three, L was moving the can (the fulcrum) around, placing the balls in various slots, and went on to launch her toy parachute, as well as her shoes! So much fun!!!


Materials needed:

  • yard stick
  • can of food
  • egg carton
  • scissors
  • hot glue gun
  • permanent markers (optional)

 Things to launch:

  • ping pong balls
  • pom poms
  • -cotton balls
  • DIY Pocket Parachute
  • plastic figurines (fairies, dinosaurs, army men)
  • marshmallows or cereal (to catch in one’s mouth)

First, cut your egg carton in half.

Using a hot glue gun, glue the egg carton onto one end of your yard stick. (Don’t worry…when your kids are done playing with their catapult, the egg carton and glue should peel right off the yard stick! I take ours apart every time we’re finished playing with it!)


Next, number your egg carton slots and your ping pong balls. This step is optional, but it makes it easy to keep track of what ball goes the farthest and which slots you’re putting things into…especially if you’re launching multiple balls at once!


The set-up of your catapult is easy…just place the can on it’s side in the grass (keeps it from rolling) and place the yardstick on top. Fill the slots with your projectiles!


Now, time to play!!!

Launching balls…


 Parachutes…


 And L’s shoes…


What will you all send flying through the air???

If your kids like the catapult, they’ll definitely love making POCKET PARACHUTES…another “make something from nothing” craft! Enjoy!


DIY Pocket Parachute

What kid doesn’t love throwing a toy parachute around?!! And what parent doesn’t love a toy that costs nothing, takes less than 5 minutes to make, and entertains your kids for hours on end?!! I made this DIY POCKET PARACHUTE for L on a rainy day last week…as soon as there was a break in the weather, we were out the door throwing the parachute all around town. L dropped the parachute off the steps of the old courthouse, a church, the library, a little pavilion stage, and she climbed up a tree and dropped it down as well. This pocket parachute is so simple, so easy, and so much fun!!!


Materials needed:

  • plastic bag
  • food pouch cap
  • string
  • scissors
  • an awl (or screwdriver)

If you don’t have a food pouch cap, a toy wheel, some safety pins, paper clips or a wine cork could be used as well…get creative with what you have on hand!

First, cut the plastic bag into a square at least 12×12 inches.

Cut your string into 4 equal pieces, all approximately 15 inches long.

Using the awl, carefully poke a hole through the center of the food pouch cap.

Also, poke holes into each corner of the square you cut from the plastic bag. Make each hole 1/2 an inch from the edges.

Tie a piece of string onto each corner, using a double knot.


Next, gather all the strings together and tie them together with one overhand knot, about 3 inches from the end.


Thread two of the strings through the center of the food pouch cap and thread the other two through the side. Tie the ends together with a double knot.


Too easy, right? Now time to play!!! It’s just as much fun trying to catch the parachute as it is to throw it!


If your kids are older, they can experiment by making various parachutes…some out of bigger pieces of plastic, longer strings and cutting a hole in the center parachute as well. Enjoy!!!

DIY Pool Toys / DIY Bath Toys

With the pools opening last weekend and the last day of school yesterday, Summertime is here!!! These are some fun DIY POOL TOYS that take just minutes to make. We like to throw ours around, splat them on the pavement and L likes to soak hers in water, then draw with it on the pavement. If you don’t have a pool nearby, just fill up some buckets of water, toss in these fun and funky toys and play a wet and refreshing game of catch in the backyard. So much fun! (Be sure to scroll down to the bottom for some other DIY POOL TOY ideas too!)


Materials needed:

  • 3 sponges
  • 1 elastic hair band
  • scissors

First, cut the sponges long-ways into 3 equal sections.

Next, stack them up.

And lastly, tie a hair band around the pile.


Too easy and so much fun!!!

Other fun and easy pool toy ideas? 

A large paintbrush! Your kids will have a blast painting with water on the pool deck or even outside on the sidewalk.

We love playing with these sensory bottles in the water too! Both the “baby sensory bottles” and the “sparkle bottles” are fun to bounce around. They are quick and easy to make and are fantastic pool toys for the little ones!

Tin Foil River and DIY Boats

This morning the girls and I went to an awesome, little program for kids where we learned about the waterways in our town and L got to make her own toy boat. When we came home I decided to make our own “waterway” in the backyard with some tin foil. Too easy and so much fun!!! All you need is some aluminum foil, water, and some toy boats to float along! I mean, seriously…who wouldn’t like a TIN FOIL RIVER in their yard?


Boat ideas and links:


First, decide which direction you’d like your TIN FOIL RIVER to flow. If your yard or driveway is on a slope, it’s pretty easy to figure out how to get the water to flow…start at the top and end at the bottom. If you yard is flat, you can prop some of the river up or make it in a donut shape. We decided to make ours interesting, starting the river on the slide, having it flow under a chair, and bend and twist across the yard.


Making the waterway is pretty simple…you can be a perfectionist about it and try to make all the sides even or just wham-bam make it, play with it. We tore large strips of aluminum foil and double-layered the foil to prevent any leaks. Fold the sides up. At any joints (places where you’re attaching two sections of foil) you can add another layer of foil underneath. Same with the end of your river…we tried making our sides a little higher and extra-sturdy at the end.


If you need to, you can weigh your foil down with some smooth rocks. Makes fun little obstacles too! If a side of your river starts to sag, it’s pretty easy to prop it up with a brick or flower pot…whatever you have handy. The TIN FOIL RIVER allows for some terrific problem solving and experimenting with your little ones! I can’t wait to see what L comes up with next for our backyard waterway!


Enjoy!


Giant Bubble Wands and a Homemade Bubble Solution Recipe

Did you ever make these GIANT BUBBLES when you were a kid? My siblings and I loved making them way back when! Recently, we had a bubble kit given to us with a wand included, but it was too big for L to do on her own…so, of course, I had to brainstorm and make a wand she could use as well! The best part about it was we already had all the materials we needed. If you don’t have two rulers to use, two large mixing spoons or spatulas would probably work great too…anything with a hole at the end of the handle. Be sure to scroll down to the bottom for the HOMEMADE BUBBLE SOLUTION RECIPE. It’s better than any store-bought variety and takes only a minute to make!

Materials Needed:

  • 2 plastic rulers
  • yarn, 3-6 feet long
  • binder ring, shower curtain ring, or a keychain ring
  • homemade bubble solution (See below)

First, cut the string to suit your size…the shorter the person, the shorter the string!

Next, thread the ring onto the string and tie both ends together with an overhand knot.

Thread a loop of yarn through the hole on one end of a ruler. Bring the loop up and over the opposite end of the ruler and pull it tight. (See pictures.)


Attach the other ruler the same way, leaving about 1 to 2 feet of yarn between the two rulers.

With the bubble solution in a large bowl or container, gently lower the yarn into the liquid. Make sure the yarn is soaked through.

Next, carefully lift the yarn out of the bubble solution. Slowly and steadily, spread the rulers apart while walking backwards. If there is a breeze, make sure the wind is blowing on your back.

To close the ginormous bubble, carefully bring the rulers together again. So cool!!!


HOMEMADE BUBBLE SOLUTION RECIPE

Ingredients:

  • warm water
  • sugar
  • dish soap

Materials:

  • measuring cup
  • Tablespoon measuring spoon
  • medium bowl or container
  • spoon

Put one Tablespoon of sugar into your bowl or container. Pour 200 ml of warm water on top of the sugar and mix until all the sugar is dissolved. Add 50 ml of dish soap (30 ml if using ultra dish-washing detergent) and mix. Finally, add 300 ml of warm water to the mixture and mix.

That’s it! This bubble solution is the best we’ve ever made!


Have fun!!!

Be sure to check out our BUBBLE BLOBS & BUBBLE WORMS page too!