Hidden Fairy Bath Bombs

Have you ever bought bath bombs for yourself or for your kids? Bath bombs were originally intended for adults to use in the bath…their scents make the water smell wonderful and many times the bath bombs contain epsom salts to soften and refresh your skin. The thing that many people don’t know is that kids LOVE them too!!! The fizzy, bubbly, sizzling chemical reaction is just too cool! In the past, we’ve bought bath bombs and given them to our girls in their stockings at Christmas or for their birthdays…but now, we’ll never buy them again! These bath bombs are so quick and easy to make and there’s a surprise hidden inside each one! I found inspiration for this DIY on a fellow blogger’s site; she makes “Hidden Train Bath Bombs” for her little boys…adorable and genius!

DSC_0574

Materials needed:

  • 2 cups baking soda
  • 1 cup citric acid
  • food coloring
  • essential oil
  • water in a spray bottle (not pictured)
  • plastic fairies (flowers, dinosaurs, cars…)
  • silicone molds or a muffin tin

DSC_0547

First, mix two cups of baking soda and 1 cup of citric acid together in a large bowl.

DSC_0548

Next, add about 10-15 drops of food coloring and some essential oil, and mix. You can add more coloring and oil to suit your preference. I used a “sweet orange” oil and yellow food coloring. Even though the bath bombs themselves were not super-vibrant in color, the bath water certainly was! The kids loved it!

DSC_0553


Now, spray your mixture with water and mix quickly! I would give our mixture about 3 squirts, mix, then repeat. The baking soda and citric acid will start to fizz a bit, but once you mix, it will stop. Repeat this process until the mixture clumps together like breadcrumbs.

DSC_0554

Spoon the mixture into your silicone molds. Fill about halfway and pack it down firmly with your hands.

DSC_0555

DSC_0557

Now, add your fairies. We added a silk flower to one of ours as well.

DSC_0560

Fill the molds the rest of the way with the baking soda-citric acid mixture and pack it down firmly. Once the bath bombs set, they will expand. The next time I make bath bombs, I may not fill them all the way up to the top…or I may do so purposely and make them look like frosted cupcakes!

DSC_0563

DSC_0564

Let your bath bombs set up for a few hours until they are hard. (Can you believe how ours expanded and “grew”!?!) Flip the bath bombs over and gently pop them out of the molds.

DSC_0565

DSC_0566

Now for the fun part, surprise your kids with the bath bombs! The chemical reaction is just so cool!!!

DSC_0576

DSC_0586

They will be doubly-surprised to find fairies hidden inside!

DSC_0582

The walls, tile and bathtub in our bathroom are all white…the bath water was so, so yellow the whole bathroom glowed!!!

DSC_0601

DSC_0584

DSC_0603

This recipe can easily make 7-8 bath bombs…plenty for you and a friend! Enjoy!!!


White Picket Fairy Fence

Well, I couldn’t show you how to make a Craft Stick Fairy Door without telling you how to make a WHITE PICKET FAIRY FENCE to go with it! The fence is simple to make and looks adorable out in the fairy garden!

IMG_3404

IMG_3406

Materials needed:

  • small craft sticks
  • regular-sized craft sticks
  • wood glue
  • Q-tips
  • white acrylic paint
  • acrylic sealant

IMG_3371

First, lay out your sticks…4 small craft sticks in the middle with 2 regular-sized ones on the ends. If you don’t have small craft sticks, just cut some regular-sized one’s in half. The two craft sticks on the ends are left long, so that you can easily stick them into the ground, keeping the fence upright!

IMG_3372

Next, think about where two craft sticks that will lie across the other ones will be and use a Q-tip to put wood glue in those spots across each stick. Lay the craft sticks on top of the glue and press to secure.

IMG_3374

IMG_3375

After the glue has dried, paint the picket fairy fence white.

IMG_3399

Finish up with a coat of acrylic sealant spray.

IMG_3400

Now for the fun part…while sneaking a fairy door into your neighbor’s garden, add a little white picket fairy fence as well! Gently push the ends of the fence into the soil. Enjoy!!!

IMG_3402

Craft Stick Fairy Doors

It’s no secret that we LOVE making fairy/gnome things at Our Beautifully Messy House…fairy houses, fairy furniture, fairy doors, gnome doors, flower fairies, fairy folk…need I go on? We just can’t help it! What I love the most about making fairy doors and gnome doors is surprising people with them! L and I made an abundance of CRAFT STICK FAIRY DOORS this week as we prepare to spread them around the neighborhood. Of course we enjoy surprising our friends and close neighbors, but what I really love is putting them on strangers’ front porches and sneaking them into their gardens! We rarely get to see people discover the fairy and gnome doors, but the surprise, the magic in it all makes L and I giggle for days! We’ve had a great time making these craft stick fairy doors…aren’t they the cutest!?!

Materials needed:

  • crafts sticks (big, small, colored, any or all)
  • wood glue
  • Q-tips
  • buttons

Optional materials:

  • acrylic paint
  • sealant spray
  • wire & nails

First, lay out your craft sticks in a door shape. If you have colored sticks, your kids will enjoy playing with patterns!


Using a Q-tip, put wood glue onto a small craft stick and carefully lay it across your door. If you don’t have small craft sticks, you can always cut a normal-sized one in half! It’s best to put at least 2 sticks across, but you can play with the angles and directions that you put them. Remember, fairy doors don’t have to be perfect!


If you don’t plan to paint your door, you can glue a button-handle on now too!

After the glue has dried a good bit, flip your doors over and smear wood glue all across the back for extra support. Let them dry for a few hours or overnight.


Next, if your craft sticks are plain and you want to, paint the doors. We especially like to add glitter paint to ours…helps the fairies and gnomes find the doors of course.


After the paint has dried, glue on button-handles if you have not done so yet. We like to spray our doors with some acrylic sealant as well…makes the wood a little more durable outdoors and gives them a more finished look.

Now for the fun part, hide them around town…or give them to friends! These would make an adorable party favor for both kids and adults! Enjoy!!!


Other posts you may like:

Jam Jar Fairy House /Jam Jar Gnome Home
Doorknob Mushroom-Fairy Houses
Fairy Furniture
DIY Fairy Door…Gnome Door
Fairy Doors & Gnome Doors #2

Fairy Doors and Gnome Doors (#2)

After making a fairy door out of sticks and hiding it in our neighbor’s garden last Summer, L and I thought we’d spread the fairy love a little farther this year…we’ve been making FAIRY DOORS and GNOME DOORS and hiding them all around town! It’s so much fun surprising the young and the old — just imagine the look on anyone’s face when they’re out in the garden and suddenly discover a teeny, tiny door that wasn’t there before. Ha! These fairy doors are so simple to make and all you need is rocks, paint and clear sealant (which is optional). To draw a little more attention to the fairy doors, we like to leave a tiny button or painted rock trail as well.


Materials needed:

  • medium-sized rocks
  • acrylic paints
  • clear sealant spray (optional)

After cleaning any dirt off your rock, start by painting on a door.

Next, add some windows, if you have room.

If adding any glitter paint, apply that next. We like to paint a little glitter over our windows.

Next, outline the door and windows carefully with black paint. Add a doorknob as well.


Now for my favorite part, paint connecting black lines on the rock, resembling a stone wall.

If you’d like to add a flower pot or lil window box, add one now.

Finally, finish with some green vines, leaves, and flower details.


Once all your paint is dry, you can spray the rocks with a coat of clear sealant to make the fairy doors even more weather resistant. Permanent paint usually doesn’t wash away, but I always like to add a coat of sealant just in case.

Now for the real fun…time to hide your fairy doors and gnome doors. (Gnome doors go on trees, generally speaking.)


I like making some of our fairy doors to resemble our neighbor’s front porches and gardens…


Enjoy!!!


See also this DIY for fairy furniture!


Fairy Mud

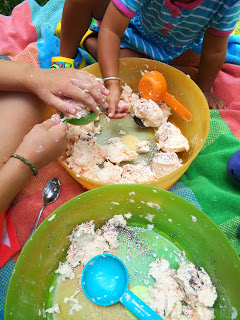
I first saw a recipe for FAIRY MUD a year or two ago on a blog called Happy Hooligans. When L’s cousins came over to play on a hot day last summer it was the perfect activity! Fairy Mud is just as much fun for the kids to make as it is to squish between your fingers and play with! With the temperatures rising and our fairy garden in full bloom, we’ll be making it again this week!


Materials needed:

  • 1 1/2 bars of soap
  • 2 rolls of toilet paper
  • food coloring
  • 1.5 to 2 cups of WARM water
  • glitter, sequins, buttons, jewels, flower petals
  • cheese grater
  • 2 large bowls or tubs

First, grate the bars of soap into a large bowl. If you have older kids, they can certainly help with this process!


While you’re busy grating soap, have the little ones unravel 2 rolls of toilet paper. So silly, they’ll just love it! Gather the toilet paper into the second large bowl.


Once the soap is grated and the toilet paper unravelled, pour the WARM water into the bowl with the soap and add a few drops of food coloring as well. Squish and squeeze the soap shavings until you have some consistently melted and mushy soap blobs.


Pour the water and soap over the toilet paper in the second bowl and continue to mush and mold the fairy mud concoction.


While the kids are playing, add some glitter into the mix. Followed by jewels, flower petals, anything you and the kids can come up with!

Don’t forget to pull out some measuring cups, spoons, and muffin tins so you can make some fairy mud pies as well! Amazingly fun!!! Enjoy!


Doorknob Mushroom-Fairy Houses

Aren’t these DOORKNOB MUSHROOM-FAIRY HOUSES the cutest??? I originally planned to just make mushrooms out of these little wooden knobs, but I just had to paint a little door and window on too. They’re just so sweet! L painted hers knobs into multi-colored mushrooms today and they are already out in the garden! So easy and so much fun!


Materials needed:

  • small wooden knobs w/ screws
  • acrylic paint
  • sealant spray
  • egg carton (optional)

First, twist the screw into the knobs.

Next, paint your knobs. You can paint them to look like mushrooms or add a few extra details for a fairy house. Even a 3 year old can paint the knob to look like a cute, lil mushroom!


After your knobs are painted, set them aside to dry. I suggest using an egg carton to prop the knobs up. Next, take them outside to spray with a coat of sealant. (The egg carton works great for this step too!)

Now for the fun part…tuck them away into your fairy garden, in a flower pot or in a wreath. Keep the screws in, just push them into the ground. Adorable! Might as well make a couple extra for family and friends!


If you like this one, you’ll be sure to like our JAM JAR FAIRY HOUSES and GNOME HOMES too!

Jam Jar Fairy House / Jam Jar Gnome Home

The other night I had a hard time falling asleep because I couldn’t stop brainstorming about how to turn a jar into a fairy house. (Only me…I know.) I knew I wanted to make it so at night the windows and door would light up; the house needed to be sturdy enough to stand up to the elements outdoors; and I wanted to use craft materials we already had around the house. Finally I had a eureka moment…why not use my beloved hot glue gun!?! So many people think hot glue guns are just for gluing things together, but they can add texture and dimension to your work as well. I’m super excited to share with you this simple tutorial for making JAM JAR FAIRY HOUSES & GNOME HOMES! They really are adorable!


Materials needed:

  • jars
  • hot glue gun and glue
  • acrylic paints
  • preserved moss, tree bark, or dried leaves
  • dried flowers
  • a bead or button
  • tea lights (battery operated)


First, decide which direction you’d like your jar to stand. For instance, my smallest JAM JAR FAIRY HOUSE stands on its lid, but the larger one (made from an apple sauce jar) stands upright. Using your hot glue gun, “draw” a door and windows on your house. Then, fill in the walls of the house with vertical lines of your hot glue. Try to draw them on in long, fluid strokes, but the house by no means needs to be perfect. Each lil blip or quirk, will give your fairy house more character!


Next, paint the inside of the jar where your windows and door are located. Keep in mind that you’ll want some light to shine through at night, so don’t pick colors too dark or layer the paint too thick.


After you’ve painted the inside, paint the outside of the jar brown. Carefully go around each window and the doorway.


After the paint dries, the final step is gluing on dried moss and some tiny dried flowers. For our little jam jar fairy house, I glued moss on the top of the house (bottom of the jar) and along the edges of the lid. You can find preserved moss at your local craft store or, if you like, just use natural materials found in your own backyard…twigs, tree bark, fallen leaves, helicopter seeds, acorns.


You can display your fairy houses inside or outside. To light them up at night, just place a little, battery operated, tea light inside. Enjoy!


If you’re giving a JAM JAR FAIRY HOUSE away as a gift, don’t forget to include some fairies and some fairy furniture tucked away inside the jar!

DIY Fairy Folk

DIY Flower Fairies

Fairy Furniture

DIY Fairy Wands


DIY Flower Fairies

I first made FLOWER FAIRIES with my youngest sister when we were kids. They are just so sweet, I couldn’t wait to make them again with my girls! L and I made these fairies this past week and we plan on making more tomorrow…I’m thinking garlands, magnets, and of course, just flower fairy dolls for playing pretend!


Materials needed:

  • florist wire
  • fabric flowers
  • wooden beads
  • other beads (wooden, plastic; colorful, plain)
  • acrylic paint
  • embroidery thread
  • scissors
  • hot glue gun and glue

First, paint simple, little faces on your wooden beads.

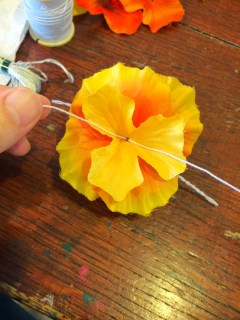
While your beads dry, take the artificial flowers apart. All you’ll need is the fabric petals. If you have any tiny flowers, set them aside to use for head decorations.

Cut a 14-inch piece of wire, and an 8-inch piece of wire. Fold the 14-inch piece in half.

With the smaller piece, bring both ends towards the center and twist the wire, leaving a little loop on each side for the fairy’s “hands.” Set aside.


Select the colors of embroidery thread you’d like to use for the fairy’s hair. Wrap the thread around all four of your fingers.

Place your looped, embroidery thread into the fold of the 14-inch piece of wire. Twist the wire, once to secure it in place.

Next, thread a “head” onto the wires (the large wire folded in half), followed by a couple small or medium-sized flowers.


Take the small wire piece (already folded and twisted into arms) and place it under the flowers, but in-between the two wires. If you like, you can fold each arm over once to secure the arms in place a little more.

Next, thread a bead onto the wire, followed by 2, 3, or more large flower petals.

At this point, separate the long wires into two legs. Fold each one in half and twist the wire, leaving a little loop on each end for the fairy’s “feet.”


Time to style some hair! You can twist the hair and glue it on top the fairy’s head. You can simply cut the thread loops and let it hang wild and free. Get creative with it!


To finish each flower fairy, glue a small flower on top of the hair. Too cute!!!


To host a tea party for your flower fairies, be sure to check out our “It’s Tea Time! Tea Party Ideas” page!