DIY Toy Sail Boat

One evening this summer, while we were getting ready for bath time, L pulled a wine cork out of her pocket. She had been saving it all day to float it around and play with in the bath tub. That got me thinking…I knew with a few toothpicks and some leaves we could turn her wine cork into a little sail boat! Leaves work great for this project, because they’re naturally water-proof and easily replaceable!

IMG_3614

IMG_3642

Materials needed:

  • 2 wine corks
  • 4 toothpicks
  • 2 leaves
  • old pencil
  • scissors

IMG_3574

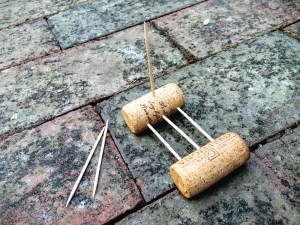
Take one of the wine corks and stick three toothpicks into it, all pointing in the same direction in a line.

IMG_3576

Next, push the second wine cork into the opposite ends of the toothpicks.

IMG_3577

Stick one more toothpick vertically into the middle of one of the corks.

IMG_3578

Find a medium-sized leaf and weave it through the bottom toothpicks. We used a balloon flower leaf. This step isn’t necessary, but it makes a nice lil bed for anything you may want to sail on top…a bug, a rock, a fairy friend.

IMG_3585

IMG_3579

Next, find a slightly larger leaf and thread it onto the vertical toothpick, making a sail. We found the hosta leaves to work best for this, though any thick and sturdy leaf will do!

IMG_3582

To make the sail boat safer for little hands, twist an eraser off the top of an old pencil. Cut it in half with scissors and push it onto the top of the sail.

IMG_3580


IMG_3581


IMG_3584

Now, time to play! L had hours of fun blowing her boats around our rain barrel!

IMG_3589


IMG_3609


IMG_3613

The boats may not seem like much, but ours withstood some submarine plunges under the water and lasted through two nights of bath time play! Tomorrow, we’ll replace the leaves and keep sailing!

IMG_3656


IMG_3662


IMG_3659

Enjoy!!!

Tin Foil River and DIY Boats

This morning the girls and I went to an awesome, little program for kids where we learned about the waterways in our town and L got to make her own toy boat. When we came home I decided to make our own “waterway” in the backyard with some tin foil. Too easy and so much fun!!! All you need is some aluminum foil, water, and some toy boats to float along! I mean, seriously…who wouldn’t like a TIN FOIL RIVER in their yard?


Boat ideas and links:


First, decide which direction you’d like your TIN FOIL RIVER to flow. If your yard or driveway is on a slope, it’s pretty easy to figure out how to get the water to flow…start at the top and end at the bottom. If you yard is flat, you can prop some of the river up or make it in a donut shape. We decided to make ours interesting, starting the river on the slide, having it flow under a chair, and bend and twist across the yard.


Making the waterway is pretty simple…you can be a perfectionist about it and try to make all the sides even or just wham-bam make it, play with it. We tore large strips of aluminum foil and double-layered the foil to prevent any leaks. Fold the sides up. At any joints (places where you’re attaching two sections of foil) you can add another layer of foil underneath. Same with the end of your river…we tried making our sides a little higher and extra-sturdy at the end.


If you need to, you can weigh your foil down with some smooth rocks. Makes fun little obstacles too! If a side of your river starts to sag, it’s pretty easy to prop it up with a brick or flower pot…whatever you have handy. The TIN FOIL RIVER allows for some terrific problem solving and experimenting with your little ones! I can’t wait to see what L comes up with next for our backyard waterway!


Enjoy!