Celery-Rose Print Shirts

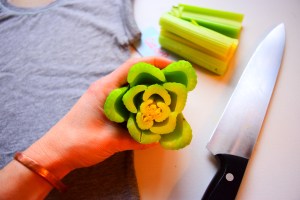
If you’re a frequent reader of the blog, you know how much I love printing with the girls…citrus prints, finger prints, leaf prints, cardboard tube-heart prints, and now celery prints! They’re the perfect replica of a rose flower! Like most of our printing projects, the girls and I put these on shirts today so they can wear their art everywhere we go. You could also make a beautiful table cloth, tea towels, or pillow cases with this celery-rose print craft.


Materials needed:

  • celery
  • knife
  • t-shirts
  • acrylic paints (red, pink, and green)
  • paper plate or plastic lid
  • thin cardboard piece


First, place a thin piece of cardboard inside the shirt you will print. A cereal box flattened out works great…just something to protect the backside of the shirt from any paint that may soak through.


Cut the celery straight across, down towards the bottom of the celery stalks where they all come together. Don’t worry if it doesn’t resemble a perfect rose. First, roses aren’t perfect either…they have beautiful and unique imperfections just like people do. And second, you can add a green leaf detail at the end that will round the flowers out.


Next, put your red and pink paint on a plastic lid or paper plate to use as your palette. Press the celery into the paint and swirl it around a bit to get the paint on all stalks.


Carefully, press the celery onto the shirt and lift up. Voilà! Continue this process until you have all the flowers you want.


The last step is to add a little bit of green. Take one of the celery stalks that was cut off and simply stamp it into some green paint. Press it sparingly around the flowers to round them out and make the appearance of leaves.


Beautiful!!! This craft makes beautiful Valentine’s Day gifts, but would be perfect for any flower-loving friend anytime of the year. Enjoy!!!


Milk Carton Fairy Houses

Who knew milk cartons had so much potential??? They are perfect for making fairy houses and gnome homes! First off, a milk carton is just the right size for fairies…all it needs is a door and a few windows to make it feel like home. Milk cartons are also water-proof, providing adequate housing for both indoor and outdoor use. WB and L like to play with their fairy houses during the day and, at night, we tuck a little tea light inside to turn them into night lights! So sweet!


2016-10-06-14-00-32

Materials needed:

  • milk cartons
  • white primer spray paint
  • exacto knife
  • acrylic paints
  • hot glue gun
  • sticks, bark, moss, acorns, etc.
  • battery-operated tea lights

dsc_0005

First, spray your milk cartons with some primer. The surface of milk cartons is usually waxy and paint will have a hard time sticking. A coat or two of primer should do the trick!

dsc_0006

Next, using an exacto knife, carefully cut a door and windows into the house. And do not worry…the windows don’t need to be perfect! Fairy houses’ never are!

dsc_0344

Now the fun part for the kids, have your little ones paint and decorate the houses. Start with a solid color or two underneath.

dsc_0347

img_0240

Then add details like polka-dot doors and Fall pumpkins. For our pumpkins, the kids used a wine cork as a stamp!

dsc_0349

dsc_0353

While the paint dries, send the kids outside to collect nature materials to use for a roof.

dsc_0356

Before assembling the roof, you can easily flip the screw-top opening inwards. Just push it in with your fingers…it’s easier than you think!

dsc_0357

dsc_0358

Glue twigs or bark over the opening, and then add all sorts of nature findings. Each house will be unique!

dsc_0360

dsc_0359

To light your fairy houses up at night, place battery-operated tea lights inside. You could also use a string of lights in and around the houses for a magical display!

dsc_0373

dsc_0383

“Those who don’t believe in magic will never find it.” -Roald Dahl

dsc_0393

Pajama Walks & Dandelion Walks

A couple years ago, our family started going on “Pajama Walks” during the warmer months of the year. They’re not something we do on a daily basis, but maybe once every couple of weeks. Pajama walks are perfect for nights when the kids have been really good, dinner was on the early side, and you want to do something special to end your perfect day. They’re also great on days which have been a complete disaster, as your last hope to turn the day around! Or maybe on rainy days when the clouds part and the sun decides to come out just before it sets…

IMG_6245

Basically, you eat dinner, give the kids a bath, and instead of reading a bedtime story, you take a stroll around the block. You sing songs, talk about your day, watch the moon come out, and unwind as a family.

IMG_5846

Over the past few weeks our pajama walks have morphed into something beautiful: “Dandelion Walks.” While on our walks, L started picking dandelions and other pretty weeds like all kids do. She then started leaving them on people’s doorsteps, in their mailboxes, and even gave a dandelion to a neighbor’s cat napping on their patio.

IMG_6811

IMG_6809

So now on our pajama walks, the kids pick flowers for one block and share them for three. The neighbors might not even notice and the girls know this, but it makes them happy leaving these little surprise gifts of sunshine all the same.

IMG_6826

IMG_6824

IMG_6821
I’ve always told our girls, “Dandelions are where the sun kisses the earth when it rises in the morning.” And it’s true.

IMG_6818

IMG_6829
To inspire your kids further, I highly recommend the book “Sidewalk Flowers” by poet JonArno Lawson and illustrator Sydney Smith. It’s one of our favorites!

IMG_6827

DIY Ragtag Fairy Skirts (No Sew!!!)

These Ragtag Fairy Skirts are so easy to make, I almost feel silly writing a post on them. They are so cute though!!! I figured if you didn’t know how to make them already, you need to learn! Like all my projects that involve fabric, my suggestion to you is to check out the secondhand stores in your area first. We have an old antique/junk store in town that has a huge selection of funky fabrics from the 80s and 90s…they’re just perfect for crafts like this. And they only cost $1-$3 for pieces 3-6 yards long! If you already have a nice pile of fabric scraps, you’re all set…it doesn’t take much!

DSC_0195 (2)

Materials needed:

  • fabric
  • elastic
  • scissors

DSC_0172

First cut the fabric into strips, about 1-2 inches wide and 12-20 inches long. Varying lengths make the skirt fun…it definitely doesn’t have to be perfect!

DSC_0177

Next, cut a piece of elastic long enough to go around your child’s waist, with enough left over for a bow or knot. Tie on each piece of fabric as pictured. First, fold the fabric in half. Then, put the folded loop under the elastic. Flip the ends of the fabric up and over the elastic and through the loop of folded fabric. Pull gently to tighten and secure.

DSC_0175

DSC_0176

DSC_0174

DSC_0173

Repeat this process until the skirt is full. Although the lengths of the fabric can vary (makes the skirt more fun and free), I would try to make each “knot” face the same direction.

DSC_0180

DSC_0179

Once all the fabric strips are secure, simply tie the skirt in a bow around your child’s waist. So easy and too cute!!!

DSC_0181

DSC_0187

DSC_0192

Rain Boot Wreath

I’ve seen old rain boots up-cycled into flower planters before, so I thought, “Why not use them for a Spring wreath!?” This RAIN BOOT WREATH was so quick and easy to put together and the outcome is adorable…perfect for Spring!

DSC_0169

I could’ve gone out and bought some new boots that weren’t dirty, worn, and broken in spots, but that required me to take the kids shopping and more money spent…not my idea of fun! I ended up making these with things we already had: L’s old rain boots and flowers we had leftover from other projects. Every time we walk in through the front door, the rain boots make me think of the many rainy, muddy adventures L went on during the first three years of her life. So much love!

Materials needed:

  • rain boots (kids’, adults’, old or new)
  • artificial flowers
  • rope and/or ribbon
  • scissors

DSC_0149

First, if your boots are dirty, clean and dry them.

DSC_0152

Next, lay out your flowers and decide how you’re going to split them up. When you arrange your flowers, start with the taller and/or leafy flowers first. Put the single, shorter, and more prominent flowers in last. Originally I thought I’d use wire cutters to trim my flowers, but I ended up just bending the wired stems in half, depending on the height I was looking for. This helped them take up room and stay put in each boot!

DSC_0155

DSC_0154

DSC_0156

DSC_0158

Once your boots are filled and arranged the way you like them, tie a rope or ribbon securely to each boot.

DSC_0159

DSC_0160

Now, take the boots to your door and see how they will hang. I ended up tying a knot in the rope down low, tying both halves together so the boots didn’t lean out too far from the door. I also shortened the rope a bit by wrapping and tying it around the wreath hanger.

DSC_0162

DSC_0161

To finish your fun and funky Spring wreath, tie a pretty ribbon in a simple bow around the top and you’re done! So easy, cute and fun!

DSC_0167

Happy Spring!!!

Naturally Dyed Easter Eggs (with Onion Skins & Cabbage)

How beautiful are these Easter eggs!?! Ever since I was a kid and read about dying eggs in onion skins in a nature-craft book, I’ve wanted to try it. I couldn’t believe how easy they were to make and how bright and colorful they turned out! The orange-brownish eggs were dyed in the onion skins, while the bluish ones were dyed using red cabbage. And no, you don’t need to buy a whole bunch of onions to get the skins. Just ask the nearest grocer at the store, and they’ll be happy to let you and the kids dig through the onion bin! You’ll find plenty there! It did not take long at all to dye the eggs in onion skins, while the ones dyed with red cabbage soaked over-night. Just takes a little patience!

DSC_0135

Materials needed:

  • white eggs
  • onion skins
  • red cabbage
  • medium-sized pot
  • water
  • small flowers, leaves, herbs
  • old pantyhose or knee highs
  • twist ties

DSC_0084

First, fill your pot up completely with onion skins. Then, fill with water, leaving a couple inches of space for the eggs.

DSC_0089

Do the same with the red cabbage, chopping the cabbage first.

DSC_0093


Next, put both pots on the stove and turn on high to boil. Let the water simmer for about 5 minutes, then turn the pots off. Let them sit and cool for 5 hours or overnight.

DSC_0095

DSC_0098

To prepare the eggs to dye, to get the beautiful nature prints on them, gather small leaves and flowers from your garden. We even used some weeds with interesting leaf shapes!

Cut your pantyhose or knee-highs in small sections. We used knee highs. I cut them in half and then with the top portion, I cut a slit up the side. With the bottom half, it was easy to just place the egg inside.

DSC_0107

Press a flower or leaf onto the egg and carefully wrap the pantyhose around it. Dipping the leaves in water first makes them stick to the eggs a bit easier.

DSC_0105

DSC_0102

DSC_0104


Twist the pantyhose in the back and secure with a twist tie.

DSC_0103

DSC_0110


Now to dye the eggs! Place your eggs into the pots, making sure they are completely submerged in the water.

DSC_0111

DSC_0115

Put the pots back onto the stove and bring them to a boil again. Turn down to low heat, and let the pots for 20-30 min.

After the water cools a bit, carefully remove the eggs soaking in the onion skins and dry them off a bit on a towel.

DSC_0118

Cut the pantyhose and the eggs will come out carefully. So cool!!!

DSC_0122

DSC_0119

DSC_0124

Place the pot with the red cabbage and eggs in your refrigerator and let them sit up to 24 hrs. Then do the same…removing them from the water and cutting the pantyhose off.

DSC_0129

To make your eggs shine, you can wet a paper towel with vegetable oil and gently rub it onto each egg. Such a naturally beautiful way to celebrate Spring, Easter, or Naw Ruz!!!

DSC_0140

DIY Nature Frame

Is your child a nature collector or, as Pippi Longstocking would say, a “thing finder”? If so, the DIY Nature Frame is the perfect project for them! Just about every day of the year, L fills our stroller, our wagon, or our pockets with things she finds on walks. We could be going for a walk around the block in the city and she still comes home with feathers, sticks, rocks, butterfly wings and seed pods! This past weekend we went for a walk and L brought home pinecones and pine needles that she wanted to “do a craft” with, ie. glue to paper. I knew that wouldn’t quite work, so in less than 10 minutes we put together this Nature Frame!

2016-02-22 21.17.25

The best part about having a Nature Frame, is that it’s a project that is constantly changing, evolving throughout the year. While ours has pine cones and pine needles in it now, the end of February, I’m sure within a month or two it will be filled with Spring flowers, robins eggs, and fallen bird’s nests. In the Fall, our Nature Frame will most likely be glowing orange with fallen leaves from the backyard…finally, a place for all our nature findings!!!

IMG_4198

Materials needed:

  • an old frame
  • string
  • scissors

DSC_1070

First, dismantle your frame. I bought this old and ugly print, among a collection of 5 other framed pictures, for $1.75 at an antique auction. I liked two of the pictures and that was worth the $1.75 and getting stuck with 3 I didn’t care for so much! So I stashed the ugly pictures away in a closet and I’m glad I did…the frame on this one was perfect for a Nature Frame! You can find similar frames for pennies at secondhand stores, yard sales, and antique shops.

DSC_1071

DSC_1072

Next, tie your string to the edge of your frame and, with the help of your child, wrap it criss-cross around the frame. We used three different strings that were three different colors…anything works!

DSC_1075

Now, after you’ve been for a nature walk and your little one’s pockets are full, you can fill your frame. And then, hang it in a place for everyone to enjoy! We hung ours in our kitchen by the back door…L’s findings usually end up on the floor by the door, so now they can go up on the wall instead! I just love it!

IMG_4303

IMG_6493

DSC_1081

Enjoy!!!


DIY Bird Nesting Kit

The “DIY Bird Nesting Kit” is the perfect project for little hands and little helpers! L and I made three kits this week: two gifts and one to hang in our own backyard, next to our DIY Tin Can Bird Feeder. It took less than a day for our feathered-friends to find it and start picking away, flying bits of string home to cozy-up their nests! The DIY Bird Nesting Kit costs only $2.50 to make (I’m not kidding!) and it’s a wonderful project to help teach kids about giving, sharing, and caring for the world around us….aaand about birds and the various types of nests they make of course!

DSC_1062

Before making our Bird Nesting Kits, the girls and I read “Mama Built a Little Nest” by Jennifer Ward and Steven Jenkins. It is fascinating book with beautiful, collage-like illustrations, depicting all kinds of birds, their families, and the homes they build. (It’s best to read in a pile of beach towels, swirled around on the floor into your own nest.) I highly recommend it!

IMG_5479

Materials needed:

  • Wired bird suet holder
  • yarn scraps
  • scissors
  • ruler (optional)

DSC_1036

First, have your little one cut the yarn scraps up into pieces about 3-5 inches long. You don’t have to measure them, but your little one might want to with the ruler!

DSC_1042

DSC_1044

After you have a nice pile of yarn pieces, it’s time to stuff them into the suet holder. Then, close the suet holder up and it’s all done. It’s that easy!

DSC_1048

DSC_1049

DSC_1050

Now, time to find the perfect place outside to hang your Bird Nesting Kit…someplace where the birds will find it and you can spy them doing so is best!

DSC_1054

IMG_5468

If you’re giving your Bird Nesting Kit away as a gift, you may want to include a little card inside explaining what it is. Your friends will be sure to love such a colorful, quirky, and fun gift! Enjoy!!!

DSC_1065

DIY Toy Sail Boat

One evening this summer, while we were getting ready for bath time, L pulled a wine cork out of her pocket. She had been saving it all day to float it around and play with in the bath tub. That got me thinking…I knew with a few toothpicks and some leaves we could turn her wine cork into a little sail boat! Leaves work great for this project, because they’re naturally water-proof and easily replaceable!

IMG_3614

IMG_3642

Materials needed:

  • 2 wine corks
  • 4 toothpicks
  • 2 leaves
  • old pencil
  • scissors

IMG_3574

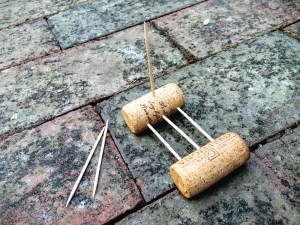
Take one of the wine corks and stick three toothpicks into it, all pointing in the same direction in a line.

IMG_3576

Next, push the second wine cork into the opposite ends of the toothpicks.

IMG_3577

Stick one more toothpick vertically into the middle of one of the corks.

IMG_3578

Find a medium-sized leaf and weave it through the bottom toothpicks. We used a balloon flower leaf. This step isn’t necessary, but it makes a nice lil bed for anything you may want to sail on top…a bug, a rock, a fairy friend.

IMG_3585

IMG_3579

Next, find a slightly larger leaf and thread it onto the vertical toothpick, making a sail. We found the hosta leaves to work best for this, though any thick and sturdy leaf will do!

IMG_3582

To make the sail boat safer for little hands, twist an eraser off the top of an old pencil. Cut it in half with scissors and push it onto the top of the sail.

IMG_3580


IMG_3581


IMG_3584

Now, time to play! L had hours of fun blowing her boats around our rain barrel!

IMG_3589


IMG_3609


IMG_3613

The boats may not seem like much, but ours withstood some submarine plunges under the water and lasted through two nights of bath time play! Tomorrow, we’ll replace the leaves and keep sailing!

IMG_3656


IMG_3662


IMG_3659

Enjoy!!!

White Picket Fairy Fence

Well, I couldn’t show you how to make a Craft Stick Fairy Door without telling you how to make a WHITE PICKET FAIRY FENCE to go with it! The fence is simple to make and looks adorable out in the fairy garden!

IMG_3404

IMG_3406

Materials needed:

  • small craft sticks
  • regular-sized craft sticks
  • wood glue
  • Q-tips
  • white acrylic paint
  • acrylic sealant

IMG_3371

First, lay out your sticks…4 small craft sticks in the middle with 2 regular-sized ones on the ends. If you don’t have small craft sticks, just cut some regular-sized one’s in half. The two craft sticks on the ends are left long, so that you can easily stick them into the ground, keeping the fence upright!

IMG_3372

Next, think about where two craft sticks that will lie across the other ones will be and use a Q-tip to put wood glue in those spots across each stick. Lay the craft sticks on top of the glue and press to secure.

IMG_3374

IMG_3375

After the glue has dried, paint the picket fairy fence white.

IMG_3399

Finish up with a coat of acrylic sealant spray.

IMG_3400

Now for the fun part…while sneaking a fairy door into your neighbor’s garden, add a little white picket fairy fence as well! Gently push the ends of the fence into the soil. Enjoy!!!

IMG_3402