DIY Vintage Postcard Christmas Garland

Anybody that’s been to our house knows that I love garlands and the Christmas season is just another excuse for me to make and display more! Our POSTCARD CHRISTMAS GARLANDS are some of the quickest and easiest to make, plus they add a lot of character to the room. We have two postcard garlands in our house…one hangs across a wide doorway and the other under a mantel…both are made a little differently.


The first VINTAGE POSTCARD GARLAND is one that I made new this year. I found a huge collection of postcards at a local antique store a couple weeks ago and knew that I had to do something with them. I carefully went through the postcards, all from the early 1900s, and picked out some of my favorites…some I chose because of the bright and colorful picture on the front and others because of the endearing (or humorous) message written on the back.


Since these postcards were old I didn’t want to damage them in any way, so I decided to clip them to a vintage-looking string with mini-clothespins. It was that easy. You can add an old ornament or a prism, as we did, in the middle as well. I just love ours!

The second POSTCARD GARLAND is one that I made a few years ago out of new, but old looking postcards. Have you ever read any of the “Flower Fairy” books by Cicely Mary Barker? The illustrations are just beautiful!

I once found these postcards with the “Flower Fairies” depicted on them and knew it’d be perfect for a garland. No, these fairies aren’t necessarily Christmassy, but I like things a little different, a little unpredictable. This garland celebrates all things magical about the Christmas season. To make this garland, I punched holes in the tops of the postcards and strung them up. On the ends I tied a few strips of fabric, just some scraps out of my scrap pile. And that’s it! Simple, but definitely cute and fun!


Enjoy!

3 Secrets for Decorating Your Christmas Tree

I always feel like our Christmas tree is a miniature version of the one I grew up with…I’m sure as our ornament collection grows over the years, so will our tree. Many of our ornaments are ones that hung on my family’s tree when I was a kid and hold such special memories to me. Isn’t that one of the best, yet bittersweet parts of Christmas…all those memories? The exciting thing is that now we have the chance to make memories with our own children…some new and some borrowed from our own childhoods. I feel like our Christmas tree is just that!


Popcorn Garland

My parents’ Christmas tree still dons the garland my brothers, sisters and I made when we were kids some 20-30 years ago. If you make it right and store it well, it will obviously last a very long time.


One of the most important tips is using plain popcorn, popped in a hot air popcorn machine. Also, if you plan ahead and have the time, letting your popcorn sit overnight and become slightly stale helps in stringing it…it won’t break as easily. To string the popcorn just use a piece of thread (or dental floss) and a sewing needle. You don’t have to make one super long string at once, make 4 or 5 foot long ones and tie them together.


When storing the popcorn, first start by adding a bright ribbon to both ends of your garland. That will make finding the end easier next year. Find a medium-large container and coil it around inside the container, much like you do a garden hose. We use a plastic tupperware-like container, but a large popcorn tin works very well too.


Tree Skirt

If you’re like me and like a homey, vintage looking tree skirt you don’t have to look far. I bought this cheap Christmas blanket one year at a thrift store and we wrap and fold it around the bottom of our tree. I do wish it was actually a quilt and not a look-alike-quilt, but nobody would ever know the difference and it achieves the look I’m going for. You could do the same with a table cloth or any large piece of fabric.


Tree Topper

Don’t be afraid to use a non-traditional tree topper. I love decorating for Christmas, but even more I love adding magical little twists to our decorations…keeping things unpredictable and slightly quirky. I found this glittery butterfly clip at a local floral shop years ago and attached some florist wire to the back to help secure it to the tree. So much fun!


Happy decorating everyone!

No-Bake Acorn Treats

I’ve been making these ACORN TREATS for Thanksgiving for a few years now. I wish I remembered the source where I originally saw them to give the right person credit…somewhere on this big internet universe! I usually pack my ACORN TREATS into little jars and give them away to family and friends on Thanksgiving day. They are so simple to make and everyone always gobbles them up immediately…I think I’d be in trouble if I came to Thanksgiving dinner without them anymore!


Ingredients:

  • Hershey Kisses (dark and original)
  • Nutter Butter Bites
  • mini-chocolate chips
  • chocolate frosting (in a pouch or in a can)


First, to make things go quicker, prepare your work station by taking the Kisses out of their wrappers, putting the mini-chocolate chips in a lil bowl and spreading out some Nutter Butter Bites nearby.

Put a little dab of chocolate frosting on one side of the Nutter Butter Bites and push a Hershey Kiss into place. (This is the perfect time for little hands to help!)


Put a teeny, tiny dab of chocolate frosting on the opposite side and push a mini-chocolate chip in place.


Presto! Too easy, right?

Place them in a little mason jar, tie a string or ribbon around the top and you have a sweet little gift to share! Enjoy!

DIY No-Sew Rag Garland

Out of all the garlands I’ve made over the years, the RAG GARLAND has always been my favorite! It’s bright, colorful, super-easy to make and it looks fantastic inside or outside, day and night!


The RAG GARLAND is fun for the holidays, but can be made and used for any time of the year. I put ours up for Christmas, but I didn’t make the color scheme ultra-Christmassy…I love color and can’t seem to limit myself to just red and green! The best place to find cheap and funky fabric is at antique stores, thrift stores or flea markets…any leftovers can be used to make lil rag tag skirts or tutus for your little ones.

Materials needed:

  • fabric
  • scissors
  • string of lights

First, cut your fabric into strips about 2 inches wide and about 12 inches long.


Next, tie each fabric strip around the string of lights with a single, basic knot. If the fabric is blank on the underside, just fold the fabric over before knotting it. Repeat until the string of lights is covered.


This is a garland we made for Steamys, a local coffee shop/book store/gift shop in town. We used vintage fabrics to make it extra funky!


Happy garland making!!!


Gnome Village Advent Calendar

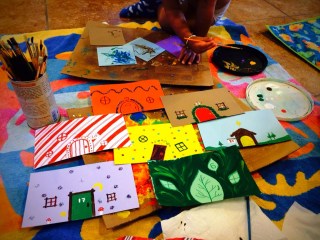
I’m so super-excited about our GNOME VILLAGE ADVENT CALENDAR this year! Starting on the 1st of December the kids will lift up a gnome home each day…the house numbers will correspond with the day. Underneath each house will be a little surprise: a hershey kiss, a candy cane, a miniature ornament for the tree, or a special message. The “special messages” may include,

  • “Make cookies for a neighbor.”
  • “Make Christmas cards for friends and family.”
  • “Leave little notes written in chalk around the neighborhood.”
  • “Make a Gingerbread House today!”


Making the GNOME VILLAGE was a little time consuming, but very easy to make. You could always make your gnome houses very simply with a standard door, windows and house number and they’d look just as cute! Just mix up the colors for some variations!

Materials needed:

  • mulit-colored card stock (or you could use toilet paper rolls)
  • doilies
  • markers and/or paint
  • glitter
  • Elmer’s glue
  • hot glue gun
  • sequins, stickers, etc (optional)

First, cut the card stock in half horizontally, then take about 3 inches off the end. I like using card stock instead of regular construction paper because it doesn’t fade as easily and it’s sturdier. I’m hoping to use our GNOME VILLAGE year after year!

After your paper is cut, it’s time to decorate! We decorated some of our gnome houses with markers, some with paint and embellished them with sequins, jewels and glitter. Have fun and be creative! They certainly don’t all have to be Christmas-y, just colorful!


Once the houses have been colored and painted, shape the paper into little tubes and use a hot glue gun to secure them in place.


To make the gnome house roofs, make a cut to the center of a doily. (I actually used two doilies stacked for a sturdier roof.) Overlap the ends and glue into place…should make a little rooftop-cone.


To add snow to the roofs, very gently roll each roof in Elmer’s glue and then sprinkle with glitter. This was definitely L’s favorite part!


Using the hot glue gun again, attach each rooftop to a house. All done! Pretty easy, huh?


We plan to display our GNOME VILLAGE ADVENT CALENDAR on one of our mantels this year…with a little snow, mini-pine trees, and a few gnomes it will surely become one of our favorite Christmas decorations for years to come! So. Much. Fun! Enjoy!


Scavenger Hunt

SCAVENGER HUNTS are lots of fun for kids (and adults) of all ages! They only take a couple minutes to throw together and can be done just about anywhere…outside on a beautiful day, inside on a rainy day, in your backyard, on a walk around town, at an art museum or the grocery store. At times when kids may become impatient or get the wiggles, a scavenger hunt can be a great way to keep them entertained!

Basically all you need is a list of things to look for and a small bag to collect your finds. It’s that easy!

Our  “around town” scavenger hunt last weekend included the following: an orange leaf, a yellow leaf, a rock, a stick, a feather, a button, a flag, an acorn, a pumpkin, a scarecrow, books, a man wearing a hat, a dog, a flower, and berries. We put the small items that we found in our little bag, while the things that were too big (like a man wearing a hat) were just checked off the list.

You can make a scavenger hunt for long car rides too! Obviously you won’t be filling a bag with things, but your kids can check items they see off a list…or, even better, put it into a “BINGO” type format and you have a car game! See who fills their card first!

Another variation: Leave a trail of clues, leading your kids to a surprise in the end! We like to do this one around the house, sending L upstairs, then downstairs, into cabinets, and under pillows, all to find a hershey kiss tucked into one of her shoes at the end. It takes a little more prep time, but is oh so fun!!!

Where will your SCAVENGER HUNT take you?

Homemade Granola (Gluten Free)

Is there anything better this time of year than HOMEMADE GRANOLA, fresh out of the oven? It’s warm, a little chewy, and crunchy too. This granola is sweet and a bit salty, with a just a hint of cinnamon. Oh, how I love homemade granola!

I came up with this granola recipe years ago (a combination of Alton Brown’s, my mom’s, plus a few of my own additions) and I’ll warn you, it’s highly-addictive. The great thing about granola is that you can add or substitute some ingredients to make it your own. You could switch out some of the nuts with walnuts or peanuts, add a pinch of nutmeg or pumpkin pie spice. I like to use Pure Maple Syrup with this recipe, but if I have Apple Syrup from the farmer’s market on hand, it’s a delicious substitution! Granola is a wonderful gift for family and friends and this recipe makes plenty enough for two families. After it’s cooled completely just put half of the granola in a large mason jar with a ribbon tied around the lid and it’s ready to share! Enjoy!


Ingredients:

  • 6 cups of oats (I use Bob’s Red Mill, Gluten-Free, Rolled Oats)
  • 1 cup almonds, sliced
  • 1 cup pecan pieces
  • 1 cup cashews, raw
  • 1/2 cup sunflower seeds
  • 1 1/2 cups coconut
  • 3/4 cup brown sugar
  • 3/4 cup maple syrup
  • 1/2 cup vegetable oil
  • 1 1/2 tsp salt
  • cinnamon
  • honey
  • 1 cup raisins
  • 1 cup dried cranberries


Preheat the oven to 250 degrees F.


In a large bowl, mix together the oats, almonds, pecans, cashews, sunflower seeds, coconut, and brown sugar.


In a smaller bowl (or in a measuring cup!) mix together the maple syrup, vegetable oil and salt. If you have kids in the kitchen, they’ll enjoy seeing how the syrup and oil separate in the glass measuring cup before you mix it all up!


Pour the syrup-oil-salt mixture overtop the oats and nuts. Mix until everything is evenly and thorough coated. Spread the granola out into a large baking pan, or what I prefer…a large, non-stick roasting pan used usually for cooking turkeys or hams. Place in the oven. The total cooking time will be about 2.5 hours for such a large amount of granola, mixing every 15-30 minutes with a large spoon or spatula. Here is the schedule I tend to follow:


Cook 30 min. Mix.

Cook 30 min. Mix again.

Cook 30 min. Mix. Add HONEY in a zigzag, all over pattern.

Cook 15 min. Mix. Add more HONEY and sprinkle CINNAMON on top too.

Cook 15 min. Mix.

Cook 15 min. Mix.

Cook 15 min. Mix. Enjoy some hot and fresh!

Allow to cool for 15 min. Mix in RAISINS and DRIED CRANBERRIES.


Enjoy!!! And share!!!


DIY Floppy Newspaper Hats

Oh, we had so much fun making these FLOPPY NEWSPAPER HATS today! I thought I’d write up this tutorial this weekend, but I just couldn’t wait…they’re just so much fun! If you have little boys in your messy house, please don’t think you can’t make these with them…a hat’s a hat! A floppy hat’s a floppy hat! I’m sure they’ll love them just as much as any girls will! Do it! There will be lots of giggling for sure.

Materials needed:

  • newspaper
  • acrylic paint
  • painters tape
  • tissue paper, poof balls, feathers, etc.
  • white glue

First, prepare your painting area. I taped some trash bags to the floor to protect it from paint…not usually necessary for painting, but the newspaper sheets are just so large.

Next, paint, paint, paint! Paint an entire sheet of newspaper, just one side though. Don’t worry if some  of the newspaper can be seen through the paint, nobody will notice when the hat is finished! Allow the paint to dry completely.


After the paint is dry, lay the paper overtop of another sheet of newspaper…two sheets will make the hat a little more durable. Fold the papers twice, once in each direction, and cut the paper so when you open them back up, you have a circle. The circle really doesn’t have to be perfect, it’ll look great when you’re done!


Next is the tricky part because kids tend to wiggle…lay the paper over your child’s head and scrunch fold it into shape. As you go around, use painters tape to hold the the folds in place. The great thing about painter’s tape is that you can fix any little mistakes and it won’t tear up the paint or paper.


In making WB’s orange hat, I just shaped it around my knee and it worked just fine. I also experimented and used a stapler instead of the painters tape. Stapling worked great and looks fantastic, but it is a little trickier to do. The paper tears a little easier with staples in it too.

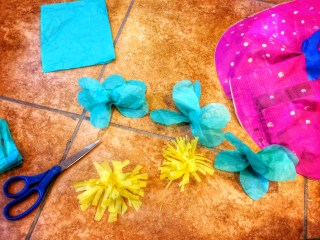
Now to decorate your hat! You can cut flowers out of tissue paper or just cut squares and scrunch them up. If you layer the tissue paper a bit, the flowers are a little fluffier and prettier. You can also glue on poof balls, jewels, feathers, anything you can think of and find around your house!


Super cute, huh!? Forget Easter bonnets, we’ll be wearing these to Thanksgiving dinner!!! That is if they survive a month’s worth of tea parties…


Wouldn’t these be adorable for a birthday party? You could make the hats beforehand and let the kids decorate them at the party…so many fun possibilities! Enjoy!


The Best Pumpkin Seed Recipe Ever!

Store-bought pumpkin seeds don’t even compare to freshly roasted ones made right in your own home! This year I think I made ours too good…they barely lasted a weekend, most didn’t even make it out of the pan and into a serving bowl before they were devoured! I know Halloween is over, but you may have some un-carved pumpkins sitting on your front porch still full of seeds… Those seeds are calling your name…

Ingredients:

  • 1 1/2 cups pumpkin seeds
  • 2 teaspoons olive oil
  • salt

Plus any or all of the following:

  • garlic powder
  • chili powder
  • paprika
  • roasted cumin
  • cayenne

Preheat the oven to 300 degrees F.

First, rinse the seeds under water washing away any pumpkin guts.

Pour the seeds out on a towel and gently pat them dry. (They don’t have to be perfectly dry.)

In a small bowl, toss the seeds with the olive oil and salt. Add your spices and toss some more to thoroughly coat the seeds. Make them to suit your preferences…if you like really spicy snacks, add more cayenne. Paprika is one of my favorite spices…kinda sweet, kinda smoky and a little spicy.

For little or no mess, line a baking pan with tinfoil. Spread the seeds out in a single layer.

Bake for about 45 minutes, stirring every 15 minutes, until golden brown.

Delish!!! (This handful of seeds was all that was left by the time I got my camera out to take a picture! They are just too good!) Enjoy!!!

Leaf “Glitter” Art

As the girls and I were crunching our way through leaves this week, this leaf “glitter” project came to mind. The leaves in our neighborhood are changing yet again…this time from their vibrant reds and oranges to dried-up, crunchy browns. No fear though, we can get one more craft out them!

Materials Needed:

  • crunchy leaves
  • paper (look in the recycling basket first!)
  • white glue
  • a small container or bowl

First, crumble the leaves into the tiniest pieces possible and collect them in a small dish.

Next, draw a Fall picture on the paper with the white glue. Feel free to draw some for your little ones, but let them scribble a glue picture too!


Now, as you would do with glitter, sprinkle the leaf dust all over the glue. This was definitely L’s favorite part.


Once the glue is all covered, gently shake the excess leaf “glitter” off and reveal your masterpiece!