Craft Stick Fairy Doors

It’s no secret that we LOVE making fairy/gnome things at Our Beautifully Messy House…fairy houses, fairy furniture, fairy doors, gnome doors, flower fairies, fairy folk…need I go on? We just can’t help it! What I love the most about making fairy doors and gnome doors is surprising people with them! L and I made an abundance of CRAFT STICK FAIRY DOORS this week as we prepare to spread them around the neighborhood. Of course we enjoy surprising our friends and close neighbors, but what I really love is putting them on strangers’ front porches and sneaking them into their gardens! We rarely get to see people discover the fairy and gnome doors, but the surprise, the magic in it all makes L and I giggle for days! We’ve had a great time making these craft stick fairy doors…aren’t they the cutest!?!

Materials needed:

  • crafts sticks (big, small, colored, any or all)
  • wood glue
  • Q-tips
  • buttons

Optional materials:

  • acrylic paint
  • sealant spray
  • wire & nails

First, lay out your craft sticks in a door shape. If you have colored sticks, your kids will enjoy playing with patterns!


Using a Q-tip, put wood glue onto a small craft stick and carefully lay it across your door. If you don’t have small craft sticks, you can always cut a normal-sized one in half! It’s best to put at least 2 sticks across, but you can play with the angles and directions that you put them. Remember, fairy doors don’t have to be perfect!


If you don’t plan to paint your door, you can glue a button-handle on now too!

After the glue has dried a good bit, flip your doors over and smear wood glue all across the back for extra support. Let them dry for a few hours or overnight.


Next, if your craft sticks are plain and you want to, paint the doors. We especially like to add glitter paint to ours…helps the fairies and gnomes find the doors of course.


After the paint has dried, glue on button-handles if you have not done so yet. We like to spray our doors with some acrylic sealant as well…makes the wood a little more durable outdoors and gives them a more finished look.

Now for the fun part, hide them around town…or give them to friends! These would make an adorable party favor for both kids and adults! Enjoy!!!


Other posts you may like:

Jam Jar Fairy House /Jam Jar Gnome Home
Doorknob Mushroom-Fairy Houses
Fairy Furniture
DIY Fairy Door…Gnome Door
Fairy Doors & Gnome Doors #2

Lemonade Play Dough

We love scented play dough at Our Beautifully Messy House and summertime is the perfect time to make LEMONADE PLAY DOUGH!

I came up with this recipe a couple weeks ago, while mixing up some play dough to take with us on vacation to the beach. And the kids LOVED it!!! It’s always nice having play dough handy for any down-time whether you’re at the beach with family or you’re having friends over for a play date.

I’ve tried making citrus-scented play dough in the past with lemon extracts and oils, but that summery lemonade scent never comes through. Adding a packet or two of lemonade mix did the trick…it was super-quick and easy and smells delicious! I suggest using a sugar-free lemonade mix (Crystal Light brand works great!) so your play dough doesn’t get super sticky with the added sugar.

When I made our lemonade play dough I wanted to make both yellow and pink dough, so I split the dough and added the food coloring before kneading it. The colors came out just fine! This play dough takes only a few minutes to make, but stored in a gallon-sized bag or an air-tight container, it’ll keep for nearly a year! This recipe makes plenty for 2 or 3 kids to play with!

My tip to keep your kids entertained playing with play dough for longer: Start off with plain play dough. Let them play 15 or 20 minutes, then throw some glitter into the mix. Once their attention starts to drift, add some colorful beads or buttons. Add some measuring cups and kitchen utensils, some lil plastic dinosaurs or army men. Just don’t give them everything at once, instead add to the play dough in intervals…works every time!

Ingredients:

  • 2 cups + 1/2 cup flour
  • 1/2 cup salt
  • 2 Tbsp cream of tartar
  • 2 Tbsp vegetable oil
  • 1.5 cups boiling water
  • food coloring
  • 1-2 packets lemonade mix

First, put the water on to boil. Add a few drops of food coloring to the water (yellow or pink). As the water is heating up, mix 2 cups of flour, salt, cream of tartar and one packet of lemonade mix in a large mixing bowl. Then add and mix the vegetable oil into the flour mixture. Once the water is boiling, add it to the bowl and mix with a spatula. The dough will be a sticky mess while warm. Mix it as best you can, then let it cool off. After a few minutes cooling off, sprinkle your working surface with some of the remaining flour. Dump the play dough onto the flour, adding more flour to the top, and knead the dough. Continue working with the dough, adding a bit of flour as needed, til the dough is not sticky anymore and you’ve reached the desired consistency. If you like, sprinkle in another packet of lemonade mix to dough! Yum yum, Summer!!! Enjoy!

DIY Citrus Stamps

How cute are these DIY CITRUS STAMPS we made this week? They really were simple to make and the outcome is adorable…perfect for Summer! L and I stamped t-shirts, tea towels, and a pillow case for her bed. Just think of the possibilities… You could use this stamping technique to brighten-up party invitations, gift bags, skirts, shorts, a tablecloth, shower curtain…the possibilities are endless (and sweet)!


Materials needed:

  • an orange, lemon, & lime
  • tea towels, t-shirts, etc.
  • knife
  • acrylic or fabric paints
  • flat, plastic lids or plates
  • paper towels
  • parchment paper

If you need to, iron your tea towels or t-shirts first! Protect your work area with parchment paper. (Usually I use cardboard or old newspapers for projects, but with this one I didn’t want the texture of the cardboard to effect the stamping and I didn’t want newspaper to discolor my cloth. Parchment paper was perfect!)

Next, cut your orange, lemon and lime in half with a sharp knife. If you like to, cut a little “handle” in each fruit half…makes stamping easier, especially for kids!


Turn the fruit over onto a paper towel, to soak up some of the juice from the fruits.

Next, squirt your paints onto plastic lids or plates.

Dip the sliced fruit into the paint. Blot it onto a paper towel, if there appears to be too much paint.


And press the fruit gently onto your cloth. Too easy, right!?


We experimented and made some of our tea towels patterned, while others we stamped randomly. The random was definitely our favorite…a little more carefree, like all things “summer” should be!

If you have some prints that are more solid looking (a bit too much paint), don’t fret…just overlap another fruit in another color on top! It will look like you planned it that way all along!


Instead of stamping an entire tablecloth, you can just stamp tea towels and overlap them as we did here. Looks great on their own or with a solid tablecloth underneath!

Too cute, huh!?! Enjoy!!!


Fairy Doors and Gnome Doors (#2)

After making a fairy door out of sticks and hiding it in our neighbor’s garden last Summer, L and I thought we’d spread the fairy love a little farther this year…we’ve been making FAIRY DOORS and GNOME DOORS and hiding them all around town! It’s so much fun surprising the young and the old — just imagine the look on anyone’s face when they’re out in the garden and suddenly discover a teeny, tiny door that wasn’t there before. Ha! These fairy doors are so simple to make and all you need is rocks, paint and clear sealant (which is optional). To draw a little more attention to the fairy doors, we like to leave a tiny button or painted rock trail as well.


Materials needed:

  • medium-sized rocks
  • acrylic paints
  • clear sealant spray (optional)

After cleaning any dirt off your rock, start by painting on a door.

Next, add some windows, if you have room.

If adding any glitter paint, apply that next. We like to paint a little glitter over our windows.

Next, outline the door and windows carefully with black paint. Add a doorknob as well.


Now for my favorite part, paint connecting black lines on the rock, resembling a stone wall.

If you’d like to add a flower pot or lil window box, add one now.

Finally, finish with some green vines, leaves, and flower details.


Once all your paint is dry, you can spray the rocks with a coat of clear sealant to make the fairy doors even more weather resistant. Permanent paint usually doesn’t wash away, but I always like to add a coat of sealant just in case.

Now for the real fun…time to hide your fairy doors and gnome doors. (Gnome doors go on trees, generally speaking.)


I like making some of our fairy doors to resemble our neighbor’s front porches and gardens…


Enjoy!!!


See also this DIY for fairy furniture!


Homemade Sidewalk Chalk

Making SIDEWALK CHALK is so fun and easy, I doubt we’ll ever buy it from a store again! I’ve seen multiple DIYs on making chalk, but they all seem to use toilet paper rolls lined with wax paper or foil…some big complicated mess. I decided to use our silicone molds (the ones we only use for crafts) and the chalk popped out easily, plus it took on some fun and funky shapes! HOMEMADE SIDEWALK CHALK can be made in less than 10 minutes, but it takes 2-3 days to set completely…so give yourself plenty of time!


Materials needed:

  • Plaster of Paris
  • tempera paints
  • water
  • silicone molds
  • paper or plastic cups
  • plastic spoons or craft sticks

First, protect your working area with some newspaper.

The recipe for sidewalk chalk is pretty simple: 50% plaster of paris, 50% liquid (water + paint).

You can measure it out precisely: 1 cup plaster, 3/4 cup water, 1/4 cup paint; or you can do what we did and just “eye ball” it.

Fill up your disposable cups about halfway with plaster.

Add a good squirt of paint.

Then add water. And mix.


Once you have all your chalk mixed up, carefully pour it into the silicone molds.

If you want to mix colors, making a funky tie-dye effect, fill your mold about halfway with one color. Then carefully pour other colors on top.

Set your sidewalk chalk aside for a full day to dry. I suggest placing it near an air vent in your house to speed up the process.


After a day has passed and the chalk looks dry, gently flip the molds over and release the chalk onto some wax paper. (If the chalk is still moist, you can try drying the chalk with a hair dryer too.)

Once the chalk has been removed from the molds, put it aside for another day or two for the chalk to set-up and dry completely. (As you can see, our yellow mixture may have been a little too moist on our first try…it was still sticky when we took it out of the molds. We let the yellow dry for a day longer than the rest, and it colored just fine!)

Now, time to play!!! Aren’t the colors beautiful? Brighter than any sidewalk chalk I’ve ever seen!


Enjoy!!!


DIY Pocket Parachute

What kid doesn’t love throwing a toy parachute around?!! And what parent doesn’t love a toy that costs nothing, takes less than 5 minutes to make, and entertains your kids for hours on end?!! I made this DIY POCKET PARACHUTE for L on a rainy day last week…as soon as there was a break in the weather, we were out the door throwing the parachute all around town. L dropped the parachute off the steps of the old courthouse, a church, the library, a little pavilion stage, and she climbed up a tree and dropped it down as well. This pocket parachute is so simple, so easy, and so much fun!!!


Materials needed:

  • plastic bag
  • food pouch cap
  • string
  • scissors
  • an awl (or screwdriver)

If you don’t have a food pouch cap, a toy wheel, some safety pins, paper clips or a wine cork could be used as well…get creative with what you have on hand!

First, cut the plastic bag into a square at least 12×12 inches.

Cut your string into 4 equal pieces, all approximately 15 inches long.

Using the awl, carefully poke a hole through the center of the food pouch cap.

Also, poke holes into each corner of the square you cut from the plastic bag. Make each hole 1/2 an inch from the edges.

Tie a piece of string onto each corner, using a double knot.


Next, gather all the strings together and tie them together with one overhand knot, about 3 inches from the end.


Thread two of the strings through the center of the food pouch cap and thread the other two through the side. Tie the ends together with a double knot.


Too easy, right? Now time to play!!! It’s just as much fun trying to catch the parachute as it is to throw it!


If your kids are older, they can experiment by making various parachutes…some out of bigger pieces of plastic, longer strings and cutting a hole in the center parachute as well. Enjoy!!!

DIY Pool Toys / DIY Bath Toys

With the pools opening last weekend and the last day of school yesterday, Summertime is here!!! These are some fun DIY POOL TOYS that take just minutes to make. We like to throw ours around, splat them on the pavement and L likes to soak hers in water, then draw with it on the pavement. If you don’t have a pool nearby, just fill up some buckets of water, toss in these fun and funky toys and play a wet and refreshing game of catch in the backyard. So much fun! (Be sure to scroll down to the bottom for some other DIY POOL TOY ideas too!)


Materials needed:

  • 3 sponges
  • 1 elastic hair band
  • scissors

First, cut the sponges long-ways into 3 equal sections.

Next, stack them up.

And lastly, tie a hair band around the pile.


Too easy and so much fun!!!

Other fun and easy pool toy ideas? 

A large paintbrush! Your kids will have a blast painting with water on the pool deck or even outside on the sidewalk.

We love playing with these sensory bottles in the water too! Both the “baby sensory bottles” and the “sparkle bottles” are fun to bounce around. They are quick and easy to make and are fantastic pool toys for the little ones!

Tin Foil Jelly Fish Craft

I love this super cute, jelly fish craft for so many reasons. Our TIN FOIL JELLY FISH were inspired by a trip to the Baltimore Aquarium and the girls’ fascination with “The Jelly Fish Invasion” exhibit. (Super cool…if you are anywhere near Baltimore, go see it!!!) I love that this craft costs nearly nothing to make and L learned all about textures and rubbings while coloring the foil. And I LOVE the way our jelly fish look hanging in our kitchen window. If you can, place them near an air vent…when the air kicks on the jelly fish will come to life, dancing and swimming in the sun!


“The Jelly Fish Invasion” at the Baltimore Aquarium…

Materials needed:

  • tin foil
  • permanent markers
  • egg cartons
  • other small, plastic containers (think applesauce, olives, etc.)
  • string or fishing line
  • painted stick
  • tape
  • scissors
  • paperclips
  • nail or sharp-tipped tool

First, cut your egg carton into little jelly fish shapes.

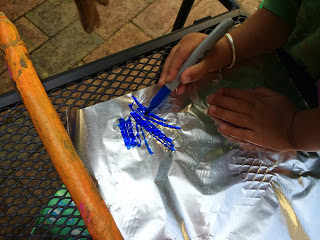
Next, take a few sheets of tin foil and have your children color them. This is a great opportunity to make rubbings. L colored on the patio furniture and bricks, over tree bark, on the textured sidewalk and on her slide. Not entirely necessary, but why not!? Your kids can also try making different patterns if coloring on a flat surface…stripes, dots, swirls, anything goes!


Cut the tin foil into little squares and have your kids wrap the egg carton cut outs with the foil. You may have to help them smooth down the outer edges.


If you have some small, plastic containers to use as well, first poke a hole in the center. Next, cover the containers with the foil too.


Cut strips of tin foil and tape the strips, 2 or 3 at a time, to the inside of your jelly fish.


Using a nail or sharp tool, poke a hole into the top of each jelly fish.

Now, it’s time to hang your jelly fish up. I knew ours would go in our kitchen window, so we hung the jelly fish along a painted stick. You could also make one large jelly fish and hang the smaller ones underneath. That method would be cute if hanging your jelly fish up under a light, in the center of a room.

We hung our jelly fish by stringing them onto fishing line and tying the line to a paperclip underneath each one. Some hung on their own, while others had a second jelly fish hanging underneath. Get creative and have fun with it!


When doing projects like this, it’s definitely easier to have the jelly fish hanging while you are tying them on rather than laying flat on the ground.

Put them up to display and enjoy!!!


Giant Bubble Wands and a Homemade Bubble Solution Recipe

Did you ever make these GIANT BUBBLES when you were a kid? My siblings and I loved making them way back when! Recently, we had a bubble kit given to us with a wand included, but it was too big for L to do on her own…so, of course, I had to brainstorm and make a wand she could use as well! The best part about it was we already had all the materials we needed. If you don’t have two rulers to use, two large mixing spoons or spatulas would probably work great too…anything with a hole at the end of the handle. Be sure to scroll down to the bottom for the HOMEMADE BUBBLE SOLUTION RECIPE. It’s better than any store-bought variety and takes only a minute to make!

Materials Needed:

  • 2 plastic rulers
  • yarn, 3-6 feet long
  • binder ring, shower curtain ring, or a keychain ring
  • homemade bubble solution (See below)

First, cut the string to suit your size…the shorter the person, the shorter the string!

Next, thread the ring onto the string and tie both ends together with an overhand knot.

Thread a loop of yarn through the hole on one end of a ruler. Bring the loop up and over the opposite end of the ruler and pull it tight. (See pictures.)


Attach the other ruler the same way, leaving about 1 to 2 feet of yarn between the two rulers.

With the bubble solution in a large bowl or container, gently lower the yarn into the liquid. Make sure the yarn is soaked through.

Next, carefully lift the yarn out of the bubble solution. Slowly and steadily, spread the rulers apart while walking backwards. If there is a breeze, make sure the wind is blowing on your back.

To close the ginormous bubble, carefully bring the rulers together again. So cool!!!


HOMEMADE BUBBLE SOLUTION RECIPE

Ingredients:

  • warm water
  • sugar
  • dish soap

Materials:

  • measuring cup
  • Tablespoon measuring spoon
  • medium bowl or container
  • spoon

Put one Tablespoon of sugar into your bowl or container. Pour 200 ml of warm water on top of the sugar and mix until all the sugar is dissolved. Add 50 ml of dish soap (30 ml if using ultra dish-washing detergent) and mix. Finally, add 300 ml of warm water to the mixture and mix.

That’s it! This bubble solution is the best we’ve ever made!


Have fun!!!

Be sure to check out our BUBBLE BLOBS & BUBBLE WORMS page too!


Doorknob Mushroom-Fairy Houses

Aren’t these DOORKNOB MUSHROOM-FAIRY HOUSES the cutest??? I originally planned to just make mushrooms out of these little wooden knobs, but I just had to paint a little door and window on too. They’re just so sweet! L painted hers knobs into multi-colored mushrooms today and they are already out in the garden! So easy and so much fun!


Materials needed:

  • small wooden knobs w/ screws
  • acrylic paint
  • sealant spray
  • egg carton (optional)

First, twist the screw into the knobs.

Next, paint your knobs. You can paint them to look like mushrooms or add a few extra details for a fairy house. Even a 3 year old can paint the knob to look like a cute, lil mushroom!


After your knobs are painted, set them aside to dry. I suggest using an egg carton to prop the knobs up. Next, take them outside to spray with a coat of sealant. (The egg carton works great for this step too!)

Now for the fun part…tuck them away into your fairy garden, in a flower pot or in a wreath. Keep the screws in, just push them into the ground. Adorable! Might as well make a couple extra for family and friends!


If you like this one, you’ll be sure to like our JAM JAR FAIRY HOUSES and GNOME HOMES too!