Pumpkin Jar Craft

I am so excited that October is finally here and we can start doing some Halloween crafts around our house! This PUMPKIN JAR CRAFT was inspired by the Jam Jar Fairy Houses we made last Spring. It’s a very similar concept! While many people think hot glue guns are just for gluing things together, we like to use them to add texture to our crafts as well. The hot glue gives our pumpkin jars a true, warty pumpkin appearance! I love the way they look with and without jack-o-lantern faces, in the day and at night! Too cute!!!


2015-10-01 20.22.19


Materials needed:

  • jars, various sizes
  • hot glue gun and glue
  • acrylic paint
  • green, glitter spray paint
  • battery-operated tea lights


DSC_0106


First, decide whether or not you’d like jack-o-lantern faces on your jars. I really liked our mixed…two with, one without. If you’re putting a face on your jar, carefully do that first with the hot glue gun. One great thing about hot glue gun glue: if you make a mistake, simply let the glue cool completely, then peel it off and start again!


DSC_0108


Next, fill in the spaces and go around the jar with long, vertical stripes of hot glue. It certainly doesn’t need to be perfect…no two pumpkins are ever alike!


DSC_0111


After the glue has cooled completely, paint the inside of the jar yellow, where the face shines through.


DSC_0157

DSC_0161


Now, paint the exterior of the jar orange. We painted ours with a mix of yellow and orange to give the pumpkins varying hues. Be careful around the face!


DSC_0162

DSC_0164

DSC_0175


The pumpkins without jack-o-lantern faces are perfect for your littles to paint!


DSC_0167

DSC_0171


As the jars dry, spray your lids with glittery, green spray paint. Do this outside or in a well-ventilated area. If you don’t have spray paint, green acrylics would work fine too!


DSC_0179


After the lids have dried, screw them on top your jars and your pumpkin jars are complete! Now for the fun part…find a place to display your pumpkins for everyone to enjoy! At nighttime, place a battery-operated tea light inside each jar to bring your pumpkins to life!


DSC_0224

DSC_0190

DSC_0192


Are they cute or what? Enjoy!!!

DIY Jacob’s Ladder Toy

I really wanted to make L a Jacob’s Ladder Toy, but didn’t want to make a trip to the local hardware or craft store for supplies. So, we made this Jacob’s Ladder out of an old board book! (If you don’t have a board book they are easy to find at the dollar store.) I just love the outcome! This one is super-colorful compared to the wooden one I had as a kid and is just as much fun!

DSC_0095

I loved playing with my Jacob’s Ladder when I was young…it’s such a unique toy! Flip-flopping it back and forth is very calming, but it also makes you think creatively and problem solve. I enjoyed watching L play with the one we made today…not only was she ecstatic when she finally figured out how to work a Jacob’s Ladder, but she was also folding it into shapes, pretending it was a snake, a bracelet and a funky hat.

DSC_0102

DSC_0100

Materials needed:

  • board book
  • 3 pieces of ribbon (35 inches long each)
  • glue
  • box cutter
  • paper cutter (optional)
  • scissors

DSC_0016

First, using a box cutter, disassemble your board book.

DSC_0018

Next, measure the dimensions of one page and decide how best to cut it. The book I used was 7 in x 7 in. I chose to cut the pages down the middle in one direction and into thirds going the other direction. Each piece ended up being 3.5 in x 2.25 in. If you have a paper cutter on hand, it makes this step super quick and easy! I cut up 4 pages, leaving me with 24 pieces.

DSC_0022

DSC_0023

DSC_0026

Once you have 24 pieces cut, sort them into “nice” and “ugly” piles, 12 cards in each pile. The “ugly” cards won’t be seen.

DSC_0027

Next, glue each “nice” card to an “ugly” card with a thin layer of wood glue. Put some canned food on top of the cards to keep them flat and clamped down for the first few minutes, while the glue is setting. Once they are all glued, let them dry for an hour or two. You should now have 12, double-stacked cards.

DSC_0028

DSC_0032

Now, time to make that Jacob’s Ladder! Lay one card-stack in front of you, “nice” side down. Spread a thin layer of glue on top of the card-stack. Place the ends of all three strips of ribbon onto the card-stack. As you can see in the photos, two of the ribbons spread out into one direction and the other ribbon to the opposite direction.

DSC_0034

DSC_0035

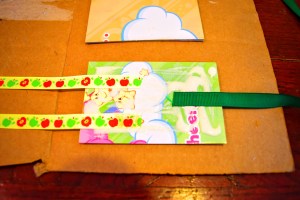
Spread a dab of glue on each ribbon end and press another card-stack carefully on top, “nice” side up.

DSC_0037

Fold all the ribbons over the top of the cards and to the opposite direction. Pulling them taut, place another card-stack on top of the ribbons, “nice” side down.

DSC_0038

DSC_0039

DSC_0040

Spread a thin layer of glue on the card-stack and fold the ribbons over, keeping them pulled taut much as possible. You can press the ribbons down into the glue to hold them in place.

DSC_0041

DSC_0042

Spread a dab of glue on top of the ribbons, and press another card-stack on top, “nice” side up.

DSC_0044

DSC_0045

DSC_0046

Folding the ribbons over again, repeat the last three steps, until you reach the last card-stack and the end of your ribbon.

DSC_0048

Trim the ribbon, pull it taut, and glue it in between the last two card-stacks.

DSC_0049

DSC_0050

DSC_0051

DSC_0052

Place a can of food on top of the entire Jacob’s Ladder Toy and allow the glue to dry completely for an hour or two.

DSC_0053

Now, time to play!!! If you’ve never used a Jacob’s Ladder before, you flip the top card to one side and let gravity do the rest of the work. The card’s flip-flop down, one after another, like magic in your own hands!

DSC_0076

DSC_0088

DSC_0104

Enjoy!!!

DIY Toy Sail Boat

One evening this summer, while we were getting ready for bath time, L pulled a wine cork out of her pocket. She had been saving it all day to float it around and play with in the bath tub. That got me thinking…I knew with a few toothpicks and some leaves we could turn her wine cork into a little sail boat! Leaves work great for this project, because they’re naturally water-proof and easily replaceable!

IMG_3614

IMG_3642

Materials needed:

  • 2 wine corks
  • 4 toothpicks
  • 2 leaves
  • old pencil
  • scissors

IMG_3574

Take one of the wine corks and stick three toothpicks into it, all pointing in the same direction in a line.

IMG_3576

Next, push the second wine cork into the opposite ends of the toothpicks.

IMG_3577

Stick one more toothpick vertically into the middle of one of the corks.

IMG_3578

Find a medium-sized leaf and weave it through the bottom toothpicks. We used a balloon flower leaf. This step isn’t necessary, but it makes a nice lil bed for anything you may want to sail on top…a bug, a rock, a fairy friend.

IMG_3585

IMG_3579

Next, find a slightly larger leaf and thread it onto the vertical toothpick, making a sail. We found the hosta leaves to work best for this, though any thick and sturdy leaf will do!

IMG_3582

To make the sail boat safer for little hands, twist an eraser off the top of an old pencil. Cut it in half with scissors and push it onto the top of the sail.

IMG_3580


IMG_3581


IMG_3584

Now, time to play! L had hours of fun blowing her boats around our rain barrel!

IMG_3589


IMG_3609


IMG_3613

The boats may not seem like much, but ours withstood some submarine plunges under the water and lasted through two nights of bath time play! Tomorrow, we’ll replace the leaves and keep sailing!

IMG_3656


IMG_3662


IMG_3659

Enjoy!!!

Coffee Can Stilts

A few weeks ago a family friend called me up to ask if I had a use for a bunch of old coffee cans. While I was a little afraid to tell my husband that I had said “yes” to accepting such a large bag of junk, taking up more room in our house, I was over-the-moon excited to be acquiring these cans! I knew just what we’d use them for…COFFEE CAN STILTS!!! These are so quick and easy to make and are so much fun for the kids! Walking on stilts is all L wants to do these days!!! “I can almost touch the sky from up here, Mom!”

IMG_3564

IMG_3542

Materials needed:

  • 2 coffee cans
  • church key can opener
  • rope
  • scissors
  • paint (optional)
  • acrylic sealant (optional)

IMG_3522

First, if you want your stilts to be colorful, have your little ones paint the cans with acrylic paints. After the paint has dried, spray on a coat of acrylic sealant to give the cans a glossy finish.

IMG_3524

IMG_3526

Next, using a church key can opener, make two holes on the bottoms of the cans. The holes should be opposite each other. Try to bend the metal all the way back inside the can, so no sharp points protrude out. (Your kids shouldn’t have their hands inside the cans at anytime, but you never know when the curious ones may take off the lid while playing and reach inside…so, better safe than sorry!)

IMG_3533

IMG_3532

Cut two pieces of rope. To find the correct length, have your kid stand on the rope, holding both ends in his or her hands pulled up to chest-level. This is a good place to cut it. After the stilts are assembled, the rope handles should reach your child’s waist.

IMG_3530

IMG_3531

Thread the rope into the holes of the can from the outside. Once both ends are pulled through, tie a knot in each end. Repeat on the second can.

IMG_3535

IMG_3536

IMG_3538

IMG_3540

Place the lids back onto the cans and flip them over. Having the lids isn’t a necessity, but it may save your floors from being scratched up while your children walk around inside. Now, time to play!!!

IMG_3539

As your little ones practice, they’ll get better and better at walking on their stilts and they’ll be oh-so-proud!!! Future circus performers, anyone?

IMG_3561

IMG_3553

Talk about good hand-eye-FOOT coordination! Enjoy!!!

IMG_3567

IMG_3557

Spice Jar Stencils

So maybe I’m a bit obsessed with using everything I find for crafting purposes…but L loves her SPICE JAR STENCILS so much, I just had to share! I usually turn our old spice jars into terrariums, but toss the little plastic lids with holes. Lately I’ve been saving them though, giving the lids to L to use as stencils!

We’ve found that markers work best for this craft. If you color the dots, then rotate the stencils carefully and color more dots, you can make all kinds of flower or sunshine patterns!


You’ll be amazed how quickly your children will perfect the stenciling technique. At first, L had trouble holding the stencil in place while coloring in all the dots, but within 5 minutes of playing with it she had no problem!


I was happy just making flowers, but her 3 year old creativity expanded our flowers into sunshines and even fireworks! I love watching little minds at work!

Really this is a super simple activity, but your little ones will love it nonetheless! Enjoy!

5 Rainy Day, Bouncy Ball Games

It wasn’t a “rainy day” here today, but it might as well have been! L was having fun, being a kid, over the weekend and ended up with stitches in her forehead…so, no swimming for the week while temps are in the upper 90s. Yuck! We had a ball this morning though (every pun intended) playing with a little, sparkly bouncy ball and some paper cups…kept us entertained for hours! You really could play these games anytime and just about anywhere!


Materials needed:

  • bouncy ball
  • paper cups

Game #1 (our favorite!): Catch the Ball

This can be a one person game or multi-person game.
One person drops the ball, bouncing it on the ground, and everyone tries to catch it in their cup. This is a great activity for little ones to learn and practice hand-eye coordination!


Game #2: Find the Ball

This game can be played various ways. You can perform the classic challenge, where you hide the ball under one of three cups and move them all around. The other person watches and then guess which cup the ball is underneath.  Or, you can have 5 or 6 cups laid out, upside down. One person turns their back on the game, while the other person hides the ball under a cup. It’s fun to move the cups around into various shapes and patterns as well, while hiding the ball.


Game #3: Stack and Find

Take turns stacking the cups and hiding the ball inside. The other person is left to guess which cup the ball is in.


Game #4: Bounce into the Cup

Put the cups out onto the floor. Take turns tossing or bouncing the ball, trying to get it into a cup. Getting it into a cup isn’t too hard, but doing it gently enough so the cup stays upright is!


Game #5: Hungry, Hungry Hippos

Sit facing each other, with your feet touching, making a diamond-shape with your legs. Drop the ball, bouncing it in front of both players. Each person tries to cover up the ball, catching it underneath a cup. This game reminded me of “Hungry, Hungry Hippos”…hence the name. Enjoy!


What other games do your kids like to play involving bouncy balls?

DIY Toy Catapult

What kid (or adult) doesn’t love launching things through the air? This DIY TOY CATAPULT takes only minutes to put together and your kids will play with it for hours…days even! I love how kids naturally experiment while playing with this toy. Even as young as three, L was moving the can (the fulcrum) around, placing the balls in various slots, and went on to launch her toy parachute, as well as her shoes! So much fun!!!


Materials needed:

  • yard stick
  • can of food
  • egg carton
  • scissors
  • hot glue gun
  • permanent markers (optional)

 Things to launch:

  • ping pong balls
  • pom poms
  • -cotton balls
  • DIY Pocket Parachute
  • plastic figurines (fairies, dinosaurs, army men)
  • marshmallows or cereal (to catch in one’s mouth)

First, cut your egg carton in half.

Using a hot glue gun, glue the egg carton onto one end of your yard stick. (Don’t worry…when your kids are done playing with their catapult, the egg carton and glue should peel right off the yard stick! I take ours apart every time we’re finished playing with it!)


Next, number your egg carton slots and your ping pong balls. This step is optional, but it makes it easy to keep track of what ball goes the farthest and which slots you’re putting things into…especially if you’re launching multiple balls at once!


The set-up of your catapult is easy…just place the can on it’s side in the grass (keeps it from rolling) and place the yardstick on top. Fill the slots with your projectiles!


Now, time to play!!!

Launching balls…


 Parachutes…


 And L’s shoes…


What will you all send flying through the air???

If your kids like the catapult, they’ll definitely love making POCKET PARACHUTES…another “make something from nothing” craft! Enjoy!


Splatter Paint Fun!!!

While SPLATTER PAINT FUN! can be done anytime of the year, we thought it would be an exceptional craft to do on the 4th of July! This can get messy, so be sure to cover your work area with old newspapers or, better yet, take it outside! I helped L with the cut-outs, but let her do most of the splattering on her own. It’s so much fun splattering paint, I bet you’ll want to join in the fun too!

Materials needed: 

  • toothbrush and/or kitchen scrub brush
  • paint
  • construction paper
  • old cereal box
  • scissors
  • old newspapers, towels, etc.

First, cover your work area with old newspapers. After all, the paint will splatter!

Next, cut some fun shapes out of your old cereal box. We did some wavy stripes, stars, and a city skyline for the 4th of July.

Lay the shapes atop your construction paper. You can do all the shapes at once or, as we did, layer them.

Next, dip your toothbrush bristles into paint. Facing the toothbrush downwards (bristles facing the paper) have your kids run their fingers along the bottom of the brush splattering the paint. When splattering around shapes, the more the better!


After splattering is complete, remove cardboard shapes carefully.

If layering paint and patterns, you can now lay more shapes down and splatter with a different color of paint.


Experiment! Have fun! Make messes!


With the kitchen brush, we didn’t “splatter” necessarily. (But you could!) Instead, L dipped the brush into paint and then pushed the bristles down on her paper to make her own, unique fireworks display! So cute and easy!


For more fun painting ideas check out our page “10 New Ways to Paint“! Enjoy!!!

Fairy Doors and Gnome Doors (#2)

After making a fairy door out of sticks and hiding it in our neighbor’s garden last Summer, L and I thought we’d spread the fairy love a little farther this year…we’ve been making FAIRY DOORS and GNOME DOORS and hiding them all around town! It’s so much fun surprising the young and the old — just imagine the look on anyone’s face when they’re out in the garden and suddenly discover a teeny, tiny door that wasn’t there before. Ha! These fairy doors are so simple to make and all you need is rocks, paint and clear sealant (which is optional). To draw a little more attention to the fairy doors, we like to leave a tiny button or painted rock trail as well.


Materials needed:

  • medium-sized rocks
  • acrylic paints
  • clear sealant spray (optional)

After cleaning any dirt off your rock, start by painting on a door.

Next, add some windows, if you have room.

If adding any glitter paint, apply that next. We like to paint a little glitter over our windows.

Next, outline the door and windows carefully with black paint. Add a doorknob as well.


Now for my favorite part, paint connecting black lines on the rock, resembling a stone wall.

If you’d like to add a flower pot or lil window box, add one now.

Finally, finish with some green vines, leaves, and flower details.


Once all your paint is dry, you can spray the rocks with a coat of clear sealant to make the fairy doors even more weather resistant. Permanent paint usually doesn’t wash away, but I always like to add a coat of sealant just in case.

Now for the real fun…time to hide your fairy doors and gnome doors. (Gnome doors go on trees, generally speaking.)


I like making some of our fairy doors to resemble our neighbor’s front porches and gardens…


Enjoy!!!


See also this DIY for fairy furniture!


DIY Pocket Parachute

What kid doesn’t love throwing a toy parachute around?!! And what parent doesn’t love a toy that costs nothing, takes less than 5 minutes to make, and entertains your kids for hours on end?!! I made this DIY POCKET PARACHUTE for L on a rainy day last week…as soon as there was a break in the weather, we were out the door throwing the parachute all around town. L dropped the parachute off the steps of the old courthouse, a church, the library, a little pavilion stage, and she climbed up a tree and dropped it down as well. This pocket parachute is so simple, so easy, and so much fun!!!


Materials needed:

  • plastic bag
  • food pouch cap
  • string
  • scissors
  • an awl (or screwdriver)

If you don’t have a food pouch cap, a toy wheel, some safety pins, paper clips or a wine cork could be used as well…get creative with what you have on hand!

First, cut the plastic bag into a square at least 12×12 inches.

Cut your string into 4 equal pieces, all approximately 15 inches long.

Using the awl, carefully poke a hole through the center of the food pouch cap.

Also, poke holes into each corner of the square you cut from the plastic bag. Make each hole 1/2 an inch from the edges.

Tie a piece of string onto each corner, using a double knot.


Next, gather all the strings together and tie them together with one overhand knot, about 3 inches from the end.


Thread two of the strings through the center of the food pouch cap and thread the other two through the side. Tie the ends together with a double knot.


Too easy, right? Now time to play!!! It’s just as much fun trying to catch the parachute as it is to throw it!


If your kids are older, they can experiment by making various parachutes…some out of bigger pieces of plastic, longer strings and cutting a hole in the center parachute as well. Enjoy!!!