5 Rainy Day, Bouncy Ball Games

It wasn’t a “rainy day” here today, but it might as well have been! L was having fun, being a kid, over the weekend and ended up with stitches in her forehead…so, no swimming for the week while temps are in the upper 90s. Yuck! We had a ball this morning though (every pun intended) playing with a little, sparkly bouncy ball and some paper cups…kept us entertained for hours! You really could play these games anytime and just about anywhere!


Materials needed:

  • bouncy ball
  • paper cups

Game #1 (our favorite!): Catch the Ball

This can be a one person game or multi-person game.
One person drops the ball, bouncing it on the ground, and everyone tries to catch it in their cup. This is a great activity for little ones to learn and practice hand-eye coordination!


Game #2: Find the Ball

This game can be played various ways. You can perform the classic challenge, where you hide the ball under one of three cups and move them all around. The other person watches and then guess which cup the ball is underneath.  Or, you can have 5 or 6 cups laid out, upside down. One person turns their back on the game, while the other person hides the ball under a cup. It’s fun to move the cups around into various shapes and patterns as well, while hiding the ball.


Game #3: Stack and Find

Take turns stacking the cups and hiding the ball inside. The other person is left to guess which cup the ball is in.


Game #4: Bounce into the Cup

Put the cups out onto the floor. Take turns tossing or bouncing the ball, trying to get it into a cup. Getting it into a cup isn’t too hard, but doing it gently enough so the cup stays upright is!


Game #5: Hungry, Hungry Hippos

Sit facing each other, with your feet touching, making a diamond-shape with your legs. Drop the ball, bouncing it in front of both players. Each person tries to cover up the ball, catching it underneath a cup. This game reminded me of “Hungry, Hungry Hippos”…hence the name. Enjoy!


What other games do your kids like to play involving bouncy balls?

DIY Toy Catapult

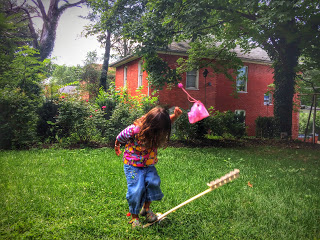
What kid (or adult) doesn’t love launching things through the air? This DIY TOY CATAPULT takes only minutes to put together and your kids will play with it for hours…days even! I love how kids naturally experiment while playing with this toy. Even as young as three, L was moving the can (the fulcrum) around, placing the balls in various slots, and went on to launch her toy parachute, as well as her shoes! So much fun!!!


Materials needed:

  • yard stick
  • can of food
  • egg carton
  • scissors
  • hot glue gun
  • permanent markers (optional)

 Things to launch:

  • ping pong balls
  • pom poms
  • -cotton balls
  • DIY Pocket Parachute
  • plastic figurines (fairies, dinosaurs, army men)
  • marshmallows or cereal (to catch in one’s mouth)

First, cut your egg carton in half.

Using a hot glue gun, glue the egg carton onto one end of your yard stick. (Don’t worry…when your kids are done playing with their catapult, the egg carton and glue should peel right off the yard stick! I take ours apart every time we’re finished playing with it!)


Next, number your egg carton slots and your ping pong balls. This step is optional, but it makes it easy to keep track of what ball goes the farthest and which slots you’re putting things into…especially if you’re launching multiple balls at once!


The set-up of your catapult is easy…just place the can on it’s side in the grass (keeps it from rolling) and place the yardstick on top. Fill the slots with your projectiles!


Now, time to play!!!

Launching balls…


 Parachutes…


 And L’s shoes…


What will you all send flying through the air???

If your kids like the catapult, they’ll definitely love making POCKET PARACHUTES…another “make something from nothing” craft! Enjoy!


DIY Citrus Stamps

How cute are these DIY CITRUS STAMPS we made this week? They really were simple to make and the outcome is adorable…perfect for Summer! L and I stamped t-shirts, tea towels, and a pillow case for her bed. Just think of the possibilities… You could use this stamping technique to brighten-up party invitations, gift bags, skirts, shorts, a tablecloth, shower curtain…the possibilities are endless (and sweet)!


Materials needed:

  • an orange, lemon, & lime
  • tea towels, t-shirts, etc.
  • knife
  • acrylic or fabric paints
  • flat, plastic lids or plates
  • paper towels
  • parchment paper

If you need to, iron your tea towels or t-shirts first! Protect your work area with parchment paper. (Usually I use cardboard or old newspapers for projects, but with this one I didn’t want the texture of the cardboard to effect the stamping and I didn’t want newspaper to discolor my cloth. Parchment paper was perfect!)

Next, cut your orange, lemon and lime in half with a sharp knife. If you like to, cut a little “handle” in each fruit half…makes stamping easier, especially for kids!


Turn the fruit over onto a paper towel, to soak up some of the juice from the fruits.

Next, squirt your paints onto plastic lids or plates.

Dip the sliced fruit into the paint. Blot it onto a paper towel, if there appears to be too much paint.


And press the fruit gently onto your cloth. Too easy, right!?


We experimented and made some of our tea towels patterned, while others we stamped randomly. The random was definitely our favorite…a little more carefree, like all things “summer” should be!

If you have some prints that are more solid looking (a bit too much paint), don’t fret…just overlap another fruit in another color on top! It will look like you planned it that way all along!


Instead of stamping an entire tablecloth, you can just stamp tea towels and overlap them as we did here. Looks great on their own or with a solid tablecloth underneath!

Too cute, huh!?! Enjoy!!!


Splatter Paint Fun!!!

While SPLATTER PAINT FUN! can be done anytime of the year, we thought it would be an exceptional craft to do on the 4th of July! This can get messy, so be sure to cover your work area with old newspapers or, better yet, take it outside! I helped L with the cut-outs, but let her do most of the splattering on her own. It’s so much fun splattering paint, I bet you’ll want to join in the fun too!

Materials needed: 

  • toothbrush and/or kitchen scrub brush
  • paint
  • construction paper
  • old cereal box
  • scissors
  • old newspapers, towels, etc.

First, cover your work area with old newspapers. After all, the paint will splatter!

Next, cut some fun shapes out of your old cereal box. We did some wavy stripes, stars, and a city skyline for the 4th of July.

Lay the shapes atop your construction paper. You can do all the shapes at once or, as we did, layer them.

Next, dip your toothbrush bristles into paint. Facing the toothbrush downwards (bristles facing the paper) have your kids run their fingers along the bottom of the brush splattering the paint. When splattering around shapes, the more the better!


After splattering is complete, remove cardboard shapes carefully.

If layering paint and patterns, you can now lay more shapes down and splatter with a different color of paint.


Experiment! Have fun! Make messes!


With the kitchen brush, we didn’t “splatter” necessarily. (But you could!) Instead, L dipped the brush into paint and then pushed the bristles down on her paper to make her own, unique fireworks display! So cute and easy!


For more fun painting ideas check out our page “10 New Ways to Paint“! Enjoy!!!

Fairy Doors and Gnome Doors (#2)

After making a fairy door out of sticks and hiding it in our neighbor’s garden last Summer, L and I thought we’d spread the fairy love a little farther this year…we’ve been making FAIRY DOORS and GNOME DOORS and hiding them all around town! It’s so much fun surprising the young and the old — just imagine the look on anyone’s face when they’re out in the garden and suddenly discover a teeny, tiny door that wasn’t there before. Ha! These fairy doors are so simple to make and all you need is rocks, paint and clear sealant (which is optional). To draw a little more attention to the fairy doors, we like to leave a tiny button or painted rock trail as well.


Materials needed:

  • medium-sized rocks
  • acrylic paints
  • clear sealant spray (optional)

After cleaning any dirt off your rock, start by painting on a door.

Next, add some windows, if you have room.

If adding any glitter paint, apply that next. We like to paint a little glitter over our windows.

Next, outline the door and windows carefully with black paint. Add a doorknob as well.


Now for my favorite part, paint connecting black lines on the rock, resembling a stone wall.

If you’d like to add a flower pot or lil window box, add one now.

Finally, finish with some green vines, leaves, and flower details.


Once all your paint is dry, you can spray the rocks with a coat of clear sealant to make the fairy doors even more weather resistant. Permanent paint usually doesn’t wash away, but I always like to add a coat of sealant just in case.

Now for the real fun…time to hide your fairy doors and gnome doors. (Gnome doors go on trees, generally speaking.)


I like making some of our fairy doors to resemble our neighbor’s front porches and gardens…


Enjoy!!!


See also this DIY for fairy furniture!


Homemade Sidewalk Chalk

Making SIDEWALK CHALK is so fun and easy, I doubt we’ll ever buy it from a store again! I’ve seen multiple DIYs on making chalk, but they all seem to use toilet paper rolls lined with wax paper or foil…some big complicated mess. I decided to use our silicone molds (the ones we only use for crafts) and the chalk popped out easily, plus it took on some fun and funky shapes! HOMEMADE SIDEWALK CHALK can be made in less than 10 minutes, but it takes 2-3 days to set completely…so give yourself plenty of time!


Materials needed:

  • Plaster of Paris
  • tempera paints
  • water
  • silicone molds
  • paper or plastic cups
  • plastic spoons or craft sticks

First, protect your working area with some newspaper.

The recipe for sidewalk chalk is pretty simple: 50% plaster of paris, 50% liquid (water + paint).

You can measure it out precisely: 1 cup plaster, 3/4 cup water, 1/4 cup paint; or you can do what we did and just “eye ball” it.

Fill up your disposable cups about halfway with plaster.

Add a good squirt of paint.

Then add water. And mix.


Once you have all your chalk mixed up, carefully pour it into the silicone molds.

If you want to mix colors, making a funky tie-dye effect, fill your mold about halfway with one color. Then carefully pour other colors on top.

Set your sidewalk chalk aside for a full day to dry. I suggest placing it near an air vent in your house to speed up the process.


After a day has passed and the chalk looks dry, gently flip the molds over and release the chalk onto some wax paper. (If the chalk is still moist, you can try drying the chalk with a hair dryer too.)

Once the chalk has been removed from the molds, put it aside for another day or two for the chalk to set-up and dry completely. (As you can see, our yellow mixture may have been a little too moist on our first try…it was still sticky when we took it out of the molds. We let the yellow dry for a day longer than the rest, and it colored just fine!)

Now, time to play!!! Aren’t the colors beautiful? Brighter than any sidewalk chalk I’ve ever seen!


Enjoy!!!


DIY Pocket Parachute

What kid doesn’t love throwing a toy parachute around?!! And what parent doesn’t love a toy that costs nothing, takes less than 5 minutes to make, and entertains your kids for hours on end?!! I made this DIY POCKET PARACHUTE for L on a rainy day last week…as soon as there was a break in the weather, we were out the door throwing the parachute all around town. L dropped the parachute off the steps of the old courthouse, a church, the library, a little pavilion stage, and she climbed up a tree and dropped it down as well. This pocket parachute is so simple, so easy, and so much fun!!!


Materials needed:

  • plastic bag
  • food pouch cap
  • string
  • scissors
  • an awl (or screwdriver)

If you don’t have a food pouch cap, a toy wheel, some safety pins, paper clips or a wine cork could be used as well…get creative with what you have on hand!

First, cut the plastic bag into a square at least 12×12 inches.

Cut your string into 4 equal pieces, all approximately 15 inches long.

Using the awl, carefully poke a hole through the center of the food pouch cap.

Also, poke holes into each corner of the square you cut from the plastic bag. Make each hole 1/2 an inch from the edges.

Tie a piece of string onto each corner, using a double knot.


Next, gather all the strings together and tie them together with one overhand knot, about 3 inches from the end.


Thread two of the strings through the center of the food pouch cap and thread the other two through the side. Tie the ends together with a double knot.


Too easy, right? Now time to play!!! It’s just as much fun trying to catch the parachute as it is to throw it!


If your kids are older, they can experiment by making various parachutes…some out of bigger pieces of plastic, longer strings and cutting a hole in the center parachute as well. Enjoy!!!

DIY Pool Toys / DIY Bath Toys

With the pools opening last weekend and the last day of school yesterday, Summertime is here!!! These are some fun DIY POOL TOYS that take just minutes to make. We like to throw ours around, splat them on the pavement and L likes to soak hers in water, then draw with it on the pavement. If you don’t have a pool nearby, just fill up some buckets of water, toss in these fun and funky toys and play a wet and refreshing game of catch in the backyard. So much fun! (Be sure to scroll down to the bottom for some other DIY POOL TOY ideas too!)


Materials needed:

  • 3 sponges
  • 1 elastic hair band
  • scissors

First, cut the sponges long-ways into 3 equal sections.

Next, stack them up.

And lastly, tie a hair band around the pile.


Too easy and so much fun!!!

Other fun and easy pool toy ideas? 

A large paintbrush! Your kids will have a blast painting with water on the pool deck or even outside on the sidewalk.

We love playing with these sensory bottles in the water too! Both the “baby sensory bottles” and the “sparkle bottles” are fun to bounce around. They are quick and easy to make and are fantastic pool toys for the little ones!

Tin Foil Jelly Fish Craft

I love this super cute, jelly fish craft for so many reasons. Our TIN FOIL JELLY FISH were inspired by a trip to the Baltimore Aquarium and the girls’ fascination with “The Jelly Fish Invasion” exhibit. (Super cool…if you are anywhere near Baltimore, go see it!!!) I love that this craft costs nearly nothing to make and L learned all about textures and rubbings while coloring the foil. And I LOVE the way our jelly fish look hanging in our kitchen window. If you can, place them near an air vent…when the air kicks on the jelly fish will come to life, dancing and swimming in the sun!


“The Jelly Fish Invasion” at the Baltimore Aquarium…

Materials needed:

  • tin foil
  • permanent markers
  • egg cartons
  • other small, plastic containers (think applesauce, olives, etc.)
  • string or fishing line
  • painted stick
  • tape
  • scissors
  • paperclips
  • nail or sharp-tipped tool

First, cut your egg carton into little jelly fish shapes.

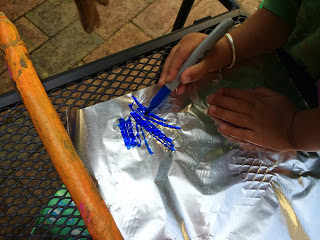
Next, take a few sheets of tin foil and have your children color them. This is a great opportunity to make rubbings. L colored on the patio furniture and bricks, over tree bark, on the textured sidewalk and on her slide. Not entirely necessary, but why not!? Your kids can also try making different patterns if coloring on a flat surface…stripes, dots, swirls, anything goes!


Cut the tin foil into little squares and have your kids wrap the egg carton cut outs with the foil. You may have to help them smooth down the outer edges.


If you have some small, plastic containers to use as well, first poke a hole in the center. Next, cover the containers with the foil too.


Cut strips of tin foil and tape the strips, 2 or 3 at a time, to the inside of your jelly fish.


Using a nail or sharp tool, poke a hole into the top of each jelly fish.

Now, it’s time to hang your jelly fish up. I knew ours would go in our kitchen window, so we hung the jelly fish along a painted stick. You could also make one large jelly fish and hang the smaller ones underneath. That method would be cute if hanging your jelly fish up under a light, in the center of a room.

We hung our jelly fish by stringing them onto fishing line and tying the line to a paperclip underneath each one. Some hung on their own, while others had a second jelly fish hanging underneath. Get creative and have fun with it!


When doing projects like this, it’s definitely easier to have the jelly fish hanging while you are tying them on rather than laying flat on the ground.

Put them up to display and enjoy!!!


Tin Foil River and DIY Boats

This morning the girls and I went to an awesome, little program for kids where we learned about the waterways in our town and L got to make her own toy boat. When we came home I decided to make our own “waterway” in the backyard with some tin foil. Too easy and so much fun!!! All you need is some aluminum foil, water, and some toy boats to float along! I mean, seriously…who wouldn’t like a TIN FOIL RIVER in their yard?


Boat ideas and links:


First, decide which direction you’d like your TIN FOIL RIVER to flow. If your yard or driveway is on a slope, it’s pretty easy to figure out how to get the water to flow…start at the top and end at the bottom. If you yard is flat, you can prop some of the river up or make it in a donut shape. We decided to make ours interesting, starting the river on the slide, having it flow under a chair, and bend and twist across the yard.


Making the waterway is pretty simple…you can be a perfectionist about it and try to make all the sides even or just wham-bam make it, play with it. We tore large strips of aluminum foil and double-layered the foil to prevent any leaks. Fold the sides up. At any joints (places where you’re attaching two sections of foil) you can add another layer of foil underneath. Same with the end of your river…we tried making our sides a little higher and extra-sturdy at the end.


If you need to, you can weigh your foil down with some smooth rocks. Makes fun little obstacles too! If a side of your river starts to sag, it’s pretty easy to prop it up with a brick or flower pot…whatever you have handy. The TIN FOIL RIVER allows for some terrific problem solving and experimenting with your little ones! I can’t wait to see what L comes up with next for our backyard waterway!


Enjoy!