DIY Flower Garden Entrance

I made this FLOWER GARDEN ENTRANCE for WB’s first birthday this week and I just love how it turned out! We put it up in our kitchen, but eventually we’ll move it to brighten up the entrance to her bedroom! A FLOWER GARDEN ENTRANCE is the perfect decoration for birthday parties, tea parties, or anytime you want to bring a little sunshine inside! You could hang it in a doorway or above a window!


IMG_8968

IMG_8966

Materials needed:

  • adjustable shower curtain rod
  • 2 rolls of green tulle
  • silk flowers
  • florist tape
  • hot glue gun and glue
  • piece of string

(Silk flowers are on sale during the winter months at most craft stores…I got these all 50% off!)

IMG_8957


First, I measured the height and width of the doorway where our FLOWER GARDEN ENTRANCE would be. Our house is old with doors of various heights and widths…I wanted to make sure that if I made it in the kitchen doorway it would fit in the doorway to my daughter’s room.

Next, put up the curtain rod and tie a piece of string around the middle. You will thread the tulle through this, so make it not too tight, but not too loose.

IMG_8950


Now thread the tulle through the string, cutting strips in similar lengths. The tulle will travel along the top of the rod and straight down (see the next steps), so measure and cut accordingly.


IMG_8953

IMG_8952


Next, wrap a small scrap of tulle around the middle a few times, tie and cut. You can now remove the string that was holding everything up.


IMG_8954

Do the same at both ends of the curtain rod…wrapping a scrap of tulle around the long tulle strands, tie and cut.


IMG_8955

IMG_8956


Now, figure out where you want your flowers to go. For long stems, I used floral tape to secure them to the curtain rod in various spots. With individual flowers, I just used a hot glue gun to glue them in place. Other smaller stems can be tucked in and behind the rest and may not even need tape or glue.


IMG_8960

IMG_8958

IMG_8959


And finally, pick a few small, delicate flowers to glue in place along the long strands of tulle. My favorite and final touch!

IMG_8964

IMG_8968

IMG_8966

My girls were so excited to find this hanging in the kitchen this morning! Easy, beautiful and fun!!!

Sock Puppets

This craft is as old and simple as they come, but so much fun!!! We often forget about SOCK PUPPETS, though I’m sure most of us played with them as kids! L and I made these sock puppets last week to give away as party favors at our girls’ birthday party. We made two for each kid and they were a big hit!


IMG_8741

IMG_8745


Materials:

  • socks
  • buttons, googlie eyes, sequins, felt, pompoms, bells…
  • hot glue gun and glue

IMG_8733


First, empty your sock drawer! Your kids will love this step, digging and swimming through your socks. Pick out a few pairs that you don’t wear…it’s definitely a bonus if they’re bright and colorful, but plain ol’ white socks work just as well.


IMG_8718

IMG_8730


Next, decorate! We made unicorns, dogs and million-eyed monsters this time around! Get creative and have fun! It’s nearly impossible to mess this one up!


IMG_8741

IMG_8743

IMG_8734

IMG_8750


A fun craft to follow this one, especially with older kids, is decorating some cardboard for a backdrop and putting on a sock puppet play! So much fun!!!

DIY Peppermint Play Dough

While you escape to the bathtub to enjoy your Candy Cane Sugar Scrub you need something to occupy the kids, right? So, here’s my recipe for PEPPERMINT PLAY DOUGH!

This play dough takes only a few minutes to make, but stored in a gallon-sized bag or an air-tight container, it’ll keep for nearly a year! Whenever L has friends or cousins over I love whipping up a batch of play dough…it keeps them happy and busy for at least an hour and I can split the dough in half and send the other kid home with some. This recipe makes plenty for 2 or 3 kids to play with!

A tip to keep your kids entertained playing with play dough for longer: Start off with plain play dough. Let them play 15 or 20 minutes, then throw some glitter into the mix. Once their attention starts to drift, add some colorful beads or buttons. Add some measuring cups and kitchen utensils, some lil plastic dinosaurs or army men. Just don’t give them everything at once, instead add to the play dough in intervals…works every time!


Ingredients:

  • 2 cups + 1/2 cup flour
  • 1/2 cup salt
  • 2 Tbsp cream of tartar
  • 2 Tbsp vegetable oil
  • 1.5 cups boiling water
  • food coloring
  • 1/2 – 1 tsp peppermint oil

First, put the water on to boil. Add about 10 drops of red food coloring to the water. As the water is heating up, mix 2 cups of flour, salt and cream of tartar in a large mixing bowl. Then add and mix the vegetable oil into the flour mixture. Once the water is boiling, add it to the bowl and mix with a spatula. The dough will be a sticky mess while warm. Mix it as best you can, then let it cool off. After a few minutes cooling off, sprinkle your working surface with some of the remaining flour. Dump the play dough onto the flour, adding more flour to the top, and knead the dough. Continue working with the dough, adding a bit of flour as needed, til the dough is not sticky anymore and you’ve reached the desired consistency. Once the play dough is made, fold in the peppermint oil to make a fun smelling PEPPERMINT PLAY DOUGH! Enjoy!


DIY Soap Crayons

Here’s another fun craft for your kids to help make and to play with…L had a ball with her DIY SOAP CRAYONS! They’re a little different than the bath crayons you’ll find at the store…these ones wash off the bath and shower walls easily with water. L likes to color with these ones in the shower before I turn the water on, then she makes a nice soapy, colorful mess once the water is on. They’re fun for coloring on your skin too…just add warm water and it washes right off!

Materials needed:

  • bar of white soap
  • cheese grater
  • food coloring
  • 2 to 4 tablespoons hot water
  • fork and spoon
  • ice cube tray, muffin tin, paper cups or candy mold

First, grate the bar of soap into a large bowl. Grate the entire bar, making about 2 cups of soap shavings.


Add 2-4 tablespoons of hot tap water to the soap and mix-mash with a fork or spoon. Continue mixing until the soap has formed a semi-liquid consistency without any big lumps.


Spoon the soap into your molds. Add about 5 drops of food coloring to each one and mix carefully with a spoon. We found that a baby spoon worked great for this step!


Once your soap crayons are all mixed and colorful, carefully push the soap down evenly into the molds. Set them aside to dry for a full week.

After a week has passed and the crayons have hardened, carefully turn the molds over and pop the crayons out. If their underside is still a little soft, let them finish drying for a few more hours.


(We saved all the little colorful crumbs too…added to a bubble bath or some shaving cream, they will make a beautiful rainbow mess!)


Now for the fun part…time to color and play with your own homemade soap crayons!!! Enjoy!!!


Sensory Bottles for Baby

I’ve made sensory bottles for L before, filled with colored water, glue and glitter or colored water and oil, but I don’t know why we never made SENSORY BOTTLES FOR BABIES until now. Babies and toddlers both love them!


The water-filled bottles are fun to look at, but too heavy for WB to really handle safely. Making these SENSORY BOTTLES FOR BABIES was a terrific tactile activity for L, and WB seems to love shaking and playing with the bottles. Not only are they fun to play with around the house and in the car, but sensory bottles make great bath toys too!


Materials needed:

  • small, plastic bottles with lids
  • any of the following: pom-poms, feathers, sequins, straws, ribbon, cereal, dyed rice, etc.
  • glue

Making the bottles is pretty self-explanatory… Remove the label from the bottle. Fill with small, colorful items. Glue the lid shut.

As always, never leave infants unattended with toys, especially if it includes small items. You can never be too safe! Enjoy!!!


Have you seen our DIY Baby Play Area yet??? These bottles would be a great addition!

Gnome Village Advent Calendar

I’m so super-excited about our GNOME VILLAGE ADVENT CALENDAR this year! Starting on the 1st of December the kids will lift up a gnome home each day…the house numbers will correspond with the day. Underneath each house will be a little surprise: a hershey kiss, a candy cane, a miniature ornament for the tree, or a special message. The “special messages” may include,

  • “Make cookies for a neighbor.”
  • “Make Christmas cards for friends and family.”
  • “Leave little notes written in chalk around the neighborhood.”
  • “Make a Gingerbread House today!”


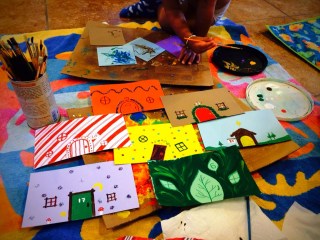
Making the GNOME VILLAGE was a little time consuming, but very easy to make. You could always make your gnome houses very simply with a standard door, windows and house number and they’d look just as cute! Just mix up the colors for some variations!

Materials needed:

  • mulit-colored card stock (or you could use toilet paper rolls)
  • doilies
  • markers and/or paint
  • glitter
  • Elmer’s glue
  • hot glue gun
  • sequins, stickers, etc (optional)

First, cut the card stock in half horizontally, then take about 3 inches off the end. I like using card stock instead of regular construction paper because it doesn’t fade as easily and it’s sturdier. I’m hoping to use our GNOME VILLAGE year after year!

After your paper is cut, it’s time to decorate! We decorated some of our gnome houses with markers, some with paint and embellished them with sequins, jewels and glitter. Have fun and be creative! They certainly don’t all have to be Christmas-y, just colorful!


Once the houses have been colored and painted, shape the paper into little tubes and use a hot glue gun to secure them in place.


To make the gnome house roofs, make a cut to the center of a doily. (I actually used two doilies stacked for a sturdier roof.) Overlap the ends and glue into place…should make a little rooftop-cone.


To add snow to the roofs, very gently roll each roof in Elmer’s glue and then sprinkle with glitter. This was definitely L’s favorite part!


Using the hot glue gun again, attach each rooftop to a house. All done! Pretty easy, huh?


We plan to display our GNOME VILLAGE ADVENT CALENDAR on one of our mantels this year…with a little snow, mini-pine trees, and a few gnomes it will surely become one of our favorite Christmas decorations for years to come! So. Much. Fun! Enjoy!


DIY Floppy Newspaper Hats

Oh, we had so much fun making these FLOPPY NEWSPAPER HATS today! I thought I’d write up this tutorial this weekend, but I just couldn’t wait…they’re just so much fun! If you have little boys in your messy house, please don’t think you can’t make these with them…a hat’s a hat! A floppy hat’s a floppy hat! I’m sure they’ll love them just as much as any girls will! Do it! There will be lots of giggling for sure.

Materials needed:

  • newspaper
  • acrylic paint
  • painters tape
  • tissue paper, poof balls, feathers, etc.
  • white glue

First, prepare your painting area. I taped some trash bags to the floor to protect it from paint…not usually necessary for painting, but the newspaper sheets are just so large.

Next, paint, paint, paint! Paint an entire sheet of newspaper, just one side though. Don’t worry if some  of the newspaper can be seen through the paint, nobody will notice when the hat is finished! Allow the paint to dry completely.


After the paint is dry, lay the paper overtop of another sheet of newspaper…two sheets will make the hat a little more durable. Fold the papers twice, once in each direction, and cut the paper so when you open them back up, you have a circle. The circle really doesn’t have to be perfect, it’ll look great when you’re done!


Next is the tricky part because kids tend to wiggle…lay the paper over your child’s head and scrunch fold it into shape. As you go around, use painters tape to hold the the folds in place. The great thing about painter’s tape is that you can fix any little mistakes and it won’t tear up the paint or paper.


In making WB’s orange hat, I just shaped it around my knee and it worked just fine. I also experimented and used a stapler instead of the painters tape. Stapling worked great and looks fantastic, but it is a little trickier to do. The paper tears a little easier with staples in it too.

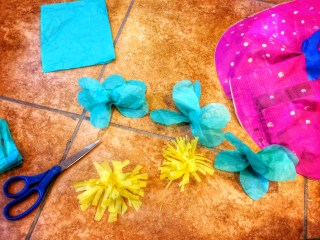
Now to decorate your hat! You can cut flowers out of tissue paper or just cut squares and scrunch them up. If you layer the tissue paper a bit, the flowers are a little fluffier and prettier. You can also glue on poof balls, jewels, feathers, anything you can think of and find around your house!


Super cute, huh!? Forget Easter bonnets, we’ll be wearing these to Thanksgiving dinner!!! That is if they survive a month’s worth of tea parties…


Wouldn’t these be adorable for a birthday party? You could make the hats beforehand and let the kids decorate them at the party…so many fun possibilities! Enjoy!


Pine Cone Flowers

Have I mentioned before how much I love Fall?! So many things to find and create with…like these mini-pine cones! I’ve been thinking of making “pine cone flowers” for months now, and when L and I found these miniature ones it was a done deal.

Materials needed:

  • miniature pine cones
  • twigs (the more lil knobs and branches the better)
  • acrylic paints
  • hot glue gun and glue

First, choose what colors you’d like your “flowers” to be…we choose multi-colored! Paint each little pine cone as you like. Set aside to dry.


Next, paint your twigs a mixture of dark and light greens. Allow to dry.


Once everything is dry, you can assemble your pine cone flowers. Using a hot glue gun, put a little dab of glue on the tip of a twig. Quickly press and hold a pine cone in place. Repeat until all your pine cones are used up.


So cute, huh!? Arranged in a little, antique bottle they make a sweet gift for a child or an adult.

Glue Ghosts

Did you ever make these “glue ghosts” when you were a kid? They were always one of my favorites! This must be one of the simplest Halloween crafts out there! L and I made extras this year so we’d have plenty to make a ghost garland decoration and to make ghost necklaces.

Materials needed:

  • wax paper
  • Elmer’s glue
  • googlie eyes (or permanent markers)
  • paperclips (optional)
  • needle and thread, string or dental floss

First, spread out a piece of wax paper over your working surface. You may want to do this on a silicone cutting board or a tray so it can be moved. (I had no idea that wax paper was slightly porous…when we did this craft the glue seeped through the wax paper a bit and stuck to our kitchen counter. It was no problem, cause Elmer’s glue washes off easily, but the project was stuck to our counter for a few days while we waited for the ghosts to dry. Ha! Just another beautiful mess!)

Next, have your little one squeeze out blobs of glue into ghost shapes.


Wait a few hours for the glue to dry a bit and then gently press in some googlie eyes. If you don’t have googlie eyes, don’t worry…you can always draw a face on the ghosts after they dry with a permanent marker.


At this point, you can also cut a paperclip and press the wire into the ghosts to make hooks. We experimented with this and I personally like the ghosts better without the paperclip-hooks. Instead, you can just use a needle to poke a hole through the ghosts after they’re dried. It’s up to you though..both methods work great!


Now for the waiting-game…wait 2 or 3 days for the ghosts to dry completely before gently peeling them off the wax paper. If you didn’t use paperclip-hooks, now is the time to use a sewing needle to thread some string or floss through your ghosts.


All done! Super easy, huh? Will you wear your “glue ghosts” on a necklace or hang them up in a doorway this Halloween? Enjoy!!!


DIY Story Stones

This is one of my favorite “games” that I’ve made for our girls, as well as one of my favorite gifts to make for other children. It’s such a versatile, quirky activity for kids (or adults) of any age and the possibilities of play are endless. We take them on long car trips, pull them out when friends are over, and use them during quiet-time when WB is sleeping.


I’ve read before that “story stones” come from the Waldorf school of thought, believing that it is far more important to teach children how to creatively weave a story at a young age than it is to teach them how to read and write. After the directions for making story stones, read on for various ways of how to play with them!


Materials needed:

  • colored pencils and paper
  • sticker book (optional)
  • old workbooks with lots of little pictures (optional)
  • scissors
  • smooth stones (found at the dollar store)
  • Mod Podge and sponge-brush

First, spend some time doodling little pictures on white paper. Think about what pictures would make up a good story…include people and animals, active words, weather, vehicles, houses, etc. Try to keep some of your pictures a little bit vague. For instance, instead of drawing a plate of spaghetti you could draw a fork, knife and spoon and the child playing could imagine any kind of meal. A picture of a foot could lead to putting on socks and shoes or it could be used for walking/running. A swirly doodle could be used for wind, but it could also be used for music, dancing, painting, water, etc.

Next, cut out each of your little doodles. If you don’t want to draw your pictures, or you’d like to use various mediums as I do, you can also cut pictures out of old workbooks or children’s dictionaries, or use a sticker book. I tend to look for such books whenever I’m browsing a flea market, antique store, or the dollar store.

After the pictures are cut out and ready, go ahead and wash and dry your rocks. Working one stone at a time, apply a little bit of Mod Podge to the smoothest surface of the rock then lay a picture in place. Apply more Mod Podge over top of the picture, making sure you smooth down all edges and avoid any wrinkles in the paper. Mod Podge dries pretty quickly. After the stones are all dry, I like to go over them all with another thin layer of Mod Podge to give them an even smoother look.


Once the stones are all dry, you’re ready to play!


(In case you want story stones the really easy way and you live in the Winchester area, Steamy’s Cafe on Piccadilly St currently sells story stones…1 for $1 and 20 for $15! They make great gifts!)

Ideas for Play:

SOLO STORY-BUILDING: Take turns building your own stories.

DICTATING STORIES: This is a good one especially with young children…take turns telling a story, while the other person finds the stones and puts them in order.

PARTNER OR GROUP STORIES: Take turns, picking stones and adding to the story.

RANDOM SELECTION – MYSTERY STORY: Turn all the stones over and take turns randomly selecting a stone to build a story.

ONE STONE STORY: Select only one stone at random and make up a whole story revolving around the stone. Or tell a silly sentence using the stone in the sentence.

CLASSIFYING: Put the stones into groups based on theme, color, likes and dislikes, etc.

EXPLORING: Let your child use the stones while playing with blocks or trucks or coloring or playing house. The stones can become pets, cars, food, etc. If the children are having fun imagining, just let them go with it!

What other ways have you found to play with your story stones? Please share with us in the comments below!