Giant Bubble Wands and a Homemade Bubble Solution Recipe

Did you ever make these GIANT BUBBLES when you were a kid? My siblings and I loved making them way back when! Recently, we had a bubble kit given to us with a wand included, but it was too big for L to do on her own…so, of course, I had to brainstorm and make a wand she could use as well! The best part about it was we already had all the materials we needed. If you don’t have two rulers to use, two large mixing spoons or spatulas would probably work great too…anything with a hole at the end of the handle. Be sure to scroll down to the bottom for the HOMEMADE BUBBLE SOLUTION RECIPE. It’s better than any store-bought variety and takes only a minute to make!

Materials Needed:

  • 2 plastic rulers
  • yarn, 3-6 feet long
  • binder ring, shower curtain ring, or a keychain ring
  • homemade bubble solution (See below)

First, cut the string to suit your size…the shorter the person, the shorter the string!

Next, thread the ring onto the string and tie both ends together with an overhand knot.

Thread a loop of yarn through the hole on one end of a ruler. Bring the loop up and over the opposite end of the ruler and pull it tight. (See pictures.)


Attach the other ruler the same way, leaving about 1 to 2 feet of yarn between the two rulers.

With the bubble solution in a large bowl or container, gently lower the yarn into the liquid. Make sure the yarn is soaked through.

Next, carefully lift the yarn out of the bubble solution. Slowly and steadily, spread the rulers apart while walking backwards. If there is a breeze, make sure the wind is blowing on your back.

To close the ginormous bubble, carefully bring the rulers together again. So cool!!!


HOMEMADE BUBBLE SOLUTION RECIPE

Ingredients:

  • warm water
  • sugar
  • dish soap

Materials:

  • measuring cup
  • Tablespoon measuring spoon
  • medium bowl or container
  • spoon

Put one Tablespoon of sugar into your bowl or container. Pour 200 ml of warm water on top of the sugar and mix until all the sugar is dissolved. Add 50 ml of dish soap (30 ml if using ultra dish-washing detergent) and mix. Finally, add 300 ml of warm water to the mixture and mix.

That’s it! This bubble solution is the best we’ve ever made!


Have fun!!!

Be sure to check out our BUBBLE BLOBS & BUBBLE WORMS page too!


The Mud Kitchen

Our MUD KITCHEN might just be my favorite kids’ project yet! I’ve been dreaming of building one for L since late last Summer and this Spring we went for it! Collecting things and building it was definitely fun for me…I love scouring antique shops and junk stores with an idea in mind. And now L has a blast playing in her MUD KITCHEN nearly every day! She’s always loved digging in her dirt pit, so we set the mud kitchen up right beside it.


Materials needed:

  • old pots and pans, muffin pan, mixing bowls, old tea set
  • cooking utensils and/or garden tools
  • old rags
  • shelving unit
  • DIRT!!!

The best places to find things for your MUD KITCHEN are yard sales, flea markets, antique and junk stores. If you find a water-proof set of shelves or little bench, that would work great! We ended up making ours out of some lumber and cinder blocks. L helped sand and paint the wood, I painted two lil burners on the top pieces, and we finished it off with a few coats of polyurethane. I love that L was able to make it her own!


We found this perfect mirror to attach to the kitchen for only $15 at a local antique store. I wanted a mirror for a bit of a “kitchen window” effect, plus it makes our tiny yard look a bit bigger! It was the only one I could find that had a wooden backing to it…most others were particle board or cardboard. Our mud kitchen is up against our house, a little bit protected by the weather, but when it pours rain the kitchen still gets wet. Make sure everything on your kitchen is more-or-less waterproof.

Along with the burners I painted on top of the mud kitchen, we also attached two lil knobs (to turn the stove and oven on, of course)! You can find knobs really cheap at your local Habitat for Humanity or at your local hardware store. Since ours were attached to solid wood, I just glued them on with some superglue. So far it’s worked great!

On the side of our mud kitchen, we attached two cute lil hooks. Again, we found them at a local antique/junk store for $1. They couldn’t be more perfect! L hangs her lil dish rags on there and when she’s all done playing with her kitchen each day, I have her clean it up. She brushes the dirt off with a dry rag, follows up with a wet rag, and she puts all her pots and pans away.


Like many activities like this, my biggest tip to you would be to withhold some of the kitchen supplies, giving your kids a lil more day by day. On the first day I gave L her pot, pan, and mixing bowls. On the second day, we added an empty milk carton, egg carton and vanilla bottle. After that, we threw in a muffin pan and some old silicon muffin cups. I have an old child’s tea set I’m saving for a special day as well. Keep things interesting and mix it up!


Sparkle bottles would be a fun addition to your mud kitchen too! Not to mention, making some potions out there as well. (Tell me I’m not the only one who mixed up “magic potions” with water, dirt, wild onions and herbs as a kid!)

How much would your child LOVE a mud kitchen??? Mmm…mmm…mud pies, mud spaghetti, dirt scrambled eggs, mud muffins…


Rainbow-Shaving Cream Sensory Play

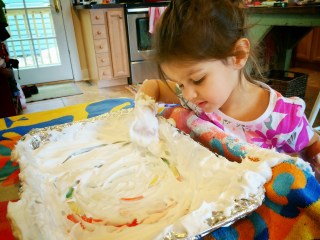
This is such a fun activity for kids and even more fun if you surprise them with it! I prepared our RAINBOW-SHAVING CREAM SENSORY PLAY activity beforehand and when I called L to the kitchen to play, draw and discover she was delighted! She kept saying, “Hey, how’d the rainbow get in here!?!” Like many of our crafts and activities, this one is done with things we already had around the house…so no need to go to the store to buy supplies! For what it’s worth, a can of cheap shaving cream equals hours of fun for kids…we always have one on hand!


Materials needed:

  • large, oven-safe pan
  • aluminum foil
  • broken crayons
  • sharp knife & cutting board
  • oven
  • shaving cream

First, line your pan with aluminum foil. Spread it out as smooth and flat as possible.

Cut your crayons into shavings…we did the colors of the rainbow, but you can do any combination of colors.

Sprinkle the crayon shavings out on the foil-lined pan.

Bake in the oven at 200 degrees F for 5 minutes. Remove from the oven, careful not to tip or shake the pan, and let the pan and crayons cool completely.

Next, squirt shaving cream onto the pan and spread it out evenly…about 1/2 inch thick.


Here comes the fun part…time for your little ones to play!!!


They can practice drawing shapes, writing letters and numbers in the shaving cream.

We had fun taking turns, playing “pictionary” too! Enjoy!!!


I Spy Bottle and Games

How many of you grew up loving the “Where’s Waldo?” books by Martin Handford or the “I Spy” books by Jean Marzollo and Walter Wick? My brothers, sisters and I adored them and now, L enjoys reading them too! The I SPY BOTTLE is very similar in principal and so much fun! It’s a fully contained game…no pieces to lose or to pick up! We take our bottle with us to restaurants on occasion and always on long car trips. The I SPY BOTTLE would be great fun in a classroom too! Be sure to scroll down, after the “how to” I’ve shared a few ideas of games to play.

Materials needed:

  • clear bottle with a wide mouth
  • rice
  • electrical tape
  • lots of small objects

First, remove the label from your bottle and clean and dry it completely. Goo Gone always works great for removing any stickiness and label residue! Fill the bottle a little over halfway with white rice.

Next, drop your objects in. We used beads, a bouncy ball, a plastic ring, spoon, animal figures, a marble, dice, a stamp, buttons, a clothespin, a rubber band, a paperclip, a toy car, keys, a wine cork, and although pictured is a crayon, I switched it out with a paintbrush. I was afraid the crayon would melt if left in the car!


Once the rice and objects are inside the bottle, use electrical tape to seal the lid closed. You could always use super glue, but I was afraid a time would come that we’d want one of the objects locked inside!

Now, time to shake your bottle up and play!!!


Different ways to play:

  • Call out the color of an object…”I spy something green!”…and have the other person find it.
  • Call out the function of an object…”I spy something that makes art!”…”A paintbrush!”
  • Things that rhyme. “I spy something that rhymes with ‘moon.'”…”Spoon!”
  • If your children can read, you could make little cards that go along with the I SPY BOTTLE too. How perfect would that be for a long car ride? Easy entertainment! Enjoy!!!


Moon Dough!

There are lots of recipes out there for MOON DOUGH or, as some like to call it, “cloud dough.” This recipe is one of our favorites! It’s one of the easiest things to make, consisting of only 2 ingredients, and, if stored properly, it will practically keep forever! The consistency of MOON DOUGH is amazing…similar to sand it holds its shape when molded, though at the same time it easily crumbles back into its silky powder form. I have to warn you, it does make a mess…but a glorious, entertain-the-kids-for-an-hour mess! Just put a blanket down on your kitchen floor first or, when the weather is nice, take MOON DOUGH outside!

 IMG_9358

IMG_1820


Ingredients:

  • 1 cup baby oil
  • 4 cups flour

Simply put the baby oil and the flour into a large bowl or plastic container. Using a whisk, spoon or your hands, mix the ingredients together. Easy peasy!!!

 IMG_6554


Fun tools for the kids to play with are spoons, forks, small measuring cups or bowls, a muffin tin, sand castle molds, plastic jewels, straws…

 IMG_9356

IMG_6549

IMG_6553


L enjoys building castles, searching for “treasures,” making pretend cakes, and pretending her lil fairies and dinosaurs are walking on the moon. So much fun!!!

 IMG_6546

IMG_6542

To store MOON DOUGH just put it in an air-tight container…any plastic container with a lid should work just fine…and keep it in a cool, dry place. Enjoy!!!

Sensory Bottles, Sparkle Bottles, Glow-in-the-Dark Bottles, and an Ocean in a Bottle

We love SENSORY BOTTLES at Our Beautifully Messy House and have been experimenting with them for years! There are so many things to do with sensory bottles and sparkle bottles…some people use them as “time-out bottles” to help calm down their toddlers when they’re having a meltdown. We like to play with our SPARKLE BOTTLES outside in the summertime, pulling them around in wagons, burying them in dirt…and inside in the play areas of our house. (Okay, I admit…that’s every room of our house!) We take SENSORY BOTTLES with us on long car rides for simple, quiet entertainment. The kids love to bounce them around in the bathtub as well! The GLOW IN THE DARK BOTTLE is great for helping kids wind down at night and drift off to sleep. So much fun and so many possibilities!!!

 IMG_9308


I find the best, smoothest and cheapest bottles to use (esp. if you don’t drink soda regularly and have a collection already) are the soda water bottles. Just look in the water or beverage aisle of your grocery store, seeking out the cheapest option…usually only $2-$3 for a pack of 6. Instead of dumping the soda water down the drain, entertain your kids with the fun “Raisins + Soda Water Experiment” while you’re mixing up the SENSORY BOTTLES.

IMG_9316

SPARKLE BOTTLES

Materials needed:

  • empty plastic bottle
  • Elmer’s glitter glue
  • glitter, sequins, and/or beads
  • water
  • superglue


IMG_9267

First, put a small pot of water on to boil. When you add the water to the bottle you will want it to be hot, but not boiling. I like to bring the water to a boil, remove from heat and set aside for a few minutes to cool.

Meanwhile, add the Elmer’s glitter glue to the empty bottle…enough to fill the bottom inch or so of the bottle. Next, add some glitter, sequins and/or beads.

IMG_9268

IMG_9264


When the water is ready, carefully pour it into the bottle as well. I like to use a measuring cup or a funnel to make this step easier. Once the bottle is filled, use superglue to secure the lid. Now it’s time to shake, shake, shake!!! Shake the bottle for a few minutes, until all the glue melts into the hot water. You shouldn’t see any globs or streaks of glue once the bottle is complete. While the bottle is warm, the glitter and sequins will fall very quickly to the bottom. Once it cools down completely over the next hour or two, the glitter will fall much slower. So relaxing… I’d like to put myself in “time-out” with one of these bottles, wouldn’t you?


IMG_9321

IMG_9325

GLOW-IN-THE-DARK BOTTLES

Materials needed:

  • empty plastic bottle
  • Elmer’s glitter glue
  • glitter paint
  • glow-in-the-dark paint
  • glitter, sequins, and/or beads
  • glow-in-the-dark stars
  • water
  • superglue


IMG_9272

First, put a small pot of water on to boil. When you add the water to the bottle you will want it to be hot, but not boiling. I like to bring the water to a boil, remove from heat and set aside for a few minutes to cool.

Meanwhile, add the Elmer’s glitter glue to the empty bottle…enough to fill the bottom inch or so of the bottle. Next, add a squirt of glitter paint and a squirt of glow-in-the-dark paint. Add some glitter, sequins and/or beads.


IMG_9273

When the water is ready, carefully pour it into the bottle as well. I like to use a measuring cup or a funnel to make this step easier. Once the bottle is filled, screw the lid on tightly, but don’t superglue it yet. Now it’s time to shake, shake, shake!!! Shake the bottle for a few minutes, until all the glue melts into the hot water. You shouldn’t see any globs or streaks of glue once the bottle is complete. The bottle will be a milky color compared to the SPARKLE BOTTLES because of the glow-in-the-dark paints. Once the bottle is shaken and cooled a bit, add the glow-in-the-dark stars and superglue the lid in place. I guarantee your little one will be excited to go to bed tonight with a GLOW-IN-THE-DARK BOTTLE in hand!!!


IMG_9310

IMG_9296


OCEAN IN A BOTTLE

Materials needed:

  • empty plastic bottle
  • oil (vegetable oil or baby oil)
  • water
  • food coloring
  • superglue


IMG_9269

First, fill the bottle about 1/3 of the way full with water. Add a few drops of food coloring and screw the lid on tight. Shake the bottle a bit until the food coloring is evenly dispersed throughout the water. Next, fill the bottle the rest of the way with oil…using a funnel is best. Superglue the lid onto the bottle. Complete!


IMG_9329


Have fun swishing the bottle from side to side or shaking it all up, just to watch the bubbles of oil pop while the water settles at the bottom and the oil at the top. This is a great time to talk to your kids about the density of liquids as well! It may be a bit over their heads if they’re really young, but you’ll be surprised at what they will comprehend and remember! Basically, the water weighs more (has a higher density) thank the oil and will sink below it in the bottle, no matter how much you shake your OCEAN IN A BOTTLE and attempt to mix the two together. So cool!!!


DIY Peppermint Play Dough

While you escape to the bathtub to enjoy your Candy Cane Sugar Scrub you need something to occupy the kids, right? So, here’s my recipe for PEPPERMINT PLAY DOUGH!

This play dough takes only a few minutes to make, but stored in a gallon-sized bag or an air-tight container, it’ll keep for nearly a year! Whenever L has friends or cousins over I love whipping up a batch of play dough…it keeps them happy and busy for at least an hour and I can split the dough in half and send the other kid home with some. This recipe makes plenty for 2 or 3 kids to play with!

A tip to keep your kids entertained playing with play dough for longer: Start off with plain play dough. Let them play 15 or 20 minutes, then throw some glitter into the mix. Once their attention starts to drift, add some colorful beads or buttons. Add some measuring cups and kitchen utensils, some lil plastic dinosaurs or army men. Just don’t give them everything at once, instead add to the play dough in intervals…works every time!


Ingredients:

  • 2 cups + 1/2 cup flour
  • 1/2 cup salt
  • 2 Tbsp cream of tartar
  • 2 Tbsp vegetable oil
  • 1.5 cups boiling water
  • food coloring
  • 1/2 – 1 tsp peppermint oil

First, put the water on to boil. Add about 10 drops of red food coloring to the water. As the water is heating up, mix 2 cups of flour, salt and cream of tartar in a large mixing bowl. Then add and mix the vegetable oil into the flour mixture. Once the water is boiling, add it to the bowl and mix with a spatula. The dough will be a sticky mess while warm. Mix it as best you can, then let it cool off. After a few minutes cooling off, sprinkle your working surface with some of the remaining flour. Dump the play dough onto the flour, adding more flour to the top, and knead the dough. Continue working with the dough, adding a bit of flour as needed, til the dough is not sticky anymore and you’ve reached the desired consistency. Once the play dough is made, fold in the peppermint oil to make a fun smelling PEPPERMINT PLAY DOUGH! Enjoy!


Candy Cane Sugar Scrub

As I was brainstorming the other day, thinking about switching out the honeysuckle oil in my Semisoft Honeysuckle Soap with peppermint oil, it occurred to me that I could try making something new altogether…a sugar scrub! Even better, a peppermint CANDY CANE SUGAR SCRUB! I had never made a sugar scrub before, but I figured it couldn’t be too hard and I was right…this one is easy peasy! What a beautiful, fun, tasty-smelling gift to give to friends this holiday season!

Ingredients:

  • 2 cups sugar
  • 1/2 cup olive oil (you could also use coconut or almond oil)
  • 1 tsp peppermint oil
  • red food coloring
  • candy cane (optional)

Materials needed:

  • 2 jars
  • spoons
  • fork
  • rolling pin
  • freezer bag
  • mixing bowls
  • thin cardboard (old cereal box…optional)
  • scissors

First, put the 2 cups of sugar in a large bowl and slowing add the olive oil while mixing with a fork. The texture of the sugar scrub should be similar to wet sand.

Next, add the peppermint oil and mix thoroughly.

Once the sugar scrub smells like a delicious candy cane, divide the sugar scrub and put half of the mixture into a separate bowl. Add about 10 drops of red food coloring to one of the bowls and mix thoroughly.

Place your candy cane into a freezer bag (either the gallon or quart-size). Crush it finely with a rolling pin. Add the candy cane dust to the red sugar scrub mixture.


Now you have to decide how you’d like your sugar scrub to look in the jar…either a layered, candy cane effect or a peppermint candy swirl.

To make the layered jar, it’s pretty self-explanatory…just spoon some white sugar scrub in the jar, pat it down and spoon some of the red sugar scrub on top. Pat that layer down and repeat until the jar is full!

To maker a peppermint swirl, it takes a little more time, but is still rather easy. First, cut the cereal box-cardboard into three equally sized strips. Make sure they all fit across, inside the jar.


Next, cut about half an inch off the top of one strip. Cut a full inch off another strip. The shortest strip should be the height of the jar, not any shorter.

Now, with the middle sized strip and the tallest strip, make a vertical cut up the middle of the cardboard, leaving the top half-inch uncut. Place the shortest strip of cardboard inside the jar. Next, slide the mid-sized strip down on top of the shortest one. Follow with the tallest strip. Arrange the cardboard, so the jar is equally divided.

Next, carefully fill each section using a small spoon. Baby spoons work great, but if you don’t have one you could always roll some paper into a funnel-shape and use that.

Once the jar is filled and you’ve gently pressed down on the sugar scrub, very carefully removed the cardboard pieces one at a time. Voila! A peppermint swirl!

L and I took a shower together this morning to try out our new CANDY CANE SUGAR SCRUB creation…amazing! And fun! The sugar gently exfoliates the skin, leaving it nice and smooth. This sugar scrub smells good enough to eat!

Enjoy some pampering amidst all the craziness this holiday season!

DIY Soap Crayons

Here’s another fun craft for your kids to help make and to play with…L had a ball with her DIY SOAP CRAYONS! They’re a little different than the bath crayons you’ll find at the store…these ones wash off the bath and shower walls easily with water. L likes to color with these ones in the shower before I turn the water on, then she makes a nice soapy, colorful mess once the water is on. They’re fun for coloring on your skin too…just add warm water and it washes right off!

Materials needed:

  • bar of white soap
  • cheese grater
  • food coloring
  • 2 to 4 tablespoons hot water
  • fork and spoon
  • ice cube tray, muffin tin, paper cups or candy mold

First, grate the bar of soap into a large bowl. Grate the entire bar, making about 2 cups of soap shavings.


Add 2-4 tablespoons of hot tap water to the soap and mix-mash with a fork or spoon. Continue mixing until the soap has formed a semi-liquid consistency without any big lumps.


Spoon the soap into your molds. Add about 5 drops of food coloring to each one and mix carefully with a spoon. We found that a baby spoon worked great for this step!


Once your soap crayons are all mixed and colorful, carefully push the soap down evenly into the molds. Set them aside to dry for a full week.

After a week has passed and the crayons have hardened, carefully turn the molds over and pop the crayons out. If their underside is still a little soft, let them finish drying for a few more hours.


(We saved all the little colorful crumbs too…added to a bubble bath or some shaving cream, they will make a beautiful rainbow mess!)


Now for the fun part…time to color and play with your own homemade soap crayons!!! Enjoy!!!


DIY Semisoft Honeysuckle Soap

I have to start by telling you that I’m not a fan of smelly soaps, smelly candles. I don’t even own perfume. This honeysuckle soap is perfect though…its mild smell reminds me of childhood summers, playing outside in the woods, drinking the lil drops of honeysuckle nectar pretending it was a real treat. Just about everyone I give this soap to has asked for the recipe. It’s just that good!

Ingredients:

  • 1 bar of unscented, white soap (my favorite to use is Dove for sensitive skin)
  • 1 1/2 cups boiling water
  • 1/2 to 1 tsp honeysuckle oil (I buy mine at the Handworks Gallery in Winchester, Va.)
  • 4 drops red food coloring
  • 10 drops yellow food coloring

Tools needed:

  • blender
  • cutting board and knife
  • cooking spray
  • paper towel
  • 12 little jars and lids
  • hot glue gun and glue (optional, to secure lids)

First, put the water on to boil. While waiting for the water to boil, cut your bar of soap up into small pieces.

Place the soap into your blender. (Have the lil kids help with that step!) Pour in the boiling (or nearly boiling) water. Add the honeysuckle oil and food coloring.


Blend for 15-30 seconds. Your blender will fill to the top with foamy, lotion-like soap.


Prepare your jars with a quick spray of cooking oil. Follow by wiping the spray around the inside of the jar briefly with a paper towel.

Carefully pour the soap concoction into each little jar. Set the jars aside for a few hours before putting the lids on. The soap will firm up a bit, but will continue to have a creamy, semi-soft texture. (Most canning jars come with the lids in two pieces. Just use a hot glue gun to secure the lids together if you like. Don’t use super-glue or crazy glue!!! I made that mistake once and all the soap ended up smelling like toxic glue! Ick!)

Stick a little label on the lid; tie a ribbon or string around the jar and you have the perfect “anytime gift.” Enjoy!