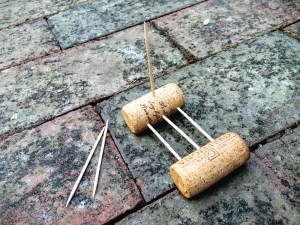
DIY Toy Sail Boat

One evening this summer, while we were getting ready for bath time, L pulled a wine cork out of her pocket. She had been saving it all day to float it around and play with in the bath tub. That got me thinking…I knew with a few toothpicks and some leaves we could turn her wine cork into a little sail boat! Leaves work great for this project, because they’re naturally water-proof and easily replaceable!

IMG_3614

IMG_3642

Materials needed:

  • 2 wine corks
  • 4 toothpicks
  • 2 leaves
  • old pencil
  • scissors

IMG_3574

Take one of the wine corks and stick three toothpicks into it, all pointing in the same direction in a line.

IMG_3576

Next, push the second wine cork into the opposite ends of the toothpicks.

IMG_3577

Stick one more toothpick vertically into the middle of one of the corks.

IMG_3578

Find a medium-sized leaf and weave it through the bottom toothpicks. We used a balloon flower leaf. This step isn’t necessary, but it makes a nice lil bed for anything you may want to sail on top…a bug, a rock, a fairy friend.

IMG_3585

IMG_3579

Next, find a slightly larger leaf and thread it onto the vertical toothpick, making a sail. We found the hosta leaves to work best for this, though any thick and sturdy leaf will do!

IMG_3582

To make the sail boat safer for little hands, twist an eraser off the top of an old pencil. Cut it in half with scissors and push it onto the top of the sail.

IMG_3580


IMG_3581


IMG_3584

Now, time to play! L had hours of fun blowing her boats around our rain barrel!

IMG_3589


IMG_3609


IMG_3613

The boats may not seem like much, but ours withstood some submarine plunges under the water and lasted through two nights of bath time play! Tomorrow, we’ll replace the leaves and keep sailing!

IMG_3656


IMG_3662


IMG_3659

Enjoy!!!

Glow-in-the-Dark Bath

A couple weeks ago L and I walked down the street to check out a kids’ festival going on in town. Our favorite part was some “Glow-in-the-Dark Yoga” going on at a local yoga studio. While the kids danced and froze into yoga poses with their glow bracelets on, the skies opened up into a torrential downpour outside. (I thought we’d need a canoe to get home.) Of course L and I embraced mother nature as we danced and splashed the whole way home. Cold and muddy, our next stop was a hot and soapy bath…with the lights off and our glow bracelets still on!!! It was silly, but so cool…I don’t know why I never thought of it before!


While lil ones love the idea of glow sticks, our kids are rarely up late enough to play with them in the dark. Turning the lights off at bath time and adding some glow sticks and glow bracelets to the water is perfect! Glow sticks only cost $1 to $2 dollars for a pack of 5-10.

Many bathrooms don’t have windows, so a glow-in-the-dark bath can be done at any time of day.


Make sure you keep an eye on your children while taking a glow bath, many glow sticks suggest kids be at least 8 years old to play with them. You definitely want to make sure your little teethers keep them out of their mouths!


You can even add some “glow-in-the-dark bottles” to the mix as well! Enjoy!!!

DIY Pool Toys / DIY Bath Toys

With the pools opening last weekend and the last day of school yesterday, Summertime is here!!! These are some fun DIY POOL TOYS that take just minutes to make. We like to throw ours around, splat them on the pavement and L likes to soak hers in water, then draw with it on the pavement. If you don’t have a pool nearby, just fill up some buckets of water, toss in these fun and funky toys and play a wet and refreshing game of catch in the backyard. So much fun! (Be sure to scroll down to the bottom for some other DIY POOL TOY ideas too!)


Materials needed:

  • 3 sponges
  • 1 elastic hair band
  • scissors

First, cut the sponges long-ways into 3 equal sections.

Next, stack them up.

And lastly, tie a hair band around the pile.


Too easy and so much fun!!!

Other fun and easy pool toy ideas? 

A large paintbrush! Your kids will have a blast painting with water on the pool deck or even outside on the sidewalk.

We love playing with these sensory bottles in the water too! Both the “baby sensory bottles” and the “sparkle bottles” are fun to bounce around. They are quick and easy to make and are fantastic pool toys for the little ones!

Tin Foil River and DIY Boats

This morning the girls and I went to an awesome, little program for kids where we learned about the waterways in our town and L got to make her own toy boat. When we came home I decided to make our own “waterway” in the backyard with some tin foil. Too easy and so much fun!!! All you need is some aluminum foil, water, and some toy boats to float along! I mean, seriously…who wouldn’t like a TIN FOIL RIVER in their yard?


Boat ideas and links:


First, decide which direction you’d like your TIN FOIL RIVER to flow. If your yard or driveway is on a slope, it’s pretty easy to figure out how to get the water to flow…start at the top and end at the bottom. If you yard is flat, you can prop some of the river up or make it in a donut shape. We decided to make ours interesting, starting the river on the slide, having it flow under a chair, and bend and twist across the yard.


Making the waterway is pretty simple…you can be a perfectionist about it and try to make all the sides even or just wham-bam make it, play with it. We tore large strips of aluminum foil and double-layered the foil to prevent any leaks. Fold the sides up. At any joints (places where you’re attaching two sections of foil) you can add another layer of foil underneath. Same with the end of your river…we tried making our sides a little higher and extra-sturdy at the end.


If you need to, you can weigh your foil down with some smooth rocks. Makes fun little obstacles too! If a side of your river starts to sag, it’s pretty easy to prop it up with a brick or flower pot…whatever you have handy. The TIN FOIL RIVER allows for some terrific problem solving and experimenting with your little ones! I can’t wait to see what L comes up with next for our backyard waterway!


Enjoy!


The Mud Kitchen

Our MUD KITCHEN might just be my favorite kids’ project yet! I’ve been dreaming of building one for L since late last Summer and this Spring we went for it! Collecting things and building it was definitely fun for me…I love scouring antique shops and junk stores with an idea in mind. And now L has a blast playing in her MUD KITCHEN nearly every day! She’s always loved digging in her dirt pit, so we set the mud kitchen up right beside it.


Materials needed:

  • old pots and pans, muffin pan, mixing bowls, old tea set
  • cooking utensils and/or garden tools
  • old rags
  • shelving unit
  • DIRT!!!

The best places to find things for your MUD KITCHEN are yard sales, flea markets, antique and junk stores. If you find a water-proof set of shelves or little bench, that would work great! We ended up making ours out of some lumber and cinder blocks. L helped sand and paint the wood, I painted two lil burners on the top pieces, and we finished it off with a few coats of polyurethane. I love that L was able to make it her own!


We found this perfect mirror to attach to the kitchen for only $15 at a local antique store. I wanted a mirror for a bit of a “kitchen window” effect, plus it makes our tiny yard look a bit bigger! It was the only one I could find that had a wooden backing to it…most others were particle board or cardboard. Our mud kitchen is up against our house, a little bit protected by the weather, but when it pours rain the kitchen still gets wet. Make sure everything on your kitchen is more-or-less waterproof.

Along with the burners I painted on top of the mud kitchen, we also attached two lil knobs (to turn the stove and oven on, of course)! You can find knobs really cheap at your local Habitat for Humanity or at your local hardware store. Since ours were attached to solid wood, I just glued them on with some superglue. So far it’s worked great!

On the side of our mud kitchen, we attached two cute lil hooks. Again, we found them at a local antique/junk store for $1. They couldn’t be more perfect! L hangs her lil dish rags on there and when she’s all done playing with her kitchen each day, I have her clean it up. She brushes the dirt off with a dry rag, follows up with a wet rag, and she puts all her pots and pans away.


Like many activities like this, my biggest tip to you would be to withhold some of the kitchen supplies, giving your kids a lil more day by day. On the first day I gave L her pot, pan, and mixing bowls. On the second day, we added an empty milk carton, egg carton and vanilla bottle. After that, we threw in a muffin pan and some old silicon muffin cups. I have an old child’s tea set I’m saving for a special day as well. Keep things interesting and mix it up!


Sparkle bottles would be a fun addition to your mud kitchen too! Not to mention, making some potions out there as well. (Tell me I’m not the only one who mixed up “magic potions” with water, dirt, wild onions and herbs as a kid!)

How much would your child LOVE a mud kitchen??? Mmm…mmm…mud pies, mud spaghetti, dirt scrambled eggs, mud muffins…


PVC Pipe Ball Drop / Water Run

We made this PVC PIPE BALL DROP / WATER RUN last Summer to take with us to the beach…beach houses usually have large windows and sliding doors so I knew it’d be the perfect place to test it out. We originally used corn kernels to drop through the tubes, which turned out to be a huge mess, but we had fun!!! As cabin fever set in this week with cold, snowy weather outside I decided to bring out the PVC PIPE BALL DROP / WATER RUN again! This time we used poof balls (as well as plastic fairies and frogs) to drop through the tubes and it worked great! You could also put this up in the shower and dump water through the tubing to make a water run…I think we’ll try that next! The materials for this project only cost about $10 and it provides hours of fun!


IMG_9538

IMG_9528


Materials needed:

  • PVC connectors and elbows
  • suction cups
  • drill
  • flathead screw driver
  • poof balls, beans, feathers, pennies…

We found these suction cups at the craft store and they were perfect…just remove the little, metal hook.

 IMG_9455


First, drill a hole in the middle of one side of each PVC connector. Compare the suction cup piece with the drill bits to figure out the right size to use…you can always drill a bigger hole if need be, so start with the smaller bit if you’re deciding between two. Using the flat head screw driver, pry and poke the suction cup into the PVC connector.

IMG_9456

IMG_9452

IMG_9453


Now, time to play!!! Press the tubes onto a sturdy glass door or window and let the fun begin! It’s fun letting the kids experiment with placement of the tubes!


IMG_9480

IMG_9464


If your “Ball Drop” has two starting places, it’s fun to race the balls down…see whose comes out first!

 IMG_9471

IMG_9490


To mix things up, give your kid a spoon or tongs to pick the balls up and drop them down!

 IMG_9552

IMG_9559


Get crazy! Have fun! Enjoy!!!

Sensory Bottles, Sparkle Bottles, Glow-in-the-Dark Bottles, and an Ocean in a Bottle

We love SENSORY BOTTLES at Our Beautifully Messy House and have been experimenting with them for years! There are so many things to do with sensory bottles and sparkle bottles…some people use them as “time-out bottles” to help calm down their toddlers when they’re having a meltdown. We like to play with our SPARKLE BOTTLES outside in the summertime, pulling them around in wagons, burying them in dirt…and inside in the play areas of our house. (Okay, I admit…that’s every room of our house!) We take SENSORY BOTTLES with us on long car rides for simple, quiet entertainment. The kids love to bounce them around in the bathtub as well! The GLOW IN THE DARK BOTTLE is great for helping kids wind down at night and drift off to sleep. So much fun and so many possibilities!!!

 IMG_9308


I find the best, smoothest and cheapest bottles to use (esp. if you don’t drink soda regularly and have a collection already) are the soda water bottles. Just look in the water or beverage aisle of your grocery store, seeking out the cheapest option…usually only $2-$3 for a pack of 6. Instead of dumping the soda water down the drain, entertain your kids with the fun “Raisins + Soda Water Experiment” while you’re mixing up the SENSORY BOTTLES.

IMG_9316

SPARKLE BOTTLES

Materials needed:

  • empty plastic bottle
  • Elmer’s glitter glue
  • glitter, sequins, and/or beads
  • water
  • superglue


IMG_9267

First, put a small pot of water on to boil. When you add the water to the bottle you will want it to be hot, but not boiling. I like to bring the water to a boil, remove from heat and set aside for a few minutes to cool.

Meanwhile, add the Elmer’s glitter glue to the empty bottle…enough to fill the bottom inch or so of the bottle. Next, add some glitter, sequins and/or beads.

IMG_9268

IMG_9264


When the water is ready, carefully pour it into the bottle as well. I like to use a measuring cup or a funnel to make this step easier. Once the bottle is filled, use superglue to secure the lid. Now it’s time to shake, shake, shake!!! Shake the bottle for a few minutes, until all the glue melts into the hot water. You shouldn’t see any globs or streaks of glue once the bottle is complete. While the bottle is warm, the glitter and sequins will fall very quickly to the bottom. Once it cools down completely over the next hour or two, the glitter will fall much slower. So relaxing… I’d like to put myself in “time-out” with one of these bottles, wouldn’t you?


IMG_9321

IMG_9325

GLOW-IN-THE-DARK BOTTLES

Materials needed:

  • empty plastic bottle
  • Elmer’s glitter glue
  • glitter paint
  • glow-in-the-dark paint
  • glitter, sequins, and/or beads
  • glow-in-the-dark stars
  • water
  • superglue


IMG_9272

First, put a small pot of water on to boil. When you add the water to the bottle you will want it to be hot, but not boiling. I like to bring the water to a boil, remove from heat and set aside for a few minutes to cool.

Meanwhile, add the Elmer’s glitter glue to the empty bottle…enough to fill the bottom inch or so of the bottle. Next, add a squirt of glitter paint and a squirt of glow-in-the-dark paint. Add some glitter, sequins and/or beads.


IMG_9273

When the water is ready, carefully pour it into the bottle as well. I like to use a measuring cup or a funnel to make this step easier. Once the bottle is filled, screw the lid on tightly, but don’t superglue it yet. Now it’s time to shake, shake, shake!!! Shake the bottle for a few minutes, until all the glue melts into the hot water. You shouldn’t see any globs or streaks of glue once the bottle is complete. The bottle will be a milky color compared to the SPARKLE BOTTLES because of the glow-in-the-dark paints. Once the bottle is shaken and cooled a bit, add the glow-in-the-dark stars and superglue the lid in place. I guarantee your little one will be excited to go to bed tonight with a GLOW-IN-THE-DARK BOTTLE in hand!!!


IMG_9310

IMG_9296


OCEAN IN A BOTTLE

Materials needed:

  • empty plastic bottle
  • oil (vegetable oil or baby oil)
  • water
  • food coloring
  • superglue


IMG_9269

First, fill the bottle about 1/3 of the way full with water. Add a few drops of food coloring and screw the lid on tight. Shake the bottle a bit until the food coloring is evenly dispersed throughout the water. Next, fill the bottle the rest of the way with oil…using a funnel is best. Superglue the lid onto the bottle. Complete!


IMG_9329


Have fun swishing the bottle from side to side or shaking it all up, just to watch the bubbles of oil pop while the water settles at the bottom and the oil at the top. This is a great time to talk to your kids about the density of liquids as well! It may be a bit over their heads if they’re really young, but you’ll be surprised at what they will comprehend and remember! Basically, the water weighs more (has a higher density) thank the oil and will sink below it in the bottle, no matter how much you shake your OCEAN IN A BOTTLE and attempt to mix the two together. So cool!!!


DIY Soap Crayons

Here’s another fun craft for your kids to help make and to play with…L had a ball with her DIY SOAP CRAYONS! They’re a little different than the bath crayons you’ll find at the store…these ones wash off the bath and shower walls easily with water. L likes to color with these ones in the shower before I turn the water on, then she makes a nice soapy, colorful mess once the water is on. They’re fun for coloring on your skin too…just add warm water and it washes right off!

Materials needed:

  • bar of white soap
  • cheese grater
  • food coloring
  • 2 to 4 tablespoons hot water
  • fork and spoon
  • ice cube tray, muffin tin, paper cups or candy mold

First, grate the bar of soap into a large bowl. Grate the entire bar, making about 2 cups of soap shavings.


Add 2-4 tablespoons of hot tap water to the soap and mix-mash with a fork or spoon. Continue mixing until the soap has formed a semi-liquid consistency without any big lumps.


Spoon the soap into your molds. Add about 5 drops of food coloring to each one and mix carefully with a spoon. We found that a baby spoon worked great for this step!


Once your soap crayons are all mixed and colorful, carefully push the soap down evenly into the molds. Set them aside to dry for a full week.

After a week has passed and the crayons have hardened, carefully turn the molds over and pop the crayons out. If their underside is still a little soft, let them finish drying for a few more hours.


(We saved all the little colorful crumbs too…added to a bubble bath or some shaving cream, they will make a beautiful rainbow mess!)


Now for the fun part…time to color and play with your own homemade soap crayons!!! Enjoy!!!


Water Lens

I don’t know a kid (or an adult) who doesn’t love playing with a magnifying glass. They’re just mesmerizing! The “water lens” experiment is such a fun activity that allows kids to not only play with a magnifying glass, but it shows kids how to make one too. So much discovering going on here!

Materials needed:

  • a plastic bucket (we used a large coffee container)
  • marker
  • knife and/or scissors
  • clear, plastic material (a dry-cleaners bag is best, but plastic wrap would work too!)
  • large rubber band
  • water
  • small objects

First, draw three large circles on your bucket or plastic container. They need to be big enough to get one’s hand in-and-out easily. Our coffee container had a funky handle part, so we just drew and cut a rectangle shape around it. Modify your circles however you need to to make it work!


Using your knife and/or scissors, cut the circles out. Try making smooth edges so no little hands get cut going in-and-out.

Next, lay the plastic material loosely over the bucket and secure it with the large rubber band. If you don’t have a rubber band big enough, you could always cut and tie a couple together to make it work.


Since water is involved, it’s best to do this activity outside, in the bath tub or in a water-safe area. We put a beach towel down on our kitchen floor and put our water lens inside a baking pan to catch any splashes…worked great!

Pour warm water onto the plastic material…as much as will fit without spilling over. And now your water lens is ready for play!

Have your kids take turns holding various objects underneath the “magnifying glass.” They can experiment by moving their hands up and down, and by adjusting the amount of water in the lens. So simple to make, but so much fun!


Make sure the water you use is warm…if you use cold water the lens will fog up quickly! We made that mistake for you! Ha!

L had a ball with this one today! Tomorrow morning we plan to venture outside and collect more flowers, sticks, snail shells, leaves, etc. to examine up close with our homemade magnifying glass! Where will this discovering activity take you? Enjoy!!!

Bubble Blobs and Bubble Worms

Here is a super-fun activity made with materials you already have! L and I started making bubble blobs after breakfast this morning and we were still making them in the shower tonight! (I may or may not have bribed her into the shower with her bubble blob blower.) It’s definitely a good summer activity, but there’s no reason why it can’t be done in the bathtub on a rainy, cold day.


Materials needed:

  • plastic drink bottle
  • old sock (Thick socks work best!)
  • rubber band
  • dish soap
  • food coloring (optional)
  • a small bowl
  • scissors


First, cut the bottom of the plastic bottle off and unscrew the lid.


Turn the sock inside out (so the fluffier side is outside), and pull it over the bottom of the bottle. Secure it in place with a rubber band.


Next, put some dish soap in a small bowl with a little bit of water. If you want your bubble blobs and worms to be colored, add a few drops of food coloring too!


Now for the fun part…put the newly-made, bubble blob blower in the dish soap, then blow through the bottle top!


Instruct your kids to blow as if they’re blowing up a balloon and not to suck in!!! L made that mistake once and got a mouthful of bubbles. Ick!


It’s fun to see who can make the longest bubble worm! 🙂 What other bubble inventions have you made? Please share in the comments section below!