Pine Cone Flowers

Have I mentioned before how much I love Fall?! So many things to find and create with…like these mini-pine cones! I’ve been thinking of making “pine cone flowers” for months now, and when L and I found these miniature ones it was a done deal.

Materials needed:

  • miniature pine cones
  • twigs (the more lil knobs and branches the better)
  • acrylic paints
  • hot glue gun and glue

First, choose what colors you’d like your “flowers” to be…we choose multi-colored! Paint each little pine cone as you like. Set aside to dry.


Next, paint your twigs a mixture of dark and light greens. Allow to dry.


Once everything is dry, you can assemble your pine cone flowers. Using a hot glue gun, put a little dab of glue on the tip of a twig. Quickly press and hold a pine cone in place. Repeat until all your pine cones are used up.


So cute, huh!? Arranged in a little, antique bottle they make a sweet gift for a child or an adult.

DIY Witch Legs

So I looked around for a tutorial online for how to make “Witch Legs” and they were all much more complicated than they needed to be! People using irrigation tubing, tube socks with sand and tape, mannequin legs, etc… I don’t know about you, but I’m all for cheap and easy! So I tried it my way, fingers-crossed that it’d work out, and it did! I just love our witch legs…costing under $10, they took about 15-20 minutes to make!

Materials needed:

  • heeled, sparkly shoes (find them at a thrift store!)
  • kids, knit halloween tights
  • poly fil stuffing
  • hot glue gun and glue
  • scissors

(I originally thought I’d decorate the shoes with some pipe cleaner curlicues, but they ended up looking best without! That’s why the pipe cleaners are pictured here, if you’re wondering.)

First, stuff the tights with the poly fil. Leave about 4-5 inches at the top not stuffed.

Next, cut the legs off the tights, as far to the top as possible. Then tie a knot in each.


Position one foot into a shoe to have a good idea how it will set. Then, starting with the toes, glue each foot into the shoe. It’s okay if the “foot” is smaller than the shoe…it probably will be because they’re adult shoes and kid’s tights. You can continue pushing the leg down into the shoe just past the heel and nobody will be able to tell the difference.


And now for the fun part…find the perfect spot to display your witch legs and surprise the neighbors! If you have an overhanging porch on your house or a large bush in the yard, you can hide the ends underneath. There’s about a half-inch gap between the siding of our house and the front porch that I was able to wedge the ends down into. A big flower pot set on top would work too! Get creative and have fun! Ding-dong the wicked witch it dead!!!


DIY Melted Crayon Art with Variations

This was the perfect “rainy day craft” for today…fun for me and for L! I’m so excited about these melted crayon creations, I can’t wait to make more! Let’s jump right in…
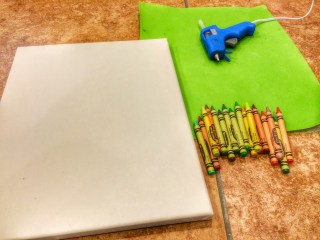
 

Materials needed:

  • white canvas
  • crayons
  • hot glue gun and glue
  • cardboard box
  • hair blowdryer

Although there’s definitely some unpredictability in this project, you first need to plan it out a bit. Start with picking out your colors.


After deciding where your crayons will go, use the hot glue gun to attach them to the canvas.


Next, place the canvas in a cardboard box. The box will keep your work area clean, catching the crayon splatter.

Prop the box up against a chair, table, or wall. Make sure the crayons are facing down (if you want a dripping effect) and that the box and canvas are on a little bit of an incline.


Next for the fun part, use the hair dryer to melt the crayons and blow the wax around. I let L do most of the rainbow picture. Turned out pretty awesome, huh!?


Now, display your work in whichever direction you please. I think a ribbon pinned or glued around the outside edges of the canvas would give it a nice, finished look!

Variations:

Wildflowers

To make the wildflower piece, I used mostly greens and browns. After I was done melting the crayons and the wax had time to cool down, I used the hot glue gun to attach flowers. Do this step carefully, so no glue shows! It works best to glue the flowers on spots without any wax.


Wild Splatter

I experimented with this one a bit, trying to plan for some future creations. I kept the box flat to the ground and used broken crayon pieces. To hold the crayons in place while melting them, I used a fork and smudged them around a bit. The outcome was a little funky…next time I’ll use smaller crayon pieces and maybe some crayon shavings instead.


I’m hoping to make a vibrant, Autumn tree next! I’ll be sure to update the blog and add those pictures as well, so check back soon!!! What “melted crayon art” will you make???


DIY Rustic Spinning Stars

I love these Rustic Spinning Stars. When I first saw something similar here on the “happy hooligans” blog I just knew we had to make them! They’re fun to make with the kids and are beautiful hanging inside or outside. We have ours spinning on our front porch, while my dad hung his (which we gave him for Father’s Day) in their kitchen. I think the stars would be really fun hanging, spinning from the branches of a big tree too!


Materials needed:

  • sticks
  • glue gun and glue
  • white acrylic paint and brushes
  • colored ribbon scraps, string, raffia
  • florist wire

First, have your little ones collect sticks. You can make big stars with big sticks or use little twigs, like we did, to make little 3 to 5-inch stars.

Use the hot glue gun to glue five sticks together into the shape of a star. The stars don’t all have to be the same size and they certainly don’t have to be perfect…any imperfections give your stars more character! Don’t worry about the glue showing either, in the next step the paint will cover it up.

Next, have your kids help you paint each star with white acrylic paint. This is a great painting project for little ones, since any missed spots give the stars their rustic appearance.


After the paint dries, tie one end of your ribbon to the center of the star and wrap it around. Again, no need to be perfect here…another great task for your kids to help you do! After the star is wrapped, tie the end in a knot around one of the star’s arms.

You can attach the stars to each other with string or wire. We used green florist wire, which is weather resistant and sturdy. If you link two pieces of wire together, between each star, the stars will spin a little more than if you use only one wire. We tried both ways…both did the job and look great, so it’s up to you!

Now for the fun part, find the perfect spot to hang your Rustic Spinning Stars! Enjoy!