DIY Jacob’s Ladder Toy

I really wanted to make L a Jacob’s Ladder Toy, but didn’t want to make a trip to the local hardware or craft store for supplies. So, we made this Jacob’s Ladder out of an old board book! (If you don’t have a board book they are easy to find at the dollar store.) I just love the outcome! This one is super-colorful compared to the wooden one I had as a kid and is just as much fun!

DSC_0095

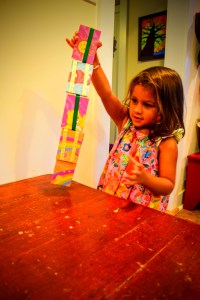
I loved playing with my Jacob’s Ladder when I was young…it’s such a unique toy! Flip-flopping it back and forth is very calming, but it also makes you think creatively and problem solve. I enjoyed watching L play with the one we made today…not only was she ecstatic when she finally figured out how to work a Jacob’s Ladder, but she was also folding it into shapes, pretending it was a snake, a bracelet and a funky hat.

DSC_0102

DSC_0100

Materials needed:

  • board book
  • 3 pieces of ribbon (35 inches long each)
  • glue
  • box cutter
  • paper cutter (optional)
  • scissors

DSC_0016

First, using a box cutter, disassemble your board book.

DSC_0018

Next, measure the dimensions of one page and decide how best to cut it. The book I used was 7 in x 7 in. I chose to cut the pages down the middle in one direction and into thirds going the other direction. Each piece ended up being 3.5 in x 2.25 in. If you have a paper cutter on hand, it makes this step super quick and easy! I cut up 4 pages, leaving me with 24 pieces.

DSC_0022

DSC_0023

DSC_0026

Once you have 24 pieces cut, sort them into “nice” and “ugly” piles, 12 cards in each pile. The “ugly” cards won’t be seen.

DSC_0027

Next, glue each “nice” card to an “ugly” card with a thin layer of wood glue. Put some canned food on top of the cards to keep them flat and clamped down for the first few minutes, while the glue is setting. Once they are all glued, let them dry for an hour or two. You should now have 12, double-stacked cards.

DSC_0028

DSC_0032

Now, time to make that Jacob’s Ladder! Lay one card-stack in front of you, “nice” side down. Spread a thin layer of glue on top of the card-stack. Place the ends of all three strips of ribbon onto the card-stack. As you can see in the photos, two of the ribbons spread out into one direction and the other ribbon to the opposite direction.

DSC_0034

DSC_0035

Spread a dab of glue on each ribbon end and press another card-stack carefully on top, “nice” side up.

DSC_0037

Fold all the ribbons over the top of the cards and to the opposite direction. Pulling them taut, place another card-stack on top of the ribbons, “nice” side down.

DSC_0038

DSC_0039

DSC_0040

Spread a thin layer of glue on the card-stack and fold the ribbons over, keeping them pulled taut much as possible. You can press the ribbons down into the glue to hold them in place.

DSC_0041

DSC_0042

Spread a dab of glue on top of the ribbons, and press another card-stack on top, “nice” side up.

DSC_0044

DSC_0045

DSC_0046

Folding the ribbons over again, repeat the last three steps, until you reach the last card-stack and the end of your ribbon.

DSC_0048

Trim the ribbon, pull it taut, and glue it in between the last two card-stacks.

DSC_0049

DSC_0050

DSC_0051

DSC_0052

Place a can of food on top of the entire Jacob’s Ladder Toy and allow the glue to dry completely for an hour or two.

DSC_0053

Now, time to play!!! If you’ve never used a Jacob’s Ladder before, you flip the top card to one side and let gravity do the rest of the work. The card’s flip-flop down, one after another, like magic in your own hands!

DSC_0076

DSC_0088

DSC_0104

Enjoy!!!

Pumpkin Pancakes (GF)

I came up with this PUMPKIN PANCAKE recipe years ago and it remains a favorite in our house! Every Fall I wait for that first cold and rainy day and we have pumpkin pancakes for dinner! Paired with some bacon and homemade, baked apples, the meal couldn’t be more cozy, more filling and it couldn’t be easier to make! L likes to eat hers with her hands…with a couple apple slices folded inside of a pancake it’s like a little taco! At times, I’ve made three or four huge pancakes, layered baked apples in-between, and served this up as a Pumpkin-Apple Cake! Such a yummy side to a fall soup or stew!

You’d never know that the pancakes are low-fat. If you want to make them completely fat-free, replace the eggs with 3 egg whites. You can’t even tell the difference! We make our pancakes with an all-purpose, Gluten-Free flour and they come out just fine. Go ahead and use whatever flour you fancy though…they’d be good with a whole wheat variety or your regular, unbleached white flour.

Ingredients:

  • 1 cup flour
  • 1 tsp baking powder
  • 2 Tbsp brown sugar
  • 1/4 tsp cinnamon
  • dash of ginger and/or nutmeg
  • 1/2 tsp salt
  • 2 eggs
  • 1 cup plain, fat-free yogurt
  • 1/2 cup canned pumpkin
  • 1/4 cup unsweetened applesauce
  • 1 tsp vanilla
  • 1 box raisins (2 oz.) optional
  • 3/4 cup milk or water


Mix dry ingredients thoroughly in a large mixing-bowl w/ hands or spatula.
In a separate bowl, combine eggs, pumpkin and liquid ingredients. Beat well.
Make a small well in center of dry ingredients and slowly beat in the liquid ingredients. Beat until contents are thoroughly mixed, but not too long. Add additional water to desired consistency. Stir in raisins with a spatula (optional).

Spray a large skillet lightly with non-stick cooking spray. Put over medium heat. Pan is ready when water droplets quickly sizzle and evaporate.

Serves 2-3. Yummm!!! Enjoy!!!

DIY Toy Sail Boat

One evening this summer, while we were getting ready for bath time, L pulled a wine cork out of her pocket. She had been saving it all day to float it around and play with in the bath tub. That got me thinking…I knew with a few toothpicks and some leaves we could turn her wine cork into a little sail boat! Leaves work great for this project, because they’re naturally water-proof and easily replaceable!

IMG_3614

IMG_3642

Materials needed:

  • 2 wine corks
  • 4 toothpicks
  • 2 leaves
  • old pencil
  • scissors

IMG_3574

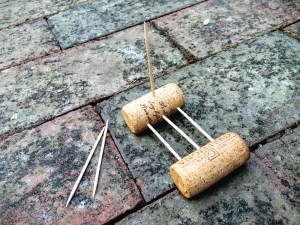
Take one of the wine corks and stick three toothpicks into it, all pointing in the same direction in a line.

IMG_3576

Next, push the second wine cork into the opposite ends of the toothpicks.

IMG_3577

Stick one more toothpick vertically into the middle of one of the corks.

IMG_3578

Find a medium-sized leaf and weave it through the bottom toothpicks. We used a balloon flower leaf. This step isn’t necessary, but it makes a nice lil bed for anything you may want to sail on top…a bug, a rock, a fairy friend.

IMG_3585

IMG_3579

Next, find a slightly larger leaf and thread it onto the vertical toothpick, making a sail. We found the hosta leaves to work best for this, though any thick and sturdy leaf will do!

IMG_3582

To make the sail boat safer for little hands, twist an eraser off the top of an old pencil. Cut it in half with scissors and push it onto the top of the sail.

IMG_3580


IMG_3581


IMG_3584

Now, time to play! L had hours of fun blowing her boats around our rain barrel!

IMG_3589


IMG_3609


IMG_3613

The boats may not seem like much, but ours withstood some submarine plunges under the water and lasted through two nights of bath time play! Tomorrow, we’ll replace the leaves and keep sailing!

IMG_3656


IMG_3662


IMG_3659

Enjoy!!!