Milk Carton Fairy Houses

Who knew milk cartons had so much potential??? They are perfect for making fairy houses and gnome homes! First off, a milk carton is just the right size for fairies…all it needs is a door and a few windows to make it feel like home. Milk cartons are also water-proof, providing adequate housing for both indoor and outdoor use. WB and L like to play with their fairy houses during the day and, at night, we tuck a little tea light inside to turn them into night lights! So sweet!


2016-10-06-14-00-32

Materials needed:

  • milk cartons
  • white primer spray paint
  • exacto knife
  • acrylic paints
  • hot glue gun
  • sticks, bark, moss, acorns, etc.
  • battery-operated tea lights

dsc_0005

First, spray your milk cartons with some primer. The surface of milk cartons is usually waxy and paint will have a hard time sticking. A coat or two of primer should do the trick!

dsc_0006

Next, using an exacto knife, carefully cut a door and windows into the house. And do not worry…the windows don’t need to be perfect! Fairy houses’ never are!

dsc_0344

Now the fun part for the kids, have your little ones paint and decorate the houses. Start with a solid color or two underneath.

dsc_0347

img_0240

Then add details like polka-dot doors and Fall pumpkins. For our pumpkins, the kids used a wine cork as a stamp!

dsc_0349

dsc_0353

While the paint dries, send the kids outside to collect nature materials to use for a roof.

dsc_0356

Before assembling the roof, you can easily flip the screw-top opening inwards. Just push it in with your fingers…it’s easier than you think!

dsc_0357

dsc_0358

Glue twigs or bark over the opening, and then add all sorts of nature findings. Each house will be unique!

dsc_0360

dsc_0359

To light your fairy houses up at night, place battery-operated tea lights inside. You could also use a string of lights in and around the houses for a magical display!

dsc_0373

dsc_0383

“Those who don’t believe in magic will never find it.” -Roald Dahl

dsc_0393

Tin Can Telephone

Now I know this craft, toy, activity is as old as they come, but how many of you have actually made a TIN CAN TELEPHONE for your kids yet!?! L has been begging for weeks for us to make one and today was the day! It was so quick and easy to put together and the kids played with it all afternoon. L already has plans for tomorrow and how we’ll make a longer TIN CAN TELEPHONE that will stretch to the neighbor’s porch. And yes…if you’re wondering…yes, it does work!!! As you probably remember, the key is making sure the string is pulled taut when you’re talking to each other, and try not to rest the can against your face as well. Enjoy!

2016-05-18 19.59.34


Materials needed:

  • 2 tin cans, clean and lids removed
  • Sharpie markers (optional)
  • awl or nail
  • scissors
  • string
  • tape (fabric, duct, or gaffer)

DSC_0211

First, color the cans with Sharpie markers. Of course you could always paint the cans, glue paper to the cans, or leave them plain as well.

DSC_0216

DSC_0218

Next, put tape on the cans to protect your kids from any sharp edges. To do this, measure the tape, to get the length right.

DSC_0219


Carefully roll the can over the tape, wrapping the tape around the can, and leaving about half an inch of the tape hanging off the edge.

DSC_0222

DSC_0223

Next, use scissors to cut the tape as pictured. Then, fold all the flaps down over the can’s edge. No fear of little hands getting cut now!

DSC_0224

DSC_0227

DSC_0228

Using an awl or a nail, poke a hole in the bottom of each can.

DSC_0229

Cut a piece of string and thread it through the hole in the bottom of a can. Double or triple knot the string. Repeat on the other side of the string with the second can.

DSC_0230

If the holes seems to be a bit sharp on the inside, and you have especially little hands that you’re afraid may explore the inside of the cans, you can put a piece of tape over the knots and holes of the cans.

DSC_0232

DSC_0231

Now, time to play! Your little ones can experiment talking across a room, through fort walls, up and down stairs, from one bedroom to another…the possibilities are endless.

DSC_0234

DSC_0237

DSC_0239

IMG_7354

Such simple, wonderful, old school fun!!!

IMG_7361

DIY Ragtag Fairy Skirts (No Sew!!!)

These Ragtag Fairy Skirts are so easy to make, I almost feel silly writing a post on them. They are so cute though!!! I figured if you didn’t know how to make them already, you need to learn! Like all my projects that involve fabric, my suggestion to you is to check out the secondhand stores in your area first. We have an old antique/junk store in town that has a huge selection of funky fabrics from the 80s and 90s…they’re just perfect for crafts like this. And they only cost $1-$3 for pieces 3-6 yards long! If you already have a nice pile of fabric scraps, you’re all set…it doesn’t take much!

DSC_0195 (2)

Materials needed:

  • fabric
  • elastic
  • scissors

DSC_0172

First cut the fabric into strips, about 1-2 inches wide and 12-20 inches long. Varying lengths make the skirt fun…it definitely doesn’t have to be perfect!

DSC_0177

Next, cut a piece of elastic long enough to go around your child’s waist, with enough left over for a bow or knot. Tie on each piece of fabric as pictured. First, fold the fabric in half. Then, put the folded loop under the elastic. Flip the ends of the fabric up and over the elastic and through the loop of folded fabric. Pull gently to tighten and secure.

DSC_0175

DSC_0176

DSC_0174

DSC_0173

Repeat this process until the skirt is full. Although the lengths of the fabric can vary (makes the skirt more fun and free), I would try to make each “knot” face the same direction.

DSC_0180

DSC_0179

Once all the fabric strips are secure, simply tie the skirt in a bow around your child’s waist. So easy and too cute!!!

DSC_0181

DSC_0187

DSC_0192

Rain Boot Wreath

I’ve seen old rain boots up-cycled into flower planters before, so I thought, “Why not use them for a Spring wreath!?” This RAIN BOOT WREATH was so quick and easy to put together and the outcome is adorable…perfect for Spring!

DSC_0169

I could’ve gone out and bought some new boots that weren’t dirty, worn, and broken in spots, but that required me to take the kids shopping and more money spent…not my idea of fun! I ended up making these with things we already had: L’s old rain boots and flowers we had leftover from other projects. Every time we walk in through the front door, the rain boots make me think of the many rainy, muddy adventures L went on during the first three years of her life. So much love!

Materials needed:

  • rain boots (kids’, adults’, old or new)
  • artificial flowers
  • rope and/or ribbon
  • scissors

DSC_0149

First, if your boots are dirty, clean and dry them.

DSC_0152

Next, lay out your flowers and decide how you’re going to split them up. When you arrange your flowers, start with the taller and/or leafy flowers first. Put the single, shorter, and more prominent flowers in last. Originally I thought I’d use wire cutters to trim my flowers, but I ended up just bending the wired stems in half, depending on the height I was looking for. This helped them take up room and stay put in each boot!

DSC_0155

DSC_0154

DSC_0156

DSC_0158

Once your boots are filled and arranged the way you like them, tie a rope or ribbon securely to each boot.

DSC_0159

DSC_0160

Now, take the boots to your door and see how they will hang. I ended up tying a knot in the rope down low, tying both halves together so the boots didn’t lean out too far from the door. I also shortened the rope a bit by wrapping and tying it around the wreath hanger.

DSC_0162

DSC_0161

To finish your fun and funky Spring wreath, tie a pretty ribbon in a simple bow around the top and you’re done! So easy, cute and fun!

DSC_0167

Happy Spring!!!

Shoebox-Marble Game

Not only is the SHOEBOX-MARBLE GAME super-easy and simple to make, it’s also a challenging game for anyone to play! For younger children, they can try to catch the marbles on any holes; for adults and older kids, they may try to catch the marbles on specific colors or to make patterns with the marbles. Sounds pretty easy, but it’s not! L and I had lots of fun this afternoon taking turns, playing the Shoebox-Marble Game. Our shoebox was big enough, we were even able to play together with all hands on the box, tipping and tilting it until all the marbles were caught!

DSC_0014


Materials needed:

  • shoebox
  • awl (or sharp tool)
  • markers
  • marbles

DSC_0007


First, color a fun picture or design inside your shoebox.

DSC_0009


Using your awl, poke holes through the bottom. I like to do this by placing the box on a doormat, then poking the holes from the inside of the box – out. If the game is too hard, you may want to go back and make some larger.

DSC_0012


Now it’s time to play! Put some marbles in your box and see who can catch the most on the holes! The more you practice, the better you’ll get. For younger children, it helps to have them balance the box on a flat surface.

DSC_0013

DSC_0023

DSC_0017

Enjoy!!!

DIY Bird Nesting Kit

The “DIY Bird Nesting Kit” is the perfect project for little hands and little helpers! L and I made three kits this week: two gifts and one to hang in our own backyard, next to our DIY Tin Can Bird Feeder. It took less than a day for our feathered-friends to find it and start picking away, flying bits of string home to cozy-up their nests! The DIY Bird Nesting Kit costs only $2.50 to make (I’m not kidding!) and it’s a wonderful project to help teach kids about giving, sharing, and caring for the world around us….aaand about birds and the various types of nests they make of course!

DSC_1062

Before making our Bird Nesting Kits, the girls and I read “Mama Built a Little Nest” by Jennifer Ward and Steven Jenkins. It is fascinating book with beautiful, collage-like illustrations, depicting all kinds of birds, their families, and the homes they build. (It’s best to read in a pile of beach towels, swirled around on the floor into your own nest.) I highly recommend it!

IMG_5479

Materials needed:

  • Wired bird suet holder
  • yarn scraps
  • scissors
  • ruler (optional)

DSC_1036

First, have your little one cut the yarn scraps up into pieces about 3-5 inches long. You don’t have to measure them, but your little one might want to with the ruler!

DSC_1042

DSC_1044

After you have a nice pile of yarn pieces, it’s time to stuff them into the suet holder. Then, close the suet holder up and it’s all done. It’s that easy!

DSC_1048

DSC_1049

DSC_1050

Now, time to find the perfect place outside to hang your Bird Nesting Kit…someplace where the birds will find it and you can spy them doing so is best!

DSC_1054

IMG_5468

If you’re giving your Bird Nesting Kit away as a gift, you may want to include a little card inside explaining what it is. Your friends will be sure to love such a colorful, quirky, and fun gift! Enjoy!!!

DSC_1065

Lace Snowflake Bowls & Decorations

Our LACE SNOWFLAKE BOWLS are one of those crafts that started as one thing, but inspiration hit and they morphed into something even cooler in the process! Originally, L and I were just making lacy snowflakes to hang in a window…which we did! But then it dawned on me that, much like our DIY String Bowls, we could easily turn the snowflakes into bowls as well! These are super-easy to make and it’s fun experimenting with various-sized lace and bowl molds. The finished product makes a whimsical, winter decoration for any windowsill or tabletop. They’d be a lovely centerpiece with candles set inside each snowflake too…so many possibilities!

DSC_1029


DSC_1013


Materials needed:

  • white or cream-colored lace
  • white glue
  • glitter (optional)
  • scissors
  • water
  • craft stick or plastic spoon
  • a cup for mixing
  • silicone mats
  • plastic wrap (not pictured)
  • small bowls (not pictured)

DSC_0969

First, prepare your work station. Have silicone mats out on the table and mix up your glue. Use about 3-4 parts glue to 1 part water. (An old yogurt cup or butter tub is great for holding your mixture.) Add some glitter to the mix as well, if you like!

DSC_0978

DSC_0983

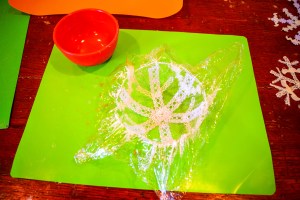
If you’re making a snowflake bowl, cover a small bowl from your kitchen in plastic wrap. (We used measuring bowls.) Pull the wrap tight and smooth it down, though it doesn’t need to be perfect.

Next, get an idea of how you’d like your snowflakes to look. Cut some strips of lace and lay them out, either flat on the table or across your bowl.

DSC_0972

DSC_0974

DSC_0977

When you’re ready to start crafting, dip a strip of lace into the glue mixture. Take it out and run your fingers down the lace to remove any excess glue.

DSC_0984

DSC_0985

DSC_0991

Now, lay the lace strip out…either flat on the silicone mat for a simple snowflake to hang in your window, or across your bowl, if you’re making a lace snowflake bowl.

DSC_0988

DSC_0989

DSC_0992

Continue to dip strips of lace in the glue mixture, then lay them down on top of each other, creating a snowflake pattern.

DSC_0994

DSC_0996

Once your snowflakes are complete, set them aside overnight to dry. If you’re the impatient type, you could also dry them very carefully with a hot blow dryer. : )

DSC_0997

After the glue is good and dry, gently peel the lace snowflake off of the silicone mats. Ready to hang in a window!!!

DSC_0998

DSC_1000

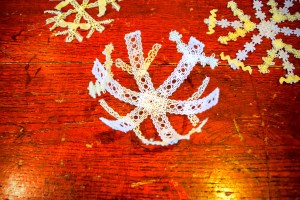
To remove a snowflake from the bowl, turn the bowl upside down. Undo the plastic wrap and remove the bowl. Finally, gently peel the plastic wrap off of the snow flake.

DSC_0999

DSC_1002

DSC_1003

DSC_1004


Beautiful!!!

DSC_1019

Such a fun way to celebrate a snow day!

Road Trip Survival Kit: 10+ Activities for On-the-Go

Every Summer my family likes to take a 7-hour trip to the beach…well, the 7 hours isn’t exactly the part we like, but we do it and we make the best of it! I’m not a fan of giving my kids a screen to look at for the entire trip, because I feel there’s so much that they will be missing out on. Remember when we were kids, going through the entire stash of cassette tapes? Staring out the window watching the terrain change and landmarks pass as we got closer and closer to our destinations, the excitement building? All those silly word games or family air guitar shenanigans? See…I don’t want my kids to miss out on that! I want us to talk. I want them to play, to be entertained, but to experience the trip with us, rather than plugged in and tuned out.

IMG_1696

We started with this ROAD TRIP SURVIVAL KIT when L was just 2. As the kids grow, some things will change, but many will continue to entertain at any age!

Pipe Cleaners, Shoelaces, and Beads

If you have any of those snack cups with the slits on top, they’re the perfect thing to hold beads and prevent spilling! Just tie a shoelace to the handle and you’re good to go!

IMG_3076

Slinky

Who doesn’t love a slinky? You can buy 2 for a dollar at most dollar stores…definitely worth that dollar! We don’t usually play with ours at home, rather we save them for long trips!

IMG_3083

“I Spy” Books

These books are fun for kids age 2 to 100 to look at, no reading required!

IMG_3082

Musical Instruments

When the kids get whiny, bored, tired, put on some jams, some sunglasses and start a family band! Sometimes we even bring out the cow bell – yikes! The kids love it though!

IMG_3081


Paper and Coloring

Go ahead and buy some fun, new crayons for your big trip, as well as a blank composition book, new coloring books, or even post-it notes!

IMG_3080


Figurines and Cars

Even if these things are “old” and have been played with a million times at home, when pulled out one-by-one as a surprise on the 4th hour of your trip, your kids will be delighted…I promise!

IMG_3084

Fairy Folk

L loves her “fairy folk” and will play pretend with them for nearly an hour at home. I scooped up a few of them and their accessories for our last trip. Get the DIY here: DIY Fairy Folk.

IMG_3085

Lacing Boards

If you don’t have lacing boards at home, they’re simple to make. Just cut out a shape from an old cereal box and punch some holes around the edge. Tie a shoelace and and you’re good to go!

IMG_3075

Magna Doodles

These come in all shapes and sizes…and all of them are perfect for the road!

IMG_3073

Kaleidoscopes and View Masters

I always throw one of these in the bag!

IMG_3086

Re-usable Sticker Books

“Melissa & Doug” brand sticker books and Water Wow! books are great for the road. Virtually no mess and they can be used over and over and over and over!

IMG_3077

“I Spy” Bottles

We made this game years ago, and the kids love it! It’s something that can be played with one person or many! Get the DIY here: I Spy Bottle and Games.

IMG_0280


The Tray

We found this traveling tray at Hobby Lobby a few Summers ago. I’m sure you can find one online too! They’re perfect for coloring and containing all those little toys and food.

IMG_3072


It’s hard to believe, but all of this stuff plus more will fit in one medium-sized bag! We usually put the bag off to the side, when we get home, ready to grab-and-go for the next road trip!

IMG_3087


Happy traveling!!! What are some of your favorite activities for on the road?

IMG_1706


Thankful Trees and Variations

What a fun way to teach kids about thankfulness! All you need to do to make your own family “Thankful Tree” is to write down things you and your kids are thankful for on “leaves” and put them together in the shape of a tree! Every year now I look forward to making our “Thankful Tree” as Thanksgiving approaches, and every year we do it a little bit differently! In the past, L and I made a simple tree on a single piece of construction paper, the leaves different colors, but all the same size.

IMG_7616

This year we made our “Thankful Tree” when my niece and nephew came over…and we made a big, fun, mixed-media tree!

IMG_4264

We put the tree up on a door in our dining room and everyone had a job to do! L cut strips of brown paper for the tree’s trunk and branches; my 9-year-old niece helped cut leaves of various sizes and shapes; and my 6-year-old nephew did a little of both!

DSC_0675

After everything was cut, we went outside and collected sticks, twigs, and real leaves. My niece helped write all the things we were thankful for on the leaves, while we all took turns shouting out ideas! Meanwhile, I started to tape the tree trunk and branches up on the door.

DSC_0678

DSC_0677

Once all the leaves were full of things we were thankful for, the kids filled the branches with the leaves! I love how it turned out!


DSC_0689

DSC_0685

DSC_0692

IMG_4264

Other ideas:

  • Trace your hands and cut them out, for your tree’s leaves.
  • Add a new leaf every day of November leading up to Thanksgiving.
  • Make a “Thankful Tree” on Thanksgiving with the entire family.
  • Instead of a tree, put your leaves together in the shape of a wreath.

12191331_10153854550573054_2785937210932093271_o

The above photo was shared by one of my dear friends from childhood, Sarah. Her family is adding a hand-shaped leaf every day this November! Too cute! Comment below and share some of your “Thankful Trees” with us! I can’t wait to see all your wonderful creations!!!

Pumpkin Suncatchers

How sweet are these PUMPKIN SUNCATCHERS? They brighten up our kitchen windows and, hung beside some glue ghosts, they’ve quickly become my favorite Halloween decoration in the house!


DSC_0307


This project evolved while L and I were making it. (I love when that happens!) Originally we were just going to paint some mason jar lids, tie a ribbon on and call them “pumpkins.” Once I realized they’d be hanging in the kitchen window, I had a eureka moment…I knew that turning our pumpkins into suncatchers would be too easy and too perfect! I just love the bright and sunny colors!


DSC_0303

DSC_0304


Materials needed:

  • mason jar lids
  • orange acrylic paint
  • plastic container (berry containers work great!)
  • Sharpie markers
  • green ribbon
  • green pipe cleaners
  • scissors
  • hot glue gun

*Notice the plastic container, hot glue gun, and markers are not pictured here…they surprised us in becoming “needed materials” half-way through the project!


DSC_0245


First, have your little ones paint the mason jar lids orange.


DSC_0247


After the lids have dried, tie a ribbon in a double-knot around the lid.


DSC_0270


Next, cut a pipe cleaner in half. Wrap it around a thin marker or pen to make a curlicue.


DSC_0272

DSC_0273

DSC_0275


Gently wrap the pipe cleaner curlicue around the knot at the base of the ribbon.


DSC_0276


Now for the suncatcher part! Cut the lid off your plastic container and remove the label if there is one.


DSC_0265


Have your little one color the plastic lid with Sharpie markers. L did some in solely “pumpkin colors” while the others she colored freely, using every color of the rainbow. (It’s important to use permanent markers, washable will rub right off and won’t work!)


DSC_0278


DSC_0281


Use the center part of a jar lid to trace rounds on the colored-plastic. Cut the rounds out and make sure they fit into the pumpkin lids. You may have to trim the sides a bit and cut a piece out where the ribbon will lie.


DSC_0282

DSC_0283

DSC_0284


Next, with just a few dabs of hot glue, glue the colored-plastic in place. All done!


DSC_0286


Hang your PUMPKIN SUNCATCHERS up in a bright and sunny window where everyone can enjoy them! Adorable!!!


DSC_0308