Snow Paint Fun

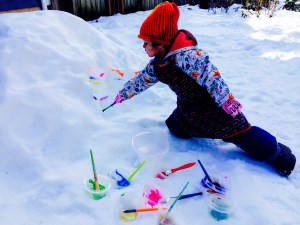
This activity is so easy, so simple, it almost seems silly to write a blog post on it…but people have asked, so here it is! Earlier this week, we had  35 inches of snow fall in our area and it’s given us an opportunity to do anything and everything snow-related…we’ve built igloos and tunnels, gone sledding, and eaten snow cream. I thought today would be a fun day to give “snow paint” a try. Every recipe I’ve seen floating around the internet involves dying water and putting it in separate spray bottles or squirt bottles though, something we just didn’t have. I figured why not just use our tempera paints!?

2016-01-27 19.02.54

We rarely use tempera paints, because frankly I don’t really like them. They’re absolutely perfect for this activity though! Tempera paint in general is washable and non-toxic, so it won’t stain clothes or harm the environment when the snow melts.

IMG_5275

To prepare for snow painting, I gathered 8 small plastic containers, 8 paint brushes, all our tempera paints, and a large plastic container. Even though the paint is washable, we went ahead and put aprons on over our snow clothes and wore old gloves too.

IMG_5269

Outside, spread the small containers out with a good squirt of paint in each one, as well as a paint brush. Now simply, paint the snow! After a day of the snow melting and then refreezing, our snow had a nice icy layer on top…it was perfect for painting!

IMG_5280

IMG_5283

An hour or two later, when it’s time to go inside (L could’ve painted all day!), gather all the brushes and throw them into the larger plastic container. Stack up your paint cups and put them in the container too. Now it’s easy to carry everything inside in only one trip! Just rinse your containers out and put them in the dishwasher to clean…and don’t forget to rinse your brushes too! Super easy to clean up…definitely worth the hours of creativity outside! Enjoy!!!

IMG_5273

IMG_5299

Mixed-media Fall Art

We have some glorious October weather in Virginia this week…cool mornings, sunny days, and brilliant leaves falling from our trees! L’s been painting outside these days, in a world of October color! Yesterday she made a beautiful fall tree using acrylics, melted crayons, and a sprinkle of “leaf glitter” (tiny pieces of actually leaves). The outcome is beautiful!!! I made a similar piece last year that I also adore…the process is as much fun as the piece of art itself!

2015-10-21 06.43.21

Materials needed:

  • canvas (you could do this on cardboard too!)
  • acrylic paints (blues, white, brown)
  • crayons (oranges, yellows, and red)
  • knife and cutting board
  • oven

*A tip when buying crayons for this project…when you’re looking for orange crayons, buy a box of 24 crayons. The larger boxes contain more crayons, but not any more orange and yellows!!! We always seem to run out of orange crayons this time of year!

First, have your child paint their canvas blue. We like to use some darker and some lighter blues, mixing them all together.

DSC_0494

DSC_0496

Next, have them paint a few white, fluffy clouds.

DSC_0500

As the sky is drying, sit back and look at the trees with your child. Point out how the trunk is usually straight and thick. As you move up the tree, the branches get smaller and smaller, and they get more squiggly!

DSC_0498

As you continue to discuss trees and their features, lay out a few various-sized paintbrushes. Have your child put them in order from biggest to smallest. Now they know which paintbrush to use for their tree’s trunk and all its branches!

DSC_0504

Time to paint the tree!

DSC_0508

DSC_0516

DSC_0522

The next step is a little “out of the box,” but that’s what makes it so great! Have your child pick out which crayons are the colors of the fall leaves before them. Using a sharp knife and a cutting board, remove the paper off the crayons and chop the crayons up into tiny pieces. I think we used half a lime-green crayon, one yellow, three or four oranges, and one red crayon.

DSC_0523

Lay the painting down on a flat surface and have your little one sprinkle the crayon shavings all over the trees branches. L also crumbled up an actual leaf from the yard and sprinkled some of it among the crayon pieces. It’s a minor detail, but it’s my favorite. I’ll always remember this day and where L made her Fall Tree.

DSC_0529

DSC_0538

DSC_0541

Once the crayon shavings are all dispersed, put your painting into the oven at 200 degrees for about 3-5 minutes. Watch the pieces as they melt. (Our painting was too big to fit in the oven this time, so I carefully held it under the broilers with the oven set on broil. I did one end, then turned it around and did the opposite.) When you remove the artwork from the oven, be careful to hold it flat and steady…until the crayon wax hardens, the wax will drip if it is tilted at all.

DSC_0542

Isn’t the outcome gorgeous? It’s perfectly imperfect…just like a fall leaf.

DSC_0544

If you think this is just a craft for kids, you’re wrong…you can totally do this as well! “Mixed-media Fall Art” is fun for anyone and everyone! Enjoy!!!

IMG_5687

IMG_5689

IMG_5691

DIY Citrus Stamps

How cute are these DIY CITRUS STAMPS we made this week? They really were simple to make and the outcome is adorable…perfect for Summer! L and I stamped t-shirts, tea towels, and a pillow case for her bed. Just think of the possibilities… You could use this stamping technique to brighten-up party invitations, gift bags, skirts, shorts, a tablecloth, shower curtain…the possibilities are endless (and sweet)!


Materials needed:

  • an orange, lemon, & lime
  • tea towels, t-shirts, etc.
  • knife
  • acrylic or fabric paints
  • flat, plastic lids or plates
  • paper towels
  • parchment paper

If you need to, iron your tea towels or t-shirts first! Protect your work area with parchment paper. (Usually I use cardboard or old newspapers for projects, but with this one I didn’t want the texture of the cardboard to effect the stamping and I didn’t want newspaper to discolor my cloth. Parchment paper was perfect!)

Next, cut your orange, lemon and lime in half with a sharp knife. If you like to, cut a little “handle” in each fruit half…makes stamping easier, especially for kids!


Turn the fruit over onto a paper towel, to soak up some of the juice from the fruits.

Next, squirt your paints onto plastic lids or plates.

Dip the sliced fruit into the paint. Blot it onto a paper towel, if there appears to be too much paint.


And press the fruit gently onto your cloth. Too easy, right!?


We experimented and made some of our tea towels patterned, while others we stamped randomly. The random was definitely our favorite…a little more carefree, like all things “summer” should be!

If you have some prints that are more solid looking (a bit too much paint), don’t fret…just overlap another fruit in another color on top! It will look like you planned it that way all along!


Instead of stamping an entire tablecloth, you can just stamp tea towels and overlap them as we did here. Looks great on their own or with a solid tablecloth underneath!

Too cute, huh!?! Enjoy!!!


Splatter Paint Fun!!!

While SPLATTER PAINT FUN! can be done anytime of the year, we thought it would be an exceptional craft to do on the 4th of July! This can get messy, so be sure to cover your work area with old newspapers or, better yet, take it outside! I helped L with the cut-outs, but let her do most of the splattering on her own. It’s so much fun splattering paint, I bet you’ll want to join in the fun too!

Materials needed: 

  • toothbrush and/or kitchen scrub brush
  • paint
  • construction paper
  • old cereal box
  • scissors
  • old newspapers, towels, etc.

First, cover your work area with old newspapers. After all, the paint will splatter!

Next, cut some fun shapes out of your old cereal box. We did some wavy stripes, stars, and a city skyline for the 4th of July.

Lay the shapes atop your construction paper. You can do all the shapes at once or, as we did, layer them.

Next, dip your toothbrush bristles into paint. Facing the toothbrush downwards (bristles facing the paper) have your kids run their fingers along the bottom of the brush splattering the paint. When splattering around shapes, the more the better!


After splattering is complete, remove cardboard shapes carefully.

If layering paint and patterns, you can now lay more shapes down and splatter with a different color of paint.


Experiment! Have fun! Make messes!


With the kitchen brush, we didn’t “splatter” necessarily. (But you could!) Instead, L dipped the brush into paint and then pushed the bristles down on her paper to make her own, unique fireworks display! So cute and easy!


For more fun painting ideas check out our page “10 New Ways to Paint“! Enjoy!!!

Egg Carton Flower Wreath

Can you believe this beautiful Spring wreath was made primarily out of egg cartons!?! I just love the outcome! I’ve wanted to make an EGG CARTON FLOWER WREATH for years! Last year we tried it, using tempera paints, but the colors weren’t nearly as vibrant. I highly suggest using acrylics for this project. Our EGG CARTON FLOWER WREATH hangs inside Our Beautifully Messy House, as we await the first blooms of spring flowers outside in our garden!


Materials needed:

  • 3 egg cartons
  • med-large cardboard piece
  • sharp scissors (fabric scissors)
  • acrylic paints
  • hot glue gun and glue

First, cut the egg cartons into flower shapes. Get creative! The pointy, divider sections can be used to make narrow flowers or daffodil trumpets and the lids of the egg cartons can be cut into leaves.

After all your flowers are cut, time to paint with your little ones! L and I painted side-by-side…when she was finished with a flower or bored with a color, I’d let her start on another one while I filled in any spots she may missed. After all the flowers were painted a solid color, I went back and painted on some details! Although the flowers look great in solid colors, the details really bring them to life…worth the extra 30 minutes of painting!


To make your wreath base, use some large mixing bowls to trace circles onto your cardboard and cut it out. I used two separate pieces of cardboard and just taped them together. Once your wreath base is cut out, give it a quick coat of green paint.


Next, using a hot glue gun, glue the leaves onto your wreath base randomly.

After the leaves are in place, glue the flowers on. Try to space the colors out, but don’t think too much about order. In nature, nothing is perfect and the imperfections themselves are beautiful!


Hang your wreath on a door, a wall or in your kitchen window! Enjoy!!!


Winter Shelter for Strays

Though we don’t own any furry pets ourselves, our neighborhood seems to have its own little cat community. On any given day we may have up to 5 or 6 cats playing in our yard, hiding under our front porch or napping beneath our Little Free Library. Some of the cats have collars and tags, though quite a few do not. With the temperatures dropping well below freezing, L and I decided to make a warm place for our kitty friends to rest.


IMG_9121

IMG_6569


Materials needed:

  • styrofoam cooler (found at your local grocery store)
  • knife
  • paints (optional)
  • old towels or bedding
  • tape

First, remove the lid and turn the cooler over. Using a knife, cut a small doorway for the cats to go in and out. Next, paint the cooler whatever snazzy way you like!


IMG_9108

IMG_9111


Once the paint is dry, fold up some old towels or bedding (we cut up an old mattress pad) and place it inside the lid.

IMG_9112


Put the cooler on top of the lid and tape it in place.


IMG_9113

IMG_9114


(My friend Helen takes this project a step further…she places the styrofoam cooler inside a plastic rubbermaid-like box with a hole cut out and layers hay in between! Extra warm and cozy!)

Now for the final step, find a safe place near your home to put your WINTER SHELTER FOR STRAYS, preferably up against a building and out of the wind.


IMG_9115

IMG_9121


We put our Winter Shelter in our backyard where we often see cats passing through and, an extra bonus, we can see the shelter from our kitchen window. I know L will be watching for her feline friends first thing every morning! She was so proud today knowing she was helping others!

DIY Fairy Folk

L and I made these FAIRY FOLK this morning and she’s been playing with them all day long! She loves them!!! L has made up a house, a bed, a car for them…a phone, bathtub, table and chairs, a crib and even a change of clothes! Tomorrow we shall have a “Fairy Tea Party” in their honor. The fun never stops around here!

IMG_9038

IMG_9033


Materials needed:

  • wooden peg people
  • acrylic paints
  • felt or fabric scraps
  • hot glue gun and glue


IMG_8991

First, paint the fairies’ bodies.

IMG_8992


Next, paint hair and eyes on the fairies. I tried to make each of ours a little different.

IMG_9003


Then draw and cut a little fairy wing stencil. You can trace this on the felt or fabric before cutting out the wings. After a few, I just winged it! Ha! I liked having some big, some small. (Cut a few extras for fairy “outfits.”)

IMG_9004

IMG_9005

IMG_9008

To complete the fairies, attach the wings to the bodies using just a touch of glue with your hot glue gun. Now, time to play!!!

IMG_9009

IMG_9010

IMG_9011

Our “Acorn Cap Treasures” were perfect for the fairy folk. As was the “Fairy Furniture” we made last Summer.

IMG_9033


A toy teacup was just the right size for a bath and one of WB’s socks made a roomy bed.

IMG_9026

IMG_9027


The fairies also enjoyed skating on this melted-bead ice rink and, of course, driving in their jam jar car.

IMG_9020

IMG_9024


A change of wings for the fairies…

IMG_9039


I’ll be sure to post our Fairy Tea Party details later this week so your lil ones can join in the fun! Enjoy!

IMG_9025

Pine Cone Flowers

Have I mentioned before how much I love Fall?! So many things to find and create with…like these mini-pine cones! I’ve been thinking of making “pine cone flowers” for months now, and when L and I found these miniature ones it was a done deal.

Materials needed:

  • miniature pine cones
  • twigs (the more lil knobs and branches the better)
  • acrylic paints
  • hot glue gun and glue

First, choose what colors you’d like your “flowers” to be…we choose multi-colored! Paint each little pine cone as you like. Set aside to dry.


Next, paint your twigs a mixture of dark and light greens. Allow to dry.


Once everything is dry, you can assemble your pine cone flowers. Using a hot glue gun, put a little dab of glue on the tip of a twig. Quickly press and hold a pine cone in place. Repeat until all your pine cones are used up.


So cute, huh!? Arranged in a little, antique bottle they make a sweet gift for a child or an adult.

The Buckeye Zoo (and Other Fall Seed Creations)

I just love this time of year! One of my favorite things to do since I was a kid and now with my own kids is collecting the Fall leaves, nuts, and seeds. L says she likes to be a “thing finder” like Pippi Longstocking on our nature walks. This year, as we’ve been foraging, we’ve also begun gluing some of our buckeyes and other nuts and seeds together into animals.

Materials needed:

  • buckeyes
  • acorns
  • helicopter seeds
  • whatever other nuts and seeds you can find
  • feathers
  • twigs
  • glue (I used a hot glue gun, but let L use wood glue.)
  • acrylic paint
  • sealant

Before you start gluing, it’s important to make sure that all your findings are bug-free and that they’re dry. Put a layer of tinfoil on a baking sheet or pan and spread your nuts and seeds out on top. With your oven set to 200 degrees, bake your acorns, walnuts and buckeyes for about 1.5 to 2 hours. Turn the seeds over about every half an hour to prevent burning. With some of the spiky or more delicate seeds, bake them at a lower temperature…around 180 degrees…for an hour or so.

After the seeds are baked and cooled, you can start gluing together your creatures. I prefer using a hot glue gun…it’s quick and holds the buckeyes and other seeds together nicely. I let L glue some of her own with some standard “wood glue” though. It takes longer to dry, but it’s much safer for a 2 year old to use on her own!


The elephant was the first member of our Buckeye Zoo…definitely L’s idea! She looooves elephants!


Here’s a little bunny rabbit…I think tomorrow I’ll make some flop-eared bunnies for a dear friend of mine. So simple, but so cute!


I thought this one was gonna be a porcupine or hedgehog, but L said it looked most like a sheep. I agree!

And I just love this bird. We’ll be making him/her a nest by gluing together twigs later this week.


While most of our creatures were complete after gluing, we chose to paint others…like L’s caterpillar and the turtle and dragonfly we made together.


What Buckeye creatures will you and your kids make this year? We’d love to see your creations shared here in the comment section…there are so many possibilities! Have fun collecting and creating!!!

Playing Monet

Ever since I was a kid and was given the book “Linnea in Monet’s Garden,” Claude Monet has been one of my very favorite painters. When L found my old book last week, I immediately thought of our melted crayon art and thought that we could try to make our own impressionist, water lily artwork. We used a different technique to melt the crayons this time, and we used materials found in the recycling basket for a “canvas.” I was thrilled to be able to teach L a little bit about Monet and his phenomenal paintings…and in such a fun way too!


Materials Needed:

  • empty cereal or cracker box
  • acrylic paints
  • crayons
  • oven

First, I cut the cereal boxes to make nice little “canvases” to paint on. I left the side flaps intact, making the artwork easier to move while working, using the flaps as handles. You can cut them off at the end.

Next, looking at Monet’s painting we talked about what colors to paint the background, representing the water. We chose two colors of green and two of blue to use. I let L paint the cardboard canvas however she pleased, encouraging her to cover the entire thing.


After the paint dried, it was time to create the lily pads and flowers. I made crayon shavings by simply cutting up crayons into little shavings or pieces. You can use a cheese grater if you like, but a sharp knife works just fine! (The crayon shavings pictured here are from another piece of work…hence the orange, yellows and reds. For Monet’s water lilies, I made shaving from three different green crayons, as well as some pinks, yellows and white.)

Now, using one color at a time, L sprinkled the crayon shavings onto her canvas. We started with the greens for the lily pads, putting the shavings into little piles, and followed it with the pink and white for flowers.


Next is the really fun part…melting the crayons, transforming the artwork! With the oven set to 200 degrees F, I lay the cardboard on a cookie sheet and placed it in the oven for 5 minutes. L loved watching the crayons melt!

Once the shavings were all melted, we removed the artwork from the oven to cool. Be very careful not to tilt or shake the artwork at this point…for the first minute or two before the melted crayon cools, it’s very liquid and will drip or move-mix around. After a couple minutes, the crayon is dried and the art ready to show off and display!


I hope you have as much fun with this one as we did! If you have a favorite impressionist painter, other than Monet, I’m sure the melted-crayon technique would work to mimic their work too! Enjoy!