Celery-Rose Print Shirts

If you’re a frequent reader of the blog, you know how much I love printing with the girls…citrus prints, finger prints, leaf prints, cardboard tube-heart prints, and now celery prints! They’re the perfect replica of a rose flower! Like most of our printing projects, the girls and I put these on shirts today so they can wear their art everywhere we go. You could also make a beautiful table cloth, tea towels, or pillow cases with this celery-rose print craft.


Materials needed:

  • celery
  • knife
  • t-shirts
  • acrylic paints (red, pink, and green)
  • paper plate or plastic lid
  • thin cardboard piece


First, place a thin piece of cardboard inside the shirt you will print. A cereal box flattened out works great…just something to protect the backside of the shirt from any paint that may soak through.


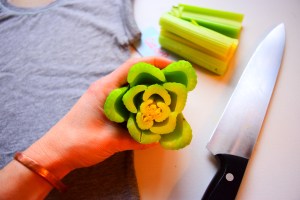
Cut the celery straight across, down towards the bottom of the celery stalks where they all come together. Don’t worry if it doesn’t resemble a perfect rose. First, roses aren’t perfect either…they have beautiful and unique imperfections just like people do. And second, you can add a green leaf detail at the end that will round the flowers out.


Next, put your red and pink paint on a plastic lid or paper plate to use as your palette. Press the celery into the paint and swirl it around a bit to get the paint on all stalks.


Carefully, press the celery onto the shirt and lift up. Voilà! Continue this process until you have all the flowers you want.


The last step is to add a little bit of green. Take one of the celery stalks that was cut off and simply stamp it into some green paint. Press it sparingly around the flowers to round them out and make the appearance of leaves.


Beautiful!!! This craft makes beautiful Valentine’s Day gifts, but would be perfect for any flower-loving friend anytime of the year. Enjoy!!!


Milk Carton Fairy Houses

Who knew milk cartons had so much potential??? They are perfect for making fairy houses and gnome homes! First off, a milk carton is just the right size for fairies…all it needs is a door and a few windows to make it feel like home. Milk cartons are also water-proof, providing adequate housing for both indoor and outdoor use. WB and L like to play with their fairy houses during the day and, at night, we tuck a little tea light inside to turn them into night lights! So sweet!


2016-10-06-14-00-32

Materials needed:

  • milk cartons
  • white primer spray paint
  • exacto knife
  • acrylic paints
  • hot glue gun
  • sticks, bark, moss, acorns, etc.
  • battery-operated tea lights

dsc_0005

First, spray your milk cartons with some primer. The surface of milk cartons is usually waxy and paint will have a hard time sticking. A coat or two of primer should do the trick!

dsc_0006

Next, using an exacto knife, carefully cut a door and windows into the house. And do not worry…the windows don’t need to be perfect! Fairy houses’ never are!

dsc_0344

Now the fun part for the kids, have your little ones paint and decorate the houses. Start with a solid color or two underneath.

dsc_0347

img_0240

Then add details like polka-dot doors and Fall pumpkins. For our pumpkins, the kids used a wine cork as a stamp!

dsc_0349

dsc_0353

While the paint dries, send the kids outside to collect nature materials to use for a roof.

dsc_0356

Before assembling the roof, you can easily flip the screw-top opening inwards. Just push it in with your fingers…it’s easier than you think!

dsc_0357

dsc_0358

Glue twigs or bark over the opening, and then add all sorts of nature findings. Each house will be unique!

dsc_0360

dsc_0359

To light your fairy houses up at night, place battery-operated tea lights inside. You could also use a string of lights in and around the houses for a magical display!

dsc_0373

dsc_0383

“Those who don’t believe in magic will never find it.” -Roald Dahl

dsc_0393

Mini-Canvas Magnets

MINI-CANVAS MAGNETS are not only a fun project for kids (and adults!) of all ages, but they also make sweet, little gifts for friends, grandparents, and teachers! I’ve founded mini-canvases at Michael’s on numerous occasions…usually on the ends of the acrylic paint aisle.

dsc_0327

dsc_0339


Materials needed:

  • mini-canvases
  • acrylic paints & brushes
  • thin magnet strips

img_5625

First, paint your mini-canvases. The canvases are so small, little hands have no problem filling the space with a rainbow of colors. Best to give the kids 2-3 colors to use at a time. You may even want to paint a few!

img_5638

img_5636

img_5668

After the paint dries, flip the canvases over and attach magnet strips. You can find an array of magnets at craft stores with an adhesive tape on one side. Best to choose thin magnets, so the canvases lie close to the fridge.

dsc_0330

dsc_0331

Now, time to gift and/or display your mini-masterpieces! So cute…and easy!!! Enjoy!

dsc_0341

dsc_0339