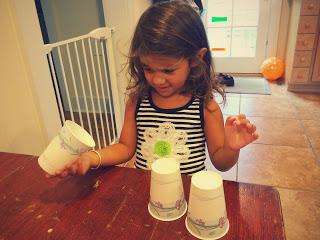
5 Rainy Day, Bouncy Ball Games

It wasn’t a “rainy day” here today, but it might as well have been! L was having fun, being a kid, over the weekend and ended up with stitches in her forehead…so, no swimming for the week while temps are in the upper 90s. Yuck! We had a ball this morning though (every pun intended) playing with a little, sparkly bouncy ball and some paper cups…kept us entertained for hours! You really could play these games anytime and just about anywhere!


Materials needed:

  • bouncy ball
  • paper cups

Game #1 (our favorite!): Catch the Ball

This can be a one person game or multi-person game.
One person drops the ball, bouncing it on the ground, and everyone tries to catch it in their cup. This is a great activity for little ones to learn and practice hand-eye coordination!


Game #2: Find the Ball

This game can be played various ways. You can perform the classic challenge, where you hide the ball under one of three cups and move them all around. The other person watches and then guess which cup the ball is underneath.  Or, you can have 5 or 6 cups laid out, upside down. One person turns their back on the game, while the other person hides the ball under a cup. It’s fun to move the cups around into various shapes and patterns as well, while hiding the ball.


Game #3: Stack and Find

Take turns stacking the cups and hiding the ball inside. The other person is left to guess which cup the ball is in.


Game #4: Bounce into the Cup

Put the cups out onto the floor. Take turns tossing or bouncing the ball, trying to get it into a cup. Getting it into a cup isn’t too hard, but doing it gently enough so the cup stays upright is!


Game #5: Hungry, Hungry Hippos

Sit facing each other, with your feet touching, making a diamond-shape with your legs. Drop the ball, bouncing it in front of both players. Each person tries to cover up the ball, catching it underneath a cup. This game reminded me of “Hungry, Hungry Hippos”…hence the name. Enjoy!


What other games do your kids like to play involving bouncy balls?

DIY Tin Can Bird Feeder #2

To celebrate the last week of National Bird Feeding Month, L and I made these adorable TIN CAN BIRD FEEDERS! They are really easy to make, look beautiful and cost nothing…just go digging through your recyclables! Not only will the birds love this winter treat, this bird feeder would make a fantastic gift for your children to make for a friend, parent or grandparent!

IMG_0317

IMG_0150

IMG_0141

Materials needed:

  • tin can w/ lid
  • wooden paint stirrer
  • pliers
  • acrylic paints
  • hot glue gun
  • string
  • glossy sealant (optional)
  • church key can and bottle opener (optional)
  • bird seed


IMG_0107

IMG_0111

First, make sure your can is clean and remove the label.

IMG_0108


Using your hands, carefully bend the lid of the can in half. Using pliers, squeeze it flat.

IMG_0109


Using the hot glue gun, glue the paint stirrer inside the can. You can break the stirrer if it’s too long. This will be the birds’ perch.

IMG_0113


Next, glue the bent lid back into the can as pictured. Try not to make a huge mess with the hot glue gun, but if the glue shows it is no big deal…you will paint over it next.

IMG_0114


Paint the can any way you like.


IMG_0125

IMG_0128

IMG_0129


After the paint dries, you can use the can opener to make holes in the can from where you’ll hang it on a string. On one of our cans I placed two holes on the top…this bird feeder will hang from an old clothes line end.

IMG_0136


On our second can I made holes in the back of the bird feeder…this one we will tie onto a fence. I was careful to put the holes in the can after we painted it, because I wanted to avoid any sharp edges while L was handling the bird feeder.

IMG_0135


If you’d like your bird feeder to have a shiny, glossy finish, spray the can with a glossy sealant. It only takes 15-30 min to dry and will help protect the paint as well!

IMG_0137


Thread string through the holes of the bird feeder and fill with bird seed!


IMG_0138

IMG_0150


Now, find the perfect spot to hang your TIN CAN BIRD FEEDER! We placed one of ours right outside our kitchen window…the girls will love watching their little wildlife friends snack throughout the day! Enjoy!


IMG_0141

IMG_0144

IMG_0142


IMG_0191


In case you missed it, here’s the first DIY TIN CAN BIRD FEEDER we made! Another fun nature craft!

IMG_3262

Snow Candles

Ever since I was a kid I’ve always wanted to try making candles in the snow and today was the day!!! Such a cool experiment! I just love how they turned out! The sides of the SNOW CANDLES have this beautiful texture created by the crystals of snow. Just like snowflakes, each snow candle is unique!

IMG_0008

 IMG_0027

IMG_0028

IMG_0023

This is definitely a craft that should be done with adult supervision, though it is a fun one for kids of all ages.

Materials needed:

  • snow
  • paraffin wax
  • crayons
  • candle wicks
  • med/large pot for water
  • tin can or candle pouring pot
  • stick

 IMG_9999

First, decide what color you want your candles to be. Pick out 5 or 6 crayons all similar in color. L chose purples for our candles. Using a knife, cut a slit down the side of the crayon papers and peel the paper off.

 IMG_0003

Fill your pot with water about an inch high. Next place your pouring pot or tin can in the water creating a double boiler. (If using a tin can, make sure it is clean and the paper has been removed.) Place 3 blocks of paraffin wax and your crayons into the pouring pot or can. Bring the water to a boil, then turn the heat down to med-low so it’s at a simmer. ***Never melt wax directly on the stove top without the double boiler! The high heat may cause a fire!***

 IMG_0002

IMG_0004

Watch as the crayons and wax melt completely. Turn the stovetop off as you go outside to prepare your candle molds.

Outside you’ll need about a foot of snow. If the snow isn’t deep enough, you can use your hands to pile it up and lightly pack it down. Using a stick or a spoon handle, dig a little hole in the snow. We made ours about 4 inches deep and 1 to 2 inches wide.

 IMG_0005

Back inside, turn the stove back on for a couple minutes to heat up the wax again. Gather your candle wicks. When you’re ready, carefully remove the pouring pot or tin can (using an oven mitt) and quickly go outside to pour the wax into your molds. After a couple minutes, insert the wicks into your candles and hold in place until the wax hardens a bit…about 4-5 minutes.

 IMG_0007

IMG_0008

Leave your candles in the snow for an hour to harden completely. As the wax hardens, the candles take on their funky shape and texture. So cool!

 IMG_0014

Once they have hardened, carefully dig the candles out of the snow with your hands. Inside, use a knife to shave off some of the bottom of the candles if needed, so they will sit flat. Using scissors, trim the wicks to 1/2 inch high.

 IMG_0018

IMG_0020

Arrange on a dish or in a large bowl, add some decorative “fairy stones” if you like and enjoy!!! Beautiful!!!

 IMG_0025

IMG_0029

Bird Feeder Garland and Bird Feeder Ornaments

The BIRD FEEDER GARLAND is one of my favorite Winter crafts. It’s fun to make and even more fun to watch the wildlife activity that arises in our backyard after we hang it up! This week we’ve watched birds nibbling, followed by squirrels chasing the birds, then snacking themselves, and lastly, we observed four neighborhood cats stalk the squirrels for two days straight. Easy Winter entertainment…the girls and I have been glued to our kitchen window! The BIRD FEEDER GARLAND itself looks beautiful hanging in a tree, around a bush, or along a fence!

IMG_9838

Materials needed:

  • dental floss
  • unsalted peanuts in their shells
  • old apples, oranges, cranberries and/or raisins
  • embroidery needle
  • cardboard


IMG_9795

Thread the dental floss into the needle. I use dental floss for lots of projects, because it’s always on hand and is super-sturdy! Using the needle, string the peanuts onto the dental floss. Having cardboard under the peanuts, makes it easier to push the needle through. Tie a knot after you string the first peanut to hold the rest on!


IMG_9797

IMG_9796

IMG_9799


You can cut an apple into small pieces to string as well. If you have dried fruit, you can string that along with the peanuts too.


IMG_9798


My helper squirreling away some apple bits…

IMG_9800


Once the peanuts are all strung, find the perfect place to hang your BIRD FEEDER GARLAND!


IMG_9832

IMG_9830


The BIRD FEEDER GARLAND looks great on it’s own, but to really give the birds a treat, add some BIRD FEEDER ORNAMENTS as well! Kids love helping with this part!

IMG_9842


Materials needed:

  • dental floss
  • pinecones
  • peanut butter
  • bird seed
  • butter knife
  • 2 plates


IMG_9803

First, tie the dental floss in a knot or two around the top of the pinecone.


IMG_9804

Using a butter knife, slather on some peanut butter.


IMG_9805

IMG_9806


Pour some bird seed out on a plate and let your little one roll the peanut butter-covered pinecone through the bird seed.

IMG_9811


Hang the pinecones from your BIRD FEEDER GARLAND!


IMG_9819

You can also slice some apples and/or oranges to hang from the garland. And if you make these DIY Cereal Bird Feeders, you can add them as well! Enjoy!!!

IMG_9820

IMG_9709


DIY Cereal Bird Feeder

Being that February is National Bird-Feeding Month, I thought we’d make and share a few homemade, bird feeders with you over the next few weeks! This DIY CEREAL BIRD FEEDER may be the quickest and easiest one to make! I remember making similar ones when I was in grade school. So cute!

 IMG_9709


IMG_9711


Materials needed:

  • pipe cleaners (or other thin wire)
  • O-shaped cereal (non-sugary)
  • ribbon

 IMG_9691


First, bend the wire in half gently, making a V-shape.

 IMG_9692


Have your little ones string the cereal onto the wire, as you would with beads. Leave about 1/2 – 1 inch of the wire showing at the ends.


IMG_9696

IMG_9698


Twist the ends together and shape into a heart.


IMG_9699

IMG_9700


Tie some ribbon in the middle of your bird feeders and hang them outside for the birds!


IMG_9702

IMG_9711


Notice the hearts are rather light, so hang them up in a bush or against a tree trunk…someplace protected from the wind. Enjoy!

 IMG_32621


Check out our DIY TIN CAN BIRD FEEDER as well!

PVC Pipe Ball Drop / Water Run

We made this PVC PIPE BALL DROP / WATER RUN last Summer to take with us to the beach…beach houses usually have large windows and sliding doors so I knew it’d be the perfect place to test it out. We originally used corn kernels to drop through the tubes, which turned out to be a huge mess, but we had fun!!! As cabin fever set in this week with cold, snowy weather outside I decided to bring out the PVC PIPE BALL DROP / WATER RUN again! This time we used poof balls (as well as plastic fairies and frogs) to drop through the tubes and it worked great! You could also put this up in the shower and dump water through the tubing to make a water run…I think we’ll try that next! The materials for this project only cost about $10 and it provides hours of fun!


IMG_9538

IMG_9528


Materials needed:

  • PVC connectors and elbows
  • suction cups
  • drill
  • flathead screw driver
  • poof balls, beans, feathers, pennies…

We found these suction cups at the craft store and they were perfect…just remove the little, metal hook.

 IMG_9455


First, drill a hole in the middle of one side of each PVC connector. Compare the suction cup piece with the drill bits to figure out the right size to use…you can always drill a bigger hole if need be, so start with the smaller bit if you’re deciding between two. Using the flat head screw driver, pry and poke the suction cup into the PVC connector.

IMG_9456

IMG_9452

IMG_9453


Now, time to play!!! Press the tubes onto a sturdy glass door or window and let the fun begin! It’s fun letting the kids experiment with placement of the tubes!


IMG_9480

IMG_9464


If your “Ball Drop” has two starting places, it’s fun to race the balls down…see whose comes out first!

 IMG_9471

IMG_9490


To mix things up, give your kid a spoon or tongs to pick the balls up and drop them down!

 IMG_9552

IMG_9559


Get crazy! Have fun! Enjoy!!!

20 Non-Candy Valentine Ideas!

Valentine’s Day is just around the corner…time to spread a little love and happiness! Instead of giving out candy this year, why not make some NON-CANDY VALENTINES for friends and loved ones? Here are a few ideas for your kids’ friends and for yours…you may even want to make a “Thumbprint Necklace” for yourself! Most of these are really quick and easy to make too! Enjoy!!!

2016-01-14 21.04.09

Just click on the link under each picture for the “how-to!”

For kids:

IMG_2106

Homemade Sidewalk Chalk

DSC_0574

Hidden Fairy Bath Bombs

IMG_1988

DIY Pocket Parachutes


IMG_9038

Fairy Folk


IMG_8741
Sock Puppets


IMG_9380
Melted Crayon Stones…Love Rocks!


IMG_3348

Craft Stick Fairy Doors


IMG_8404
Scented Play Dough


IMAGE_2341
Story Stones


DIY Capes…Wizard Capes…Superhero Capes

IMG_9308

Sensory Bottles, Sparkle Bottles, Glow-in-the-Dark Bottles, and an Ocean in a Bottle!

IMG_0981

DIY Flower Fairies

IMG_1375

Doorknob Mushroom-Fairy Houses

For adults:

IMG_84811
Thumbprint Necklace

IMG_9978

DIY Chocolate Orange Sugar Scrub


IMG_8122
Semisoft Honeysuckle Soap


IMG_9188
Heart Wreath


IMG_9161
Strawberry Jam Scones

DSC_0943

Cardboard Heart Stamps

IMAGE_1417

Melted Crayon Art with Variations

DIY Heart Wreath

I’m so glad I dreamt this HEART WREATH up last night…it’s that time of year when your Christmas wreath needs to come down off the front door, but it’s not quite time for your Spring wreath to go up. This HEART WREATH is cute, simple, sweet and perfect to get us through the months of January and February!


IMG_9192


Materials needed:

  • wire coat hanger
  • fabric scraps
  • scissors
  • pliers
  • ribbon


IMG_9170

First, untwist the coat hanger apart. It’s easiest to do this part with your hands, holding the top of the hanger in one hand and untwisting it from below with the other.

IMG_9171


Once the hanger comes apart, try to smooth out some of the bends. Gently fold the hanger in half as well.


IMG_9172

Next, bend the hanger into a heart shape, looping the ends together with the pliers. It’s okay if your heart isn’t perfect…the fabric scraps will hide any blemishes.


IMG_9175

IMG_9174


Once you are satisfied with your wire heart, it’s time to cut some fabric strips. Each strip should be about 1-1.5 inches wide and 5-7 inches long. They do not all have to be the exact same length!


IMG_9176

Now to assemble your wreath…simply knot the fabric strips around the wire. Pull each knot taut and, every once in a while, push the knots down so you can squeeze on as many fabric strips as possible.


IMG_9177

IMG_9178

IMG_9180


If the fabric you’re using is blank on the underside, simply fold it in half before knotting.


IMG_9183

Once your heart wreath is made, use a ribbon to hang it on your front door! So sweet!!!

IMG_9188


This wreath would also be beautiful hanging inside in a kitchen window or on a wall! Enjoy!!! Happy Valentine’s Day!

Winter Shelter for Strays

Though we don’t own any furry pets ourselves, our neighborhood seems to have its own little cat community. On any given day we may have up to 5 or 6 cats playing in our yard, hiding under our front porch or napping beneath our Little Free Library. Some of the cats have collars and tags, though quite a few do not. With the temperatures dropping well below freezing, L and I decided to make a warm place for our kitty friends to rest.


IMG_9121

IMG_6569


Materials needed:

  • styrofoam cooler (found at your local grocery store)
  • knife
  • paints (optional)
  • old towels or bedding
  • tape

First, remove the lid and turn the cooler over. Using a knife, cut a small doorway for the cats to go in and out. Next, paint the cooler whatever snazzy way you like!


IMG_9108

IMG_9111


Once the paint is dry, fold up some old towels or bedding (we cut up an old mattress pad) and place it inside the lid.

IMG_9112


Put the cooler on top of the lid and tape it in place.


IMG_9113

IMG_9114


(My friend Helen takes this project a step further…she places the styrofoam cooler inside a plastic rubbermaid-like box with a hole cut out and layers hay in between! Extra warm and cozy!)

Now for the final step, find a safe place near your home to put your WINTER SHELTER FOR STRAYS, preferably up against a building and out of the wind.


IMG_9115

IMG_9121


We put our Winter Shelter in our backyard where we often see cats passing through and, an extra bonus, we can see the shelter from our kitchen window. I know L will be watching for her feline friends first thing every morning! She was so proud today knowing she was helping others!

Giant Ice Marbles

How cool are these GIANT ICE MARBLES!? I’d seen pictures of something similar before, but never a “how-to” on making them. Figuring it couldn’t be too hard to do, we gave it a try! There is definitely a list of things not to do we quickly found out. Haha! Hopefully I can help you avoid such mistakes! These GIANT ICE MARBLES are just beautiful in the snow!


IMG_8998

IMG_9085

Materials needed:

  • regular sized balloons
  • food coloring
  • warm water
  • below freezing temps

First, put 5-10 drops of food coloring in a balloon. Next, fill with warm water and tie off with a knot. Do not try putting food coloring in last…your hands may become dyed blue for a day or two if you do. Make sure to use warm water instead of cold…it helps the coloring spread evenly around the entire balloon. If you fill the balloon to only mid-capacity it will help make the marble round as a ball. Before tying the knot, very carefully let any air residing just above the water line out of the balloon…simply do this by loosening your grip on the mouth of the balloon until a bit of water starts to leak out.


IMG_8989

Now, it’s time to put the balloon outside. Placing the balloon partially on its side (like the balloon pictured on the far right) and in snow is best…helps it keep a nice round shape rather than flattening out.

IMG_8974


Leave the water-filled balloon outside in below freezing temps for 36 to 48 hours. Even if the temperature is in the single digits, one night is not enough for the entire balloon to freeze. As you can see with this one, the water in the center will flow right out.

IMG_8975


Finally, after the water is completely frozen, cut and remove the balloon from your GIANT ICE MARBLE. Beautiful!!!


IMG_9082

IMG_9066

IMG_9060

IMG_9085