Toad Cottages

I saw this idea in a book we checked out from the library recently, “Toad Cottages and Shooting Stars” by Sharon Lovejoy, and thought it was just the cutest! Such a simple and fun summertime craft for kids of any age! Around our house the kids are always finding little critters under rocks and flowerpots and around tree stumps, so why not make little houses inviting the slugs and frogs and skinks and toads and roly-polies to come and stay a while? We expanded on the Toad Cottages idea and also made a Slug Sanctuary, a Frog & Toad & Slug Hotel, and a Frog Planetarium. So much fun!!!


Materials needed:

  • old flowerpots
  • acrylic paints and brushes


First, make sure you protect your painting surfaces from the acrylic paint and have the kids wear smock-shirts.


Next, let the kids paint! We did some pots individually and some as a group effort.


After the paint has dried, it’s time to let the kids pick spots around your house and garden where they think their frog friends would like to visit! Prop one edge of the turned-over flowerpots up on a rock or large stick to give the critters an easy entrance and exit.


Now our kids are checking under their flowerpots first thing in the morning, to see if they’ve had any visitors over night! Watching the worlds of nature and imagination collide in your young one’s eyes is the best! Pure magic – enjoy!!!

Tin Can Telephone

Now I know this craft, toy, activity is as old as they come, but how many of you have actually made a TIN CAN TELEPHONE for your kids yet!?! L has been begging for weeks for us to make one and today was the day! It was so quick and easy to put together and the kids played with it all afternoon. L already has plans for tomorrow and how we’ll make a longer TIN CAN TELEPHONE that will stretch to the neighbor’s porch. And yes…if you’re wondering…yes, it does work!!! As you probably remember, the key is making sure the string is pulled taut when you’re talking to each other, and try not to rest the can against your face as well. Enjoy!

2016-05-18 19.59.34


Materials needed:

  • 2 tin cans, clean and lids removed
  • Sharpie markers (optional)
  • awl or nail
  • scissors
  • string
  • tape (fabric, duct, or gaffer)

DSC_0211

First, color the cans with Sharpie markers. Of course you could always paint the cans, glue paper to the cans, or leave them plain as well.

DSC_0216

DSC_0218

Next, put tape on the cans to protect your kids from any sharp edges. To do this, measure the tape, to get the length right.

DSC_0219


Carefully roll the can over the tape, wrapping the tape around the can, and leaving about half an inch of the tape hanging off the edge.

DSC_0222

DSC_0223

Next, use scissors to cut the tape as pictured. Then, fold all the flaps down over the can’s edge. No fear of little hands getting cut now!

DSC_0224

DSC_0227

DSC_0228

Using an awl or a nail, poke a hole in the bottom of each can.

DSC_0229

Cut a piece of string and thread it through the hole in the bottom of a can. Double or triple knot the string. Repeat on the other side of the string with the second can.

DSC_0230

If the holes seems to be a bit sharp on the inside, and you have especially little hands that you’re afraid may explore the inside of the cans, you can put a piece of tape over the knots and holes of the cans.

DSC_0232

DSC_0231

Now, time to play! Your little ones can experiment talking across a room, through fort walls, up and down stairs, from one bedroom to another…the possibilities are endless.

DSC_0234

DSC_0237

DSC_0239

IMG_7354

Such simple, wonderful, old school fun!!!

IMG_7361

DIY Ragtag Fairy Skirts (No Sew!!!)

These Ragtag Fairy Skirts are so easy to make, I almost feel silly writing a post on them. They are so cute though!!! I figured if you didn’t know how to make them already, you need to learn! Like all my projects that involve fabric, my suggestion to you is to check out the secondhand stores in your area first. We have an old antique/junk store in town that has a huge selection of funky fabrics from the 80s and 90s…they’re just perfect for crafts like this. And they only cost $1-$3 for pieces 3-6 yards long! If you already have a nice pile of fabric scraps, you’re all set…it doesn’t take much!

DSC_0195 (2)

Materials needed:

  • fabric
  • elastic
  • scissors

DSC_0172

First cut the fabric into strips, about 1-2 inches wide and 12-20 inches long. Varying lengths make the skirt fun…it definitely doesn’t have to be perfect!

DSC_0177

Next, cut a piece of elastic long enough to go around your child’s waist, with enough left over for a bow or knot. Tie on each piece of fabric as pictured. First, fold the fabric in half. Then, put the folded loop under the elastic. Flip the ends of the fabric up and over the elastic and through the loop of folded fabric. Pull gently to tighten and secure.

DSC_0175

DSC_0176

DSC_0174

DSC_0173

Repeat this process until the skirt is full. Although the lengths of the fabric can vary (makes the skirt more fun and free), I would try to make each “knot” face the same direction.

DSC_0180

DSC_0179

Once all the fabric strips are secure, simply tie the skirt in a bow around your child’s waist. So easy and too cute!!!

DSC_0181

DSC_0187

DSC_0192

2-Ingredient Slime

This SLIME recipe has to be the quickest and easiest sensory-dough-goop we’ve ever made in Our Beautifully Messy House! It was perfect for a cold, rainy afternoon…a perfect excuse to keep the t.v. off as well! Both girls loved squishing and stretching our slime and I’m sure they’ll be asking for it first thing tomorrow morning!

DSC_0057

DSC_0071

Ingredients:

  • one bottle, glitter glue
  • 1/4 cup, liquid starch

DSC_0029

I’ve seen various recipes for this slime and it looks like all types of liquid, non-toxic glue will work: white (Elmer’s) glue + food coloring; clear glue + food coloring + glitter. I thought just using the glitter glue would take out the extra steps of adding coloring and glitter, and it worked great! No dyed fingers and no glitter mess to boot!

First, empty an entire bottle of glitter glue into a plastic container or bowl.

DSC_0030

Next, add the liquid starch a little at a time. Stir for a minute or two, until the slime congeals together and is semi-solid.

DSC_0036

DSC_0037

Dump the slime out on a hard surface and squish with your hands. (After this step, my hands and the plastic mat were a little wet. I simply dried them off, and after that, the slime was virtually mess-free!)

DSC_0047

Time to play!!! L and WB enjoyed squishing plastic figurines into their slime this afternoon. They made a bed for some jawas to nap on, a dinosaur taco, and a sparkly potion for the fairies. Let their imaginations soar!!!

DSC_0051


DSC_0068

DSC_0082

An extra-fun quality of this slime is the inappropriate “FlAaArP!!!” sound it makes when you squash it into a plastic cup with your fingers. Haha! There was so much laughter to be had with that one!!!

DSC_0072

Store your slime in a sealed container and it should last for at least a couple months! Enjoy!!!

DSC_0076

Shoebox-Marble Game

Not only is the SHOEBOX-MARBLE GAME super-easy and simple to make, it’s also a challenging game for anyone to play! For younger children, they can try to catch the marbles on any holes; for adults and older kids, they may try to catch the marbles on specific colors or to make patterns with the marbles. Sounds pretty easy, but it’s not! L and I had lots of fun this afternoon taking turns, playing the Shoebox-Marble Game. Our shoebox was big enough, we were even able to play together with all hands on the box, tipping and tilting it until all the marbles were caught!

DSC_0014


Materials needed:

  • shoebox
  • awl (or sharp tool)
  • markers
  • marbles

DSC_0007


First, color a fun picture or design inside your shoebox.

DSC_0009


Using your awl, poke holes through the bottom. I like to do this by placing the box on a doormat, then poking the holes from the inside of the box – out. If the game is too hard, you may want to go back and make some larger.

DSC_0012


Now it’s time to play! Put some marbles in your box and see who can catch the most on the holes! The more you practice, the better you’ll get. For younger children, it helps to have them balance the box on a flat surface.

DSC_0013

DSC_0023

DSC_0017

Enjoy!!!

Cardboard Heart Stamps

How cute are these HEART STAMPS L and I made last week? Nobody would know by looking at the girls’ outfits that the hearts were made with a cardboard tube, but they were! This is such a simple craft, little hands can do the stamping all by themselves. Any imperfections make the final product even sweeter…that’s the sign that they were made with love. : ) After making Valentine’s outfits for the girls, we went on to stamp a pillowcase for L’s bed and some tea towel-dishcloths to give away as gifts. As I often say, the possibilities are endless!

DSC_0950

DSC_0967

DSC_0932

Materials needed:

  • cardboard tubes
  • acrylic paints
  • old lids or plates
  • rubberband
  • placemats or thin cardboard (to protect surfaces)
  • shirts, leggings, tea towels, pillowcase, tablecloth, etc

DSC_0921

DSC_0923

To make your heart stamps, simply squash a cardboard tube in half gently. Then, push one crease inwards to create a heart shape. You can roll a rubber band over the tube to help hold the shape.

DSC_0924

Next, test your stamp out and have your little one practice a bit on paper. Just put the tube end into a little paint, and then, press down on a flat surface.

DSC_0926

DSC_0928

DSC_0929

Make sure whatever you are stamping is nice and flat. Run an iron over any clothes or towels. When stamping shirts or pillowcases, it’s a good idea to put a thin piece of cardboard in-between the clothing’s layers too. That way the paint won’t seep through the cloth and onto the other side.

Finally, stamp away!

DSC_0931

DSC_0932

DSC_0933

We used red paint, glitter paint, and some white paint to make our hearts. Really though, you could use any colors and they’d be just as precious!

DSC_0937

DSC_0945

I love the little sideways, topsy-turvy hearts…simply “falling” in love.

Happy Valentine’s crafting!!!

Elf Donuts, Fairy Donuts, Wee Folk Donuts

What kid wouldn’t love making these teeny, tiny “donuts” for the fairies, gnomes, and Santa’s elves? They’re just too cute! L and I make chocolate-sprinkle donuts, powdered sugar donuts, and cinnamon sugar donuts; because, you know…it’s nice to give the wee folk some options after all. We make these “donuts” throughout the year for L and her fairy tea parties, but we also like to whip up a batch at Christmastime and leave them alongside Santa’s cookies and the reindeer’s carrots on Christmas Eve…we wouldn’t want any elf to be left out! They’re rather simple to make and your kids will go nuts when they see them! Sometimes it’s the littlest things (literally)!

DSC_0768

Ingredients:

  • O-shaped cereal
  • chocolate chips or baker’s chocolate
  • syrup (or honey)
  • powdered sugar
  • brown sugar
  • mini-sprinkles

DSC_0712

Materials needed:

  • small bowls
  • toothpicks
  • double-broiler (or microwave)


DSC_0737

Chocolate-Sprinkle Donuts

First, melt your chocolate in either a double-broiler or in the microwave.

DSC_0727

Next, carefully dip your O-shaped cereal into the chocolate.

DSC_0729

And L’s favorite step, cover in sprinkles!

DSC_0736

DSC_0742

Yumm!!!


DSC_0766

Powdered Sugar Donuts & Cinnamon Sugar Donuts

These donuts are super easy to make. First, dip the O-shaped cereal into a little bowl of syrup or honey.

DSC_0716

Next, remove the cereal with a toothpick, and toss around in either a bowl of powdered sugar…

DSC_0720

…or a bowl of brown sugar.

DSC_0722

It’s that simple, but oh so sweet!

A few weeks ago, L gave two of her classmates homemade fairy sets for their birthdays. Sure enough, we included some fairy donuts in little, folded-paper boxes!

DSC_0771

IMG_9142

Sometimes you really do have to make your own magic! Enjoy!!!

Hidden Fairy Bath Bombs

Have you ever bought bath bombs for yourself or for your kids? Bath bombs were originally intended for adults to use in the bath…their scents make the water smell wonderful and many times the bath bombs contain epsom salts to soften and refresh your skin. The thing that many people don’t know is that kids LOVE them too!!! The fizzy, bubbly, sizzling chemical reaction is just too cool! In the past, we’ve bought bath bombs and given them to our girls in their stockings at Christmas or for their birthdays…but now, we’ll never buy them again! These bath bombs are so quick and easy to make and there’s a surprise hidden inside each one! I found inspiration for this DIY on a fellow blogger’s site; she makes “Hidden Train Bath Bombs” for her little boys…adorable and genius!

DSC_0574

Materials needed:

  • 2 cups baking soda
  • 1 cup citric acid
  • food coloring
  • essential oil
  • water in a spray bottle (not pictured)
  • plastic fairies (flowers, dinosaurs, cars…)
  • silicone molds or a muffin tin

DSC_0547

First, mix two cups of baking soda and 1 cup of citric acid together in a large bowl.

DSC_0548

Next, add about 10-15 drops of food coloring and some essential oil, and mix. You can add more coloring and oil to suit your preference. I used a “sweet orange” oil and yellow food coloring. Even though the bath bombs themselves were not super-vibrant in color, the bath water certainly was! The kids loved it!

DSC_0553


Now, spray your mixture with water and mix quickly! I would give our mixture about 3 squirts, mix, then repeat. The baking soda and citric acid will start to fizz a bit, but once you mix, it will stop. Repeat this process until the mixture clumps together like breadcrumbs.

DSC_0554

Spoon the mixture into your silicone molds. Fill about halfway and pack it down firmly with your hands.

DSC_0555

DSC_0557

Now, add your fairies. We added a silk flower to one of ours as well.

DSC_0560

Fill the molds the rest of the way with the baking soda-citric acid mixture and pack it down firmly. Once the bath bombs set, they will expand. The next time I make bath bombs, I may not fill them all the way up to the top…or I may do so purposely and make them look like frosted cupcakes!

DSC_0563

DSC_0564

Let your bath bombs set up for a few hours until they are hard. (Can you believe how ours expanded and “grew”!?!) Flip the bath bombs over and gently pop them out of the molds.

DSC_0565

DSC_0566

Now for the fun part, surprise your kids with the bath bombs! The chemical reaction is just so cool!!!

DSC_0576

DSC_0586

They will be doubly-surprised to find fairies hidden inside!

DSC_0582

The walls, tile and bathtub in our bathroom are all white…the bath water was so, so yellow the whole bathroom glowed!!!

DSC_0601

DSC_0584

DSC_0603

This recipe can easily make 7-8 bath bombs…plenty for you and a friend! Enjoy!!!


DIY Jacob’s Ladder Toy

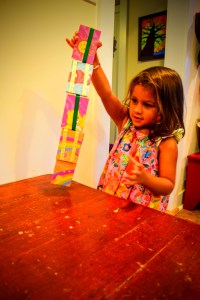
I really wanted to make L a Jacob’s Ladder Toy, but didn’t want to make a trip to the local hardware or craft store for supplies. So, we made this Jacob’s Ladder out of an old board book! (If you don’t have a board book they are easy to find at the dollar store.) I just love the outcome! This one is super-colorful compared to the wooden one I had as a kid and is just as much fun!

DSC_0095

I loved playing with my Jacob’s Ladder when I was young…it’s such a unique toy! Flip-flopping it back and forth is very calming, but it also makes you think creatively and problem solve. I enjoyed watching L play with the one we made today…not only was she ecstatic when she finally figured out how to work a Jacob’s Ladder, but she was also folding it into shapes, pretending it was a snake, a bracelet and a funky hat.
DSC_0102

DSC_0100

Materials needed:

  • board book
  • 3 pieces of ribbon (35 inches long each)
  • glue
  • box cutter
  • paper cutter (optional)
  • scissors

DSC_0016

First, using a box cutter, disassemble your board book.

DSC_0018

Next, measure the dimensions of one page and decide how best to cut it. The book I used was 7 in x 7 in. I chose to cut the pages down the middle in one direction and into thirds going the other direction. Each piece ended up being 3.5 in x 2.25 in. If you have a paper cutter on hand, it makes this step super quick and easy! I cut up 4 pages, leaving me with 24 pieces.

DSC_0022

DSC_0023

DSC_0026

Once you have 24 pieces cut, sort them into “nice” and “ugly” piles, 12 cards in each pile. The “ugly” cards won’t be seen.

DSC_0027

Next, glue each “nice” card to an “ugly” card with a thin layer of wood glue. Put some canned food on top of the cards to keep them flat and clamped down for the first few minutes, while the glue is setting. Once they are all glued, let them dry for an hour or two. You should now have 12, double-stacked cards.

DSC_0028

DSC_0032

Now, time to make that Jacob’s Ladder! Lay one card-stack in front of you, “nice” side down. Spread a thin layer of glue on top of the card-stack. Place the ends of all three strips of ribbon onto the card-stack. As you can see in the photos, two of the ribbons spread out into one direction and the other ribbon to the opposite direction.

DSC_0034

DSC_0035

Spread a dab of glue on each ribbon end and press another card-stack carefully on top, “nice” side up.

DSC_0037

Fold all the ribbons over the top of the cards and to the opposite direction. Pulling them taut, place another card-stack on top of the ribbons, “nice” side down.

DSC_0038

DSC_0039

DSC_0040

Spread a thin layer of glue on the card-stack and fold the ribbons over, keeping them pulled taut much as possible. You can press the ribbons down into the glue to hold them in place.

DSC_0041

DSC_0042

Spread a dab of glue on top of the ribbons, and press another card-stack on top, “nice” side up.

DSC_0044

DSC_0045

DSC_0046

Folding the ribbons over again, repeat the last three steps, until you reach the last card-stack and the end of your ribbon.

DSC_0048

Trim the ribbon, pull it taut, and glue it in between the last two card-stacks.

DSC_0049

DSC_0050

DSC_0051

DSC_0052

Place a can of food on top of the entire Jacob’s Ladder Toy and allow the glue to dry completely for an hour or two.

DSC_0053

Now, time to play!!! If you’ve never used a Jacob’s Ladder before, you flip the top card to one side and let gravity do the rest of the work. The card’s flip-flop down, one after another, like magic in your own hands!

DSC_0076

DSC_0088

DSC_0104

Enjoy!!!

Coffee Can Stilts

A few weeks ago a family friend called me up to ask if I had a use for a bunch of old coffee cans. While I was a little afraid to tell my husband that I had said “yes” to accepting such a large bag of junk, taking up more room in our house, I was over-the-moon excited to be acquiring these cans! I knew just what we’d use them for…COFFEE CAN STILTS!!! These are so quick and easy to make and are so much fun for the kids! Walking on stilts is all L wants to do these days!!! “I can almost touch the sky from up here, Mom!”

IMG_3564

IMG_3542

Materials needed:

  • 2 coffee cans
  • church key can opener
  • rope
  • scissors
  • paint (optional)
  • acrylic sealant (optional)

IMG_3522

First, if you want your stilts to be colorful, have your little ones paint the cans with acrylic paints. After the paint has dried, spray on a coat of acrylic sealant to give the cans a glossy finish.

IMG_3524

IMG_3526

Next, using a church key can opener, make two holes on the bottoms of the cans. The holes should be opposite each other. Try to bend the metal all the way back inside the can, so no sharp points protrude out. (Your kids shouldn’t have their hands inside the cans at anytime, but you never know when the curious ones may take off the lid while playing and reach inside…so, better safe than sorry!)

IMG_3533

IMG_3532

Cut two pieces of rope. To find the correct length, have your kid stand on the rope, holding both ends in his or her hands pulled up to chest-level. This is a good place to cut it. After the stilts are assembled, the rope handles should reach your child’s waist.

IMG_3530

IMG_3531

Thread the rope into the holes of the can from the outside. Once both ends are pulled through, tie a knot in each end. Repeat on the second can.

IMG_3535

IMG_3536

IMG_3538

IMG_3540

Place the lids back onto the cans and flip them over. Having the lids isn’t a necessity, but it may save your floors from being scratched up while your children walk around inside. Now, time to play!!!

IMG_3539

As your little ones practice, they’ll get better and better at walking on their stilts and they’ll be oh-so-proud!!! Future circus performers, anyone?

IMG_3561

IMG_3553

Talk about good hand-eye-FOOT coordination! Enjoy!!!

IMG_3567

IMG_3557