DIY Bird Nesting Kit

The “DIY Bird Nesting Kit” is the perfect project for little hands and little helpers! L and I made three kits this week: two gifts and one to hang in our own backyard, next to our DIY Tin Can Bird Feeder. It took less than a day for our feathered-friends to find it and start picking away, flying bits of string home to cozy-up their nests! The DIY Bird Nesting Kit costs only $2.50 to make (I’m not kidding!) and it’s a wonderful project to help teach kids about giving, sharing, and caring for the world around us….aaand about birds and the various types of nests they make of course!

DSC_1062

Before making our Bird Nesting Kits, the girls and I read “Mama Built a Little Nest” by Jennifer Ward and Steven Jenkins. It is fascinating book with beautiful, collage-like illustrations, depicting all kinds of birds, their families, and the homes they build. (It’s best to read in a pile of beach towels, swirled around on the floor into your own nest.) I highly recommend it!

IMG_5479

Materials needed:

  • Wired bird suet holder
  • yarn scraps
  • scissors
  • ruler (optional)

DSC_1036

First, have your little one cut the yarn scraps up into pieces about 3-5 inches long. You don’t have to measure them, but your little one might want to with the ruler!

DSC_1042

DSC_1044

After you have a nice pile of yarn pieces, it’s time to stuff them into the suet holder. Then, close the suet holder up and it’s all done. It’s that easy!

DSC_1048

DSC_1049

DSC_1050

Now, time to find the perfect place outside to hang your Bird Nesting Kit…someplace where the birds will find it and you can spy them doing so is best!

DSC_1054

IMG_5468

If you’re giving your Bird Nesting Kit away as a gift, you may want to include a little card inside explaining what it is. Your friends will be sure to love such a colorful, quirky, and fun gift! Enjoy!!!

DSC_1065

Snow Paint Fun

This activity is so easy, so simple, it almost seems silly to write a blog post on it…but people have asked, so here it is! Earlier this week, we had  35 inches of snow fall in our area and it’s given us an opportunity to do anything and everything snow-related…we’ve built igloos and tunnels, gone sledding, and eaten snow cream. I thought today would be a fun day to give “snow paint” a try. Every recipe I’ve seen floating around the internet involves dying water and putting it in separate spray bottles or squirt bottles though, something we just didn’t have. I figured why not just use our tempera paints!?

2016-01-27 19.02.54

We rarely use tempera paints, because frankly I don’t really like them. They’re absolutely perfect for this activity though! Tempera paint in general is washable and non-toxic, so it won’t stain clothes or harm the environment when the snow melts.

IMG_5275

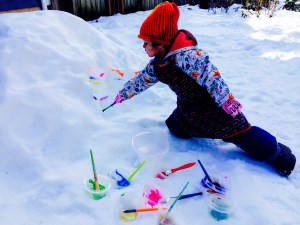
To prepare for snow painting, I gathered 8 small plastic containers, 8 paint brushes, all our tempera paints, and a large plastic container. Even though the paint is washable, we went ahead and put aprons on over our snow clothes and wore old gloves too.

IMG_5269

Outside, spread the small containers out with a good squirt of paint in each one, as well as a paint brush. Now simply, paint the snow! After a day of the snow melting and then refreezing, our snow had a nice icy layer on top…it was perfect for painting!

IMG_5280

IMG_5283

An hour or two later, when it’s time to go inside (L could’ve painted all day!), gather all the brushes and throw them into the larger plastic container. Stack up your paint cups and put them in the container too. Now it’s easy to carry everything inside in only one trip! Just rinse your containers out and put them in the dishwasher to clean…and don’t forget to rinse your brushes too! Super easy to clean up…definitely worth the hours of creativity outside! Enjoy!!!

IMG_5273

IMG_5299

The Christmas Tree Teepee (No-Sew!)

“The Christmas Tree Teepee” is quirky, fun, and magical…perfect for celebrating Christmas with kids! So often when building forts for the kids, they beg me to get inside to play with them and I just barely fit, if at all. This teepee is big! It’s nearly 6 feet across and 7 feet tall, leaving plenty of room for 3-4 people inside, adults included! It’s perfect! So far this week, in our teepee, we’ve eaten breakfast every morning, made christmas garlands and decorations to send loved ones, played board games and puzzles, and each night before bed we curl up and read a couple Christmas books under the lights. We just love it! After the holidays I plan to collapse the teepee, folding it up much like an umbrella, wrap it in plastic and stow it away. Next year we plan to set the teepee up in L’s bedroom during December and let both girls sleep inside!


DSC_0846


Since the teepee is replacing our tree this year it includes all the trimmings…sparkly lights, colorful ornaments, and a few surprises when you get inside and look close! The best place to find fabric for this project is at a local, second-hand store or an antique/junk store. We have an awesome antique store in the area that has a booth full of fabrics. Most of the fabric is clearly from the 80s and 90s (ie. funky and fun!) and is anywhere from $1 -$6 per piece. I picked out anything green with various patterns and textures: corduroy, twill, jersey-knit, silk, suede. You really can’t beat the prices for all that material! I was also lucky enough to stumble upon a bunch of, what I call, “old-lady, sequined, Christmas appliqués” in the same booth. They were all less than a dollar a piece and made for perfect ornaments for the “Christmas Tree Teepee.”


DSC_0863


Oh, and did I mention that there’s NO SEWING INVOLVED when making this teepee??? I do not, cannot sew, especially anything of this magnitude! It’s held together all thanks to my handy, dandy hot glue gun. We had so much fun with this project!


IMG_4408

Materials needed:

  • 6 x 1″x 2″x 8′ lumber (Any quality will do, but I went for the nicer, less splinter-filled sort!)
  • jute
  • green fabrics
  • christmas lights
  • felt or sequined Christmas appliqués
  • drill
  • hot glue gun and glue
  • scissors

First, drill two holes in each wooden, teepee pole. One 12″-15″ from the top, and the other 1″ from the bottom.

DSC_0801

DSC_0800

String some jute through the holes that are 12″ from the top, before carrying it all inside. Having someone help you, spread your teepee poles out and around until you get the teepee shape you’re looking for. (It will not be perfect, so don’t drive yourself crazy trying to make it perfect! Just go with it!) Once the poles are in place, wrap the jute around and in-between the poles until they are secured.

DSC_0802

DSC_0804

To ensure that the poles won’t move on you too much, thread some jute around the bottom too, knotting it around each pole. Even though the poles can move closer together and shift a little bit, it certainly helps to see where they originally were and where you want them to be while building your teepee.

DSC_0807

DSC_0806

Now for the real work. You will cut strips of fabric and using the hot glue gun, secure them in place along the teepee poles. First, spread out all your fabrics and see which material you have the most of. You will need to use this for the bottom. I didn’t use a ruler or yardstick to measure my fabric precisely while working, instead I laid it out on our hardwood floor, and just used the planks of wood to “measure” each strip of fabric.

DSC_0808

Looking at the teepee, you may think I used one long piece of fabric to wrap around the entire structure, but in fact, each layer is made up of 5 shorter strips running from pole to pole. I started each layer with one piece of fabric along the outside of teepee…wrapping, gluing, trimming, and tucking the fabric into place. Now this is just the first section, between the first two poles. On the next section, I ran the fabric along the inside, gluing it into place. When done in this manner, the teepee poles will be invisible from the inside and outside of the teepee (except for the top of course) and all you will see is green, green, green! The pattern on each layer was outside-inside-outside-inside-outside. If you get frustrated at the beginning and things aren’t perfect, do not worry! After attaching the first few pieces, you will certainly know what you’re doing and the process will get a lot easier…promise!

DSC_0812

DSC_0813

DSC_0815

As you go up the teepee, adding more layers, overlap the fabric by a couple inches above and below. This will help avoid gaps in the teepee. If there are places where gaps are seen, you can use a touch of hot glue to fasten the fabrics together.

DSC_0814

DSC_0817

DSC_0816

As I got to the very top of the teepee, on the last two layers I used light-weighted fabrics that gathered well. Instead of cutting each sectioned-piece and gluing it outside-inside-outside, etc., I loosely gathered it around the teepee and glued it in place along the outside. I wanted the poles exposed on the inside in the top so I could string-up some Christmas lights to brighten things up a bit!

DSC_0824

The top and front of the teepee was a bit of trial and error. I sort of knew how I wanted the finished teepee to look, so I wrapped fabric, held up fabric, and pinned some in place until I was satisfied. Here again, it was important that I saved my light-weighted fabrics that gathered well for the top and front of the teepee to achieve this look. I must say that it looks even better than I imagined…both like a teepee and a tree!

DSC_0823

DSC_0825

I was up in the air on whether to decorate the outside of the teepee, the inside or both. We decided on just the inside, keeping the magic inside and “secret” for all those who enter. L and I used duct tape to tape each sequined ornament in place. I could have glued them, but I wanted something that could be done by the children, year after year.

DSC_0832

DSC_0840

Inside the teepee, just below the lights, is my favorite little detail. I’ve held onto these fabric scraps of Santa flying through the night sky for a few years now, not sure what to do with them. Their placement, tucked away inside our teepee, is just the perfect home for them…I knew I was saving them for a reason!

DSC_0834

DSC_0836

The Christmas blanket underneath our teepee is the finishing touch. We usually use the blanket as a tree skirt around our tree each year, and in a way it is the tree skirt once again. This time it’s just in a more practical, more appreciated, and loved sort of way!

DSC_0852

DSC_0869

Think you’re ready to build your own??? Go for it! Your kids will absolutely love snuggling inside the Christmas tree this year, reading books, drinking hot chocolate, and playing games!

Feel free to leave any questions you may have below. Enjoy!!!

Road Trip Survival Kit: 10+ Activities for On-the-Go

Every Summer my family likes to take a 7-hour trip to the beach…well, the 7 hours isn’t exactly the part we like, but we do it and we make the best of it! I’m not a fan of giving my kids a screen to look at for the entire trip, because I feel there’s so much that they will be missing out on. Remember when we were kids, going through the entire stash of cassette tapes? Staring out the window watching the terrain change and landmarks pass as we got closer and closer to our destinations, the excitement building? All those silly word games or family air guitar shenanigans? See…I don’t want my kids to miss out on that! I want us to talk. I want them to play, to be entertained, but to experience the trip with us, rather than plugged in and tuned out.

IMG_1696

We started with this ROAD TRIP SURVIVAL KIT when L was just 2. As the kids grow, some things will change, but many will continue to entertain at any age!

Pipe Cleaners, Shoelaces, and Beads

If you have any of those snack cups with the slits on top, they’re the perfect thing to hold beads and prevent spilling! Just tie a shoelace to the handle and you’re good to go!

IMG_3076

Slinky

Who doesn’t love a slinky? You can buy 2 for a dollar at most dollar stores…definitely worth that dollar! We don’t usually play with ours at home, rather we save them for long trips!

IMG_3083

“I Spy” Books

These books are fun for kids age 2 to 100 to look at, no reading required!

IMG_3082

Musical Instruments

When the kids get whiny, bored, tired, put on some jams, some sunglasses and start a family band! Sometimes we even bring out the cow bell – yikes! The kids love it though!

IMG_3081


Paper and Coloring

Go ahead and buy some fun, new crayons for your big trip, as well as a blank composition book, new coloring books, or even post-it notes!

IMG_3080


Figurines and Cars

Even if these things are “old” and have been played with a million times at home, when pulled out one-by-one as a surprise on the 4th hour of your trip, your kids will be delighted…I promise!

IMG_3084

Fairy Folk

L loves her “fairy folk” and will play pretend with them for nearly an hour at home. I scooped up a few of them and their accessories for our last trip. Get the DIY here: DIY Fairy Folk.

IMG_3085

Lacing Boards

If you don’t have lacing boards at home, they’re simple to make. Just cut out a shape from an old cereal box and punch some holes around the edge. Tie a shoelace and and you’re good to go!

IMG_3075

Magna Doodles

These come in all shapes and sizes…and all of them are perfect for the road!

IMG_3073

Kaleidoscopes and View Masters

I always throw one of these in the bag!

IMG_3086

Re-usable Sticker Books

“Melissa & Doug” brand sticker books and Water Wow! books are great for the road. Virtually no mess and they can be used over and over and over and over!

IMG_3077

“I Spy” Bottles

We made this game years ago, and the kids love it! It’s something that can be played with one person or many! Get the DIY here: I Spy Bottle and Games.

IMG_0280


The Tray

We found this traveling tray at Hobby Lobby a few Summers ago. I’m sure you can find one online too! They’re perfect for coloring and containing all those little toys and food.

IMG_3072


It’s hard to believe, but all of this stuff plus more will fit in one medium-sized bag! We usually put the bag off to the side, when we get home, ready to grab-and-go for the next road trip!

IMG_3087


Happy traveling!!! What are some of your favorite activities for on the road?

IMG_1706


Hidden Fairy Bath Bombs

Have you ever bought bath bombs for yourself or for your kids? Bath bombs were originally intended for adults to use in the bath…their scents make the water smell wonderful and many times the bath bombs contain epsom salts to soften and refresh your skin. The thing that many people don’t know is that kids LOVE them too!!! The fizzy, bubbly, sizzling chemical reaction is just too cool! In the past, we’ve bought bath bombs and given them to our girls in their stockings at Christmas or for their birthdays…but now, we’ll never buy them again! These bath bombs are so quick and easy to make and there’s a surprise hidden inside each one! I found inspiration for this DIY on a fellow blogger’s site; she makes “Hidden Train Bath Bombs” for her little boys…adorable and genius!

DSC_0574

Materials needed:

  • 2 cups baking soda
  • 1 cup citric acid
  • food coloring
  • essential oil
  • water in a spray bottle (not pictured)
  • plastic fairies (flowers, dinosaurs, cars…)
  • silicone molds or a muffin tin

DSC_0547

First, mix two cups of baking soda and 1 cup of citric acid together in a large bowl.

DSC_0548

Next, add about 10-15 drops of food coloring and some essential oil, and mix. You can add more coloring and oil to suit your preference. I used a “sweet orange” oil and yellow food coloring. Even though the bath bombs themselves were not super-vibrant in color, the bath water certainly was! The kids loved it!

DSC_0553


Now, spray your mixture with water and mix quickly! I would give our mixture about 3 squirts, mix, then repeat. The baking soda and citric acid will start to fizz a bit, but once you mix, it will stop. Repeat this process until the mixture clumps together like breadcrumbs.

DSC_0554

Spoon the mixture into your silicone molds. Fill about halfway and pack it down firmly with your hands.

DSC_0555

DSC_0557

Now, add your fairies. We added a silk flower to one of ours as well.

DSC_0560

Fill the molds the rest of the way with the baking soda-citric acid mixture and pack it down firmly. Once the bath bombs set, they will expand. The next time I make bath bombs, I may not fill them all the way up to the top…or I may do so purposely and make them look like frosted cupcakes!

DSC_0563

DSC_0564

Let your bath bombs set up for a few hours until they are hard. (Can you believe how ours expanded and “grew”!?!) Flip the bath bombs over and gently pop them out of the molds.

DSC_0565

DSC_0566

Now for the fun part, surprise your kids with the bath bombs! The chemical reaction is just so cool!!!

DSC_0576

DSC_0586

They will be doubly-surprised to find fairies hidden inside!

DSC_0582

The walls, tile and bathtub in our bathroom are all white…the bath water was so, so yellow the whole bathroom glowed!!!

DSC_0601

DSC_0584

DSC_0603

This recipe can easily make 7-8 bath bombs…plenty for you and a friend! Enjoy!!!


Mixed-media Fall Art

We have some glorious October weather in Virginia this week…cool mornings, sunny days, and brilliant leaves falling from our trees! L’s been painting outside these days, in a world of October color! Yesterday she made a beautiful fall tree using acrylics, melted crayons, and a sprinkle of “leaf glitter” (tiny pieces of actually leaves). The outcome is beautiful!!! I made a similar piece last year that I also adore…the process is as much fun as the piece of art itself!

2015-10-21 06.43.21

Materials needed:

  • canvas (you could do this on cardboard too!)
  • acrylic paints (blues, white, brown)
  • crayons (oranges, yellows, and red)
  • knife and cutting board
  • oven

*A tip when buying crayons for this project…when you’re looking for orange crayons, buy a box of 24 crayons. The larger boxes contain more crayons, but not any more orange and yellows!!! We always seem to run out of orange crayons this time of year!

First, have your child paint their canvas blue. We like to use some darker and some lighter blues, mixing them all together.

DSC_0494

DSC_0496

Next, have them paint a few white, fluffy clouds.

DSC_0500

As the sky is drying, sit back and look at the trees with your child. Point out how the trunk is usually straight and thick. As you move up the tree, the branches get smaller and smaller, and they get more squiggly!

DSC_0498

As you continue to discuss trees and their features, lay out a few various-sized paintbrushes. Have your child put them in order from biggest to smallest. Now they know which paintbrush to use for their tree’s trunk and all its branches!

DSC_0504

Time to paint the tree!

DSC_0508

DSC_0516

DSC_0522

The next step is a little “out of the box,” but that’s what makes it so great! Have your child pick out which crayons are the colors of the fall leaves before them. Using a sharp knife and a cutting board, remove the paper off the crayons and chop the crayons up into tiny pieces. I think we used half a lime-green crayon, one yellow, three or four oranges, and one red crayon.

DSC_0523

Lay the painting down on a flat surface and have your little one sprinkle the crayon shavings all over the trees branches. L also crumbled up an actual leaf from the yard and sprinkled some of it among the crayon pieces. It’s a minor detail, but it’s my favorite. I’ll always remember this day and where L made her Fall Tree.

DSC_0529

DSC_0538

DSC_0541

Once the crayon shavings are all dispersed, put your painting into the oven at 200 degrees for about 3-5 minutes. Watch the pieces as they melt. (Our painting was too big to fit in the oven this time, so I carefully held it under the broilers with the oven set on broil. I did one end, then turned it around and did the opposite.) When you remove the artwork from the oven, be careful to hold it flat and steady…until the crayon wax hardens, the wax will drip if it is tilted at all.

DSC_0542

Isn’t the outcome gorgeous? It’s perfectly imperfect…just like a fall leaf.

DSC_0544

If you think this is just a craft for kids, you’re wrong…you can totally do this as well! “Mixed-media Fall Art” is fun for anyone and everyone! Enjoy!!!

IMG_5687

IMG_5689

IMG_5691

DIY Jacob’s Ladder Toy

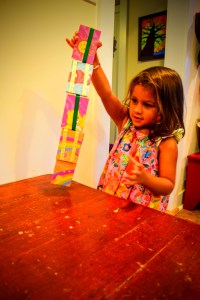
I really wanted to make L a Jacob’s Ladder Toy, but didn’t want to make a trip to the local hardware or craft store for supplies. So, we made this Jacob’s Ladder out of an old board book! (If you don’t have a board book they are easy to find at the dollar store.) I just love the outcome! This one is super-colorful compared to the wooden one I had as a kid and is just as much fun!

DSC_0095

I loved playing with my Jacob’s Ladder when I was young…it’s such a unique toy! Flip-flopping it back and forth is very calming, but it also makes you think creatively and problem solve. I enjoyed watching L play with the one we made today…not only was she ecstatic when she finally figured out how to work a Jacob’s Ladder, but she was also folding it into shapes, pretending it was a snake, a bracelet and a funky hat.

DSC_0102

DSC_0100

Materials needed:

  • board book
  • 3 pieces of ribbon (35 inches long each)
  • glue
  • box cutter
  • paper cutter (optional)
  • scissors

DSC_0016

First, using a box cutter, disassemble your board book.

DSC_0018

Next, measure the dimensions of one page and decide how best to cut it. The book I used was 7 in x 7 in. I chose to cut the pages down the middle in one direction and into thirds going the other direction. Each piece ended up being 3.5 in x 2.25 in. If you have a paper cutter on hand, it makes this step super quick and easy! I cut up 4 pages, leaving me with 24 pieces.

DSC_0022

DSC_0023

DSC_0026

Once you have 24 pieces cut, sort them into “nice” and “ugly” piles, 12 cards in each pile. The “ugly” cards won’t be seen.

DSC_0027

Next, glue each “nice” card to an “ugly” card with a thin layer of wood glue. Put some canned food on top of the cards to keep them flat and clamped down for the first few minutes, while the glue is setting. Once they are all glued, let them dry for an hour or two. You should now have 12, double-stacked cards.

DSC_0028

DSC_0032

Now, time to make that Jacob’s Ladder! Lay one card-stack in front of you, “nice” side down. Spread a thin layer of glue on top of the card-stack. Place the ends of all three strips of ribbon onto the card-stack. As you can see in the photos, two of the ribbons spread out into one direction and the other ribbon to the opposite direction.

DSC_0034

DSC_0035

Spread a dab of glue on each ribbon end and press another card-stack carefully on top, “nice” side up.

DSC_0037

Fold all the ribbons over the top of the cards and to the opposite direction. Pulling them taut, place another card-stack on top of the ribbons, “nice” side down.

DSC_0038

DSC_0039

DSC_0040

Spread a thin layer of glue on the card-stack and fold the ribbons over, keeping them pulled taut much as possible. You can press the ribbons down into the glue to hold them in place.

DSC_0041

DSC_0042

Spread a dab of glue on top of the ribbons, and press another card-stack on top, “nice” side up.

DSC_0044

DSC_0045

DSC_0046

Folding the ribbons over again, repeat the last three steps, until you reach the last card-stack and the end of your ribbon.

DSC_0048

Trim the ribbon, pull it taut, and glue it in between the last two card-stacks.

DSC_0049

DSC_0050

DSC_0051

DSC_0052

Place a can of food on top of the entire Jacob’s Ladder Toy and allow the glue to dry completely for an hour or two.

DSC_0053

Now, time to play!!! If you’ve never used a Jacob’s Ladder before, you flip the top card to one side and let gravity do the rest of the work. The card’s flip-flop down, one after another, like magic in your own hands!

DSC_0076

DSC_0088

DSC_0104

Enjoy!!!

DIY Toy Sail Boat

One evening this summer, while we were getting ready for bath time, L pulled a wine cork out of her pocket. She had been saving it all day to float it around and play with in the bath tub. That got me thinking…I knew with a few toothpicks and some leaves we could turn her wine cork into a little sail boat! Leaves work great for this project, because they’re naturally water-proof and easily replaceable!

IMG_3614

IMG_3642

Materials needed:

  • 2 wine corks
  • 4 toothpicks
  • 2 leaves
  • old pencil
  • scissors

IMG_3574

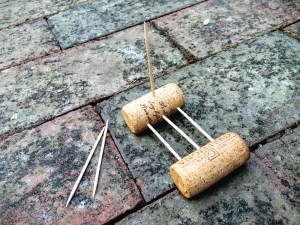
Take one of the wine corks and stick three toothpicks into it, all pointing in the same direction in a line.

IMG_3576

Next, push the second wine cork into the opposite ends of the toothpicks.

IMG_3577

Stick one more toothpick vertically into the middle of one of the corks.

IMG_3578

Find a medium-sized leaf and weave it through the bottom toothpicks. We used a balloon flower leaf. This step isn’t necessary, but it makes a nice lil bed for anything you may want to sail on top…a bug, a rock, a fairy friend.

IMG_3585

IMG_3579

Next, find a slightly larger leaf and thread it onto the vertical toothpick, making a sail. We found the hosta leaves to work best for this, though any thick and sturdy leaf will do!

IMG_3582

To make the sail boat safer for little hands, twist an eraser off the top of an old pencil. Cut it in half with scissors and push it onto the top of the sail.

IMG_3580


IMG_3581


IMG_3584

Now, time to play! L had hours of fun blowing her boats around our rain barrel!

IMG_3589


IMG_3609


IMG_3613

The boats may not seem like much, but ours withstood some submarine plunges under the water and lasted through two nights of bath time play! Tomorrow, we’ll replace the leaves and keep sailing!

IMG_3656


IMG_3662


IMG_3659

Enjoy!!!

Coffee Can Stilts

A few weeks ago a family friend called me up to ask if I had a use for a bunch of old coffee cans. While I was a little afraid to tell my husband that I had said “yes” to accepting such a large bag of junk, taking up more room in our house, I was over-the-moon excited to be acquiring these cans! I knew just what we’d use them for…COFFEE CAN STILTS!!! These are so quick and easy to make and are so much fun for the kids! Walking on stilts is all L wants to do these days!!! “I can almost touch the sky from up here, Mom!”

IMG_3564

IMG_3542

Materials needed:

  • 2 coffee cans
  • church key can opener
  • rope
  • scissors
  • paint (optional)
  • acrylic sealant (optional)

IMG_3522

First, if you want your stilts to be colorful, have your little ones paint the cans with acrylic paints. After the paint has dried, spray on a coat of acrylic sealant to give the cans a glossy finish.

IMG_3524

IMG_3526

Next, using a church key can opener, make two holes on the bottoms of the cans. The holes should be opposite each other. Try to bend the metal all the way back inside the can, so no sharp points protrude out. (Your kids shouldn’t have their hands inside the cans at anytime, but you never know when the curious ones may take off the lid while playing and reach inside…so, better safe than sorry!)

IMG_3533

IMG_3532

Cut two pieces of rope. To find the correct length, have your kid stand on the rope, holding both ends in his or her hands pulled up to chest-level. This is a good place to cut it. After the stilts are assembled, the rope handles should reach your child’s waist.

IMG_3530

IMG_3531

Thread the rope into the holes of the can from the outside. Once both ends are pulled through, tie a knot in each end. Repeat on the second can.

IMG_3535

IMG_3536

IMG_3538

IMG_3540

Place the lids back onto the cans and flip them over. Having the lids isn’t a necessity, but it may save your floors from being scratched up while your children walk around inside. Now, time to play!!!

IMG_3539

As your little ones practice, they’ll get better and better at walking on their stilts and they’ll be oh-so-proud!!! Future circus performers, anyone?

IMG_3561

IMG_3553

Talk about good hand-eye-FOOT coordination! Enjoy!!!

IMG_3567

IMG_3557

White Picket Fairy Fence

Well, I couldn’t show you how to make a Craft Stick Fairy Door without telling you how to make a WHITE PICKET FAIRY FENCE to go with it! The fence is simple to make and looks adorable out in the fairy garden!

IMG_3404

IMG_3406

Materials needed:

  • small craft sticks
  • regular-sized craft sticks
  • wood glue
  • Q-tips
  • white acrylic paint
  • acrylic sealant

IMG_3371

First, lay out your sticks…4 small craft sticks in the middle with 2 regular-sized ones on the ends. If you don’t have small craft sticks, just cut some regular-sized one’s in half. The two craft sticks on the ends are left long, so that you can easily stick them into the ground, keeping the fence upright!

IMG_3372

Next, think about where two craft sticks that will lie across the other ones will be and use a Q-tip to put wood glue in those spots across each stick. Lay the craft sticks on top of the glue and press to secure.

IMG_3374

IMG_3375

After the glue has dried, paint the picket fairy fence white.

IMG_3399

Finish up with a coat of acrylic sealant spray.

IMG_3400

Now for the fun part…while sneaking a fairy door into your neighbor’s garden, add a little white picket fairy fence as well! Gently push the ends of the fence into the soil. Enjoy!!!

IMG_3402