Coffee Can Stilts

A few weeks ago a family friend called me up to ask if I had a use for a bunch of old coffee cans. While I was a little afraid to tell my husband that I had said “yes” to accepting such a large bag of junk, taking up more room in our house, I was over-the-moon excited to be acquiring these cans! I knew just what we’d use them for…COFFEE CAN STILTS!!! These are so quick and easy to make and are so much fun for the kids! Walking on stilts is all L wants to do these days!!! “I can almost touch the sky from up here, Mom!”

IMG_3564

IMG_3542

Materials needed:

  • 2 coffee cans
  • church key can opener
  • rope
  • scissors
  • paint (optional)
  • acrylic sealant (optional)

IMG_3522

First, if you want your stilts to be colorful, have your little ones paint the cans with acrylic paints. After the paint has dried, spray on a coat of acrylic sealant to give the cans a glossy finish.

IMG_3524

IMG_3526

Next, using a church key can opener, make two holes on the bottoms of the cans. The holes should be opposite each other. Try to bend the metal all the way back inside the can, so no sharp points protrude out. (Your kids shouldn’t have their hands inside the cans at anytime, but you never know when the curious ones may take off the lid while playing and reach inside…so, better safe than sorry!)

IMG_3533

IMG_3532

Cut two pieces of rope. To find the correct length, have your kid stand on the rope, holding both ends in his or her hands pulled up to chest-level. This is a good place to cut it. After the stilts are assembled, the rope handles should reach your child’s waist.

IMG_3530

IMG_3531

Thread the rope into the holes of the can from the outside. Once both ends are pulled through, tie a knot in each end. Repeat on the second can.

IMG_3535

IMG_3536

IMG_3538

IMG_3540

Place the lids back onto the cans and flip them over. Having the lids isn’t a necessity, but it may save your floors from being scratched up while your children walk around inside. Now, time to play!!!

IMG_3539

As your little ones practice, they’ll get better and better at walking on their stilts and they’ll be oh-so-proud!!! Future circus performers, anyone?

IMG_3561

IMG_3553

Talk about good hand-eye-FOOT coordination! Enjoy!!!

IMG_3567

IMG_3557

Lemonade Play Dough

We love scented play dough at Our Beautifully Messy House and summertime is the perfect time to make LEMONADE PLAY DOUGH!

I came up with this recipe a couple weeks ago, while mixing up some play dough to take with us on vacation to the beach. And the kids LOVED it!!! It’s always nice having play dough handy for any down-time whether you’re at the beach with family or you’re having friends over for a play date.

I’ve tried making citrus-scented play dough in the past with lemon extracts and oils, but that summery lemonade scent never comes through. Adding a packet or two of lemonade mix did the trick…it was super-quick and easy and smells delicious! I suggest using a sugar-free lemonade mix (Crystal Light brand works great!) so your play dough doesn’t get super sticky with the added sugar.

When I made our lemonade play dough I wanted to make both yellow and pink dough, so I split the dough and added the food coloring before kneading it. The colors came out just fine! This play dough takes only a few minutes to make, but stored in a gallon-sized bag or an air-tight container, it’ll keep for nearly a year! This recipe makes plenty for 2 or 3 kids to play with!

My tip to keep your kids entertained playing with play dough for longer: Start off with plain play dough. Let them play 15 or 20 minutes, then throw some glitter into the mix. Once their attention starts to drift, add some colorful beads or buttons. Add some measuring cups and kitchen utensils, some lil plastic dinosaurs or army men. Just don’t give them everything at once, instead add to the play dough in intervals…works every time!

Ingredients:

  • 2 cups + 1/2 cup flour
  • 1/2 cup salt
  • 2 Tbsp cream of tartar
  • 2 Tbsp vegetable oil
  • 1.5 cups boiling water
  • food coloring
  • 1-2 packets lemonade mix

First, put the water on to boil. Add a few drops of food coloring to the water (yellow or pink). As the water is heating up, mix 2 cups of flour, salt, cream of tartar and one packet of lemonade mix in a large mixing bowl. Then add and mix the vegetable oil into the flour mixture. Once the water is boiling, add it to the bowl and mix with a spatula. The dough will be a sticky mess while warm. Mix it as best you can, then let it cool off. After a few minutes cooling off, sprinkle your working surface with some of the remaining flour. Dump the play dough onto the flour, adding more flour to the top, and knead the dough. Continue working with the dough, adding a bit of flour as needed, til the dough is not sticky anymore and you’ve reached the desired consistency. If you like, sprinkle in another packet of lemonade mix to dough! Yum yum, Summer!!! Enjoy!

5 Rainy Day, Bouncy Ball Games

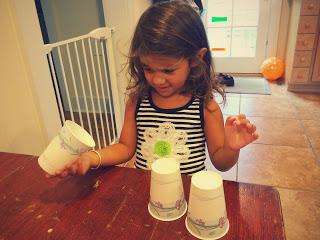
It wasn’t a “rainy day” here today, but it might as well have been! L was having fun, being a kid, over the weekend and ended up with stitches in her forehead…so, no swimming for the week while temps are in the upper 90s. Yuck! We had a ball this morning though (every pun intended) playing with a little, sparkly bouncy ball and some paper cups…kept us entertained for hours! You really could play these games anytime and just about anywhere!


Materials needed:

  • bouncy ball
  • paper cups

Game #1 (our favorite!): Catch the Ball

This can be a one person game or multi-person game.
One person drops the ball, bouncing it on the ground, and everyone tries to catch it in their cup. This is a great activity for little ones to learn and practice hand-eye coordination!


Game #2: Find the Ball

This game can be played various ways. You can perform the classic challenge, where you hide the ball under one of three cups and move them all around. The other person watches and then guess which cup the ball is underneath.  Or, you can have 5 or 6 cups laid out, upside down. One person turns their back on the game, while the other person hides the ball under a cup. It’s fun to move the cups around into various shapes and patterns as well, while hiding the ball.


Game #3: Stack and Find

Take turns stacking the cups and hiding the ball inside. The other person is left to guess which cup the ball is in.


Game #4: Bounce into the Cup

Put the cups out onto the floor. Take turns tossing or bouncing the ball, trying to get it into a cup. Getting it into a cup isn’t too hard, but doing it gently enough so the cup stays upright is!


Game #5: Hungry, Hungry Hippos

Sit facing each other, with your feet touching, making a diamond-shape with your legs. Drop the ball, bouncing it in front of both players. Each person tries to cover up the ball, catching it underneath a cup. This game reminded me of “Hungry, Hungry Hippos”…hence the name. Enjoy!


What other games do your kids like to play involving bouncy balls?

DIY Pocket Parachute

What kid doesn’t love throwing a toy parachute around?!! And what parent doesn’t love a toy that costs nothing, takes less than 5 minutes to make, and entertains your kids for hours on end?!! I made this DIY POCKET PARACHUTE for L on a rainy day last week…as soon as there was a break in the weather, we were out the door throwing the parachute all around town. L dropped the parachute off the steps of the old courthouse, a church, the library, a little pavilion stage, and she climbed up a tree and dropped it down as well. This pocket parachute is so simple, so easy, and so much fun!!!


Materials needed:

  • plastic bag
  • food pouch cap
  • string
  • scissors
  • an awl (or screwdriver)

If you don’t have a food pouch cap, a toy wheel, some safety pins, paper clips or a wine cork could be used as well…get creative with what you have on hand!

First, cut the plastic bag into a square at least 12×12 inches.

Cut your string into 4 equal pieces, all approximately 15 inches long.

Using the awl, carefully poke a hole through the center of the food pouch cap.

Also, poke holes into each corner of the square you cut from the plastic bag. Make each hole 1/2 an inch from the edges.

Tie a piece of string onto each corner, using a double knot.


Next, gather all the strings together and tie them together with one overhand knot, about 3 inches from the end.


Thread two of the strings through the center of the food pouch cap and thread the other two through the side. Tie the ends together with a double knot.


Too easy, right? Now time to play!!! It’s just as much fun trying to catch the parachute as it is to throw it!


If your kids are older, they can experiment by making various parachutes…some out of bigger pieces of plastic, longer strings and cutting a hole in the center parachute as well. Enjoy!!!

Glow-in-the-Dark Bath

A couple weeks ago L and I walked down the street to check out a kids’ festival going on in town. Our favorite part was some “Glow-in-the-Dark Yoga” going on at a local yoga studio. While the kids danced and froze into yoga poses with their glow bracelets on, the skies opened up into a torrential downpour outside. (I thought we’d need a canoe to get home.) Of course L and I embraced mother nature as we danced and splashed the whole way home. Cold and muddy, our next stop was a hot and soapy bath…with the lights off and our glow bracelets still on!!! It was silly, but so cool…I don’t know why I never thought of it before!


While lil ones love the idea of glow sticks, our kids are rarely up late enough to play with them in the dark. Turning the lights off at bath time and adding some glow sticks and glow bracelets to the water is perfect! Glow sticks only cost $1 to $2 dollars for a pack of 5-10.

Many bathrooms don’t have windows, so a glow-in-the-dark bath can be done at any time of day.


Make sure you keep an eye on your children while taking a glow bath, many glow sticks suggest kids be at least 8 years old to play with them. You definitely want to make sure your little teethers keep them out of their mouths!


You can even add some “glow-in-the-dark bottles” to the mix as well! Enjoy!!!

Rainbow-Shaving Cream Sensory Play

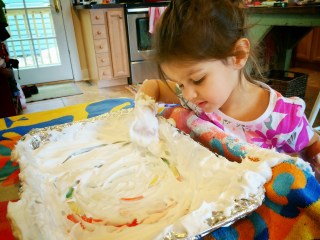
This is such a fun activity for kids and even more fun if you surprise them with it! I prepared our RAINBOW-SHAVING CREAM SENSORY PLAY activity beforehand and when I called L to the kitchen to play, draw and discover she was delighted! She kept saying, “Hey, how’d the rainbow get in here!?!” Like many of our crafts and activities, this one is done with things we already had around the house…so no need to go to the store to buy supplies! For what it’s worth, a can of cheap shaving cream equals hours of fun for kids…we always have one on hand!


Materials needed:

  • large, oven-safe pan
  • aluminum foil
  • broken crayons
  • sharp knife & cutting board
  • oven
  • shaving cream

First, line your pan with aluminum foil. Spread it out as smooth and flat as possible.

Cut your crayons into shavings…we did the colors of the rainbow, but you can do any combination of colors.

Sprinkle the crayon shavings out on the foil-lined pan.

Bake in the oven at 200 degrees F for 5 minutes. Remove from the oven, careful not to tip or shake the pan, and let the pan and crayons cool completely.

Next, squirt shaving cream onto the pan and spread it out evenly…about 1/2 inch thick.


Here comes the fun part…time for your little ones to play!!!


They can practice drawing shapes, writing letters and numbers in the shaving cream.

We had fun taking turns, playing “pictionary” too! Enjoy!!!


Knuckle-Print Carrots

How cute are these KNUCKLE-PRINT CARROTS we made for Easter? They’re not only fun to make with your little ones, but they make sweet gifts for parents and grandparents too!

Materials needed:

  • paper
  • orange and green paint
  • little knuckles

Just a little note: Whenever doing projects like this, I like to have a sheet of paper to practice on first. Our practice paper is the big white one here, giving us lots of room to experiment with before making little Easter cards for the grandparents.

First, paint your kid’s knuckles orange. Have them stamp the paper with their knuckles. We found that it worked best if L was standing or on her knees doing this part, making sure she was well above the paper.


Next, I marked each carrot lightly with a pencil, so we knew which side would be best to put the “leaves” on.

Using your child’s thumb or index finger, have them make little leaves atop each carrot. I had to help L with this part…as you can see in the picture below, when left to do it alone, she was happy putting green dots all over her carrots! Ha!


So sweet! Happy Spring!

Crazy Colored Easter Eggs

Last year was the first time we colored our Easter eggs in this fashion and oh my gosh, was it easy!!! These CRAZY COLORED EASTER EGGS are much cleaner and quicker to make than the traditional dyed Easter eggs! And aren’t they just beautiful???


Materials needed:

  • white eggs
  • pot with water
  • broken crayons
  • tin foil
  • large dish or pan
  • fork
  • tongs
  • glitter (optional)
  • towel for drying
  • parchment paper

First, put your eggs in the pot of water and on your stovetop to boil. I’ve always heard that 13 minutes is the magic number for perfectly cooked, hard-boiled eggs.

While your eggs cook, line your pan with tin foil. Also, prepare a place on your kitchen counter for your finished eggs…just a piece of parchment paper will do!

Make some crayon shavings, using a sharp knife. The more wild and beautiful your colors, the more wild and beautiful the eggs!

Sprinkle the crayon shavings on top of the tin foil and add glitter if you like too! You don’t need a whole lot of crayon shavings…less is really better to avoid big color mixtures turning the eggs into yucky shades of brown.

Once the eggs are cooked, use tongs to carefully move one egg at a time onto the towel to dry, and then into the pan of crayon shavings. Have your little one roll the egg around the shavings, pushing gently with the underside of a fork. Since the eggs are still very hot, the crayon shavings will melt immediately, painting the eggs!


After each egg is dyed, remove it with the tongs and lay it on the parchment paper to cool completely.  Repeat with the remaining eggs!


I just love our CRAZY COLORED EASTER EGGS!!! Beautiful!!! Enjoy!

DIY Toy Vacuum (that Really Cleans!!!)

I love showing my kids that with a little creativity and a basketful of recycling materials you can make just about anything! One morning L woke up asking me to make her a vacuum…strange request, but I accepted the challenge. My thoughts immediately went to that toy vacuum from yesteryear with the popping balls inside. Kids love those things because of the noise they make, so I knew ours had to be similar. The only thing to improve upon that vacuum would be to make one that cleans as well! So here you have it — a toy vacuum that essentially costs you nothing (assuming you have all the materials) and it actually cleans the floors while your kid plays!

Materials needeed:

  • Swiffer sweeper w/ dry swiffer pad
  • empty milk carton
  • plastic container (like one berries come in)
  • plastic beads
  • duct tape
  • paper towel tube (optional)
  • hot glue gun
  • scissors

First, using scissors or a knife, cut a little window on the front of the milk carton. Cut a piece of clear plastic off of the plastic container to cover the window.

Using a hot glue gun, carefully glue the clear plastic in place over the “window.”

Cover the entire milk carton in duct tape. Make sure you cover up the glued edges of the plastic window as well…this should eliminate any sharp or pointy edges.

Next, have your little one help you drop beads into the carton. A few handfuls will do. Screw the lid back on the carton.

If your Swiffer sweeper’s handle has removable links (which I think they all do), remove the two middle ones to make it a more suitable height for your child.

Now the next step you can do in two ways: you can tape the milk carton directly onto the Swiffer sweeper…it may be more secure, but it may also leave some duct tape residue on the Swiffer. (That would be the more permanent option.) Or, you can glue and tape a paper towel tube onto the back of the milk carton and slide it onto the Swiffer’s handle. We went with the later…I thought it may jiggle more and make a louder, bead-popping sound too!

Now to clean floors…just replace the Swiffer pad as you would normally do and let your child go to work! (I mean play!) I really thought ours would last a couple weeks, but we’re going on 4 months now and every week L asks if she can help “vacuum” the floors. Enjoy!!!


10+ Silly Jokes for Kids!

The only thing better than a good knock-knock joke is watching your kids crack up at them! Give them something to smile about at breakfast with these 10+ SILLY JOKES FOR KIDS!


IMG_9773


What does a cow wear?
Udder-wear!

Knock-Knock.
Who’s there?
Olive.
Olive who?
Olive you!

(L made this one up. She think’s it’s hysterical!)
Knock-Knock.
Who’s there?
Shoes.
Shoes who?
Shoes don’t talk!

What do frogs order when they go to a restaurant?
French flies!

What does a nosy pepper do?
Get’s jalapeño business!

Knock-Knock.
Who’s there?
Orange.
Orange who?
Orange you glad I’m here?

Knock-Knock.
Who’s there?
Lemme.
Lemme who?
Lemme kiss you!

Knock-Knock.
Who’s there?
Ida.
Ida who?
Ida want to!

What do you call a fly without wings?
A walk!

What did the dog say to the flea?
Stop bugging me!

Why do fish live in salt water?
Cause pepper makes them sneeze!

What did one volcano say to the other?
I lava you!


IMG_9731


What’s your kid’s favorite joke??? Share in the comments section below!!! Happy laughing!!!