Color Changing Carnations

The latest experiment in Our Beautifully Messy House is one of the most colorful ones yet – Color Changing Carnations! It’s pretty simple to throw together and you will start to see results within a day! You can do this experiment with any white flowers…daisies, roses, even Queen Anne’s Lace…but carnations are cheap and abundant in our local grocery store these days. I was able to use this experiment to show L and WB how chemicals get into the food we eat, especially the food we grow. L knows why we always try to find organic fruits and veggies at the grocery, but now she can see why we do too!


Materials needed:

  • jars or vases
  • white flowers
  • scissors
  • water
  • food coloring

First, trim your flowers’ stems. It’s best to cut flowers at an angle and to remove any leafage near the bottom. Leaves trapped underneath the water’s surface become moldy and cause your water to go bad sooner.

Next, put about 10-20 drops of food coloring into each jar. The bigger the jar, the more food coloring you’ll need. Then, add the water.

Finally, put a flower or two into each vase and wait a day or two for the magic to happen!

The results are fun and exciting to see! Even I couldn’t wait to see what our flowers looked like with each passing hour.

To take this experiment to the next level, you can try making bi-colored carnations. Carefully split a flower stem down the middle and put each stem half into a different jar of colored water. We tried to make a half-yellow, half-red flower. Our “red” jar didn’t have quite enough food coloring in it, but the flower was clearly half-yellow! We’re still working on this one!

Enjoy!


Celery-Rose Print Shirts

If you’re a frequent reader of the blog, you know how much I love printing with the girls…citrus prints, finger prints, leaf prints, cardboard tube-heart prints, and now celery prints! They’re the perfect replica of a rose flower! Like most of our printing projects, the girls and I put these on shirts today so they can wear their art everywhere we go. You could also make a beautiful table cloth, tea towels, or pillow cases with this celery-rose print craft.


Materials needed:

  • celery
  • knife
  • t-shirts
  • acrylic paints (red, pink, and green)
  • paper plate or plastic lid
  • thin cardboard piece


First, place a thin piece of cardboard inside the shirt you will print. A cereal box flattened out works great…just something to protect the backside of the shirt from any paint that may soak through.


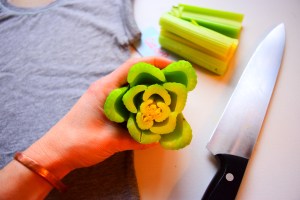
Cut the celery straight across, down towards the bottom of the celery stalks where they all come together. Don’t worry if it doesn’t resemble a perfect rose. First, roses aren’t perfect either…they have beautiful and unique imperfections just like people do. And second, you can add a green leaf detail at the end that will round the flowers out.


Next, put your red and pink paint on a plastic lid or paper plate to use as your palette. Press the celery into the paint and swirl it around a bit to get the paint on all stalks.


Carefully, press the celery onto the shirt and lift up. Voilà! Continue this process until you have all the flowers you want.


The last step is to add a little bit of green. Take one of the celery stalks that was cut off and simply stamp it into some green paint. Press it sparingly around the flowers to round them out and make the appearance of leaves.


Beautiful!!! This craft makes beautiful Valentine’s Day gifts, but would be perfect for any flower-loving friend anytime of the year. Enjoy!!!